
Popular categories
Looking for a yarn?


Comments / Questions (146)
![]() Marilyn wrote:
Marilyn wrote:
Thank you for your response! I have another question. When it says "work rib back and forth on heel sts for 5-5.5-6 cm" does that mean that the entire piece, right from the first row should measure 5 cm or just from where you started the heel part? Thanks!
27.09.2016 - 17:24DROPS Design answered:
Dear Marilyn, the 5-5.5-6 cm apply only to heel, ie to the 21 sts worked back and forth. Happy knitting!
28.09.2016 - 08:32
![]() Marilyn wrote:
Marilyn wrote:
After the part where you pick up the 9 stitched on either side, this pattern blows my mind. I have NO IDEA how to proceed. Can you please elaborate? A video on the heel part of this slipper woukd be very helpful, the videos attached to the pattern are not specific to this pattern. Thanks
27.09.2016 - 04:55DROPS Design answered:
Dear Marilyn, when you have 48 sts on needle, then insert a marker as follows: 1st marker, 3 sts, M.1 (= 15 sts), 3 sts, 2nd marker (= 21 sts between markers). Continue now with stocking st and M.1 dec before 1st marker and after 2nd marker a total of 6 times every other round = 36 sts remain. Happy knitting!
27.09.2016 - 10:14
![]() Chantal wrote:
Chantal wrote:
Hi Drops Design, I finally figured it out, with some assistance. For those in the same boat as I was it's marker - 23 sts - marker. Thanks :)
26.09.2016 - 03:06
![]() Chantal wrote:
Chantal wrote:
Dear Drops Design, I realize a few people have asked this question already, but the placement of the markers is still baffling me. (Insert a marker each side of the middle 21-23-25 sts on upper foot (= 3-4-5 sts each side of M.1) I am knitting the middle size of this pattern. Do I place my markers before and after the 23rd stitch? Thanks in advance for your answer.
25.09.2016 - 16:50DROPS Design answered:
Dear Chantal, in 2nd size you should have on upper foot: 1st marker, 4 sts, 15 sts in M.1, 4 sts, 2nd marker. So that there are 23 sts for upper foot (15 sts in M.1 + 4 sts on each side of M.1). Happy knitting!
26.09.2016 - 10:51Rosalie wrote:
First time making socks and I am stuck on one place. A video from start to finish; of making these gorgeous socks; would be wonderful.please explain this part to me : Insert a marker each side of the middle 21-23-25 sts on upper foot (= 3-4-5 sts each side of M.1). Continue in stockinette st and M.1 - AT THE SAME TIME dec each side as follows: K tog into back of loop the 2 last sts before first marker on upper foot and K tog the first 2 sts after second marker on upper foot. Thank you
21.09.2016 - 00:32DROPS Design answered:
Dear Rosalie, when all sts are on needle, insert a marker 3-4-5 sts before M.1 an 3-4-5 sts after M.1 then dec before 1st marker with K2 tog twisted and after 2nd marker with K2 tog (this will dec the number of sts you picked up along heel) = 36-38-42 sts remain. Happy knitting!
21.09.2016 - 09:23
![]() Donna wrote:
Donna wrote:
You mentioned you had no name for these how about the name (Cable Vamp.) They are very pretty. Donna
31.08.2016 - 15:52
![]() Donna wrote:
Donna wrote:
You mentioned you had no name for these how about the name (Cable Vamp.) They are very pretty. Donna
31.08.2016 - 15:16
![]() Jean Tansley wrote:
Jean Tansley wrote:
I tend to agree with Teresa in how confusing this pattern is. I have knit the toe several times and am not convinced it is correct. I had to make changes to get it to end off correctly. A friend of mine has been knitting for years as well and she had to resort to her own way of decreasing for toes. I'm debating whether I will even attempt the second slipper.
29.08.2016 - 19:21DROPS Design answered:
Dear Mrs Tansley, this pattern is correct, I personnaly made 2 pairs of these in 2 sizes and they worked fine. Feel free to ask any question here or contact your DROPS store for any further personnal assistance. Happy knitting!
30.08.2016 - 08:31
![]() Teresa wrote:
Teresa wrote:
I have been knitting for over 40 years and have knitted many pairs of socks and slippers sweaters etc. in that time. this has to be the most confusing pattern I have ever come across. It would make it a lot easier if it was written in regular pattern form.
26.08.2016 - 16:02DROPS Design answered:
Dear Teresa, you are always welcome to ask your questions here or to contact your DROPS store for any further personnal assistance when working a pattern. Happy knitting!
29.08.2016 - 12:39
![]() Ann Parsons wrote:
Ann Parsons wrote:
What weight is the yarn used for short socks with cables?
22.08.2016 - 11:23DROPS Design answered:
Dear Mrs Parsons, DROPS Alaska is a 10 ply/aran - read more about this yarn on its shadecard. Happy knitting!
22.08.2016 - 13:07
|
|||||||||||||||||||||||||
Alaskan Cables |
|||||||||||||||||||||||||
 |
 |
||||||||||||||||||||||||
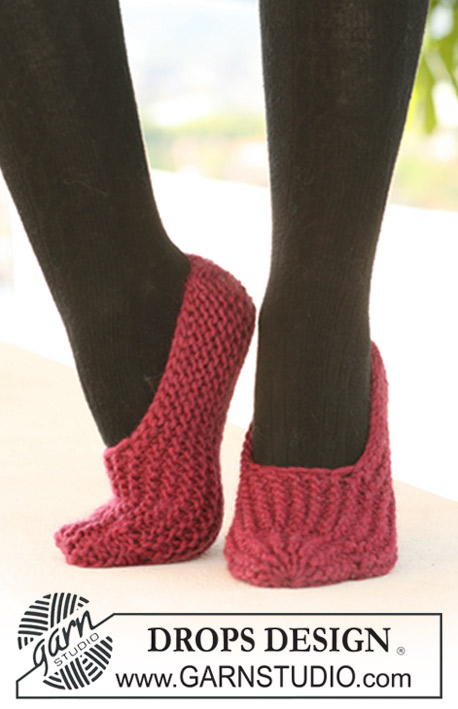
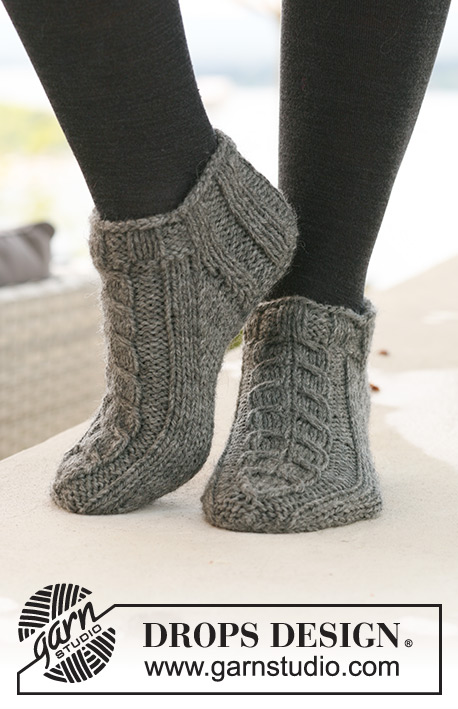
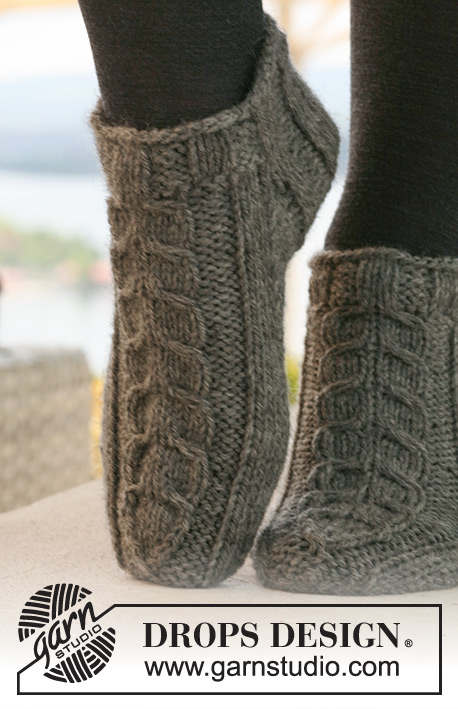
DROPS short Socks with cables in ”Alaska”.
DROPS 125-15 |
|||||||||||||||||||||||||
|
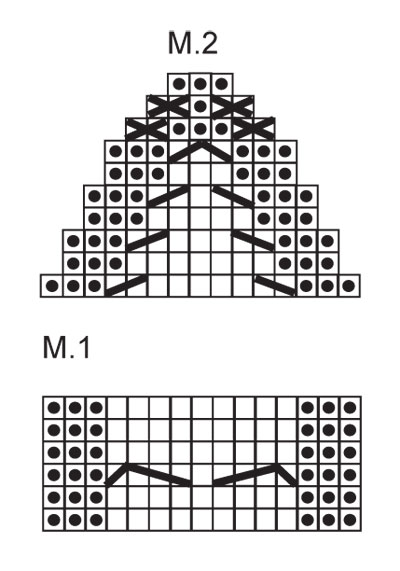
PATTERN: See diagram M.1 (= 15 sts) and M.2 (= 15 sts). Diagram shows the pattern from RS. HEEL DECREASES (worked in stockinette st): Row 1 (= RS): Work row until 6-7-7 sts remain, slip next st as it to K, K1, psso, turn piece. Row 2 (= WS): Work row until 6-7-7 sts remain, slip next st as it to P, P1, psso, turn piece. Row 3 (= RS): Work row until 5-6-6 sts remain, slip next st as it to K, K1, psso, turn piece. Row 4 (= WS): Work row until 5-6-6 sts remain, slip next st as it to P, P1, psso, turn piece. Continue dec like this with 1 less st before each dec until there are 9-11-11 sts on needle. -------------------------------------------------------- SOCK: Worked in the round. Cast on 42-48-48 sts on double pointed needles size 4.5 mm / US 7 with Alaska. K 2 rounds and work 5 rounds rib, K3/P3. On next round work PATTERN - see above - as follows: Continue in rib K3/P3 on the first 18-24-24 sts, K 6-6-6 sts, M.1 (= 15 sts), K 3-3-3 sts. REMEMBER THE GAUGE! Continue like this until piece measures 4 cm / 1½" for all sizes. Now keep the first 21-27-27 sts on needle for heel and slip the last 21-21-21 sts on a stitch holder (= mid upper foot). Work rib back and forth on heel sts for 5-5.5-6 cm / 2"-2¼"-2⅜". NOTE! On last row from WS dec as follows: Size 5/6½ / 35/37: 1 st in the first and last K-section by K2 tog. Size 7½/9 and 9½/10½ / 38/40 and 41/43: 1 st in each of the K4-section by K2 tog. All Sizes: = 19-23-23 sts. Insert a marker in piece. Now work HEEL DECREASES – see above! After heel dec pick up 9-10-12 sts each side of heel and slip the 21-21-21 sts from stitch holder back on needle = 48-52-56 sts. Insert a marker each side of the middle 21-23-25 sts on upper foot (= 3-4-5 sts each side of M.1). Continue in stockinette st and M.1 - AT THE SAME TIME dec each side as follows: K tog into back of loop the 2 last sts before first marker on upper foot and K tog the first 2 sts after second marker on upper foot. Repeat the dec on every other round a total of 6-7-7 times = 36-38-42 sts. Continue until piece measures 18-20-22 cm / 7"-8"-8¾" from marker on heel – adjust to after a full repeat of M.1 (= approx 4-4-5 cm / 1½"-1½"-2" remain). Insert a marker each side with 19-19-21 sts under foot and 17-19-21 sts on upper foot (= 1-2-3 sts each side of M.1). Now dec for toes. READ ALL OF THE FOLLOWING SECTION BEFORE CONTINUING: (NOTE! dec differently under foot and upper foot but make the dec on the same rounds). Dec under foot as follows: K tog into back of loop the 2 sts after marker and K tog the 2 sts before marker. Repeat the dec on every other round a total of 4-4-4 times, then on every round a total of 3-3-4 times. AT THE SAME TIME dec on upper foot as follows: Work M.2 over M.1 (1-2-3 sts each side of M.1 worked in stockinette st as before). Finish with P the 3 last sts on last round for Size 9½/10½ / 41/43 = 10-12-14 sts left on needle. Cut the thread, pull it through remaining sts and fasten. |
|||||||||||||||||||||||||
Diagram explanations |
|||||||||||||||||||||||||
|
|||||||||||||||||||||||||
 |
|||||||||||||||||||||||||
Have you finished this pattern?Tag your pictures with #dropspattern or submit them to the #dropsfan gallery. Do you need help with this pattern?You'll find 16 tutorial videos, a Comments/Questions area and more by visiting the pattern on garnstudio.com. © 1982-2026 DROPS Design A/S. We reserve all rights. This document, including all its sub-sections, has copyrights. Read more about what you can do with our patterns at the bottom of each pattern on our site. |
|||||||||||||||||||||||||


With over 40 years in knitting and crochet design, DROPS Design offers one of the most extensive collections of free patterns on the internet - translated to 17 languages. As of today we count 324 catalogs and 12290 patterns - 12280 of which are translated into English (US/in).
We work hard to bring you the best knitting and crochet have to offer, inspiration and advice as well as great quality yarns at incredible prices! Would you like to use our patterns for other than personal use? You can read what you are allowed to do in the Copyright text at the bottom of all our patterns. Happy crafting!
Post a comment to pattern DROPS 125-15
We would love to hear what you have to say about this pattern!
If you want to leave a question, please make sure you select the correct category in the form below, to speed up the answering process. Required fields are marked *.