
Popular categories
Looking for a yarn?


Comments / Questions (38)
![]() Barbara wrote:
Barbara wrote:
Ik ben een beginner en bezig met het achterpand. Om te minderen voor de raglan staat; 1x in elke 4de naald en 5x in elke 2de naald. Hoe moet ik dit zien? Is dit eerst 3 naalden breien, dan 4de minderen en vanaf daar elke 2de naald minderen? Hopelijk kunnen jullie me verder helpen!
04.12.2024 - 16:45DROPS Design answered:
Dag Barbara,
Ja, het klopt zoals je zegt. Je breit 3 naalden, dan op de 4e naald minderingen voor de raglan maken, dan weer 3 naalden breien, enz. Bij elke tweede naald meerder je de eerste naald niet en de tweede naald wel en dit herhaal je 5 keer.
04.12.2024 - 17:57
![]() Susan McMurrich wrote:
Susan McMurrich wrote:
As to above answer. Im not sure I was clear with my question. once the 6 stitches are on the holder Im talking about the remaining stitches. It doesnt say how many to have left I would probably need to do another 10 rows to complete the cast off stitch by stitch. Is this ok. So the top of the neck edge at the front would be higher than the ones on the holder.....??
21.08.2020 - 21:49DROPS Design answered:
Dear Mrs McMurrich, at the beg of a row from neck (towards armhole) you work the first 6 sts and slip them on a thread, work row to the end, turn and work return row. Now cast off at the beg of every row from neck 2 sts 1 time and 1 st 2 times = if your tension is right in height, you should have now reach same height as on back piece, now cast off all sts. The 6 sts from stitch holder will be knitted later when working the hood. Hope this now answers the question. Happy knitting!
24.08.2020 - 08:01
![]() Susan McMurrich wrote:
Susan McMurrich wrote:
Im completing the baby its cold out and having trouble with the front pieces. when I get to 13 3/4 " and put the 6 stitches on the holder I have too many stitches left to complete as described. If I go on casting off one at a time it is way higher than the stitches on the holder - is this supposed to happen?
20.08.2020 - 16:28DROPS Design answered:
Dear Mrs McMurrich, make sure you get the correct tension in height, if yours is different, adjust the height of stitches put on a st holder for neck so that both shoulders will match together. Happy knitting!
21.08.2020 - 07:50
![]() Lisa wrote:
Lisa wrote:
Hallo. Warum werden die beiden Vorderteile und das Rückenteil einzeln gestrickt? Kann ich die drei Teile gemeinsam aufnehmen und stricken oder funktioniert das mit den Raglan Nähten bei den Ärmeln dann nicht? Vielen Dank
04.12.2019 - 21:46DROPS Design answered:
Liebe Lisa, wenn Sie die drei Teile gemeinsam stricken wollen, dann passen Sie die angeschlagtene Maschenanzahl an (Randmaschen brauchen Sie dann nicht); beachten Sie nur, daß nähen manchmal mehr "Stabilität" bring. Viel Spaß beim stricken!
05.12.2019 - 10:04
![]() Camilla wrote:
Camilla wrote:
Hej. Jag förstår inte "2 m 1 gång och 1 m 2 ggr" i framstyckena. Hur gör man? Borde jag inte maska av alla resterande när jag spar de 6 andra maskorna? Det blir ju som en längre kant annars?
12.11.2018 - 17:47DROPS Design answered:
Hej, nej du ska maska av för halsen på vartannat varv först 2 maskor en gågng och sedan 1 maska 2 gånger. Detta för att halsen ska få en fin rund form.
14.11.2018 - 17:29
![]() Beatrice Felder wrote:
Beatrice Felder wrote:
Beim Rückenteil für den Raglan verstehe ich nicht genau wie es gemeint ist mit der Maschenabnahme. Soll man 4 Reihen stricken und in jeder von diesen 4 Reihen je eine Masche abketten, dann 2 Reihen stricken und in jeder von diesen 2 Reihen je 5 bzw. 6 Maschen abketten und dann in jeder weiteren Reihe, bis 14 Maschen übrig sind, je 0 bzw. 2 bzw. 4 Maschen abketten. Danke für ihre rasche Antwort und tolle Anleitung.
08.09.2016 - 15:42DROPS Design answered:
Liebe Frau Felder, am Rückenteil müssen Sie zuerst 3 R stricken, dann am 4. R (= von der Vorderseite) 1 M auf jeder Seiten abnehmen, dann *1 Reihe ohne Abn. stricken, 1 Reihe mit Abn stricken*, von *-* 6 Mal insgesamt wiederholen, dann in jeder R 1 M abn (= ins 2-4 mal - siehe Grösse). Siehe "Tipp für das Abenehmen (gilt für Raglanabnahme)".
08.09.2016 - 16:11
![]() Anni wrote:
Anni wrote:
Toll, diese Jacke! Allerdings ist uns bei der Anleitung aufgefallen, dass das Garn nicht ausgereicht hat. Es waren 300g angegeben für die größte Größe. Meine Mutter hat aber eine Zwischengröße gestrickt (etwas kleiner als die größte Größe) und wir mussten leider nochmal ein Garn nachbestellen. Also brauchte sie 350g. Und sie strickt ganz normal. Also bestellt lieber 50g mehr.
14.11.2015 - 00:44
![]() Danielle wrote:
Danielle wrote:
Ik kom niet uit bij het linkervoorpand. Ik start met 22 steken. Dan minder ik er eerst drie voor het armsgat = 19 steken. Dan minder ik voor de mouwen (totaal 9 steken) en ondertussen zet ik 6 steken bij 30 cm op een stekenhouder. Dan heb ik dus 4 steken over en die moet ik afkanten voor de hals dus dan houd ik geen steken over... In het patroon staat echter: kant bij 34 cm de rest van de steken af (staat niet bij hoeveel). Wat gaat hier fout? Groet, Danielle
01.08.2015 - 16:26DROPS Design answered:
Hoi Danielle. Ik zie dat het een klein vertaalfoutje is. Je moet klaar zijn met alle minderingen / afkanten bij ca. 34 cm - je houdt inderdaad geen steken over. Ik heb het aangepast
03.08.2015 - 14:56Carolyn Jones wrote:
Having great difficulty understanding the pattern, knitted the back up to armhole now trying to decrease for raglan but pattern very difficult to understand from "Decrease for raglan each side" Help!
17.05.2015 - 05:56DROPS Design answered:
Dear Mrs Jones, when decreasing for raglan, please follow instructions under "Decreasing" at the beg of the pattern, ie dec from RS after 1st st on row and before last st on row = 2 sts dec. Happy knitting!
18.05.2015 - 09:46
![]() Maria wrote:
Maria wrote:
Hej, som Sinne skrev i 2010, så er der i den danske opskrift angivet lavere garnforbrug end i den engelske opskrift. Det ville være lækkert for fremtidige strikkede hvis det blev rettet :)
16.01.2015 - 16:26
|
|
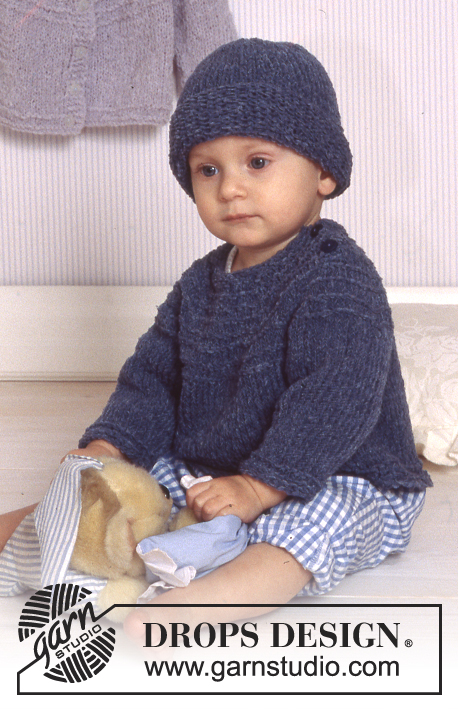
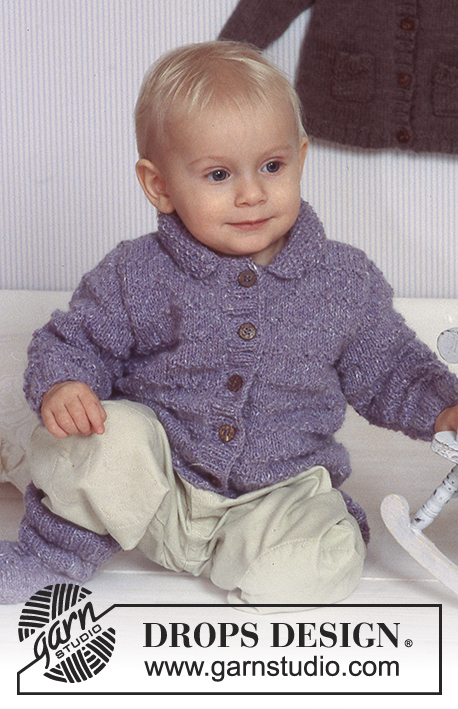
Baby It's Cold Outside#babyitscoldoutsidejacket |
|
|
|
|
Knitted DROPS jacket with hood in Snow
DROPS Baby 11-27 |
|
|
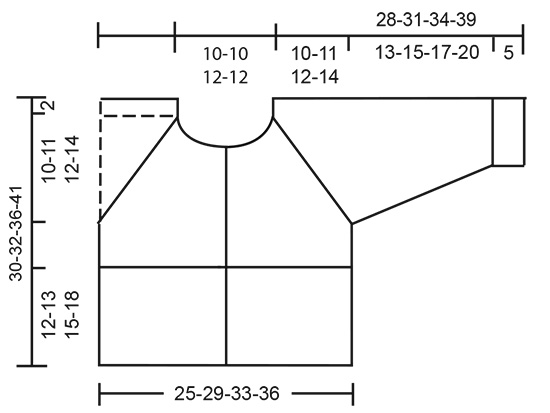
Garter sts (back and forth): Knit all rows Front band: = 3 sts towards the middle on front pieces. Work in Garter sts throughout (= K on every row). Button holes: Make buttonholes on right front from the RS. 1 buttonhole = K2 tog, yarn over needle, knit 1. Knit yarn over needle into back of st on the return row. Make button holes when front measures: 1/3 mths: 6, 12, 18 and 24 cm / 2½", 4¾", 7" and 9½" 6/9 mths: 6, 13, 19 and 26 cm / 2½", 5", 7½" and 10¼" 12/18 mths: 6, 12, 18, 24 and 29 cm / 2½", 4¾", 7", 9½" and 11½" 24 mths: 6, 13, 19, 26 and 34 cm / 2½", 5", 7½", 10¼" and 13½" Decreasing: applies to raglan decreases. Decrease within 1 st as follows: From the RS: after 1 st: K2 tog; before 1 st: slip 1 st as if to knit, K1, psso. From the WS: before 1 st: P2 tog; after 1 st: P2 tog into back of st. BACK PIECE Cast on 30-34-38-42 sts on needle size 9 mm / US 13 needle with Snow. K 4 rows garter sts and continue in stockinette sts. When back measures 12-13-15-18 cm / 4¾"-5"-6"-7", purl one row from the RS, and continue in stockinette sts. When back measures 18-19-22-25 cm / 7"-7½"-8¾"-9¾", bind off 3 sts each side for armholes i.e bind off in beg of next 2 rows = 24-28-32-36 sts. Work 3 rows and then start dec for raglan each side (see Decreasing above) on every other row as follows: 1 st 6-6-7-7 times and then on every row 1 st 0-2-2-4 times. Bind off remaining 12-12-14-14 sts. Piece measures approx 28-30-34-39 cm / 11"-11¾"-13½"-15¼". LEFT FRONT Cast on 18-20-22-24 sts (includes 3 front band sts) on needle size 9 mm / US 13. K 4 rows garter sts and continue in stockinette sts (see Front band above). When front piece measures 12-13-15-18 cm / 4¾"-5"-6"-7" purl one row from the RS, and continue in stockinette sts. When front measures 18-19-22-25 cm / 7"-7½"-8¾"-9¾", bind off 3 sts at side for armhole = 15-17-19-21 sts, work 3 rows and then start dec for raglan as described for back piece. At the same time: when front measures 25-27-30-35 cm / 9¾"-10½"-11¾"-13¾", put 5-5-6-6 sts (incl the 3 band sts) on a stitch holder for neck. Bind off to shape the neckline on every row starting from neckline as follows: 2 sts 1 time and 1 st 2 times = no sts left. Front measures approx 28-30-34-39 cm / 11"-11¾"-13½"-15¼". RIGHT FRONT As left front, but mirrored - remember buttonholes- read above. SLEEVES Cast on 20-22-22-24 sts using 9 mm/US 13 needle. K 4 rows garter sts and continue in stockinette sts. When sleeve measures 5 cm / 2", purl 1 row from the RS, and continue in stockinette sts. When sleeve measures 6 cm / 2½", inc 1 st each side, repeat on every 4 – 4.5 – 4 - 4 cm / 1½"-1¾"-1½"-1½" 2-2-3-4 more times = 26-28-30-34 sts. When sleeve measures 18-20-22-25 cm / 7"-8"-8¾"-9¾" bind off 3 sts each side for sleeve cap (i.e bind off in beg of next 2 rows ). Then start to dec for raglan (see Decreasing) on every other row: 1 st 7-8-9-10 times and then on every row 1 st 0-0-0-1 times. Bind off remaining 6 sts. The sleeve measures approx 28-31-34-39 cm / 11"-12¼"-13½"-15¼". Cast on 9-10-10-11 sts using 9 mm/US 13 needle and knit garter sts for 6-7-8-9 cm / 2½"-2¾"-3"-3½", bind off. Make two and sew the pockets to the RS of cardigan approx 3-3-4-5 cm / 1"-1"-1½"-2" from bottom edge. ASSEMBLY Join sleeve and body raglan seams from the RS within ½ edge st in order the seams don’t become to thick/bulky. HOOD Pick up approx 32-38 sts (including sts on stitch holder on front pieces) using 9 mm/US 13 needle and work stockinette sts (continue in garter sts over the 3 front band sts each side). When hood measures 1 cm / ½", increase to 38-40-42-44 sts evenly on row. Continue in stockinette sts and bind off when hood measures 21-23-25-27 cm / 8¼"-9"-9¾"-10½". Sew hood together at the top from the RS. Sew side and sleeve seams from the RS within ½ edge st. Sew on buttons. |
|
 |
|
Have you finished this pattern?Tag your pictures with #dropspattern #babyitscoldoutsidejacket or submit them to the #dropsfan gallery. Do you need help with this pattern?You'll find 22 tutorial videos, a Comments/Questions area and more by visiting the pattern on garnstudio.com. © 1982-2026 DROPS Design A/S. We reserve all rights. This document, including all its sub-sections, has copyrights. Read more about what you can do with our patterns at the bottom of each pattern on our site. |


With over 40 years in knitting and crochet design, DROPS Design offers one of the most extensive collections of free patterns on the internet - translated to 17 languages. As of today we count 324 catalogs and 12290 patterns - 12280 of which are translated into English (US/in).
We work hard to bring you the best knitting and crochet have to offer, inspiration and advice as well as great quality yarns at incredible prices! Would you like to use our patterns for other than personal use? You can read what you are allowed to do in the Copyright text at the bottom of all our patterns. Happy crafting!
Post a comment to pattern DROPS Baby 11-27
We would love to hear what you have to say about this pattern!
If you want to leave a question, please make sure you select the correct category in the form below, to speed up the answering process. Required fields are marked *.