
Popular categories
Looking for a yarn?


Comments / Questions (85)
![]() Frauke Henze wrote:
Frauke Henze wrote:
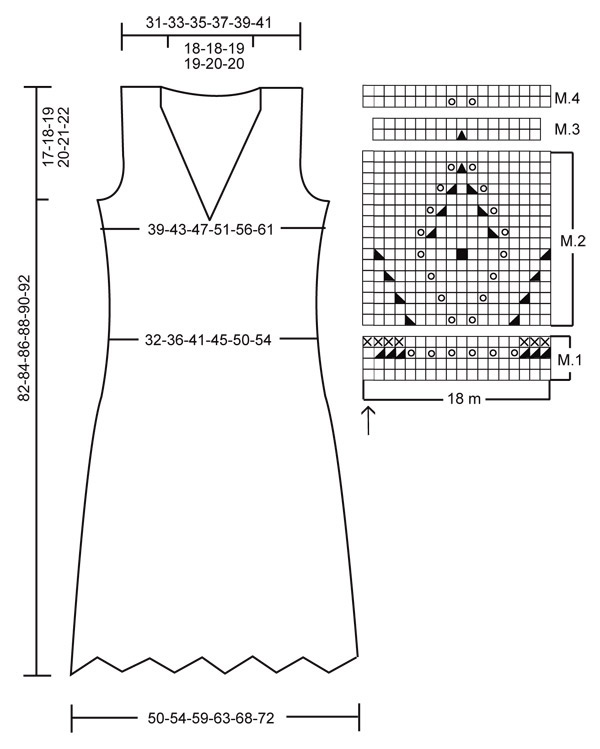
Hallo, ich habe eine Frage zu diesem Modell. Wird das Kleid in Runden gestrickt ( ähnlich wie ein Rvo) Oder von rechts nach links und wieder zurück.? Das ist mir nicht ganz ersichtlich in der Anleitung. Würde mich über eine schnelle Antwort freuen.
25.08.2020 - 16:40DROPS Design answered:
Liebe Frau Henze, das Kleid wird von unten nach oben in Runden bis Halsauschnitt gestrickt, dann wird die Arbeit in Hin- und Rückreihen gestrickt. Nach Armausschnitt wird jedes Teil separat gestrickt. Viel Spaß beim stricken!
25.08.2020 - 17:06
![]() Vera wrote:
Vera wrote:
Es geht bei M 1 um Reihe 3 die letzten 4 gezeichneten Maschen. In der Strickschrift werden 3 x hintereinander 2 M rechts zusammengestrickt gefolgt von einer weiteren rechten Masche. Die 3 aufeinanderfolgenden müssen aber nicht zusammen gestrickt werden sondern 1 M rechts abheben, 1 M rechts stricken und die abgehobene M überziehen. Das Symbol ist falsch herum
11.07.2018 - 15:13DROPS Design answered:
Liebe Vera, in M.1 wird man 2 M rechts zusammen am Anfang und am Ende des Diagrams - siehe dieses Video (das Muster im Video ist etwas unterschiedlich aber troztdem wird man auch 2 M re zs stricken). Viel Spaß beim stricken!
11.07.2018 - 15:58
![]() Vera wrote:
Vera wrote:
Die Strickschrift von M 1 ist falsch.Die 3 letzten Abnahmen im Rapport müssen links geneigt sein sonst entsteht kein Fächer (also 1 M abheben, 1 re, abgehobene überziehen).Weiter bei Gr. L und der Einteilung der Markierungsfäden. So muss es richtig heißen 36 M stricken, 1. Markierungsfaden, 40 M stricken, 2. Markierungsfaden, 36 M stricken, 3. Markierungsfaden,36 M stricken,4. Markierungsfaden,40 M stricken,5. Markierungsfaden,36 M stricken, 6. Markierungsfaden.Sonst sind es 222 M statt 224
11.07.2018 - 13:02DROPS Design answered:
Liebe Vera, M.1 ist so richtig, bei der letzten Reihe in M.1 stricken Sie 3 M li, 11 M re, 4 M li = diese 18 M wiederholen. Bei der Größe L stimmt schon die Maschenanzahl, die 3. Markierungsfaden und die 6. Markierungsfaden sind in einem M eingesetzt, das sind sicher die 2 "fehlenden" Maschen. Viel Spaß beim stricken!
11.07.2018 - 13:46
![]() Vibeke Tryk wrote:
Vibeke Tryk wrote:
Hvordan får jeg en midt maske for og bag når jeg har 80m på forstk og 82 m på bagstk?
14.05.2018 - 01:27DROPS Design answered:
Hei Vibeke. Merketråd 3 og 6 (i sidene) sitter i hver sin maske, og ikke mellom 2 masker. Du vil derfor ha 79 masker på forstykke og 81 masker på bakstykke, og da blir det en midtmaske på hver del. God fornøyelse
15.05.2018 - 14:58Jeanette wrote:
When inserting the marking threads (MT) for decreasing the large size, I come up with two extra stitches. The count of stitches don't add up to 224 stitches, but 222. Please tell me what I'm doing wrong. The maths don't work, so I'm thinking I don't understand the pattern. Thank you.
13.12.2017 - 02:15DROPS Design answered:
Dear Jeanette, 2 markers are inserted in a stitch and not between sts, these maybe the both you are missing: work 36 sts, MT-1, work 39 sts, MT-2, work 36 sts, MT-3 in next st (= side), work 36 sts, MT-4, work 39 sts, MT-5, work 36 sts, MT-6 in next st (= side) = 36+39+36+ 1 (st with marker) + 36+39+36 + 1 (st with marker) = 224 sts. Happy knitting!
13.12.2017 - 10:31
![]() María Antonia wrote:
María Antonia wrote:
Buenos días En la talla XL, cuando hay que insertar los MP no me salen las cuentas 38 MP1 43 MP2 38 MP3 38 MP4 43 MP5 38 MP6 suman en total 238 puntos, no 240. Saludos
11.09.2016 - 13:02DROPS Design answered:
Hola Maria Antonia. El MP3 y MP6 hay que insertar dentro del pt y no entre ellos. Son justo los 2 pts que te faltaban en el número total.
17.09.2016 - 18:40Zana wrote:
This is a beautiful pattern, thank you! just finished the lower boarder, and the next instruction mention m-5 and m-6, which does not provide. Where are M-5 and M-6, please?
28.09.2015 - 15:09DROPS Design answered:
Dear Zana, there are only 4 diagrams called M.1, M.2, M.3 and M.4 - see at the bottom of the pattern. But you will have to insert 6 markers (MT = marking threads) called MT-1, MT-2, MT-3, MT-4, MT-5 and MT-6. Happy knitting!
28.09.2015 - 16:13
![]() Mette Panum Jacobsen wrote:
Mette Panum Jacobsen wrote:
Jeg vender altid tilbage til denne model, da den sidder rigtig flot og er strikket op i Muskat, som jeg er stor fan af.
08.03.2015 - 22:26
![]() Diana Demming wrote:
Diana Demming wrote:
In de beschrijving staat een fout. Er staat: Rechter voorpand. Brei zoals het rechter voorpand, maar dan in spiegelbeeld. Moet volgens mij zijn brei zoals linker voorpand, .....etc.
22.01.2015 - 14:01DROPS Design answered:
Hoi Diana. Je hebt gelijk. Het is aangepast. Bedankt voor het melden.
22.01.2015 - 14:08
![]() Gry Karoline Lindkjenn wrote:
Gry Karoline Lindkjenn wrote:
Vil som andre her forlenge til kjole. Og vil da strikke skjørt-delen lengre. Men hva gjør jeg da med fellingen? Skal jeg felle inn sjeldnere så det blir jevnt? Ønsker str M men i total lengde 93 cm.
06.01.2015 - 17:37DROPS Design answered:
Hei Gry. Ja, jeg ville nok felle med laengere afstand. Pröv eventuel kjolen undervejs og se hvordan det passer. God fornöjelse.
07.01.2015 - 15:41
|
|||||||||||||||||||||||||
Dancing Jewels |
|||||||||||||||||||||||||
 |
 |
||||||||||||||||||||||||
DROPS dress in textured pattern in “Muskat”.
DROPS 106-2 |
|||||||||||||||||||||||||
|
Garter st, back and forth on needle: K all rows Garter st, in the round: K 1 round, P 1 round. Pattern: See diagram M.1 to M.4. The diagram shows the pattern from the RS side. Decreasing tip 1, apply to neckline: Dec as follows before MT: K2 tog Dec as follows after MT: slip 1 st as if to knit, K1, psso. Decreasing tip 2: All dec done from RS. Dec inside 3 garter sts. Dec as follows after 3 sts: slip 1 st as if to knit, K1, psso. Dec as follows before 3 sts: K2 tog Measuring tip: Because of the weight of the yarn, make all measurements while the garment is hanging, otherwise it will be too long when worn. Dress, front and back piece: Knitted in the round from bottom up. See Measuring tip! Loosely cast on 198-216-234-252-270-288 sts on circular needle size 4.5 mm [US 7] with Muskat. P 1 round, K 1 round, P 1 round, K 1 round, P 1 round. Continue in M.1, work 4 vertical repeats of M.1, and then work M.2 and M.3. Piece now measures approx 15 cm [6"] and there are 176-192-208-224-240-256 st s on needle. Continue in stockinette st. Remember the knitting gauge. When piece measures 24-24-25-25-26-26 cm [9½"-9½"-9¾"-9¾"-10¼"-10¼"] insert 6 Marking Threads (MT) as follows: work 27-30-33-36-38-41 sts, MT-1, work 33-35-37-39-43-45 sts, MT-2, work 27-30-33-36-38-41 sts, MT-3 in next st(= side), work 27-30-33-36-38-41 sts, MT-4, work 33-35-37-39-43-45 sts, MT-5, work 27-30-33-36-38-41 sts, MT-6 in next st(= side). On next round dec 1 st on both sides of sts with MT-3 and MT-6 (i.e. at sides) – see Dec tip 1. Repeat this dec on every 6-6-7-7-9-9 round a total of 8-8-7-7-6-6 times. At the same time, when doing the 4-4-3-3-2-2 dec, also dec 1 st by the remaining MT as follows: after MT-1 and MT-4 and before MT-2 and MT-5 – see Dec tip 1. Repeat this dec on every 6-6-7-7-9-9 round (same rounds as dec at sides) a total of 4 times. After all dec are complete there are 128-144-164-180-200-216 sts on round and piece measures approx 40-40-41-41-42-42 cm [15¾"-15¾"-16⅛"-16⅛"-16½"-16½"]. Continue in stockinette st, remove MT-1, 2, 4 and 5, at the same time for size XS + XL: dec 2 sts evenly on front piece on first round, size M: dec 2 sts evenly on back piece on first round, (in order to have 1 st mid front and mid back and to make number of sts fit M.2) = 126-144-162-180-198-216 sts (no dec in size S, L and XXL). When piece measures 42-43-44-45-46-47 cm [16½"-17"-17¼"-17¾"-18"-18½"] work 3 vertical repeats of M.1 – Note! Make sure arrow in diagram is mid front. Continue in M.2 and M.4 - make sure to place pattern with middle st over middle of M.1 as shown in diagram. (After M.4 there are again an equal number of sts front and back because of the additional inc in M.4 for size XS + M + XL. Continue in stockinette st. At the same time when piece measures 56-57-58-60-61-62 cm [22"-22½"-22¾"-23⅝"-24"-24⅜"] inc 1 st on both sides of MT at sides, and repeat this inc for the 3 smaller sizes on every 2-2-3 cm [¾"-¾"-1⅛"] 3-2-1 times = 156-172-188-204-224-244 sts (= 77-85-93-101-111-121 sts on front and back piece + 1 st each side). Neckline: At the same time, when piece measures 62-63-64-65-66-67 cm [24⅜"-24¾"-25¼"-25½"-26"-26⅜"] work 4 rows garter st on the 7 sts mid front. Now dec the middle st and continue back and forth on needle. Continue with 3 garter st towards neckline and dec to shape the neckline on every other row – see Dec tip 1: 1 st 11-12-12-12-13-13 times, and then on every 4th row: 1 st 6 times. . Armhole: At the same time, when piece measures 64-65-66-67-68-69 cm [25¼"-25½"-26"-26⅜"-26¾"-27⅛"] work 4 rows garter st on 13-13-15-17-19-21 sts each side (i.e. st with MT + 6-6-7-8-9-10 sts either side), work remaining sts as before. Now bind off the middle 7-7-9-11-13-15 sts each side for armhole, and complete front and back pieces separately. Left front piece: Continue dec for neckline and dec to shape the armhole – see Dec tip 2 – inside 3 garter sts on every other row: 1 st 5-7-8-9-11-13 times. After all dec are complete there are 13-15-16-18-19-21 sts left on shoulder. Continue in stockinette st with 3 garter sts each side and bind off when piece measures 82-84-86-88-90-92 cm [32¼"-33"-33⅞"-34⅝"-35½"-36¼"]. Right front piece: Like left front piece, but mirrored. Back piece: = 71-79-85-91-99-107 sts. Dec to shape the armhole as described for front piece = 61-65-69-73-77-81 sts. Continue in stockinette st with 3 garter sts each side. When piece measures 76-78-80-82-84-86 cm [30"-30¾"-31½"-32¼"-33"-33⅞"] work 4 rows garter st on the middle 31-31-33-33-35-35 sts, and now bind off the middle 25-25-27-27-29-29 sts for neck. Continue with 3 garter sts each side and dec to shape the neckline on every other row: 1 st 5 times – see Dec tip 2 = 13-15-16-18-19-21 sts left on each shoulder. bind off when piece measures 82-84-86-88-90-92 cm [32¼"-33"-33⅞"-34⅝"-35½"-36¼"]. Assembly Sew shoulder seam. Crochet border: Crochet a border on crochet hook size 4 mm [US G/6] with Muskat round neckline and armholes as follows: 1 sc in first st, *3 ch, skip ⅜", 1 sc*, repeat from *-*. |
|||||||||||||||||||||||||
Diagram explanations |
|||||||||||||||||||||||||
|
|||||||||||||||||||||||||
 |
|||||||||||||||||||||||||
Have you finished this pattern?Tag your pictures with #dropspattern or submit them to the #dropsfan gallery. Do you need help with this pattern?You'll find 23 tutorial videos, a Comments/Questions area and more by visiting the pattern on garnstudio.com. © 1982-2026 DROPS Design A/S. We reserve all rights. This document, including all its sub-sections, has copyrights. Read more about what you can do with our patterns at the bottom of each pattern on our site. |
|||||||||||||||||||||||||


With over 40 years in knitting and crochet design, DROPS Design offers one of the most extensive collections of free patterns on the internet - translated to 17 languages. As of today we count 325 catalogs and 12298 patterns - 12288 of which are translated into English (US/in).
We work hard to bring you the best knitting and crochet have to offer, inspiration and advice as well as great quality yarns at incredible prices! Would you like to use our patterns for other than personal use? You can read what you are allowed to do in the Copyright text at the bottom of all our patterns. Happy crafting!
Post a comment to pattern DROPS 106-2
We would love to hear what you have to say about this pattern!
If you want to leave a question, please make sure you select the correct category in the form below, to speed up the answering process. Required fields are marked *.