
Popular categories
Looking for a yarn?


Comments / Questions (38)
![]() Titti wrote:
Titti wrote:
Sono arrivata a dover lavorare il dietro ma non riesco a capire a quanti cm cominciare a fare le diminuizioni e gli aumenti . Lo stesso vale per davanti sin. e destro. Mi potete aiutare? Grazie
04.08.2015 - 11:12DROPS Design answered:
Buongiorno Titti. Dopo aver lavorato il diag M3 e 2 giri a legaccio, il lavoro dovrebbe misurare ca: 27-27-31-31 cm a seconda della taglia. A questa altezza inserisce 2 segni (al centro sul davanti e al centro sul dietro) e da adesso in avanti prende le misure da questi segni. A 6-7-6-6 cm dai segni intreccia le m per gli scalfi. Lavora poi le diminuzioni per gli scalfi come indicato e quando ci sono 56-62-70-72 m per il dietro, aumenta per le spalle come indicato. Ci riscriva se non è chiaro. Buon lavoro!
04.08.2015 - 17:10
![]() Devroey Murielle wrote:
Devroey Murielle wrote:
J'ai un peu de mal à comprendre : "Après avoir tricoté un motif de M2 à la verticale, tricoter 6 m de jersey end au début du tour pour marquer. Mettre un marqueur (=milieu côté). Mettre 1 deuxième marqueur après 70-80-90-100 m (=milieu 2ème côté). " Le motif M2 finit par un rang envers... donc comment faire 6m en jersey endroit? Le second marqueur doit être mis après 80m (pour ma taille), ces 80 mailles doivent elles être faites selon le motif M3 ou en mailles endroit?
20.07.2015 - 13:11DROPS Design answered:
Bonjour Mme Devroey, il fallait lire de tricoter 6 m pour décaler le début du tour: tricotez 6 m end à la fin du tour et placez 1 marqueur: c'est le nouveau début des tours (le modèle se tricote en rond jusqu'aux emmanchures), placez un autre marqueur après 80 m (2ème côté) et tricotez M3, les motifs doivent être alignés comme sur la photo. Bon tricot!
27.07.2015 - 15:51Valentina wrote:
Ciao a tutti, vorrei avere un chiarimento sul diagramma M1 Il secondo giro, lavorando in cerchio, è composto da 2 rovesci, 17 dritti ed 1 rovescio? Grazie Valentina
30.06.2015 - 10:08DROPS Design answered:
Buonasera Valentina. Sì, il secondo giro del diagramma M1, lavorato in tondo è composto da 2 m rov, 17 dir e 1 m rov. Le tradurremo il modello, così da facilitarle il lavoro. Buon lavoro!
30.06.2015 - 21:49Carolyn Hayhurst wrote:
Can not work out which side is the right side also started M1 and 2nd row the stictches have increased is this correct
08.01.2013 - 16:46DROPS Design answered:
Dear Mrs Hayhurst, body is worked in the round until armhole is reached, so all rounds are worked from RS. When work is divided into 2 pieces, take care that the rows with dec (odd numbered rows) are worked from RS. M.1 is worked on 20 sts, dec in the middle are compensated by the yos, so that number of sts should be constant. Happy knitting !
08.01.2013 - 17:01
![]() DROPS Design NL wrote:
DROPS Design NL wrote:
Goedemorgen. Bij M.2 zijn er geen minderingen? Het aantal steken blijft hetzelfde tot het afkanten en minderingen voor de armsgaten? Gr. Tine
14.05.2010 - 09:52
![]() Gerda De Ruiter wrote:
Gerda De Ruiter wrote:
Patroon m2 krijg je de minderingen dan staan er nog 70 steken op de pen er moeten 140 steken zijn hier kom ik niet uit.
13.05.2010 - 12:08
![]() Drops Design wrote:
Drops Design wrote:
Kanterne er de yderste masker som du strikker i retstrik ifølge opskriften, du tager ind inden for det antal masker som strikkes i retstrik. Se indtagningstips for ærmegab øverst i opskriften. God fornøjelse
20.10.2009 - 10:09
![]() Lizzie Rauholt wrote:
Lizzie Rauholt wrote:
Der er kanter på ærmer og i slids foran, men de er ikke i opskriften, jeg kan se på opskriften at det er rib, men hvor mange pinde og masker?
19.10.2009 - 19:16
![]() DROPS Deutsch wrote:
DROPS Deutsch wrote:
Die Erklärung zum Diagramm steht am Schluss der Anleitung.
22.01.2008 - 08:58
![]() gaby wrote:
gaby wrote:
Kann man das diagramm zu diesem pulli auch in deutsch erhalten?? LG Gaby
21.01.2008 - 20:05
|
|||||||||||||||||||
Seaside Bird#seasidebirdtop |
|||||||||||||||||||
|
|
|||||||||||||||||||
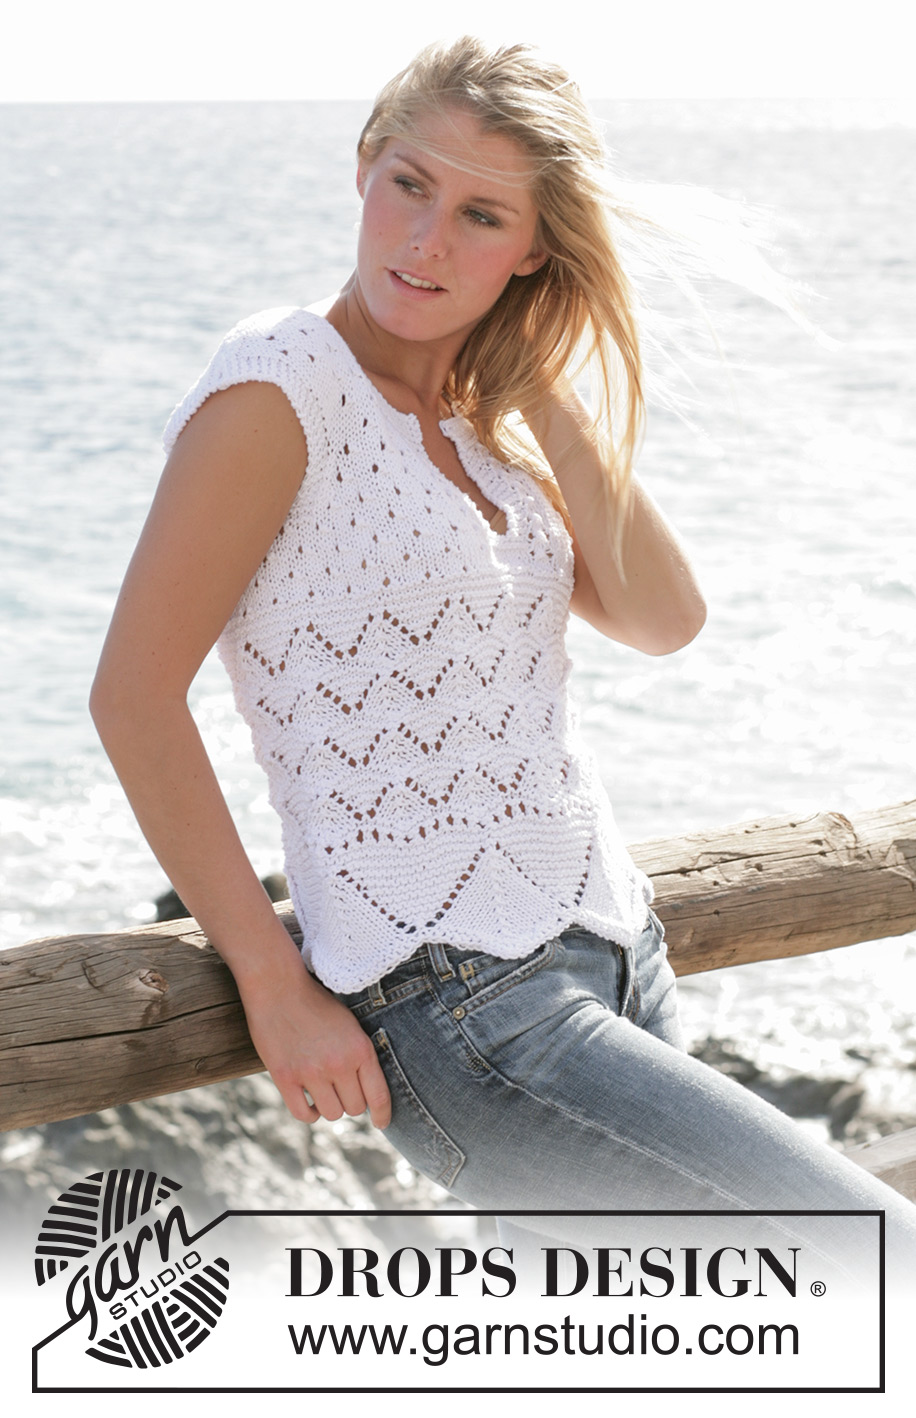
DROPS top with lace pattern in ”Paris”
DROPS 101-29 |
|||||||||||||||||||
|
Knitting gauge: 17 sts x 22 rows on needles size 5 mm / US 8 in stockinette st = 10 x 10 cm / 4" x 4". Lace pattern will stretch garment somewhat in width. Pattern: See diagram M.1 to M.5. Pattern is showing all rows in pattern seen from RS. Garter st: (in the round on needle): 1st round: K and 2nd round: P Garter st (back and forth on row): Knit all rows. Decreasing tips (applies to armhole): All dec from RS. Dec for armhole within 4 sts garter st as follows: Before 4 sts garter st: K2 tog After 4 sts garter st: Slip 1 st as if to knit, K1, psso. Increasing tips (applies to wide shoulders): All inc from RS. Inc for wide shoulders within 4 garter sts on each side by yo on needle. On next row P yo into back of st to avoid hole. Incorporate new sts into pattern as you go. ____________________________________________________________ Back and front pieces: Work piece in the round. Cast on 140-160-180-200 sts loosely with Paris. Insert 1 marker at start of round. K1 round, P1 round. Continuing work diagram M.1. When M.1 is worked once in height continue with M.2. When M.2 is worked once in height work 6 sts stockinette st on next round to shift round start. Insert 1 marker (= mid side). Also insert 1 marker after 70-80-90-100 sts (= mid opposite side). Now work M.3. Patterns should now appear on top of each other as shown in diagram. Work M.3 4-4-5-5 times in total in height. Continuing K1 round, P1 round. Piece now measures approx 27-27-31-31 cm / 10½"-10½"-12¼"-12¼". Insert 2 new markers into piece, 1 marker after 35-40-45-50 sts (= mid front piece) and 1 marker after 105-120-135-150 sts (= mid back). Continuing, measure piece from here. K1 round. Continuing work M.4. When piece measures approx 2-3-3-3 cm / ¾"-1⅛"-1⅛"-1⅛" from marker, continue with M.4, but work 8 sts on each side of marker mid front as follows: M.5 (= 3 sts), 10 sts garter sts (marker is placed between these sts), M.5 (= 3 sts). Read next section before continuing. At the same time when piece measures 4-5-4-4 cm / 1½"-2"-1½"-1½" from marker also work 12 sts on each side in garter st (6 sts on each side of markers in sides). At the same time when piece measures 4-5-5-5 cm / 1½"-2"-2"-2" from markers bind off middle 2 sts from neck side = 138-158-178-198 sts (continuing, work piece back and forth from mid front). Continue with M.5 and 4 sts garter sts on each side of bind off sts, work remaining sts as before. Continue like this until piece measures 6-7-6-6 cm / 2⅜"-2¾"-2⅜"-2⅜". Now bind off 4 sts on each side of armhole = 130-150-170-190 sts. Work front and back pieces separately. Back piece: = 66-76-86-96 sts. Continue in M.4. At the same time dec 1 sts for armhole on every other row – read Decreasing tips: 5-7-8-10 times = 56-62-70-76 sts. Then inc 1 sts for shoulder on each side on every other row – read Increasing tips – 6-6-4-3 times = 68-74-78-82 sts. When piece measures 22-25-25-26 cm / 8¾"-9¾"-9¾"-10¼" from marker mid back bind off middle 32-36-36-38 sts for neck. Continuing bind off 1 sts on next row at neckline = 17-18-20-21 sts left on each shoulder. Work until piece measures approx 23-26-26-27 cm / 9"-10¼"-10¼"-10⅝"from marker mid back. K4 rows garter sts before binding off loosely. Left front piece: = 32-37-42-47 sts. Continue with M.4 but 7 sts from mid front continues as before (M.5 and 4 sts garter st). At the same time dec for armhole and inc for wide shoulder like back piece. At the same time when piece measures 13-15-15-15 cm / 5⅛"-6"-6"-6" from marker mid front slip 6-8-8-9 m at mid front onto stitch holder. Continuing, bind off for neck on every other row 2 sts 2 times and 1 st 6 times = 17-18-20-21 m left on needle for shoulder. Work until piece measures approx 23-26-26-27 cm / 9"-10¼"-10¼"-10⅝" from marker mid front. K 4 rows garter st before binding off loosely. Right front piece: Work like left front piece but reversed. Assembly: Sew shoulder seams. Neckline: Pick up approx 85 to 102 sts (incl sts from stitch holder) around neckline on needle size 5 mm / US 8. K8 rows garter sts back and forth from mid front. Bind off loosely. |
|||||||||||||||||||
Diagram explanations |
|||||||||||||||||||
|
|||||||||||||||||||
 |
|||||||||||||||||||
Have you finished this pattern?Tag your pictures with #dropspattern #seasidebirdtop or submit them to the #dropsfan gallery. Do you need help with this pattern?You'll find 26 tutorial videos, a Comments/Questions area and more by visiting the pattern on garnstudio.com. © 1982-2026 DROPS Design A/S. We reserve all rights. This document, including all its sub-sections, has copyrights. Read more about what you can do with our patterns at the bottom of each pattern on our site. |
|||||||||||||||||||


With over 40 years in knitting and crochet design, DROPS Design offers one of the most extensive collections of free patterns on the internet - translated to 17 languages. As of today we count 325 catalogs and 12298 patterns - 12288 of which are translated into English (US/in).
We work hard to bring you the best knitting and crochet have to offer, inspiration and advice as well as great quality yarns at incredible prices! Would you like to use our patterns for other than personal use? You can read what you are allowed to do in the Copyright text at the bottom of all our patterns. Happy crafting!
Post a comment to pattern DROPS 101-29
We would love to hear what you have to say about this pattern!
If you want to leave a question, please make sure you select the correct category in the form below, to speed up the answering process. Required fields are marked *.