DROPS Muskat
DROPS Muskat
100% Cotton
from 1.95 $ /50g
Get the yarn to make this pattern from 13.65$.

The yarn cost is calculated from the pattern’s smallest size and the yarn’s cheapest product type. Looking for an even better price? You might find it on the DROPS Deals!

DROPS Super Sale

Seaside Affair

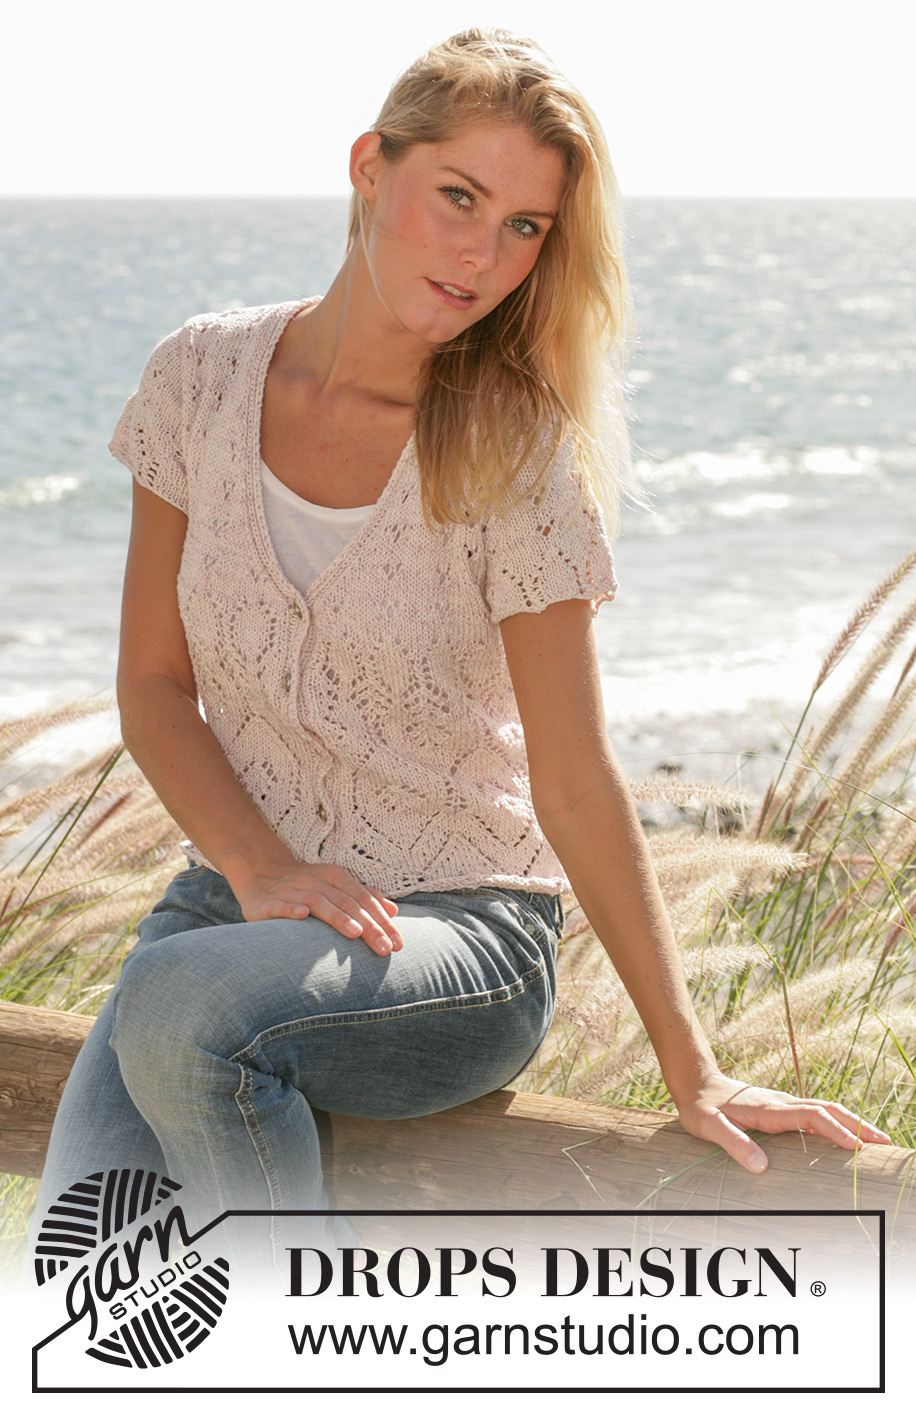
DROPS Jersey with short sleeve, V-neck and lace pattern in “Muskat”

DROPS 101-32
Size: S - M - L - XL - XXL
Finished measurements:
Bust: 86-94-102-110-120 cm / 34"-37"-40"-43½"-47 1/4"
Full length: 52-54-56-58-60 cm / 20½"-21 1/4"-22"-22 3/4"-23½"

Materials: DROPS Muskat from Garnstudio
350-400-400-450-500 g color no 70, off white/rose

DROPS circular needles size 4 mm / US 6 – or the needle size needed to obtain correct knitting gauge

DROPS edged silver button no 534: 5 pcs

-------------------------------------------------------

Alternative Yarn – See how to change yarns here
Yarn Groups A to F – Use the same pattern and change the yarn here
Yarn usage using an alternative yarn – Use our yarn converter here

-------------------------------------------------------

DROPS Muskat
DROPS Muskat
100% Cotton
from 1.95 $ /50g
Get the yarn to make this pattern from 13.65$.

The yarn cost is calculated from the pattern’s smallest size and the yarn’s cheapest product type. Looking for an even better price? You might find it on the DROPS Deals!

DROPS Super Sale

SAVE 30% on 6 cotton favorites!
Valid until 04.12.2024

Pattern instructions

NOTE: This pattern is written in American English. All measurements in charts are in cm. For conversion from inches to cm - click here. There are different terms for crocheting in American and British English. If this pattern includes crochet, click for "crochet terms" here. For this pattern in British English, please click here.
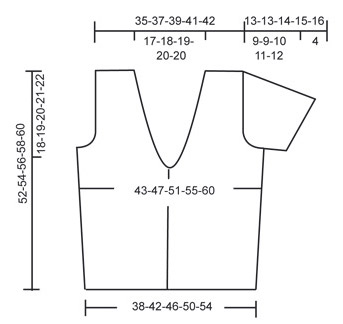
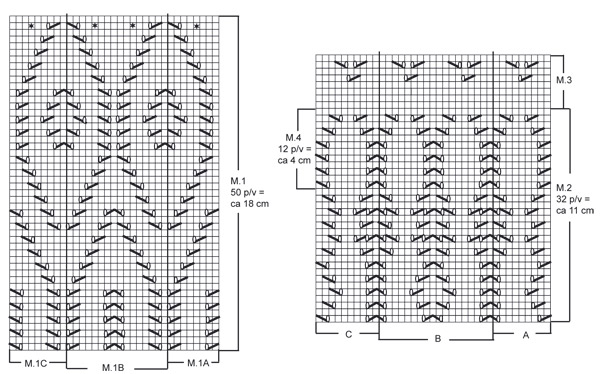
Knitting gauge: 21 sts x 28 rows on needle size 4 mm / US 6 with Muscat in stockinette sts = 10 x 10 cm / 4'' x 4''

Front band:
Work front edge as follows from the edge (viewed from RS): K1 in garter st on all rows, K1, P2, K1, P2, K1.

Pattern: Diagram M.1 to M.4. Diagrams are seen from RS.

Decreasing tip (applies to neckline):
Dec from RS within 7 first band sts on each side
Dec as follows after 7 sts: Slip 1 sts as if to knit, K1, psso.
Dec as follows before 7 sts: K2 tog
Note: Knit sts that cannot be incorporated into diagram during dec. in stockinette sts

Buttonholes:
Bind off for buttonhole on right front band. 1 buttonhole = K 5th and 6th sts tog from mid front, make a yo.
Bind off for buttonhole when piece measures:
Size S: 4, 10, 16, 22 and 28 cm / 1½",4",6 1/4",8 3/4" and 11"
Size M: 4, 11, 17, 23 and 29 cm / 1½",4 3/8",6 3/4",9" and 11 3/8".
Size L: 4, 11, 17, 24 and 30 cm / 1½",4 3/8",6 3/4",9½" and 11 3/4".
Size XL: 4, 11, 18, 25 and 31 cm / 1½",4 3/8",7",9 3/4" and 12 1/4".
Size XXL: 4, 11, 18, 25 and 32 cm / 1½",4 3/8",7",9 3/4" and 12½".
___________________________________________________________________

Back and front pieces:
Work piece back and forth on circular needles from mid front.
Cast on 187-204-221-238-255 sts loosely (includes 8 front band sts on each side) on circular needles size 4 mm / US 6 and K2 rows – at the same time dec 10-11-12-13-14 sts evenly on 1st row = 177-193-209-225-241 sts.
Continuing, work next row as follows (from RS):
8 front band sts – see explanation above, diagram M.1A (= 8 sts), M.1B over 144-160-176-192-208 sts, M.1C (= 9 sts) and 8 front band sts.
Continue pattern.
NOTE: Remember buttonhole on right front band – see explanation above.
On second last row of M.1 inc 20-22-24-26-28 sts as shown on diagram = 197-215-233-251-269 sts.
Then work M.2 as follows:
8 front band sts as before, A (= 9 sts), B over 162-180-198-216-234 sts, C (= 10 sts) and front band as before.
After M.2 piece measures approx 29 cm / 11½'' – insert 1 marker in 54th-58th-63rd-67th-72nd sts from each side.

Read entire section before knitting commences!
Continue with M.3 until complete measurement is reached.
Neckline: At the same time when piece measures 29-30-31-32-33 cm / 11 3/8"-11 3/4"-12 1/4"-12½"-13" dec for neckline each side at front edges – see Decreasing tip: Dec 1 sts on every other row 9-9-11-11-13 times and then on every 4th row 9 times.

Armholes: At the same time when piece measures 34-35-36-37-38 cm / 13 3/8"-13 3/4"-14 1/4"-14½"-15" bind off 9 sts on each side for armhole (= sts with marker + 4 sts on each side of this).
Complete back and front piece separately.

Back piece:
= 81-91-99-109-117 sts. Bind off for armholes each side on every other row: 3 sts 0-1-1-1-1 times, 2 sts 1-1-2-3-3 times and 1 st 2-2-2-3-5 times = 73-77-81-85-89 sts left on row.
Continue with M.3 – work sts that cannot be incorporated into diagram in stockinette sts, there should be at least 2 sts stockinette sts outside 1 pattern repeat each side.
When piece measures approx 49-51-53-55-57 cm / 19 1/4"-20"-21"-21 5/8"-22½" – stop after at least 2 rows stockinette sts – bind off 31-33-35-37-39 sts for neck. and bind off 1 sts to shape neckline on every other row 2 times = 19-20-21-22-23 sts left on each shoulder.
Bind off when piece measures 52-54-56-58-60 cm / 20½"-21 1/4"-22"-22 3/4"-23½".

Right front piece:
Continue dec for neckline– at the same time bind off for armhole at side like back piece. After all dec there are 27-28-29-30-31 sts on shoulder.
When piece measures 52-54-56-58-60 cm / 20½"-21 1/4"-22"-22 3/4"-23½" bind off 19-20-21-22-23 sts from shoulder side towards the neck for shoulder.
Continue working over the remaining 8 front band sts for 8-8-9-9-9 cm / 3 1/8"-3 1/8"-3½"-3½"-3½", slip sts onto a stitch holder.
Sew edge to back piece afterwards, do not work further than indicated as edge is easily stretched when sewing it on.

Left front piece:
Work like right but reversed.

Sleeve:
Work sleeve back and forth on needles.
Cast on 71-81-81-91-91 sts (includes 1 edge st on each side) on needle size 4 mm / US 6 and K2 rows – at the same times on 1st row dec 5-6-6-7-7 sts evenly = 66-75-75-84-84 sts.
Continue with M.4 as follows: 1 edge st, A (= 9 sts), B over 45-54-54-63-63 sts, C (= 10 sts) and 1 edge st.
After M.4 continue with M.3 at the same time bind off to shape sleeve cap on each side on every other row: 3 sts 1 time, 2 sts 2 times, 1 sts 7-7-8-9-11 times, continuing bind off 2 sts on each side until piece measures 12-12-13-14-15 cm / 4 3/4"-4 3/4"-5 1/8"-5½"-6", then bind off 3 sts 1 time on each side.
Bind off when piece measures 13-13-14-15-16 cm / 5 1/8"-5 1/8"-5½"-6"-6 1/4".

Assembly:
Sew 2 edges from front piece tog with crafting sts.
Sew band neatly for neckline on back – remember to stretch slightly.
Sew shoulder seams and sleeve seams and sew in sleeves.
Sew on the buttons.

Diagram

All measurements in charts are in cm.

symbols = K from RS, P from WS
symbols = K2 tog, yo
symbols = yo, slip 1 st as if to knit, K1, psso
symbols = yo, slip 1 st as if to knit, K2 tog, psso, yo
symbols = inc 1 st by K2 in st
diagram
diagram
Do you have a question? See a list of frequently asked questions (FAQ)

Knitting tension is what determines the final measurements of your work, and is usually measured per 10 x 10 cm. It is provided like so: number of stitches in width x number of rows in height - eg: 19 stitches x 26 rows = 10 x 10 cm.

The knitting tension is very individual; some people knit/crochet loosely while others work tightly. You adjust the knitting tension with the needle size, which is why the suggested needle size only serve as a guide! You need to adjust this (up or down) to ensure that YOUR knitting tension matches the knitting tension provided in the pattern. If you work with a different knitting tension than provided you will have a different yarn consumption, and your work will have different measurements than what the pattern suggests.

The knitting tension also determines which yarns can replace each other. As long as you achieve the same knitting tension you can replace one yarn with another.

See DROPS lesson: How to measure your tension/gauge

See DROPS video: How to make a gauge tension swatch

The required amount of yarn is provided in grams, eg: 450 g. To calculate how many balls you’ll need you first need to know how many grams are in 1 ball (25g, 50g or 100g). This information is available if you click on the individual yarn quality on our pages. Divide the amount required with the amount of each ball. For example, if each ball is 50g (the most common amount), the calculation will be as follows: 450 / 50 = 9 balls.

The important thing when changing from one yarn to another is that the knitting/crochet tension remains the same. This is so that the measurements of the finished piece will be the same as on the sketch provided. It is easier to achieve the same knitting tension using yarns from the same yarn group. It is also possible to work with multiple strands of a thinner yarn to achieve the knitting tension of a thicker one. Please try our yarn converter. We recommend you to always work a test swatch.

Please NOTE: when changing yarn the garment might have a different look and feel to the garment in the photo, due to individual properties and qualities of each yarn.

See DROPS lesson: Can I use a different yarn than the one mentioned in the pattern?

All our yarns are categorised into yarn groups (from A to F) according to thickness and knitting tension – group A contains the thinnest yarns and group F the thickest. This makes it easier for you to find alternative yarns to our patterns, should you wish to switch yarn. All yarns within the same group have a similar knitting tension and can easily replace each other. However, different yarn qualities have different structures and properties which will give the finished work a unique look and feel.

Click here for an overview of the yarns in each yarn group

At the top of all our patterns you’ll find a link to our yarn converter, which is a helpful tool should you wish to use a different yarn than suggested. By filling in the yarn quality you wish to replace, the amount (in your size) and number of strands, the converter will present good alternative yarns with the same knitting tension. Additionally it will tell you how much you’ll require in the new qualities and whether you’ll need to work with multiple strands. Most skeins are 50g (some are 25g or 100g).

If the pattern is worked with multiple colours, every colour will have to be converted separately. Similarly, if the pattern is worked with several strands of different yarns (for example 1 strand Alpaca and 1 strand Kid-Silk) you will have to find alternatives for each, individually.

Click here to see our yarn converter

Since different yarns have different qualities and textures we have chosen to keep the original yarn in our patterns. However, you can easily find options among our available qualities by using our yarn converter, or simply pick a yarn from the same yarn group.

It is possible that some retailers still have discontinued yarns in stock, or that someone has a few skeins at home that they would like to find patterns for.

The yarn converter will provide both alternative yarn as well as required amount in the new quality.

If you think it's hard to decide what size to make, it can be a good idea to measure a garment you own already and like the size of. Then you can pick the size by comparing those measures with the ones available in the pattern's size chart.

You'll find the size chart at the bottom of the pattern.

See DROPS lesson: How to read size chart

The needle size provided in the pattern serves only as a guide, the important thing is to follow the knitting tension. And since knitting tension is very individual, you will have to adjust the needle size to ensure that YOUR tension is the same as in the pattern – maybe you’ll have to adjust 1, or even 2 needle sizes, up or down to achieve the correct tension. For this, we recommend that you work test swatches.

Should you work with a different knitting tension than the one provided, the measurements of the finished garment might deviate from the measurement sketch.

See DROPS lesson: How to measure your tension/gauge

See DROPS video: How to make a gauge tension swatch

Working a garment top-down provides more flexibility and room for personal adjustment. For example it is easier to try the garment on while working, as well as making adjustments to length of yoke and shoulder caps.

The instructions are carefully explaining every step, in the correct order. Diagrams are adjusted to the knitting direction and are worked as usual.

The diagram depicts all rows/rounds, and every stitch seen from the right side. It is read from bottom to top, from right to left. 1 square = 1 stitch.

When working back and forth, every other row is worked from the right side and every other row is worked from the wrong side. When working from the wrong side, the diagram will have to be worked reversed: from left to right, knit stitches are purled, purl stitches are knit etc.

When working in the round every round is worked from the right side and the diagram are worked from right to left on all rounds.

See DROPS lesson: How to read knitting diagrams

The diagram depicts all rows/rounds, and every stitch seen from the right side. It is worked from bottom to top, from right to left.

When working back and forth every other row is worked from the right side: from right to left and every other row is worked from the wrong side: from left to right.

When working in the round, every row in the diagram are worked from the right side, from right to left.

When working a circular diagram you start in the middle and work your way outwards, counter clockwise, row by row.

The rows usually start with a given number of chain stitches (equivalent to the height of the following stitch), this will either be depicted in the diagram or explained in the pattern.

See DROPS lesson: How to read crochet diagrams

Instructions for working several diagrams after each other on the same row/round, will often be written like so: “work A.1, A.2, A.3 a total of 0-0-2-3-4 times". This means you work A.1 once, then A.2 is worked once, and A.3 is repeated (in width) the number of times provided for your size – in this case like so: S = 0 times, M = 0 times, L=2 times, XL= 3 times and XXL = 4 times.

The diagrams are worked as usual: begin with the first row in A.1, then work the first row in A.2 etc.

See DROPS lesson: How to read knitting diagrams

See DROPS lesson: How to read crochet diagrams

The total width of the garment (from wrist-to-wrist) will be larger in the larger sizes, despite the actual sleeves being shorter. The larger sizes have longer sleeve caps and wider shoulders, so there will be a good fit in all sizes.

The measurement sketch/schematic drawing provides information regarding the full length of the garment. If it’s a jumper or a jacket the length is measured from the highest point on the shoulder (usually closest to the neckline), and straight down to the bottom of the garment. It is NOT measured from the tip of shoulder. Similarly, the length of yoke is measured from the highest point on the shoulder and down to where yoke is split into body and sleeves.

See DROPS lesson: How to read a schematic drawing

Diagrams are often repeated on the round or in height. 1 repeat is the diagram the way it appears in the pattern. If it says to work 5 repeats of A.1 in the round, then you work A.1 a total of 5 times after/next to each other in the round. If it says to work 2 repeats of A.1 vertically/in height you work the entire diagram once, then begin again at the start and work the entire diagram one more time.

Chain stitches are slightly narrower than other stitches and to avoid working the cast-on edge too tight, we simply chain more stitches to begin with. The stitch count will be adjusted on the following row to fit the pattern and measurement sketch.

The rib edge is more elastic and will contract slightly compared to, for example, stocking stitch. By increasing before the rib edge, you avoid a visible difference in width between the rib edge and the rest of the body.

It’s very easy to cast off too tightly, and by making yarn overs while casting off (and simultaneously casting these off) you avoid a too tight cast off edge.

See DROPS video: How to bind off with yarn overs (yo)

To achieve an even increase (or decrease) you can increase on, for example: every 3rd and 4th row alternately, like so: work 2 rows and increase on the 3rd row, work 3 rows and increase on the 4th. Repeat this until the increase is complete.

See DROPS lesson: Increase or decrease 1 st on every 3rd and 4th row alternately

Should you prefer to work in the round instead of back and forth, you may of course adjust the pattern. You’ll need to add steeks mid-front (usually 5 stitches), and follow the instructions. When you would normally turn and work from the wrong side, simply work across the steek and continue in the round. At the end you’ll cut the piece open, pick up stitches to work bands, and cover the cut edges.

See DROPS video: How to knit steeks and cut open

Should you prefer to work back and forth instead of in the round, you may of course adjust the pattern so you work the pieces separately and then assemble them at the end. Divide the stitches for the body in 2, add 1 edge stitch in each side (for sewing) and work the front and back pieces separately.

See DROPS lesson: Can I adapt a pattern for circular needles into straight needles?

Pattern repeats can vary slightly in the different sizes, in order to get the correct proportions. If you’re not working the exact same size as the garment in the photo, yours might deviate slightly. This has been carefully developed and adjusted so that the complete impression of the garment is the same in all sizes.

Make sure to follow instructions and diagrams for your size!

If you have found a pattern you like which is available in women’s size it’s not very difficult to convert it to men’s size. The biggest difference will be the length of sleeves and body. Start working on the women size that you think would fit across the chest. The additional length will be worked right before you cast off for the armhole/sleeve cap. If the pattern is worked top-down you can add the length right after the armhole or before the first decrease on sleeve.

Regarding additional yarn amount, this will depend on how much length you add, but it is better with a skein too many than too few.

All yarns will have excess fibres (from production) that might come off as lint or shedding. Brushed yarns (ie hairier yarns) have more of these loose, excess fibres, causing more shedding.

Shedding also depends on what is worn under or over the garment, and whether this pulls at the yarn fibres. It’s therefore not possible to guarantee that there will be no shedding

Below are some tips on how to get the best result when working with hairier yarns:

1. When the garment is finished (before you wash it) shake it vigorously so the looser hairs come off. NOTE: do NOT use a lint roller, brush or any method that pulls at the yarn.

2. Place the garment in a plastic bag and put it in your freezer - the temperature will cause the fibres to become less attached to each other, and excess fibres will come off easier.

3. Leave in the freezer for a few hours before taking it out and shaking it again.

4. Wash the garment according to the instructions on the yarn label.

Pilling is a natural process that happens to even the most exclusive of fibers. It's a natural sign of wear and tear that is hard to avoid, and that is most visible in high friction areas of your garment like a sweater's arms and cuffs.

You can make your garment look as new by removing the pilling, using a fabric comb or a pill/lint remover.

Still can't find the answer you need? Then scroll down and leave your question so one of our experts can try to help you. This will be done normally within 5 to 10 working days.
In the meantime, you can read the questions and answers that others have left to this pattern or join the DROPS Workshop on Facebook to get help from fellow knitters/crocheters!

You might also like...

Post a comment to pattern DROPS 101-32

We would love to hear what you have to say about this pattern!

If you want to leave a question, please make sure you select the correct category in the form below, to speed up the answering process. Required fields are marked *.

Comments / Questions (67)

country flag Debby Van Der Ven wrote:

Ik loop al vast. Ik ben bezig met dit patroon en ben nu bij de bies. Je begint natuurlijk aan 1 kant maar moet je de bies bij het einde van de naald in spiegelbeeld breien??? Nu is het 1 ribbelst. 1 R, 2 av, 1 R, 2 av en 1 R moet je dan aan het einde van de naald 1 R, 2 av, 1, R , 2 av, 1 R en als laatste 1 ribbelst. En hoe brei je op de volgende toer. Word dan de rechte een averechts en de averechtse een rechte of snap ik het nu verkeerd

20.07.2023 - 18:15

DROPS Design answered:

Dag Debby,

De ribbelsteek brei je zowel aan de goede als de verkeerde kant recht. Bij de anders steken van de bies geldt dat als je recht aan de goede kant hebt gebreid, deze steek averecht aan de verkeerde kant breit en vice versa.

24.07.2023 - 20:18

country flag Gabriela Ramirez wrote:

No entiendo cómo será la terminación del cuello de las partes delanteras con la espalda

27.11.2022 - 20:28

country flag Theron wrote:

Bonjour ,je viens de finir M3 et je suis en train de diminuer pour l'encolure,quel diagramme dois continuer a faire ?je suis bloquée. merci de votre reponse

27.04.2022 - 17:48

DROPS Design answered:

Bonjour Mme Théron, on termine en répétant M.3 jusqu'à la fin. Bon tricot!

28.04.2022 - 11:34

country flag Myrna Laupland wrote:

I have solved my previous question. Just needed to reread the instructions a few times. Sorry to trouble you. Love your patterns and yarns.

31.03.2021 - 07:35

DROPS Design answered:

Hi Myrna, happy to hear that. Happy knitting!

31.03.2021 - 10:03

country flag Myrna Laupland wrote:

Seaside Affair. I made this pattern a year ago and want to make another one. I am not sure if I did the front bank correctly on the first one. Is it K1, K1, P2, K1,P2,K1 on the odd # rows, right hand and also left hand side? On the Purl, even # rows is it K1 (always 1st stitch) and K the K’s and P the P’s? This would result in 3 K, P1, K2,P2 . Thank you

31.03.2021 - 03:38

DROPS Design answered:

Problem solved :)

31.03.2021 - 10:03

country flag Katarina wrote:

Måste vara fel i beskrivningen. Stickar storlek M. 8 kantmaskor, 8 maskor diagram, 153 m diagram (17m x9 gånger), 9 m diagram, 8 kantmaskor= 186 m. I beskrivningen står 193 m. Får 7 maskor "över". Står att man ska sticka diagram över 160 m, men 17 m x 9 gånger blir 153 m, så något är fel här. M1B blir 17 maskor när man stickat dom.

02.04.2020 - 09:42

DROPS Design answered:

Hej Katarina M1B består av 16 m så du upprepar M1B 10 gånger, dvs över 160 m. (Du ökar 4 m och minskar 4 m i M1B så maskantalet är detsamma). 8+8+160+9+8=193 m. Lycka till!

03.04.2020 - 13:26

country flag Myrna Laupland wrote:

Drops 101-32 Size L Re: Armholes: Back Piece - Do I bind off 9 sts each side then bind off 3 sts x 1; 2 sts x 2 and 1 st x 2? This would be a total of 18 sts bound off. Or is it just the 3, 2, and 1 part? Total 9 stitches. 2nd Query - Right front piece How many sts at start of armhole? Thank You very much

30.01.2020 - 05:17

DROPS Design answered:

Dear Mrs Lapland, you first cast on 9 stitches on each armhole on last row of body then continue each part separately binding off at the beg of every row (from RS + from WS): 3 st 1 time + 2 sts 2 times + 1 stitch 2 times = 9 sts are bound off on each side = 81 sts remain on needle. On the front piece you will bind off the same way, but only on the armhole side = 9 sts bound off for armhole on each front piece. Happy knitting!

30.01.2020 - 09:47

country flag L J MCTAVISH wrote:

Thank you so much for the help!

14.11.2019 - 08:30

country flag L J MCTAVISH wrote:

Do I switch from M2 to M3 as soon as l get to decreasing for the neckline or continue M2 all rows of M2 have been completed

14.11.2019 - 06:24

DROPS Design answered:

Hi LJ, You continue with M2 until all the rows have been completed before starting M3. Happy knitting!

14.11.2019 - 07:16

country flag L J MCTAVISH wrote:

I don't understand how to decrease for the neckline. It says to decrease within first 7 band stitches. So how do you do that without loosing the band. Does the first stitch after the band then become the last band stitch? And how does the pattern work with the missing decreased stitches

14.11.2019 - 04:06

DROPS Design answered:

Hi again LJ, You increase on the main part of the body (not on the band) so either just after or just before the band. Happy knitting!

14.11.2019 - 07:18