
Popular categories
Looking for a yarn?


Comments / Questions (186)
![]() Marianne Briffaz wrote:
Marianne Briffaz wrote:
Oj det tog lång tid att få svar, jag fick gissa.. Tröjan är klar sen länge..
08.04.2026 - 13:45DROPS Design answered:
Godt at høre :)
08.04.2026 - 14:55
![]() Rosi wrote:
Rosi wrote:
Warum ist mein gestrickter Pullover mit der Big Merino-Wolle während der Wäsche mit der Hand so aus der Form gegangen und nun 20 cm zu lang? Auch die Armlänge ist 20 cm zu lang. Ist dies jemand auch schon passiert?
25.03.2026 - 16:21
![]() Marianne Briffaz wrote:
Marianne Briffaz wrote:
Måste säga att det här mönstret saknar vissa förklaringar. Har gjort ca 25-30 mönster på eran hemsida, har aldrig behövt fråga om hjälp. Det syns på alla frågor ni fått in..
19.03.2026 - 09:40
![]() Marianne Briffaz wrote:
Marianne Briffaz wrote:
Hej På raglanminskningen, 24 ggr vartannat varv, vara färdigt vid 63cm längd? Storlek XL Hur många maskor totalt efter raglanminskningen?
16.03.2026 - 18:45DROPS Design answered:
Hej Marianne, du har 95 masker tilbage efter alle indtagninger til raglan og hals :)
08.04.2026 - 12:24
![]() Britta wrote:
Britta wrote:
Hallo! Das Muster des Pullovers wirkt bei mir ganz anders, da die Perlreihen (rechts/links) nicht zu sehen sind. Sie ziehen sich nach innen und dadurch bilden die 5er-Rippen der rechten Maschen eher eine Art „Würste“… :( Was kann ich tun? Vielen Dank für die Antwort!
22.02.2026 - 19:02DROPS Design answered:
Liebe Britta, da gibt sich, wenn Sie den Pullover am Ende anfeuchten, vorsichtig zurechtziehen und liegend trocknen lassen. Dann kommt das Muster schön zur Geltung. Viel Spaß beim Weiterstricken!
23.02.2026 - 09:15
![]() Annette Schøler wrote:
Annette Schøler wrote:
Hej Drops håber I vil være søde at svare på min tidligere besked, da jeg er kørt fast i mønsteret Har kigget på det diagram 4 mange gange, men kan ikke få maskerne til at passe De kommer til at mangle enten i snoningen eller vrang stolpen, hvis jeg strikker nogen sammen
01.02.2026 - 16:10DROPS Design answered:
Hei Annette. Vi svarer så fort som mulig, men håper på forståelse at vi ikke svarer på en søndag. Se vår forrige svar til deg. Om du fremdeles har problemer. Send inn et ny spørsmål og oppgi da hvilken str. du strikker og hvor mange masker du har, så skal vi hjelpe så godt det lar seg gjøre. mvh DROPS Design
02.02.2026 - 13:46
![]() Annette Schøler wrote:
Annette Schøler wrote:
Hej Jeg kan ikke greje diagrammet M 4 Når jeg tager ind kommer der til at mangle masker, så der ikke er 5x5 masker til at lave snoningen med? Og hvis jeg tar ind i vrang stolpen, så mangler de jo der?
01.02.2026 - 09:12DROPS Design answered:
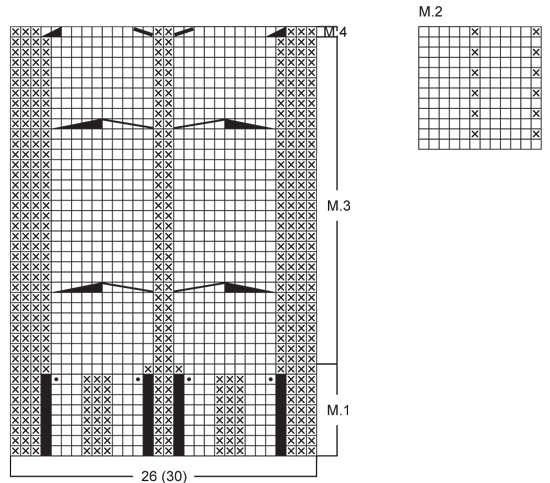
Hei Annette. Du skal bare strikke M.4 1 gang og det er etter siste flette når arbeidet måler (50) 59-61-63-65 cm. På neste omgang settes de midterste (30) 30-30-34-34 maskene på 1 tråd til hals, og arbeidet strikkes ferdig frem og tilbake på pinnen fra midt foran. mvh DROPS Design
02.02.2026 - 13:34
![]() Annick wrote:
Annick wrote:
Bonjour, je voudrais savoir si entre les torsades, c'est du point de riz sur l'endroit su travail où si c'est du jersey envers? Merci de votre réponse
12.01.2026 - 14:49DROPS Design answered:
Bonjour Annick, dans les diagrammes M.1, M.3 et M.4, les mailles avec une croix représentent des mailles envers, autrement dit, vous aurez du jersey envers entre et de chaque côté des torsades, dans M.2 vous avez (1 m point mousse, 5m jersey). Bon tricot!
14.01.2026 - 07:52
![]() Catherine wrote:
Catherine wrote:
Bonjour Je ne comprends pas comment terminer l'encolure. A 65cm de hauteur j'ai mis en attente les 34 m centrales. Je continue en aller retour en diminuant côté encolure 2fois une maille.... et je termine le raglan : il m'en reste 3. L'ouvrage doit mesurer 72 cm....en XXL. Mais je n'ai pas tricoté 7cm depuis l'encolure. Dois-je continuer à tricoter sans diminution ? Merci
29.12.2025 - 20:20DROPS Design answered:
Bonjour Catherine, les 72 cm de hauteur totale sont mesurés à plat, à partir des côtés jusqu'en haut de l'épaule, pas des côtes jusqu'aux mailles sur l'aiguille, posez bien l'ouvrage à plat pour mesurer cette hauteur pour qu'elle corresponde à celle du schéma. L'empiècement mesure environ 24 cm de hauteur totale en XXL + 5 cm d'épaules. Bon tricot!
02.01.2026 - 13:27
![]() Flemming wrote:
Flemming wrote:
Hej Hvor finder jeg mønsteret på den hue, som er vist på billedet ?
19.12.2025 - 08:47DROPS Design answered:
Hei Flemming. Scroll lengre ned på siden, og rett over diagramteksten, digrammene og målskissen til genseren, finner du oppskrift på luen. mvh DROPS Design
22.12.2025 - 13:13
|
||||||||||||||||||||||||||||
To the Sea |
||||||||||||||||||||||||||||
|
|
||||||||||||||||||||||||||||
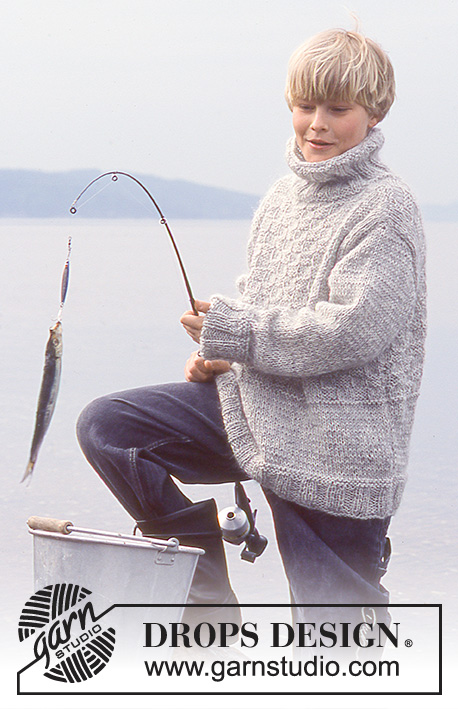
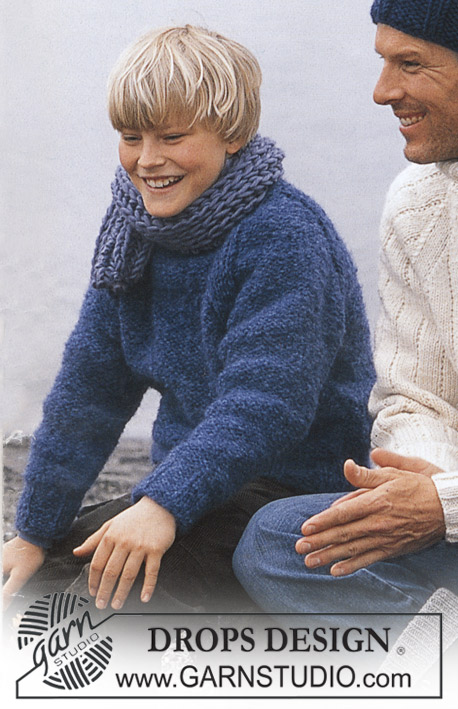
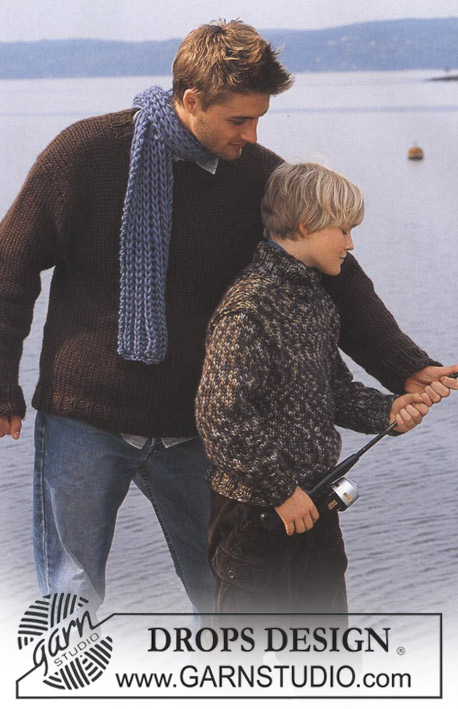
Knitted men's sweater with cables and high neck in DROPS Alaska, plus hat in DROPS Snow
DROPS 85-23 |
||||||||||||||||||||||||||||
|
Gauge: 17 sts x 22 rows on larger needles in stockinette st = 10 x 10 cm. Rib: *K 3, P 3*, repeat from *-*. Pattern: See the chart below. The pattern is seen from the right side. Decreasing tips (for raglan): Dec as follows on right side: Start 4 sts before the marker: Sl 1 as if to knit, K 1, psso, K 4 (the marker is in the middle of these 4 sts), K 2 tog. Dec as follows on wrong side: Start 4 sts before the marker, P 2 tog, P 4, P 2 tog, twisting sts (if this is too difficult, sl 2, return to left needle 1 by 1, twisting each, then P 2 tog). BODY Cast on 155-159-179-183-203 sts on smaller circular needles; join and knit rib as follows: K 3-5-3-5-3 (put a marker in the center st = side), *P 3, K 3*, repeat *-* over the following 24-24-30-30-36 sts, Pattern 1 (= 26 sts), *K 3, P 3*, repeat *-* over the following 24-24-30-30-36 sts, K 3-5-3-5-3 (put a marker in the center st = side), *P 3, K 3*, repeat *-* over the following 72-72-84-84-96 sts and finish with P 3. On the last row of Pattern 1 dec 2 sts on back and at the same time inc 4 sts on the front as shown in chart = 157-161-181-185-205 sts. When Pattern 1 is complete (the piece measures approx. 4 cm) change to larger circular needles and continue as follows: K 3-5-3-5-3, Pattern 2 over the following 24-24-30-30-36 sts, Pattern 3 (= 30 sts), Pattern 2 over the following 24-24-30-30-36 sts – reverse the pattern so that it will be the same on both sides of Pattern 3, K 3-5-3-5-3 and Pattern 2 over the remaining 73-73-85-85-97 sts. When the piece measures 12 cm inc 1 st at each side of sts with markers at each side every 5-4-6-4-4 cm a total of 4-6-4-6-6 times – knit the increased sts in Pattern 2 as you go along = 173-185-197-209-229 sts. When the piece measures 34-41-42-43-43 cm bind off 7 sts at each side for armhole (= the sts with the markers + 3 sts each side = 82-88-94-100-110 sts on front and 77-83-89-95-105 sts on back. Lay piece aside and knit the sleeves. SLEEVE Cast on 42-42-42-48-48 sts on double-pointed needles 4 mm [US 6]; join and place a marker at the join. Knit rib. When the piece measures 4 cm change to larger double pointed needles and work following Pattern 2 (the pattern will not come out even). When the piece measures 9-12-14-14-14 cm inc 1 st on each side of seed st at marker every 3.5-2.5-2-2.5-2 cm a total of 11-14-17-15-20 times (knit the incd sts into the pattern as you go along) = 64-70-76-78-88 sts. When the piece measures 50-51-53-53-54 cm bind off 7 sts at marker (the st with the marker + 3 sts each side of marker) = 57-63-69-71-81 sts. Lay piece aside and knit second sleeve. Yoke: Put the sleeves in on the same circular needles as Body where you bound off for armhole = 273-297-321-337-377 sts Put a marker in each transition between Body and sleeves = 4 markers. Knit 2-3-0-0-0 rows before decreasing. Read the entire next section before knitting: Raglan shaping: Dec 1 st at each side of each marker (= 8 decs) – see Decreasing tips above. Dec every other row 18-21-23-24-24 times and every row 0-0-1-1-6 times. Pattern: When the piece measures 50-59-61-63-65 cm – adjust to end after a cable – knit Pattern 4 over the center 30 sts (decreasing the 4 sts incd on the last row of Pattern 1 at lower edge of Body) – knit the remaining sts as before. On the next row put the center 30-30-30-34-34 sts on a st holder for the neck and knit back and forth on needles. Continue to dec 1 st at each neck edge every other row 1-2-2-2-2 times. After all raglan and neck shaping is complete, 93-91-91-95-95 sts remain and the piece measures approx. 56-66-68-70-72 cm to shoulder. Neckband: Pick up and knit approx. 32-38 sts in front neck (incl. sts on st holder) on double-pointed needles and put all sts on same needles = approx. 125-133 sts. Join and P 1 row, then K 1 row, decreasing evenly distributed to 83-89-89-95-95 sts. Knit rib (K 3, P 3) – but at center front there should be a P 2, following pattern on front. When the collar measures 18-20-20-22-22 cm bind off all sts in rib. Fold neckband out to right side. If you want a crew neck, knit as follows: knit rib until the collar measures approx. 10-11-12-12-13 cm, bind off in pattern. Fold the neckband to wrong side and stitch in place. Assembly: Sew opening under the sleeve. HAT: Sizes: one-size Materials: DROPS SNOW from Garnstudio 100 gr nr 15, marine blue. DROPS 9 mm [US 13] double-pointed needles, or size needed to obtain correct gauge. Gauge: 10 sts x 14 rows in stockinette st = 10 x 10 cm. Rib: *P 5, K 2*, repeat from *-*. Hat: Cast on 56 sts; join and place a marker at the join. Knit 1 row stockinette st, then knit rib – see instructions above. When the piece measures 12 cm dec all P 5 to P 4 = 48 sts. When the piece measures 15 cm dec all P 4 to P 3 = 40 sts. Dec in the same way 2 more times with 3 cm between each dec round so that there will be 1 P less for each dec round = 24 sts – the rib is now *K 2, P 1*. When the piece measures 22 cm knit the next row as follows: *K 2 tog, P 1*, repeat from *-* over all sts = 16 sts. Cut yarn and pull through the remaining sts, fasten neatly. Hat measures approx 23 cm high. |
||||||||||||||||||||||||||||
Diagram explanations |
||||||||||||||||||||||||||||
|
||||||||||||||||||||||||||||
 |
||||||||||||||||||||||||||||
 |
||||||||||||||||||||||||||||
Have you finished this pattern?Tag your pictures with #dropspattern or submit them to the #dropsfan gallery. Do you need help with this pattern?You'll find 25 tutorial videos, a Comments/Questions area and more by visiting the pattern on garnstudio.com. © 1982-2026 DROPS Design A/S. We reserve all rights. This document, including all its sub-sections, has copyrights. Read more about what you can do with our patterns at the bottom of each pattern on our site. |
||||||||||||||||||||||||||||


With over 40 years in knitting and crochet design, DROPS Design offers one of the most extensive collections of free patterns on the internet - translated to 17 languages. As of today we count 324 catalogs and 12290 patterns - 12280 of which are translated into English (US/in).
We work hard to bring you the best knitting and crochet have to offer, inspiration and advice as well as great quality yarns at incredible prices! Would you like to use our patterns for other than personal use? You can read what you are allowed to do in the Copyright text at the bottom of all our patterns. Happy crafting!
Post a comment to pattern DROPS 85-23
We would love to hear what you have to say about this pattern!
If you want to leave a question, please make sure you select the correct category in the form below, to speed up the answering process. Required fields are marked *.