
Popular categories
Looking for a yarn?


Comments / Questions (22)
![]() Denise wrote:
Denise wrote:
I am on size M. I was counting the 7 band sts, the stitches in between the beginning of the band and 1st marker is 28 and these stitches include the raglan stitch before the 1st marker. If I increase 1 stitch and increase at the raglan, that's 30 stitches and not 29. same is true for the next group. My question is are we ever (THROUGHOUT THE PATTERN) counting the increases at the raglan area in this pattern. The numbers add up without raglan sts 29, 18,35, 18, and 29.
05.05.2026 - 22:03DROPS Design answered:
Dear Denise, in M you start with 7 front band sts + 21 sts before first marker (28 sts for front piece), then you increase 1 stitch = 29 sts for front piece - then ou work diagrams as shown increasing in A.1, A.4, A.5 and A.7 as shown/explained so that the number of sts for each piece will increase by 1 for front pieces and by 2 on sleeves and back piece on every other row. Happy knitting!
06.05.2026 - 08:36
![]() Denise wrote:
Denise wrote:
I am not sure how to read this pattern at neck edge and yoke each section is one stitch short. is this because the increase for the yoke is not counted in the area that says (=29-29-29-31-31-31 stitches for front piece). Same for each section, one stitch short of my size # of stitches.
04.05.2026 - 15:40DROPS Design answered:
Dear Denise, you have 7 front band sts + 19 or 21 sts rib for left front piece, you work 7 front band sts and purl the next 19 or 21 sts increasing evenly 3-3-1-1-3-3-3 sts so that you get 7 front band sts + 22-22-20-20-24-24-24 sts = 29 or 31 sts in total. Can this help? Happy knitting!
05.05.2026 - 08:24
![]() Denise wrote:
Denise wrote:
1. I watched all lessons at raglan do I make yarn overs two stitches before and two stitches after the 2 knit raglan stiches? 2. The number of stitches as per pattern are not adding up correctly. Is it the number of stitches between beginning of row and between each marker section? Do I make # of stitches correct or follow pattern?
04.05.2026 - 15:20DROPS Design answered:
Dear Denise, when increasing 8 sts (body and sleeves) you will increase on each side of the 2 raglan stitches worked in stocking stitch, when you will increase alternately 4 and 8 sts, you will increase 4 sts by only increasing before the raglan sts at the end of left front piece and back piece and before the raglan sts at the beg of back piece and right front piece. Which size are you working on and where don't you get the number of sts working? Tell us more so that we can explain. Thanks for your comprehension. Happy knitting!
05.05.2026 - 08:18
![]() Elsa wrote:
Elsa wrote:
How do I read the diagrams for Drops snowbound romance cardigan?i'm confused. thanks for the answer.
26.03.2026 - 06:43DROPS Design answered:
Dear Elsa, diagrams are read from bottom up, from RS read from the right towards the left and from WS read from the left towards the right, following the description "from right side/from wrong side" under diagram key. Read even more about diagrams here. Happy knitting!
26.03.2026 - 09:25
![]() Bente wrote:
Bente wrote:
Hej Igen Jeg vil meget gerne have et svar på mit spørgsmål ?Ellers må jeg går til forretningen og få mine penge tilbage M,V,H, Bente
17.03.2026 - 19:26DROPS Design answered:
Hej Bente. De första 29 m är inklusive 7 forkantmasker, och de sista 29 m är också inklusive 7 forkantmasker, så du tar kun ud 1 maske där på första och sista delen. Mvh DROPS Design
20.03.2026 - 10:11
![]() Bente wrote:
Bente wrote:
Jeg strikker str,L kan ikke få det til at stemme med 1 mønsterpind .Jeg har taget ud først til 29 m. ,18 m,37m, 18m 29m.Det giver 131 masker med stolpe pinde har jeg145m V,H, Bente Larsen
15.03.2026 - 11:45DROPS Design answered:
Hej Bente. 29 (inklusive forkantmasker/stolpe)+18+37+18+29 (inklusive forkantmasker/stolpe) = 131 masker. Mvh DROPS Design
20.03.2026 - 10:13
![]() Mille wrote:
Mille wrote:
Hej Jeg strikker str S og har en udfordring allerede ved 1. Mønsterpind: ved de to forstykker skal der være 29 masker, heraf er de 7 ikke med i mønsteret. Så skal der strikkes A1 A2 A3 2 masker ret - men det passer jo ikke med 29-7= 22, da der skal 23 masker til for at følge mønsteret? Og ligeledes ved det andet forstykke er der en maske for lidt ift. det, I nævner, der skal strikkes? På forhånd tak for svar Mvh Mille
20.01.2026 - 21:19DROPS Design answered:
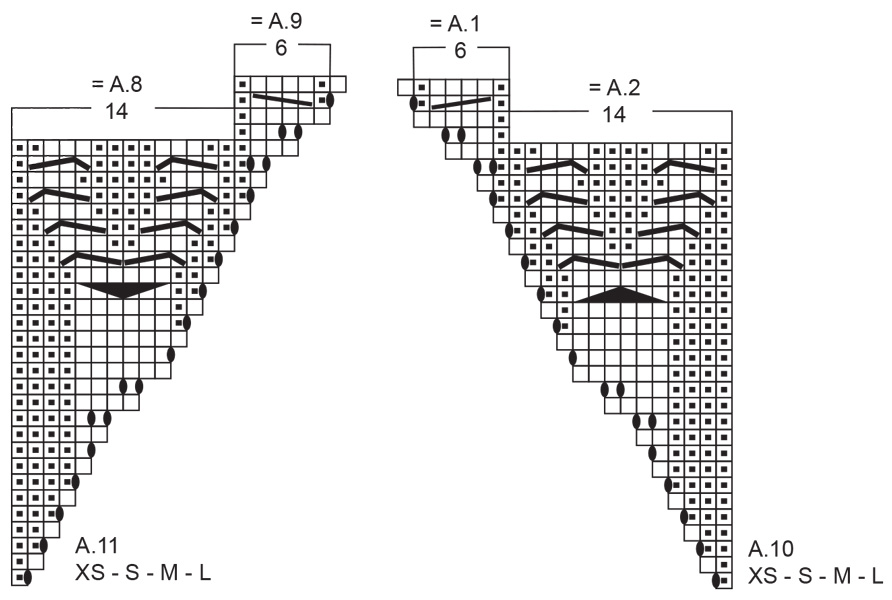
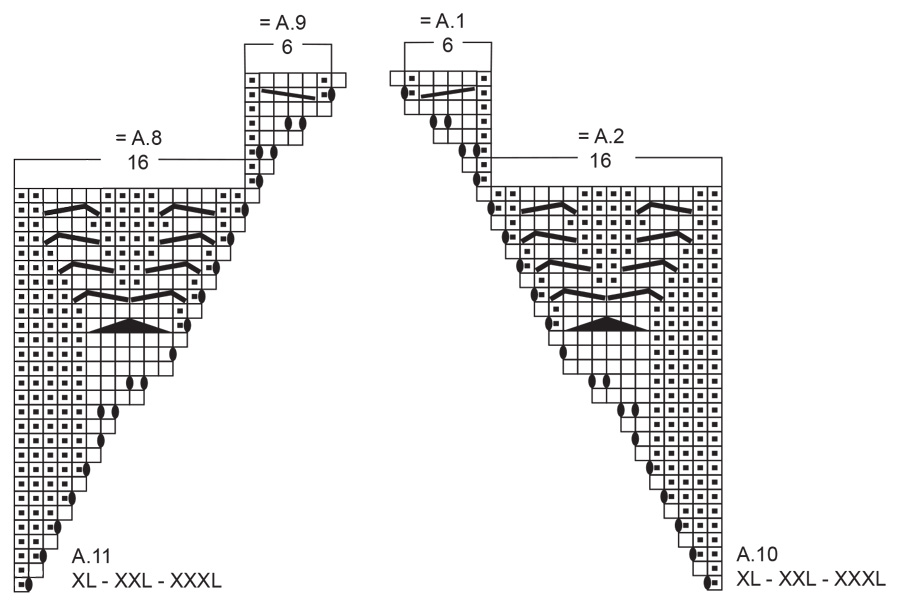
Hei Mille. I str. S har du 129 m og nå skal det strikkes mønster og økes til raglan. 1. Forstykke: strikk 7 stolpem + A.1 (6) + A.2 (14) + A.3 (1 ) + 1 m til raglanlinjen = 29 m. 1. Erme = 1 rett til raglanlinjen + A.4 (1) + A.2 (14 ) + A.3 (1) + 1 m til raglanlinjen = 18 m. Bakstykket: 1 rett til raglanlinjen + A.5 (1) + A.6 over 31 m + A.7 (1) + 1 rett til raglanlinjen = 35. 2. Erme = 1 rett til raglanlinjen + A.4 (1) + A.8 (14 ) + A.3 (1) + 1 m til raglanlinjen = 18 m. 2. Forstykke: 1 rett til raglanlinjen + A.4 (1) + A.8 (14) + A.1 (6) + 7 stolpem = 29 m. Tilsammen: 29+18+35+18+29 = 129 masker. mvh DROPS Design
30.01.2026 - 11:16
![]() Elizabeth wrote:
Elizabeth wrote:
I'm confused as to how to continue from the point where there are 179 stitches (size large). I can follow the pattern, but when continuing patterns A5 and A7 in double moss stitch, I'm not sure how to get an increase to 315 stitches. Do I make one after or before each raglan stitch at A5 And A7, keeping the double moss stitch pattern? The other pieces have increases worked into the pattern. Thanks for your assistance, and Merry Christmas and Happy New Year!
26.12.2025 - 23:38
![]() Marit wrote:
Marit wrote:
Jeg har begynt på omgang 1 på alle mønstre/diagram bortsett fra a8 og a2, da det fremsto som den mest logiske måten å fortsette mønsteret på. Om jeg startet på nytt på a8 og a2 såg det feil ut. Er det rett måte å gjøre det på?
22.12.2025 - 12:28DROPS Design answered:
Hei Marit. Du starter også med A.8 og A.2. Det strikkes slik: 7 stolpemasker + A.1 (6 masker) + A.2 /14 eller 16 masker) + A.3 (1 maske) + 2 masker rett + A.4 (1 maske) + A.2 (14 eller 16 masker) + A.3 (1 maske) + 2 masker rett + A.5 (1 maske) + A.6 (2 masker over x antall masker) + A.7 (1 maske) + 2 masker rett + A.4 (1 maske) + A.8 (14 eller 6 masker) + A.3 (1 maske) + 2 masker rett + A.4 (1 maske) + A.8 (14 eller 16 masker) + A.9 (6 masker) + 7 stolpe masker. De 2 nederste diagrammene viser hvor man strikker A.2 / A.8 når 28 pinner av A.10 / A.11 er strikket. mvh DROPS Design
05.01.2026 - 09:32
![]() Marit wrote:
Marit wrote:
Jeg strikker størrelse L og er ferdig med de 12 første omgangene. Jeg forstår ikke hvordan jeg skal fortsette. Skal jeg begynne på omgang 1 i mønsteret eller fortsette på omgang 13?
21.12.2025 - 17:11DROPS Design answered:
Hei Marit. Hvilket diagram? Som regel starter man på 1. pinne i diagrammet igjen, men for å gi deg et mer nøyaktig svar er det fint å vite hvilket diagram det gjelder. mvh DROPS Design
22.12.2025 - 09:48
|
||||||||||||||||||||||||||||
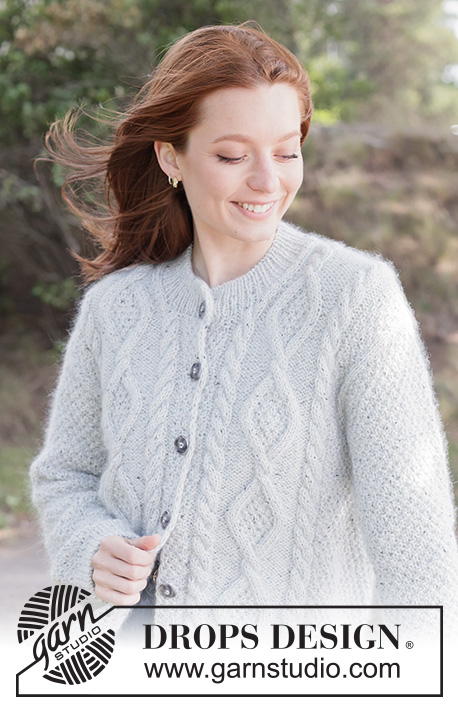
Snowbound Romance Cardigan#snowboundromancecardigan |
||||||||||||||||||||||||||||
 |
 |
|||||||||||||||||||||||||||
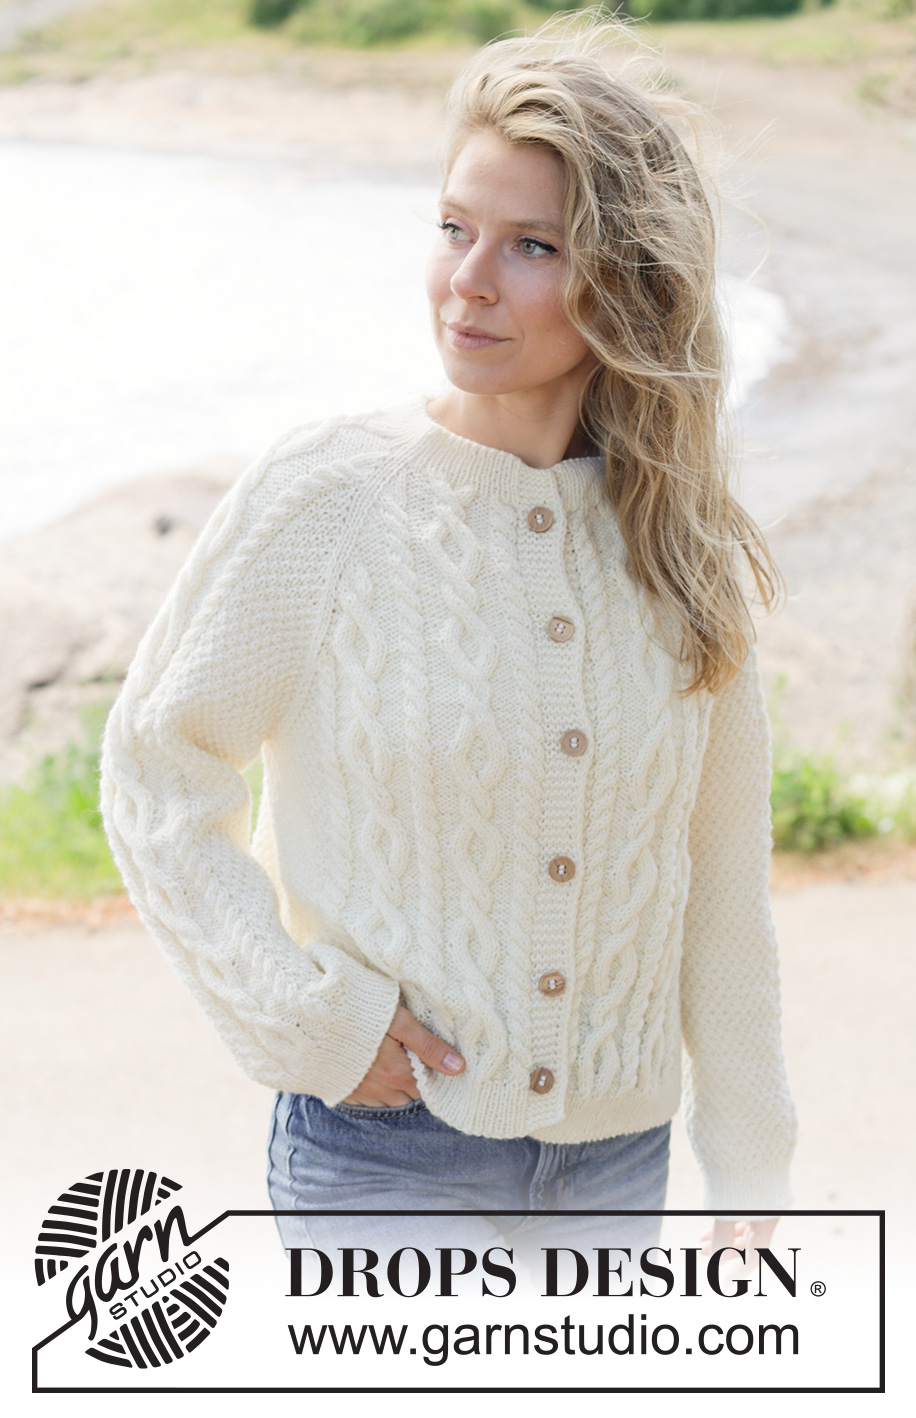
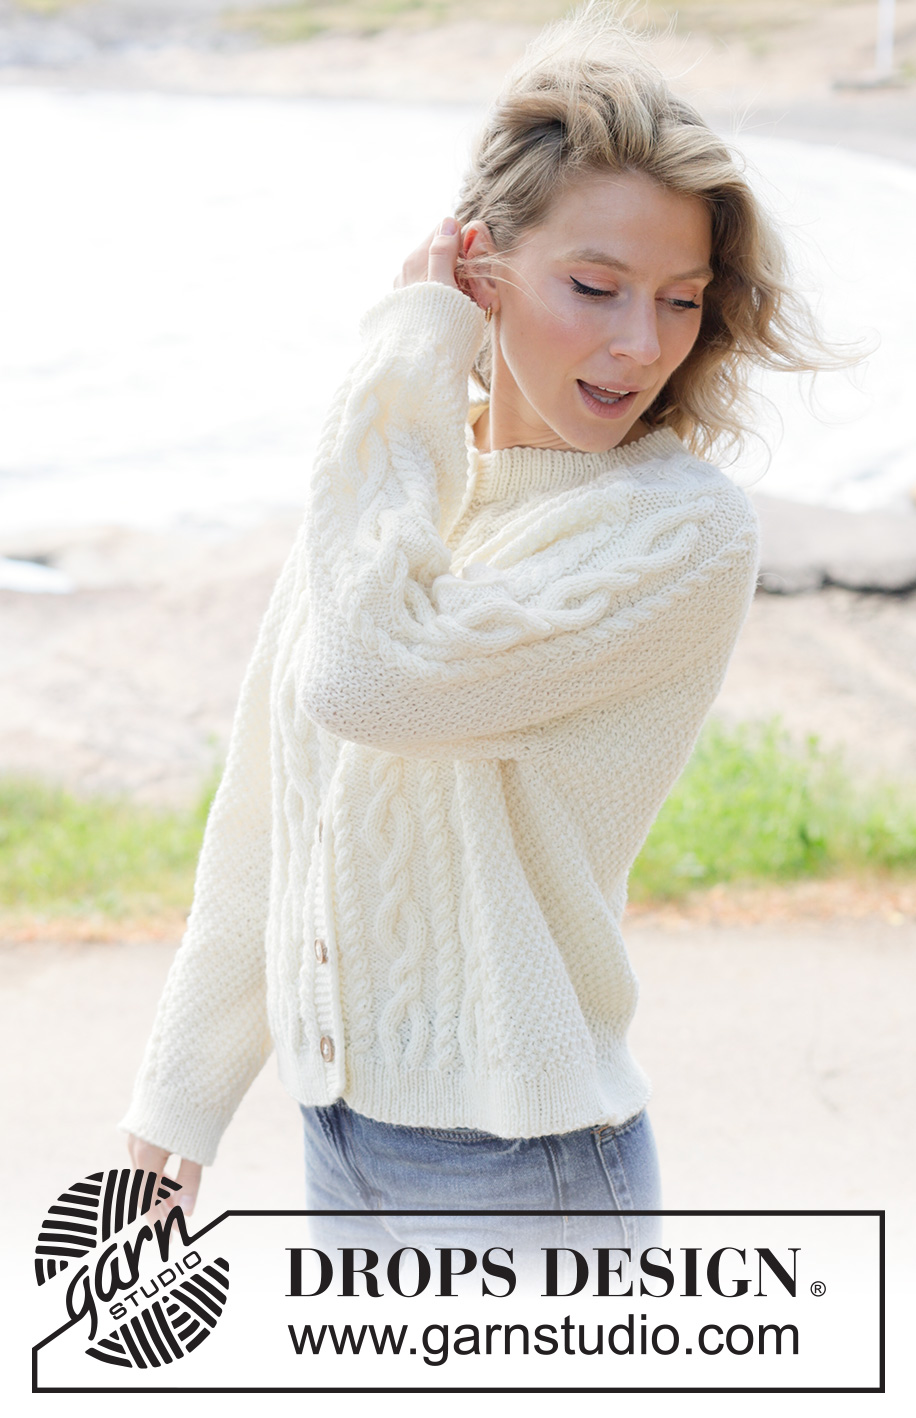
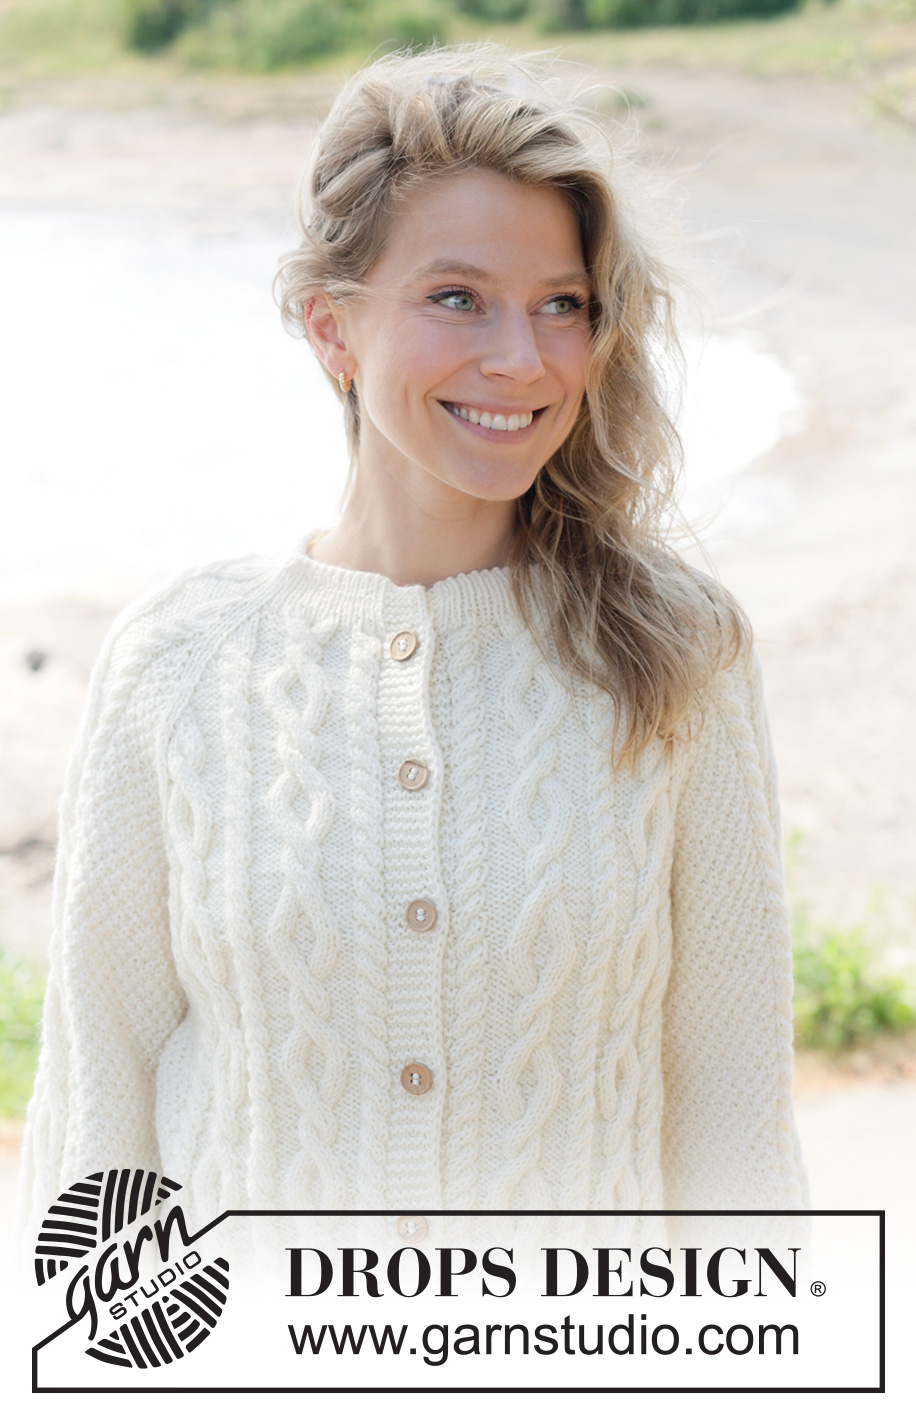
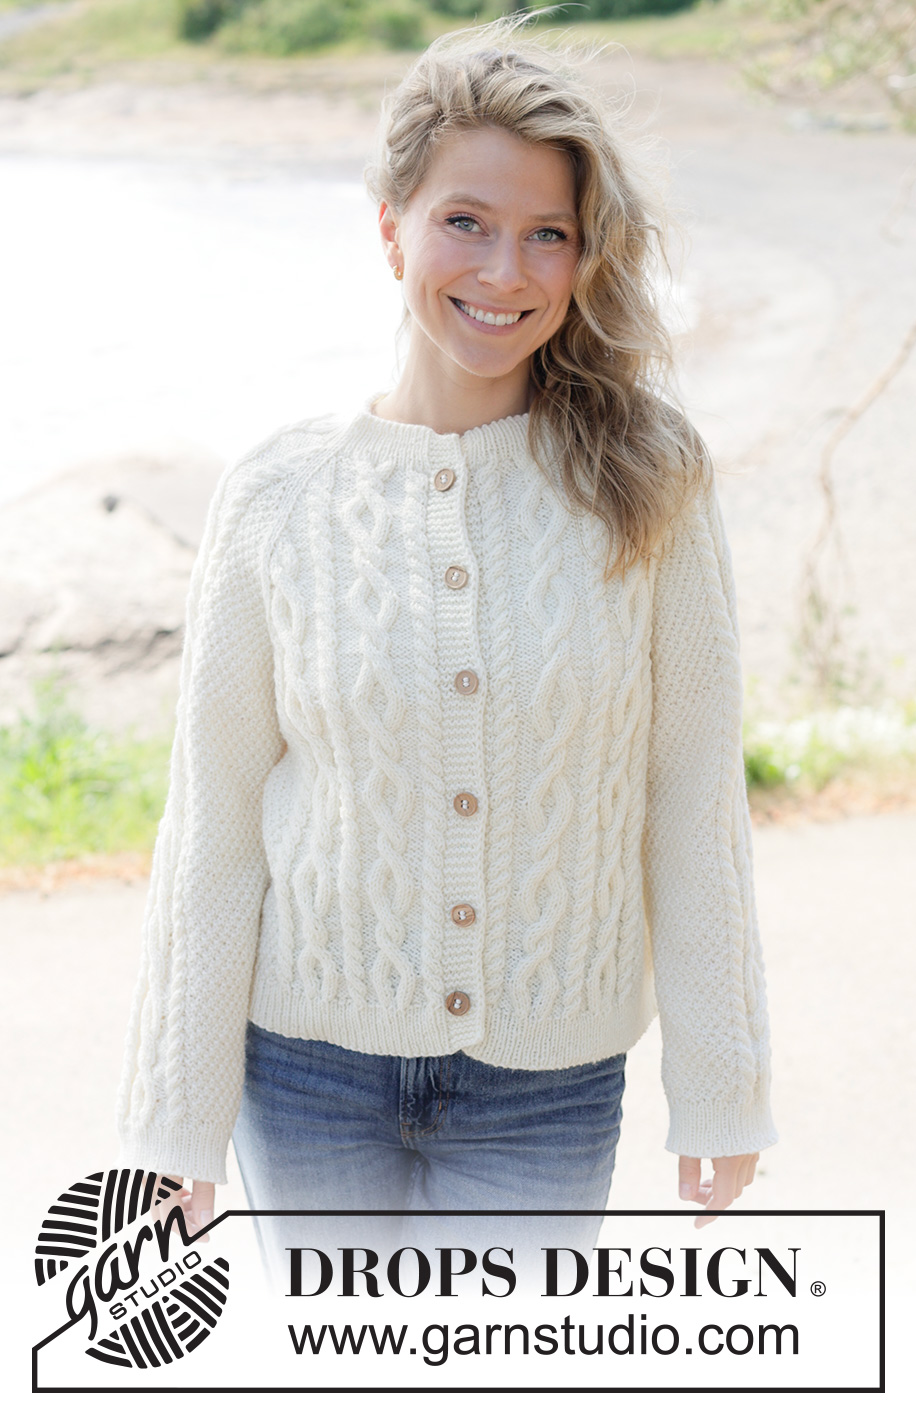
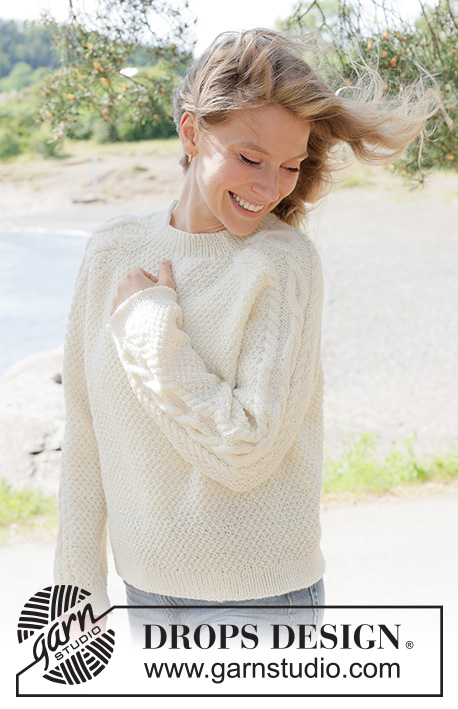
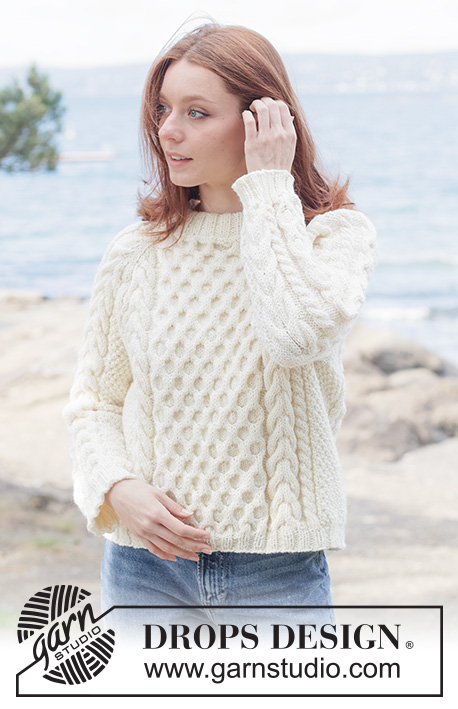
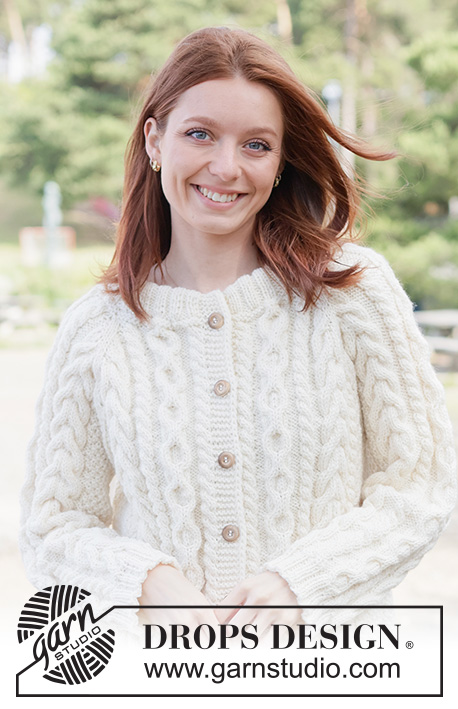
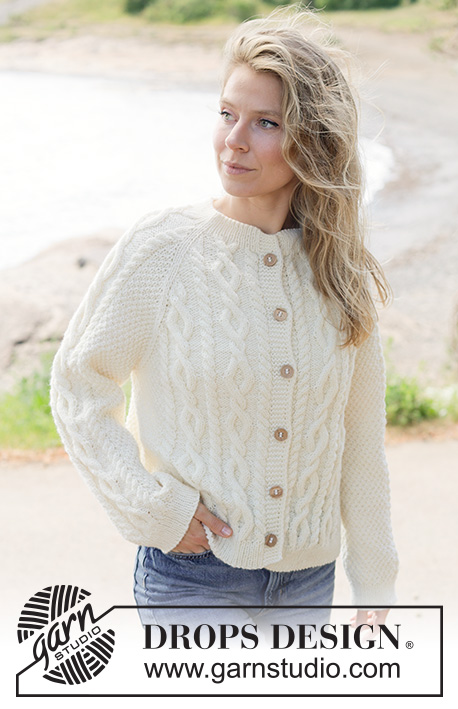
Knitted jacket in DROPS Karisma or DROPS Lima. Piece is knitted top down with raglan, I-cord, cables and double moss stitch. Size XS – XXXL.
DROPS 262-14 |
||||||||||||||||||||||||||||
|
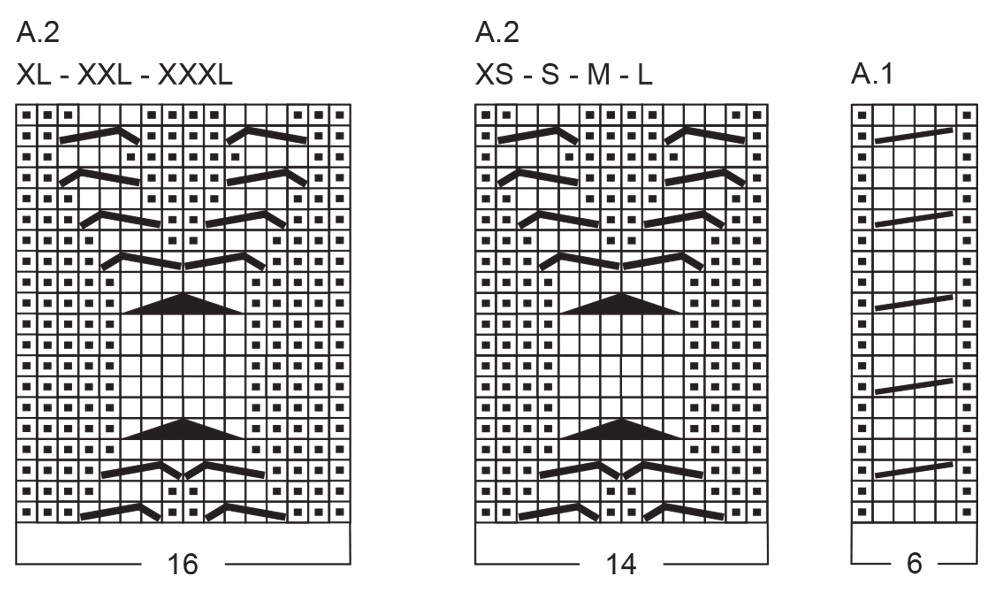
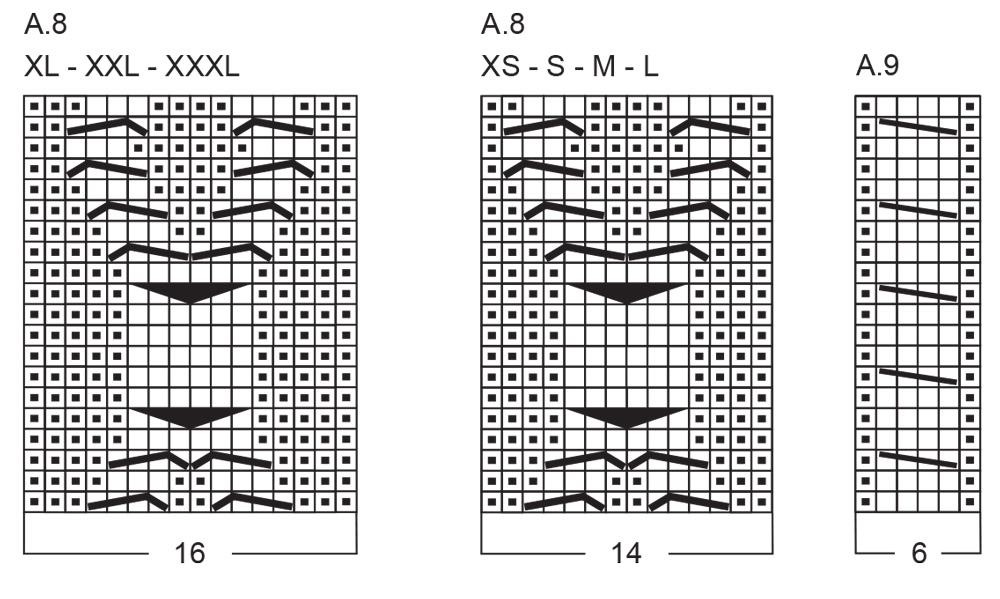
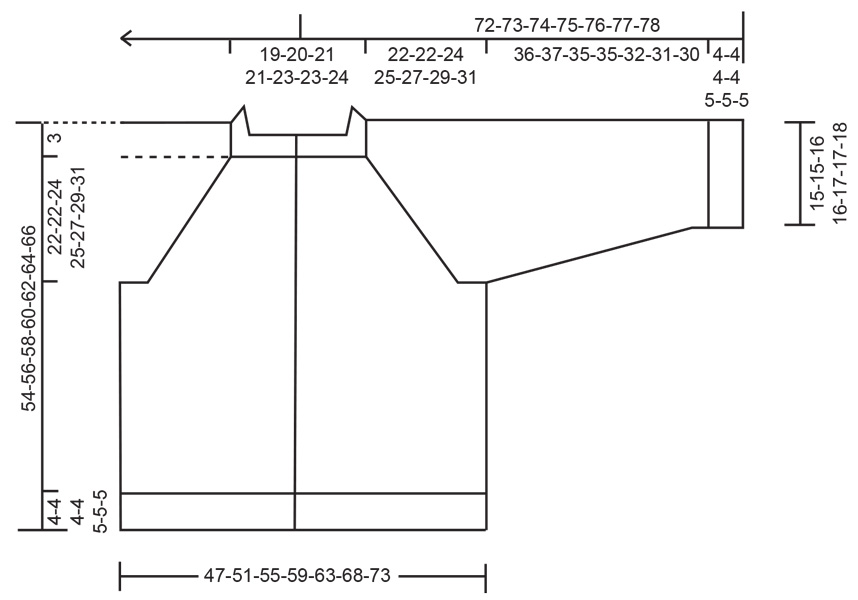
---------------------------------------------------------- EXPLANATION FOR THE PATTERN: ---------------------------------------------------------- GARTER STITCH (when working back and forth): Knit on all rows, i.e. knit from right side and knit from wrong side. 1 ridge vertically = knit 2 rows. BAND WITH I-CORD: BEGINNING OF ROW: Work band as follows: Slip 1 stitch purlwise with strand in front of piece, knit 1 and work 5 stitches in garter stitch. END OF ROW: Work band as follows: Work until 7 stitches remain on row, work 5 stitches in garter stitch, slip 1 stitch purlwise with strand in front of piece, knit 1. Work the same way both from right side and wrong side. PATTERN: See diagrams A.1 to A.11. Choose diagram for desired size (applies to A.2, A.8, A.10 and A.11). Diagrams show all rows in pattern seen from the right side. Remember to read the diagrams from left to right when working from the wrong side. RAGLAN: Increase 1 stitch by making 1 yarn over, on next row work yarns over as explained below: BEFORE RAGLAN STITCHES: Purl yarn overs in back loop of stitches to avoid holes. Then work the new stitches in pattern. AFTER RAGLAN STITCHES: Slip stitch off left needle and put it back on left needle but the opposite way (insert left needle from behind when slipping it back on needle). Purl yarn overs in front loop of stitches to avoid holes. Then work the new stitches in pattern. BUTTONHOLES: Decrease for buttonholes on right band (when garment is worn). Decrease from right side when 5 stitches remain on row as follows: ROW 1 (= right side): Make 1 yarn over, knit 2 together, knit 1, slip 1 stitch purlwise with strand in front of piece, knit 1. ROW 2 (= wrong side): Work band as before and knit yarn over to make a buttonhole. Decrease for first buttonhole on first row from right side after neck edge has been worked. Then decrease the next 5-5-6-6-6-6-6 buttonholes, approx. 9½-10-8½-9-9-9½-9½ cm = 3⅝"-4"-3¼"-3½"-3½"-3⅝"-3⅝" apart. Adjust so that bottom buttonhole is placed in the transition between stockinette stitch and rib on body. SLEEVE TIP: When picking up stitches mid under sleeve, there will be a small hole in the transition between stitches on body and sleeves. The holes can be closed by picking up the strand between two stitches - work this strand twisted together with the first stitch between body and sleeve to close the hole. DECREASE TIP: Decrease 1 stitch on each side of stitch with marker by working 3 stitches together as follows: Work until 1 stitch remains before stitch marker, purl 3 together (= 2 stitches decreased). This stitch is now the stitch with marker, purl this stitch onwards. ---------------------------------------------------------- START THE PIECE HERE: ---------------------------------------------------------- JACKET - SHORT OVERVIEW OF THE PIECE: In this pattern needles of different length have been used, begin with fitting length for number of stitches and switch as needed. Work neck edge and yoke back and forth on circular needle from mid front, work top down. When yoke is done, divide piece for body and sleeves. Work body downwards back and forth on circular needle while putting the sleeves aside. Then work sleeves downwards in the round on needle. Work cables on front pieces and sleeve, back piece is only worked in double moss stitch. If 0 stitches are given for the chosen size, it means that you skip the information and jump to next information. NECK EDGE: Cast on 121-123-127-129-135-137-139 stitches on circular needle size 3 MM = US 2.5 with DROPS Karisma or DROPS Lima. Work first row as follows from right side while AT THE SAME TIME inserting markers on needle between 2 stitches as follows: 7 stitches BAND WITH I-CORD - read explanation above, work rib (= knit 1/purl 1) over the next 19-19-21-21-21-21-21 stitches, insert 1 marker on row before next stitch (= front piece), work rib (= knit 1/purl 1) over the next 19-19-19-19-21-21-21 stitches, insert 1 marker on row before next stitch (= sleeve), work rib (= knit 1/purl 1) over the next 31-33-33-35-37-39-41 stitches, insert 1 marker on row before next stitch, (= back piece), work rib (= knit 1/purl 1) over the next 19-19-19-19-21-21-21 stitches, insert 1 marker on row before next stitch (= sleeve), work rib (= knit 1/purl 1) over the next 19-19-21-21-21-21-21 stitches, and finish with 7 stitches band with I-cord (= front piece). All the markers are between 2 knit stitches, these 2 stitches are called raglan stitches. Increase for raglan on each side of raglan stitches later. Raglan stitches are always worked in stockinette stitch and is in the transition between front pieces/back piece and sleeves. Continue rib with knit over knit and purl over purl and bands in each side for 4-4-4-4½-4½-5-5 cm = 1½"-1½"-1½"-1⅝"-1⅝"-2"-2". Insert 1 marker on the inside of band in one side of piece (= mid front), measure piece from this marker. Work last row from right side. YOKE: Continue with circular needle size 4.5 MM = US 7. Now work 1 row from wrong side while AT THE SAME TIME increasing between the 4 markers as explained (note - do not increase over bands or raglan stitches): Work 7 stitches band as before, purl until first marker while at the same time increasing 3-3-1-1-3-3-3 stitches evenly (= 29-29-29-29-31-31-31 stitches for front piece), purl until next marker while at the same time decreasing 1 stitch evenly over these (= 18-18-18-18-20-20-20 stitches for sleeve), purl until next marker while at the same time increasing 2 stitches evenly over these (= 33-35-35-37-39-41-43 stitches for back piece), purl until next marker while at the same time decreasing 1 stitch evenly over these (= 18-18-18-18-20-20-20 stitches for sleeve), purl over the next 19-19-21-21-21-21-21 stitches while at the same time increasing 3-3-1-1-3-3-3 stitches evenly, finish with 7 stitches band as before (= 29-29-29-29-31-31-31 stitches for front piece) = 127-129-129-131-141-143-145 stitches on needle. Now work PATTERN - read explanation above, while AT THE SAME TIME increasing on each side of 2 raglan stitches on every row from right side - increases are shown in diagram and are worked as explained in RAGLAN - read explanation above. Remember to decrease for BUTTONHOLES - read explanation above. ROW 1 (= right side): Work 7 stitches band, A.1, A.2, A.3, knit 2, A.4, A.2, A.3, knit 2, A.5, A.6 over the next 29-31-31-33-35-37-39 stitches, A.7, knit 2, A.4, A.8, A.3, knit 2, A.4, A.8, A.9, 7 stitches band. ROW 2 (= wrong side): From the wrong side work the pattern in opposite order, always work knit over knit and purl over purl, and 7 stitches band as before in each side - remember to work yarn overs as explained in RAGLAN. Work 1st and 2nd ROW 6 times in total (= 12 rows worked). Remember to follow the knitting gauge! A.3 and A.4 have now been worked 1 time vertically and 6 increases for raglan have been done in total. There are 30-30-30-30-32-32-32 stitches on each sleeve, 35-35-35-35-37-37-37 stitches on each front piece and 45-47-47-49-51-53-55 stitches for back piece = 175-177-177-179-189-191-193 stitches. Now increase for moss stitch on both sleeves and back piece until finished measurements, increase for cables on front pieces - note that A.10 is increased to A.1 and A.2 while A.11 is increased to A.8 and A.9. When A.5 and A.7 have been worked vertically, continue with double moss stitch (= A.6) as before over these stitches and continue to increase with A.5 and A.7 for double moss stitch. Work as follows: ROW 1 (= right side): Work 7 stitches band, A.1, A.2, A.1, A.10, knit 2, A.5, A.9, A.2, A.1, A.7, knit 2, A.5, A.6 over the next 41-43-43-45-47-49-51 stitches, A.7, knit 2, A.5, A.9 A.8, A.1, A.7, knit 2, A.11, A.9 A.8, A.9, 7 stitches band. ROW 2 (= wrong side): From the wrong side work the pattern in opposite order, always work knit over knit and purl over purl, and 7 stitches band as before in each side - remember to work yarn overs as explained in RAGLAN. Work 1st and 2nd ROW 16-16-16-16-18-18-18 times in total (= 32-32-32-32-36-36-36 rows worked). A.10 and A.11 have now been worked 1 time vertically and 22-22-22-22-24-24-24 increases for raglan have been done in total. There are 62-62-62-62-68-68-68 stitches on each sleeve, 55-55-55-55-59-59-59 stitches on each front piece and 77-79-79-81-87-89-91 stitches for back piece = 311-313-313-315-341-343-345 stitches. Now increase for double moss stitch at all raglan lines. Work as follows: ROW 1 (= right side): Work 7 stitches band, A.1, A.2, A.1, A.2, A.1, A.7, knit 2, A.5, A.6 as before over the next 16-16-16-16-18-18-18 stitches, A.9, A.2, A.1, A.6 as before over the next 16-16-16-16-18-18-18 stitches, A.7, knit 2, A.5, A.6 over the next 73-75-75-77-83-85-87 stitches, A.7, knit 2, A.5, A.6 as before over the next 16-16-16-16-18-18-18 stitches, A.9 A.8, A.1, A.6 as before over the next 16-16-16-16-18-18-18 stitches, A.7, knit 2, A.5, A.9, A.8, A.9 A.8, A.9, 7 stitches band. ROW 2 (= wrong side): From the wrong side work the pattern in opposite order, always work knit over knit and purl over purl, and 7 stitches band as before in each side - remember to work yarn overs as explained in RAGLAN. Work 1st and 2nd ROW 5-5-7-8-6-6-7 times in total (= 10-10-14-16-12-12-14 rows worked). There are 72-72-76-78-80-80-82 stitches on each sleeve, 60-60-62-63-65-65-66 stitches on each front piece and 87-89-93-97-99-101-105 stitches for back piece = 351-353-369-379-389-391-401 stitches. 27-27-29-30-30-30-31 increases for raglan have been done in total. There are no more increases on sleeves, continue pattern as before while at the same time increasing for raglan only on front pieces/back piece. ROW 1 (= right side): Work 7 stitches band, work pattern as before while at the same time increasing for double moss stitch before 1st and 3rd marker and after 2nd and 4th marker (= 4 stitches increased), finish with 7 stitches band. ROW 2 (= wrong side): From the wrong side work the pattern in opposite order, always work knit over knit and purl over purl, and 7 stitches band as before in each side - remember to work yarn overs as explained in RAGLAN. Work 1st and 2nd ROW 1-2-2-3-5-8-9 times in total (= 2-4-4-6-10-16-18 rows worked). There are 72-72-76-78-80-80-82 stitches on each sleeve, 61-62-64-66-70-73-75 stitches on each front piece and 89-93-97-103-109-117-123 stitches for back piece = 355-361-377-391-409-423-437 stitches. All increases for raglan are now done, 28-29-31-33-35-38-40 increases have been done on front pieces/back piece and 27-27-29-30-30-30-31 increases on sleeves. Work pattern and bands as before, without increasing, until piece measures 22-22-24-25-27-29-31 cm = 8¾"-8¾"-9½"-9¾"-10⅝"-11⅜"-12¼" from marker mid front. Now divide yoke for body and sleeves. DIVIDING FOR BODY AND SLEEVES: AT THE SAME TIME as next row is worked divide yoke for body and sleeves as follows: Work 61-62-64-66-70-73-75 stitches as before (= front piece), slip the next 72-72-76-78-80-80-82 stitches on a thread for sleeve, cast on 5-9-13-15-17-21-23 new stitches on row (= in the side mid under sleeve), work 89-93-97-103-109-117-123 stitches as before (= back piece), slip the next 72-72-76-78-80-80-82 stitches on a thread for sleeve, cast on 5-9-13-15-17-21-23 new stitches on row (= in the side mid under sleeve), and work the last 61-62-64-66-70-73-75 stitches as before (= front piece). Finish body and sleeves separately. BODY: = 221-235-251-265-283-305-319 stitches. Work pattern and bands as before – work the new stitches cast on under sleeve in double moss stitch (= A.6), adjust pattern to continue from yoke over on body. Work until piece measures 47-49-51-53-54-56-58 cm = 18½"-19¼"-20"-21"-21¼"-22"-22¾" from marker at the mid front - work last row from right side. Work 1 row in stockinette stitches from wrong side with bands as before while AT THE SAME TIME increasing 30-36-40-48-48-54-62 stitches evenly (do not increase over bands or cables) = 251-271-291-313-331-359-381 stitches. Switch to circular needle size 3 MM = US 2.5 and work rib as follows: Work band as before, work rib (= knit 1/purl 1 - remember increase) until 8 stitches remain, knit 1 and band as before. When rib measures 4-4-4-4-5-5-5 cm = 1½"-1½"-1½"-1½"-2"-2"-2", bind off with knit over knit and purl over purl. Jacket measures 51-53-55-57-59-61-63 cm = 20"-21"-21⅝"-22½"-23¼"-24"-24¾" from marker mid front and approx. 54-56-58-60-62-64-66 cm = 21¼"-22"-22¾"-23⅝"-24⅜"-25¼"-26" from the top of shoulder. SLEEVES: Slip 72-72-76-78-80-80-82 sleeve stitches from one thread on to circular needle size 4.5 MM = US 7 and pick in addition up 1 stitch in each of the 5-9-13-15-17-21-23 stitches cast on under sleeve - read SLEEVE TIP = 77-81-89-93-97-101-105 stitches. Insert 1 marker in the middle stitch under sleeve. Marker mid under sleeve is used when decreasing under sleeve. Begin round in the stitch with marker mid under sleeve and continue pattern from yoke over on sleeve - always purl stitch with marker mid under sleeve, on each side of the stitch work the new stitches in double moss stitch (= A.6). When sleeve measures 1-1-1-2-2-3-1 cm = ⅜"-⅜"-⅜"-¾"-¾"-1⅛"-⅜" from division, decrease mid under sleeve – read DECREASE TIP and decrease as follows: Decrease 2 stitches every 8-5½-3½-3-2½-2-2 cm = 3⅛"-2⅛"-1¼"-1⅛"-1"-¾"-¾" 5-7-10-11-12-13-14 times in total = 67-67-69-71-73-75-77 stitches on needle. Work until sleeve measures 36-37-35-35-32-31-30 cm = 14¼"-14½"-13¾"-13¾"-12½"-12¼"-11¾" from division. Knit 1 while AT THE SAME TIME increasing 9-9-9-9-11-11-11 stitches evenly (do not increase over cables) = 76-76-78-80-84-86-88 stitches. Switch to double pointed needles size 3 MM = US 2.5 and work rib (= knit 1/purl 1). When rib measures 4-4-4-4-5-5-5 cm = 1½"-1½"-1½"-1½"-2"-2"-2", bind off with knit over knit and purl over purl. Sleeve measures approx. 40-41-39-39-37-36-35 cm = 15¾"-16⅛"-15¼"-15¼"-14½"-14¼"-13¾" from division. |
||||||||||||||||||||||||||||
Diagram explanations |
||||||||||||||||||||||||||||
|
||||||||||||||||||||||||||||
 |
||||||||||||||||||||||||||||
 |
||||||||||||||||||||||||||||
 |
||||||||||||||||||||||||||||
 |
||||||||||||||||||||||||||||
 |
||||||||||||||||||||||||||||
 |
||||||||||||||||||||||||||||
Have you finished this pattern?Tag your pictures with #dropspattern #snowboundromancecardigan or submit them to the #dropsfan gallery. Do you need help with this pattern?You'll find 33 tutorial videos, a Comments/Questions area and more by visiting the pattern on garnstudio.com. © 1982-2026 DROPS Design A/S. We reserve all rights. This document, including all its sub-sections, has copyrights. Read more about what you can do with our patterns at the bottom of each pattern on our site. |
||||||||||||||||||||||||||||


With over 40 years in knitting and crochet design, DROPS Design offers one of the most extensive collections of free patterns on the internet - translated to 17 languages. As of today we count 324 catalogs and 12291 patterns - 12281 of which are translated into English (US/in).
We work hard to bring you the best knitting and crochet have to offer, inspiration and advice as well as great quality yarns at incredible prices! Would you like to use our patterns for other than personal use? You can read what you are allowed to do in the Copyright text at the bottom of all our patterns. Happy crafting!
Post a comment to pattern DROPS 262-14
We would love to hear what you have to say about this pattern!
If you want to leave a question, please make sure you select the correct category in the form below, to speed up the answering process. Required fields are marked *.