
Popular categories
Looking for a yarn?


Comments / Questions (24)
![]() Ida wrote:
Ida wrote:
Jeg ville gerne se på video, hvordan man syr “puffet” fast til blusen.
01.03.2026 - 17:28DROPS Design answered:
Hei Ida, Her er en lenke til hvordan man syr inn puffermene: https://www.garnstudio.com/video.php?id=1715&lang=dk Hilsen, Drops Team.
02.03.2026 - 06:54
![]() Marie-Louise wrote:
Marie-Louise wrote:
Hej! Jag har svårt att förstå beskrivningen gällande oket och de två markörer som ska sättas på varsin maska på var sida av axeln. Det står "dessa två markörerna ska användas när det ska ökas till axel. De sätts i en maska som inte ska stickas och de ska följa med i arbetet, det ska ökas på var sida av dessa. Om markören ska sitta i en maska som inte ska stickas hur är det då möjligt att de ska kunna följa med i arbetet? MVH Marie-Louise
03.02.2026 - 15:19DROPS Design answered:
Hej Marie-Louise, da flytter du markøren efterhånden som du har strikket et par pinde :)
05.02.2026 - 11:37
![]() HB wrote:
HB wrote:
When increasing for the neck edge, is there a particular increase that should be used?
04.12.2025 - 16:35DROPS Design answered:
Hi HB, You use the increase-method described in Increase Tip-1 and Increase-Tip 2 (in Explanations at the top of the pattern) when working the Elevation and only Increase Tip-1 when working in the round. Regards, Drops Team.
05.12.2025 - 06:54
![]() Miranda wrote:
Miranda wrote:
Hallo ik heb een vraag Er staat na de mouwmeerdering dat deze nu 20 cm meet bij maat L Maar bij mij is deze geen 20 cm maar 14 cm Moet ik nu 6 cm tricotsteek breien Of heb ik iets verkeerd begrepen Ik heb in 21 naalden 2 x 2 steken op de schouders gemeerderd en nu meet het
16.07.2025 - 19:43DROPS Design answered:
Dag Miranda,
Je meerdert op iedere andere naald, dus de ene naald wel en de andere naald niet, dus niet op iedere naald.
24.07.2025 - 20:43
![]() Tze Moi Ang wrote:
Tze Moi Ang wrote:
I’d like to knit the sleeves continuously but without increases. Can I do it and shall I skip all the cast-off and increases for sleeves cap? Thank you!
12.06.2025 - 11:15DROPS Design answered:
Dear Tze, if you mean the SHOULDER and SLEEVE INCREASE sections, these increases are for the yoke and raglan shape and they can't be skipped, in order to maintain the correct shape of the garment. If you don't want to work the puff sleeve cap, when working the SHOULDER increases you can cast on as many stitches (plus a few more sewing) as you cast off in the previous step; the sleeve will not have the large puff and will be straighter. Happy knitting!
15.06.2025 - 22:44
![]() Annika wrote:
Annika wrote:
Ich verstehe bei der Zunahme für die Ärmel etwas nicht: in der Reihe nachdem ich die 36 Maschen für die Ärmel angeschlagen habe (Größe S), stricke ich dann über die 36 Maschen? Das heißt, das "Armloch" hat einen Umfang 36 Maschen plus die 11 abgeketteten Maschen? Danke!
05.05.2025 - 20:26DROPS Design answered:
Liebe Annika, ja genau, die 36 Maschen werden glatt gestrickt und diese Anschlagskante später an den 11 abgeketteten Maschen angenäht - siehe Absatz FERTIGSTELLEN. Viel Spaß beim Stricken!
06.05.2025 - 10:11
![]() Lissy wrote:
Lissy wrote:
Hallo zusammen, Bei der Passen Zunahme komm ich in Größe L auf insgesamt 64 Zunahmen, statt den 32 in der Anleitung (4 Zunahme alle 2 Runden und das insgesamt 7x und jeweils 4 Zunahmen in den folgenden 9 Reihen). Hab ich etwas falsch verstanden oder ist hier ein Fehler?
21.04.2025 - 16:00DROPS Design answered:
Liebe Lissy, in L wird man für die Passe insgesamt 6 x zunehmen (L ist bei diesem Absatz hier die 1. Grösse) so: 6 Mal 4 Maschen in jeder 2. Runde + 2 Mal 4 Maschen in jeder Runde = 24+8 Zunahmen ingesamt; es waren 332 Maschen + 24+8= 364 Maschen. Viel Spaß beim Stricken!
22.04.2025 - 16:18
![]() Bente Michaelsen wrote:
Bente Michaelsen wrote:
Hej Jeg synes det er meget forvirrende/uklart når man begynder på bærestykket!!! Jeg kan ikke se hvilke masker der skal være ærmer og forstår ikke at der kun er to mærker til skulderudtagningen
23.07.2024 - 11:48DROPS Design answered:
Hej Bente, du sætter et mærke på hver skulder og tager ud på hver side af de 2 mærker som beskrevet under SKULDERUDTAGNING :)
01.08.2024 - 08:30
![]() Sedef wrote:
Sedef wrote:
Increase tip 1 is incorrect. Before the marker, after the marker, the tip says to take the yarn from back for both and it doesn't work. Could you please check and correct this?
23.02.2024 - 14:58DROPS Design answered:
Dear Sedef, you are right, after marker you should pick up the stitch from the front, it will be edited, thanks for noticing. Happy knitting!
23.02.2024 - 15:44
![]() Maria wrote:
Maria wrote:
Hallo, Ik heb opgemerkt dat de schoudermeerdering in de instructie video anders worden gebreid dan dat in de uitleg staat.Meerdering vóór de steek wordt in video zo gebreid dat de lus van voor naar achter is opgenomen en dan in achterste lus gebreid . Kunt u aub dit uitleggen. Bedankt
18.01.2024 - 20:54DROPS Design answered:
Dag Maria,
Dat zou kunnen kloppen. De instructies in het patroon zijn altijd leidend.
21.01.2024 - 12:07
|
||||||||||||||||||||||
May Tee#maytee |
||||||||||||||||||||||
 |
 |
|||||||||||||||||||||
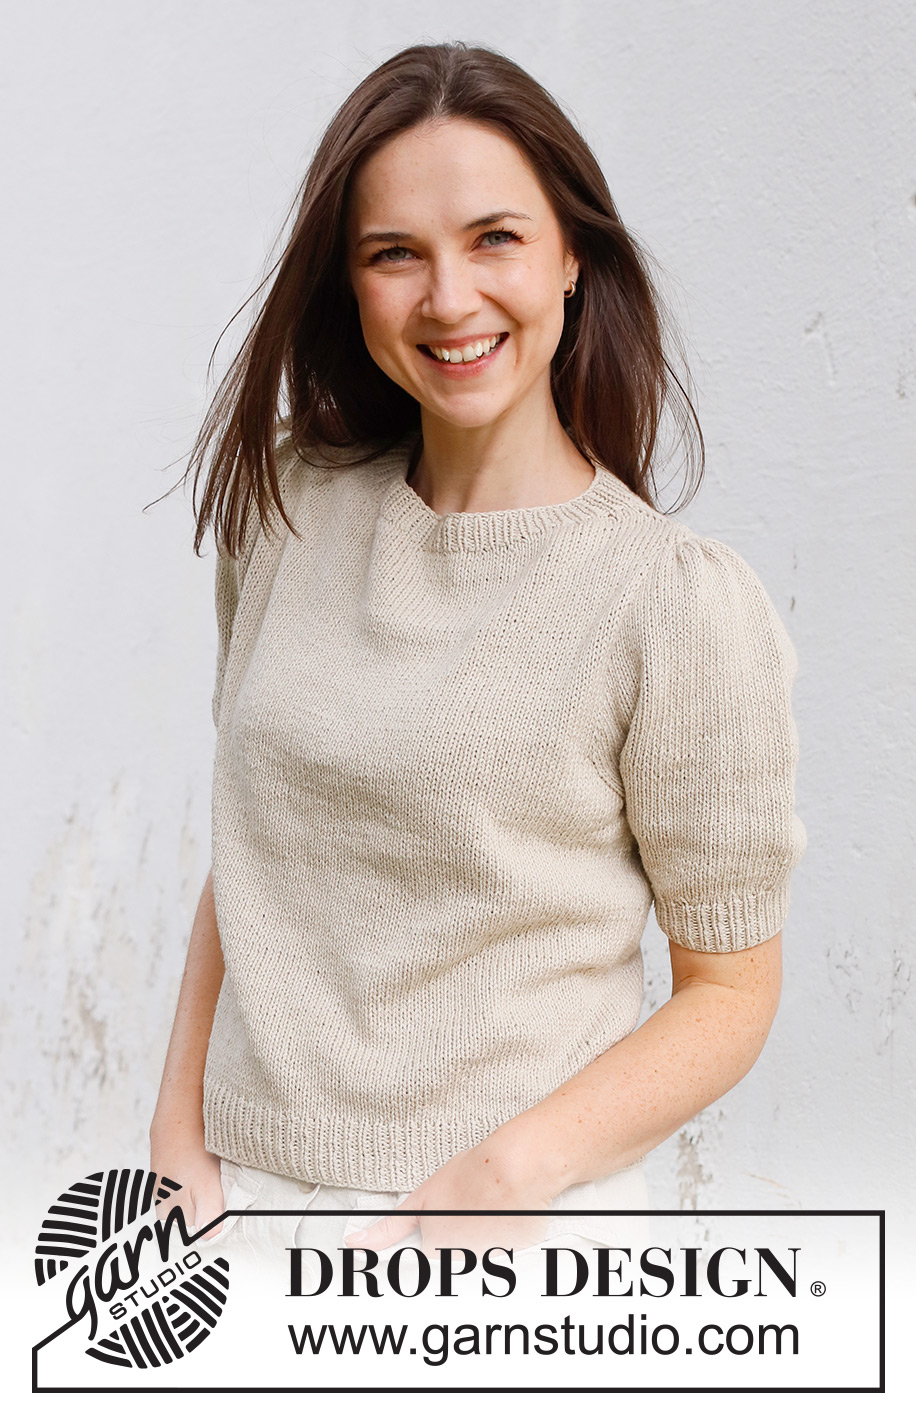
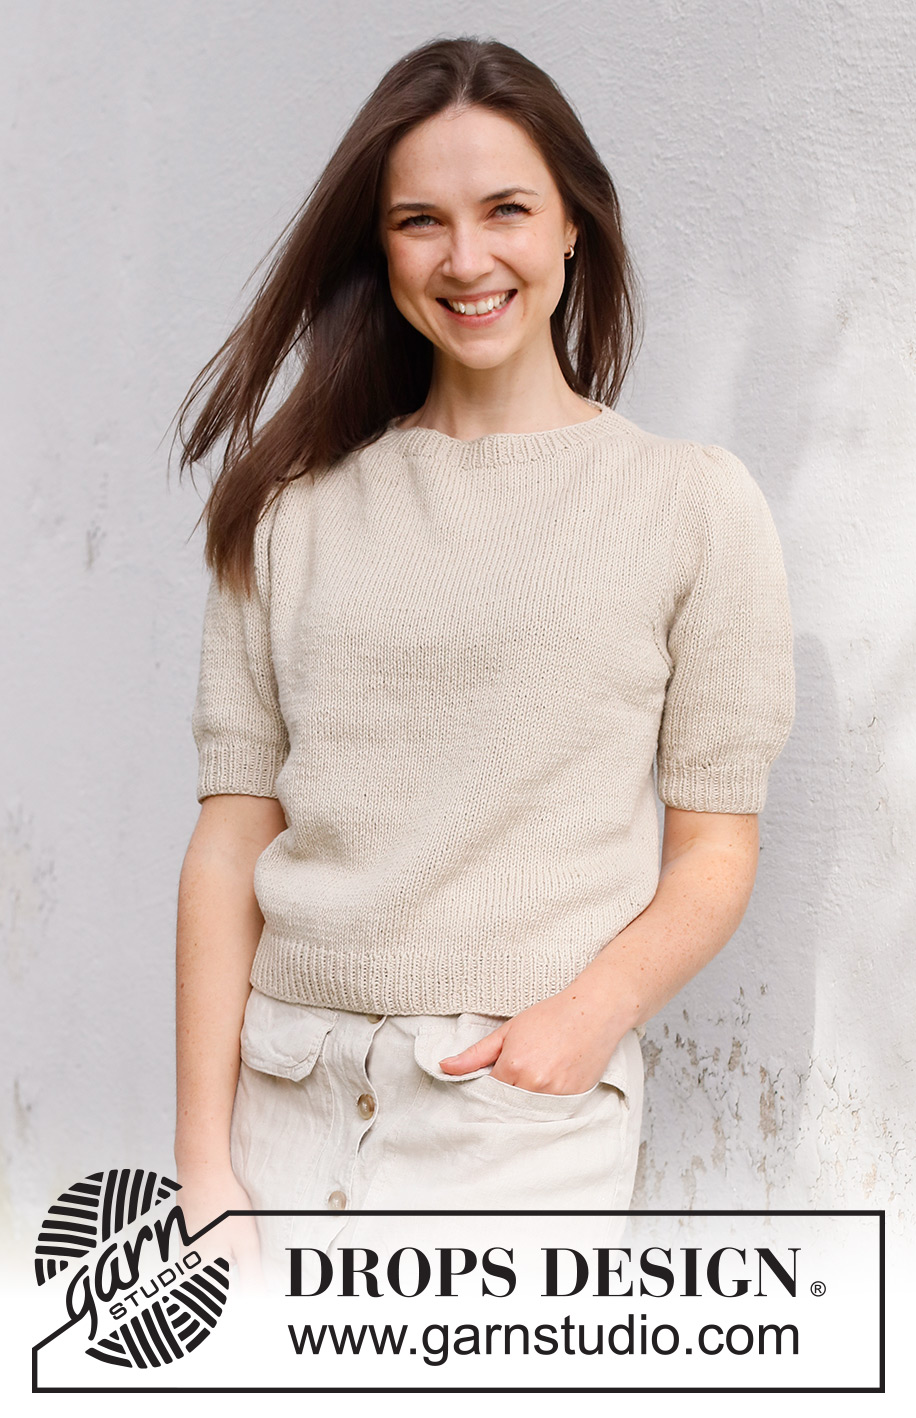
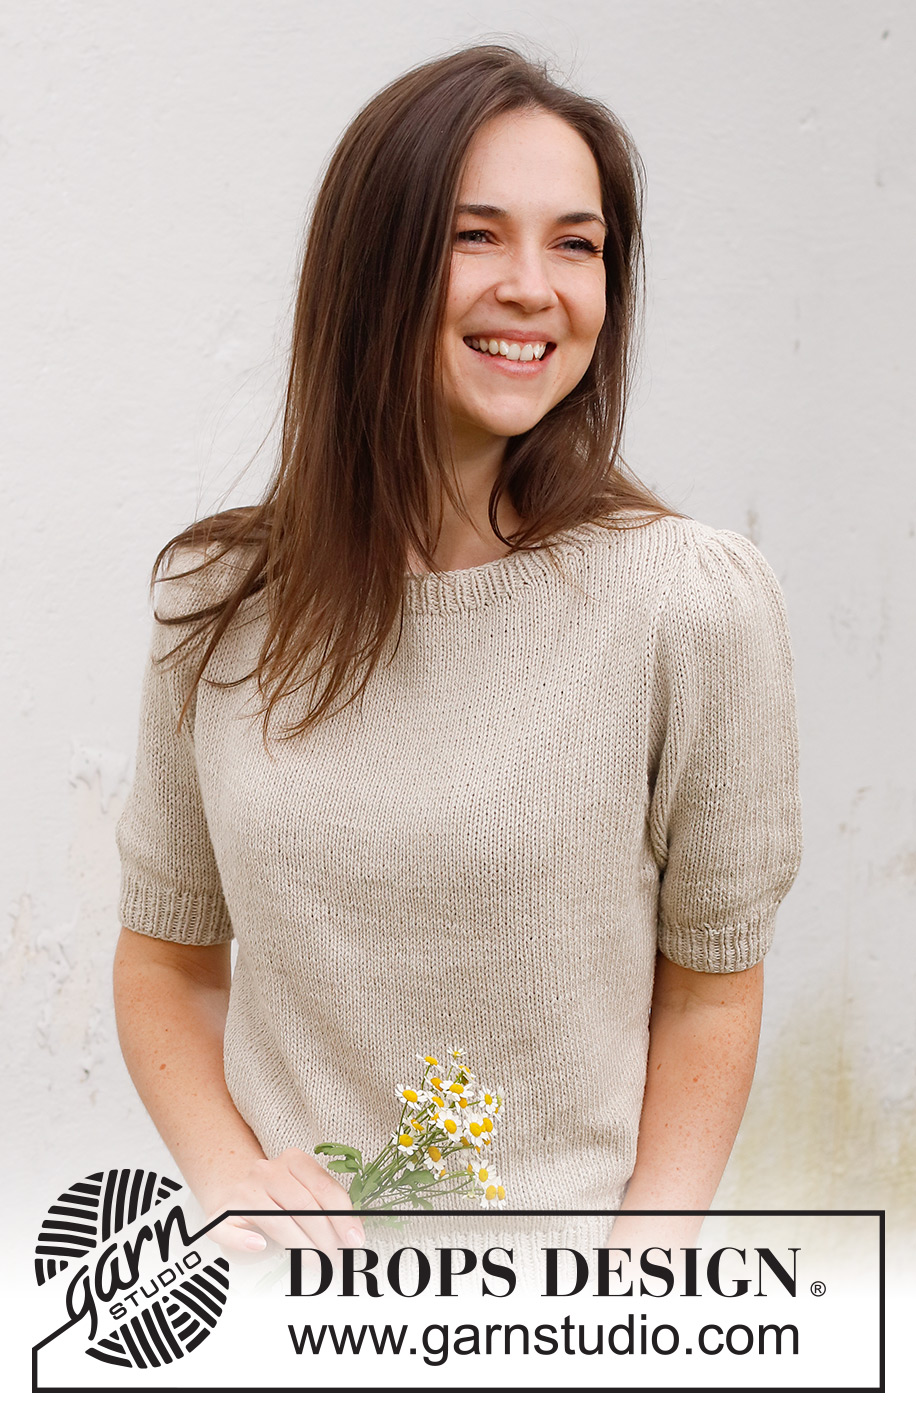
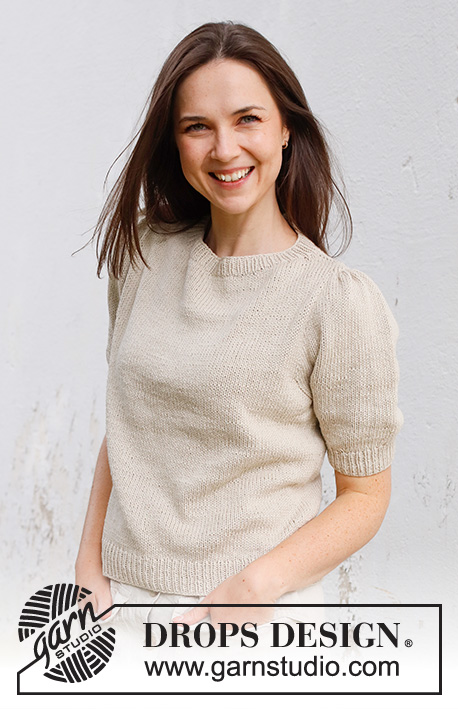
Knitted sweater with short sleeves / t-shirt in DROPS Belle. Piece is knitted top down with shoulder increase, stockinette stitch and short puffed sleeves. Size: S - XXXL
DROPS 232-53 |
||||||||||||||||||||||
|
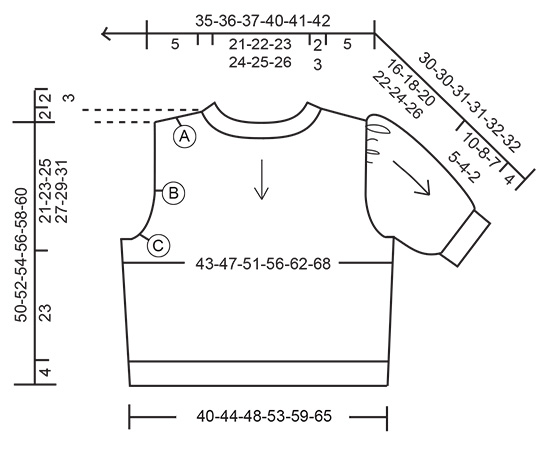
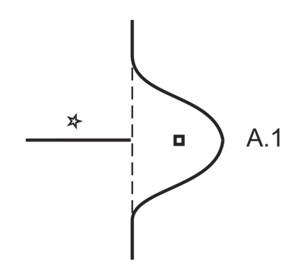
---------------------------------------------------------- EXPLANATION FOR THE PATTERN: ---------------------------------------------------------- ELEVATION (in back of neck): Begin from right side at the marker thread mid back, knit 15-15-16-16-17-18 stitches, turn, tighten yarn and purl 30-30-32-32-34-36. Turn, tighten yarn and knit 45-45-48-48-51-54, turn, tighten yarn and purl 60-60-64-64-68-72. Turn, tighten yarn and knit 75-75-80-80-85-90 (increase for the shoulders as explained in pattern here – the increased stitches are not counted), turn, tighten yarn and purl 90-90-96-96-102-108 (remember increase on shoulder). Turn, tighten yarn and knit until marker mid back. Elevation is done, and increase has been done 2 times in total on shoulder (8 stitches). Then work YOKE as explained in pattern. INCREASE TIP-1 (from right side): BEFORE MARKER: The new stitch is twisted towards the right. Use left needle to pick up yarn between 2 stitches from round below, pick up yarn from the back and knit stitch in front loop of stitch. AFTER MARKER: The new stitch is twisted towards the left. Use left needle to pick up yarn between 2 stitches from round below, pick up yarn from the front and knit stitch in back loop of stitch. INCREASE TIP-2 (from wrong side - only applies when working elevation): BEFORE MARKER: The new stitch is twisted towards the right. Use left needle to pick up yarn between 2 stitches from round below, pick up yarn from the front and purl stitch in back loop of stitch. AFTER MARKER: The new stitch is twisted towards the left. Use left needle to pick up yarn between 2 stitches from round below, pick up yarn from the back and purl stitch in front loop of stitch. DECREASE TIP: Decrease 1 stitch on each side of marker thread as follows: Work until 3 stitches remain before marker thread and knit 2 together, knit 2 (marker thread is between these 2 stitches), slip 1 stitch knitwise, knit 1, pass slipped stitch over stitch worked. ---------------------------------------------------------- START THE PIECE HERE: ---------------------------------------------------------- SWEATER - SHORT OVERVIEW OF THE PIECE: Work neck edge and yoke in the round on circular needle from mid back, top down. Now divide yoke for body and sleeves. Work the body in the round on circular needle. Work sleeves in the round on double pointed needles/a short circular needle. NECK EDGE: Cast on 106-110-114-118-122-126 stitches on circular needle size 3 MM = US 2.5 with DROPS Belle. Knit 1 round. Then work rib (knit 1 / purl 1) for 2-2-2-3-3-3 cm = ¾"-¾"-¾"-1⅛"-1⅛"-1⅛". Knit 1 round while increasing 20-20-24-24-28-28 stitches evenly = 126-130-138-142-150-154 stitches. Insert 1 marker in the middle of round (mid front) - measure yoke from this marker! Work yoke as explained below. YOKE: Switch to circular needle size 4 MM = US 6. Insert a marker thread at the beginning of round (mid back). In addition insert 2 new markers in the piece as explained below - this is done without working the stitches, and each of these 2 markers are inserted in a stitches. Use these markers when increasing for shoulder. They should be in a different color than the marker mid front. 1st marker: Begin mid back, count 31-32-34-35-37-38 stitches (½ back piece), insert 1st marker in next stitch. 2nd marker: Count 62-64-68-70-74-76 stitches from 1st marker (front piece), insert 2nd marker in next stitch. 31-32-34-35-37-38 stitches remain on back piece after 2nd marker. Move these 2 markers upwards when working, increase on each side of these markers. Now work an ELEVATION at the back of neck - read explanation above. The elevation makes the garment higher in the back of neck. Note that the shoulder increase is done at the same time as the last 3 rows in elevation is worked - read also the section SHOULDER INCREASE and INCREASE TIP-2 (when working from wrong side). If you don’t want an elevation, move on to shoulder increase. SHOULDER INCREASE: Work in stockinette stitch in the round. AT THE SAME TIME on first round increase 4 stitches for shoulder as follows: Increase BEFORE and AFTER stitch with 1st and 2nd marker – read INCREASE TIP-1. Continue like this, and increase on every round 14 times in total = 182-186-194-198-206-210 stitches. REMEMBER THE KNITTING GAUGE! After last increase piece measures approx. 5 cm = 2" from marker by neck mid front. Work next round as follows: Work stockinette stitch until 5-5-6-6-7-7 stitches remain before 1st marker, bind off 11-11-13-13-15-15 stitches (stitch with marker + 5-5-6-6-7-7 stitches on each side of this – these stitches will make a kind of small "flap"), work in stockinette stitch until 5-5-6-6-7-7 stitches remain before 2nd marker, bind off 11-11-13-13-15-15 stitches, work in stockinette stitch until mid back = 160-164-168-172-176-180 stitches. Now insert 4 new markers in the piece as explained below. This is done while working- use these new markers when increasing for sleeves. Work 40-41-42-43-44-45 stitches in stockinette stitch (½ back piece), insert 1st marker, cast on 36-38-40-42-46-50 new stitches on needle for sleeve, insert 2nd marker before next stitch, work 80-82-84-86-88-90 stitches in stockinette stitch (front piece), insert 3rd marker, cast on 36-38-40-42-46-50 new stitches on needle for sleeve, insert 4th marker before next stitch, work 40-41-42-43-44-45 stitches in stockinette stitch (½ back piece) = 232-240-248-256-268-280 stitches. Then increase for sleeves as explained below. SLEEVE INCREASE: Work in stockinette stitch in the round. AT THE SAME TIME on next round increase 4 stitches for sleeves as follows: Increase AFTER 1st and 3rd marker and increase BEFORE 2nd and 4th marker – remember INCREASE TIP-1. Increase now only on sleeves and number of stitches on front piece and back piece stays the same. Work the increased stitches in stockinette stitch. Increase like this every other round 18-20-21-22-23-24 times in total = 304-320-332-344-360-376 stitches. Piece now measures approx. 18-19-20-21-21-22 cm = 7"-7½"-8"-8¼"-8¼"-8¾" from marker by the neck. Work 1-0-0-0-0-0 cm = ⅜"-0"-0"-0"-0"-0" in stockinette stitch without increase - piece measures 19-19-20-21-21-22 cm = 7½"-7½"-8"-8¼"-8¼"-8¾" from marker by the neck. Then increase for yoke as explained below. YOKE INCREASE: Work in stockinette stitch. AT THE SAME TIME on next round increase 4 stitches for yoke as follows: Increase BEFORE 1st and 3rd marker and AFTER 2nd and 4th marker – remember INCREASE TIP-1. Increase stitches on front piece and back piece, and number of stitches on sleeves stays the same. Repeat increase as follows: S: Increase every 4th round 2 times in total. M: Increase every 3rd round 4 times in total. L, XL, XXL and XXXL: Increase every other round 6-6-7-7 times in total, then on every round 2-5-9-13 times in total. After last increase there are 312-336-364-388-424-456 stitches on row and piece measures approx. 21-23-25-27-29-31 cm = 8¼"-9"-9¾"-10⅝"-11⅜"-12¼" from marker mid front. On next round divide yoke for body and sleeves as follows: Work 42-45-50-54-60-65 stitches in stockinette stitch (½ back piece), slip the next 72-78-82-86-92-98 stitches on a stitch holder for sleeve, cast on 6-8-8-10-10-12 new stitches on row (in the side under sleeve), work 84-90-100-108-120-130 stitches in stockinette stitch (front piece), slip the next 72-78-82-86-92-98 stitches on a stitch holder for sleeve, 6-8-8-10-10-12 new stitches on row (in the side under sleeve) and work the last 42-45-50-54-60-65 stitches in stockinette stitch (= ½ back piece). Finish body and sleeves separately. BODY: = 180-196-216-236-260-284 stitches. Insert 1 marker thread in each side – in the middle of the 6-8-8-10-10-12 stitches that were cast on under each sleeve. Begin round at one of the marker threads, and work stockinette stitch in the round. When piece measures 6 cm = 2⅜" from division, decrease 1 stitch on each side of both marker threads - read DECREASE TIP. Decrease like this every 6 cm = 2⅜" 3 times in total = 168-184-204-224-248-272 stitches. Work until piece measures 23 cm = 9" from division. Switch to circular needle size 3 MM = US 2.5. Work rib (knit 1/purl 1) for 4 cm = 1½". Loosely bind off. Sweater measures approx. 50-52-54-56-58-60 cm = 19¾"-20½"-21¼"-22"-22¾"-23⅝" from shoulder. SLEEVES: Slip the 72-78-82-86-92-98 stitches from stitch holder in one side of piece on double pointed needles or a short circular needle size 4 MM = US 6 and pick in addition up 1 stitch in each of the 6-8-8-10-10-12 new stitches cast on under sleeve = 78-86-90-96-102-110 stitches. Insert 1 marker thread mid under sleeve – in the middle of the 6-8-8-10-10-12 stitches. Move the marker thread upwards when working - it should be used for decrease. Begin round at the marker thread, and work stockinette stitch in the round. When piece measures 2-2-2-1-1-1 cm = ¾"-¾"-¾"-⅜"-⅜"-⅜", decrease 2 stitches mid under sleeve - remember DECREASE TIP. Decrease like this every 2-1-1-1-1-1 cm = ¾"-⅜"-⅜"-⅜"-⅜"-⅜" 4-6-5-4-3-1 times in total = 70-74-80-88-96-108 stitches. Work until sleeve measures 10-8-7-5-4-2 cm = 4"-3⅛"-2¾"-2"-1½"-¾" from division. Knit 1 round while decreasing 12-14-18-22-26-34 stitches evenly = 58-60-62-66-70-74 stitches. Switch to double pointed needles size 3 MM = US 2.5. Work rib (knit 1/purl 1) for 4 cm = 1½". Loosely bind off. Sleeve measures approx. 14-12-11-9-8-6 cm = 5½"-4¾"-4⅜"-3½"-3⅛"-2⅜" from division. Work the other sleeve the same way. ASSEMBLY: Baste a strand up and down through cast-on edge at the top on sleeve. Wrinkle the sleeve cap so that it fits in a straight line to the opening where stitches were bind off on shoulder - NOTE: Stitches bind off on shoulder will form a small "flap" - this flap should lie under the sleeve cap and give extra support for the puff. Sew sleeve cap to opening in a straight line - see A.1 (figure shows shoulder and flap seen from above). Repeat in the other side. |
||||||||||||||||||||||
Diagram explanations |
||||||||||||||||||||||
|
||||||||||||||||||||||
 |
||||||||||||||||||||||
 |
||||||||||||||||||||||
Have you finished this pattern?Tag your pictures with #dropspattern #maytee or submit them to the #dropsfan gallery. Do you need help with this pattern?You'll find 30 tutorial videos, a Comments/Questions area and more by visiting the pattern on garnstudio.com. © 1982-2026 DROPS Design A/S. We reserve all rights. This document, including all its sub-sections, has copyrights. Read more about what you can do with our patterns at the bottom of each pattern on our site. |
||||||||||||||||||||||


With over 40 years in knitting and crochet design, DROPS Design offers one of the most extensive collections of free patterns on the internet - translated to 17 languages. As of today we count 324 catalogs and 12290 patterns - 12280 of which are translated into English (US/in).
We work hard to bring you the best knitting and crochet have to offer, inspiration and advice as well as great quality yarns at incredible prices! Would you like to use our patterns for other than personal use? You can read what you are allowed to do in the Copyright text at the bottom of all our patterns. Happy crafting!
Post a comment to pattern DROPS 232-53
We would love to hear what you have to say about this pattern!
If you want to leave a question, please make sure you select the correct category in the form below, to speed up the answering process. Required fields are marked *.