
Popular categories
Looking for a yarn?


Comments / Questions (146)
![]() Don wrote:
Don wrote:
I am making size 1/3. I am trying to understand how one ends up with 40 stockinette stitches in the sleeve sections after completing 16 rows of pattern. Can you explain how many stitches are increased in each right side row over the 2 heights of pattern?
06.04.2026 - 19:25DROPS Design answered:
Dear Don, you increase on sleeves as explained under RAGLAN, ie 2 sts on every row on each sleeve a total of 12 times on every row from RS = (12 sts between markers + 4 sts increased on first row) + 2 sts x 12 times = 40 sts - note that after 16 rows of pattern you will have increased only 8 times for sleeves, ie 16 sts only. Happy knitting!
08.04.2026 - 12:39
![]() Inge Christensen wrote:
Inge Christensen wrote:
Hej Vil I beskrive med ord hvordan f.eks. A4 skal strikkes i række 5, når det er uden udtagninger og hvor mange masker A4 strækker sig over op gennem alle 8 rækker. Som jeg forstår det er der nogle af de viste symboler, der ikke skal strikkes i mønstret, når der ikke er udtagninger. Håber på hurtigt svar, da jeg kan se, at jeg vist må trævle op igen, igen :-/ Vh Inge C.
04.04.2026 - 17:34DROPS Design answered:
Hej Inge, pind nr 5 i A.4 strikkes således: 1 omslag, 2 ret, 2 ret sammen, 1 ret, 1 omslag, 1 ret, 1 omslag, 1 ret, tag 1 maske løst af pinden som om den skulle strikkes ret, strik 2 ret sammen, løft den løse maskeo ver maskerne som blev strikket sammen og så A.5: 1 ret, 1 omslag, 1 ret, 1 omslag, 1 ret, 2 ret sammen :)
09.04.2026 - 14:04
![]() Margaret wrote:
Margaret wrote:
If it's any help, I'm working on size 4. Would you be able to write out what the first row of this part would be? I have 235 stitches at this point and will only be increasing for the sleeves going forward.
31.03.2026 - 16:49
![]() Margaret wrote:
Margaret wrote:
This is a follow up to Bernadette's question on 9.11.2025. Can you clarify "the first/final yarn overs on alternate rows in the diagrams are the yarn overs which give you increases"? Do you mean first/final yarn over per section (A.1 or A.3 etc), per front/back section, or for the entire row? example
31.03.2026 - 16:47DROPS Design answered:
Dear Margaret, write in the diagram which is your last stitch in A3 and A.4 then work lace pattern to/from that stitch, making sure you will always have 1 decrease for each yarn over - if you cannot work the decrease because you don't have enough stitches, just knit the remaining stitches to avoid increasing number of sts. Happy knitting!
07.04.2026 - 15:27
![]() Stephanie wrote:
Stephanie wrote:
Bonjour et merci pour la précédente réponse. J’en suis à la fin des augmentations sur le motif mais je les continue sur les manches. Ma question porte sur les motifs qui encadrent les manches, j’ai 5 et 6 mailles. Anciennement A3 et A4. Je ne dois pas faire les augmentations, mais je ne vois pas comment poursuivre à cet endroit… je ne peux pas le remplacer par A1 et A5 car nb de mailles différentes… ou alors je prend la maille intercalaire ?
27.03.2026 - 10:26DROPS Design answered:
Bonjour Stéphanie, les augmentations des manches se tricotent en jersey, vous les tricotez donc comme avant, pour le point ajouré, vous pouvez noter dans les diagrammes où vous en êtes et tricoter les mailles autant que possible dans le point ajouré (notez que vous devez tricoter en jersey les mailles qui ne peuvent pas être tricotées dans le point ajouré). Bon tricot!
27.03.2026 - 15:53
![]() Stéphanie wrote:
Stéphanie wrote:
Bonjour, j’ai un problème en commençant l’empiècement en 6/9 mois. 93 mailles de départ après les cotes. Je compte 89 mailles dans l’enchaînement du premier rang de l’empiècement : 6m mousse+7mailles A1+5mailles A3+12mailles end+6 mailles A4+3*6mailles A2+5 mailles A3+12 mailles endroit+6 mailles A4 +6 mailles A5+6 mailles mousse =89 mailles, il me manque alors 4 mailles pour arriver aux 93 mailles.
18.03.2026 - 00:11DROPS Design answered:
Bonjour Stéphanie, avez-vous bien pris en compte que les marqueurs doivent être dans une maille (et pas entre les mailles)? Ainsi vous aurez: 6 m mousse+7mailles A1+5mailles A3+ 1 m avec un marqueur + 12mailles end+ 1 m avec un marqueur + 6 mailles A4+3*6mailles A2+5 mailles A3+1 m avec un marqueur + 12 mailles endroit+1 m avec un marqueur + 6 mailles A4 +6 mailles A5+6 mailles mousse =93 mailles, Bon tricot!
18.03.2026 - 07:44
![]() Ingvild wrote:
Ingvild wrote:
Jeg strikker den minste størrelsen. Men jeg sitter igjen med 5 masker for mye?! Jeg har strikket første linje med mønsteret. Men det er nå for mange masker? Jeg teller og teller. Men har kommet frem til at det må være en feil?! Det går ikke opp med 93 masker?!
16.03.2026 - 01:15DROPS Design answered:
Hei Ingvild, Du strikker 6 stolpemasker, A.1 (7 masker), A.3 (5 masker), merke i neste maske, 12 masker glattstrikk (som økes til 16), merke i neste maske, A.4 (6 masker), A.2 x 3 (18 masker), A.3 (5 masker), merke i neste maske, 12 masker glattstrikk (som økes til 16), merke i neste maske, A.4 (6 masker), A.5 (6 masker) og 6 stolpemasker. 6 + 7 + 5 + 1 + 12 + 1 + 6 + 18 + 5 + 1 + 12 + 1 + 6 + 6 + 6 = 93 masker (som nå er 101 masker med de økte maskene på ermene). Hilsen Drops Team.
16.03.2026 - 07:00
![]() Margaret wrote:
Margaret wrote:
Hello! I'm working on the yoke and have a question about the sleeve increases. Are the 4 increases across the sleeve stitches meant to be done every right side row (in addition to the increases after and before the markers) or just the first row when inserting the markers? Thank you!
13.03.2026 - 14:42DROPS Design answered:
Hi Margaret, The 4 increased stitches are only worked while inserting the markers. Then you just increase for raglan, after and before the markers on the sleeves. Regards, Drops Team.
17.03.2026 - 06:43
![]() Daisy wrote:
Daisy wrote:
Kan iemand mij dit uitleggen? Als u naald 5 in A.2 breit op het achterpand, breit u de eerste steek in de eerste herhaling, de laatste steek in de laatste herhaling wordt gebreid over de eerste steek op de mouw. Ik kom ook bij de voorpanden niet uit met deze toer . Dan moet ik voor de laatste steek van toer 5 van A2 ook steken van de mouw gebruiken …
10.03.2026 - 18:27DROPS Design answered:
Dag Daisy,
A.2 zit steeds tussen A.4 en A.3 op het achterpand, dus voordat je bij de mouw bent brei je A.3 op het achterpand. (Op het voorpand zit A.2 tussen A.4 en A.5.)
10.03.2026 - 20:06
![]() Claire Cote wrote:
Claire Cote wrote:
Combien avons-nous de mailles après le premier rang de l’empiètement?et que fait-on avec la maille du marqueur? On l’a compté avec les mailles du dos ?
24.02.2026 - 17:16DROPS Design answered:
Bonjour Mme Cote, le nombre de mailles dépend de la taille tricotée, mais après le col, vous augmentez 4 m dans chaque manche, 1 m dans chaque A.3 et 1 m dans chaque A.4 soit 2x4 + 4 = on a augmenté 8 mailles. Les mailles avec un marqueur se tricotent en jersey. Bon tricot!
25.02.2026 - 07:13
|
||||||||||||||||||||||
Cotswolds Cardigan#cotswoldscardigan |
||||||||||||||||||||||
 |
 |
|||||||||||||||||||||
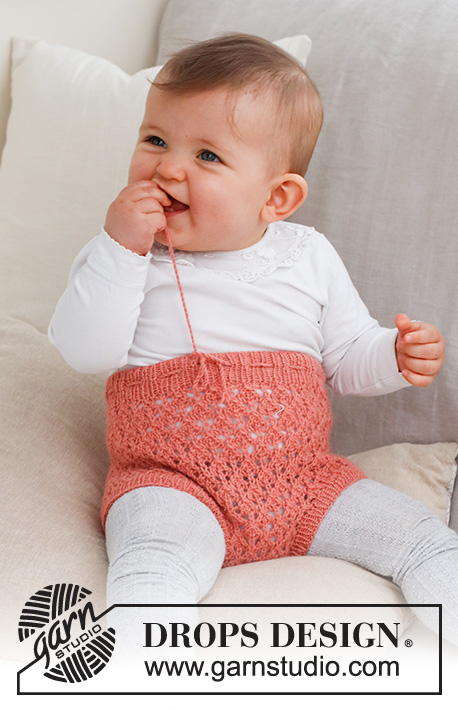
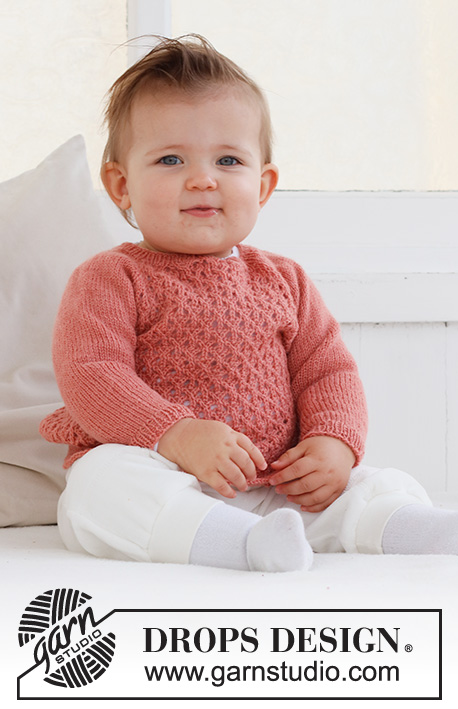
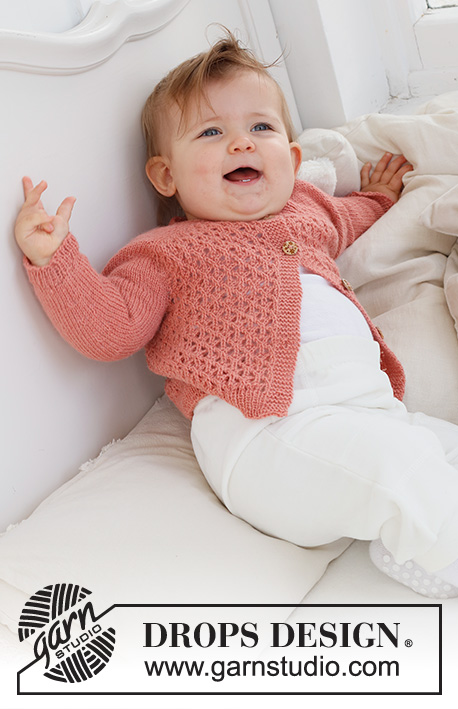
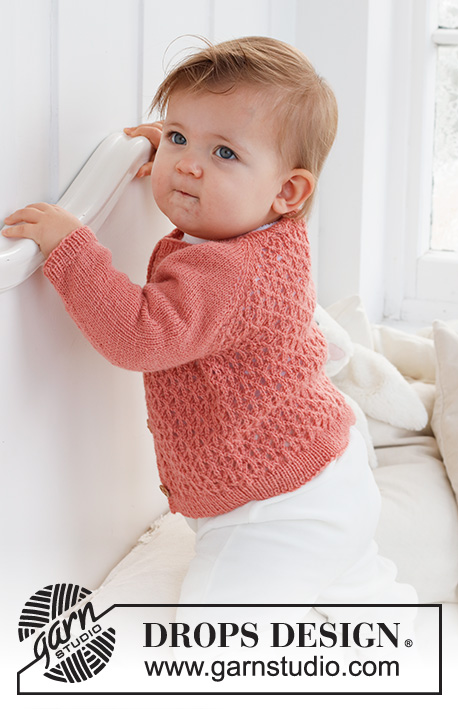
Knitted jacket for baby in DROPS Flora. The piece is worked top down, with raglan and lace pattern. Sizes 0 – 2 years.
DROPS Baby 43-2 |
||||||||||||||||||||||
|
------------------------------------------------------- EXPLANATIONS FOR THE PATTERN: ------------------------------------------------------- RIDGE/GARTER STITCH (worked back and forth): Knit all rows. 1 ridge = knit 2 rows. PATTERN: See diagrams A.1 to A.5. The diagrams show all rows in the pattern from the right side. BUTTONHOLES: Work buttonholes on the right band (when the garment is worn). Work from the right side when there are 4 stitches left on the row as follows: Make 1 yarn over, knit 2 together and knit 2. On the next row (wrong side), knit the yarn over to leave a hole. The first buttonhole is worked right after the neck. Then work the other 4 buttonholes with approx. 4½-4½-5-5½-6 cm = 1⅝"-1⅝"-2"-2⅛"-2⅜" between each one. RAGLAN: All increases are worked from the right side! On the front and back pieces the increases are included in the diagram. Increase as follows on the sleeves: Increase 1 stitch after markers 1 and 3. Knit the marker-stitch, make 1 yarn over. Increase 1 stitch before markers 2 and 4. Work as far as the marker-stitch and make 1 yarn over, knit the marker-stitch. On the next row purl the yarn overs twisted to avoid holes! Repeat this increase every row from the right side a total of 10-12-14-16-17 times. DECREASE TIP (for sleeves): Decrease 1 stitch on either side of the marker as follows: Work until there are 3 stitches left before the marker, knit 2 together, knit 2 (marker sits between these 2 stitches), slip 1 stitch as if to knit, knit 1 and pass the slipped stitch over the knitted stitch. ------------------------------------------------------- START THE PIECE HERE: ------------------------------------------------------- JACKET – SHORT OVERVIEW OF THE PIECE. The neck and yoke are worked back and forth with circular needle, top down. The yoke is divided for body and sleeves and the body continued back and forth with circular needle. The sleeves are worked in the round with double pointed needles. NECK: Cast on 93-93-93-111-111 stitches with circular needle size 2.5 MM = US 1.5 and DROPS Flora. Purl 1 row from the wrong side with 6 band stitches in GARTER STITCH – read description above, on each side. Then work rib as follows: 6 band stitches in garter stitch, * knit 1, purl 1 *, work from *-* until there are 7 stitches left, knit 1 and 6 band stitches in garter stitch. Work this rib for 2 cm = ¾". Change to circular needle size 3 MM = US 2.5. YOKE: Work the BUTTONHOLE on the right band – read description above! On the first row from the right side insert 4 markers and work as follows: Front piece: 6 band stitches in garter stitch, work A.1, then A.2 0-0-0-1-1 time, A.3. Sleeve: Insert marker 1 in the next stitch, work 12 stitches in stockinette stitch and increase 4 stitches evenly over these stitches, insert marker 2 in the next stitch. Back piece: Work A.4, A.2 3-3-3-4-4 times, then A.3. Sleeve: Insert marker 3 in the next stitch, work 12 stitches in stockinette stitch and increase 4 stitches evenly over these stitches, insert marker 4 in the next stitch. Front piece: Work A.4, A.2 0-0-0-1-1 time, A.5 and 6 band stitches in garter stitch. Continue this pattern on the next row from right side start to increase for sleeve – read description above. REMEMBER THE KNITTING GAUGE! When A.1 to A.5 are completed, work the next row from the right side as follows: 6 band stitches in garter stitch, work A.1, A.2 1-1-1-2-2 times, A.3, work stockinette stitch and increase as before over the sleeve as far as marker 2, work A.4, A.2 5-5-5-6-6 times, A.3, work stockinette stitch and increase as before over the sleeve as far as marker 4, work A.4, A.2 1-1-1-2-2 times, A.5 and 6 band stitches in garter stitch. Repeat this pattern in height. Each time A.3 and A.4 are repeated in height, there is room for 1 more repeat of A.2 on the front pieces and 2 more repeats on the back piece. When A.3 and A.4 have been worked 2-2-3-3-3 times in height, the increases are finished on the front and back pieces; continue increasing only on the sleeves as explained above. Continue the pattern on the front and back pieces, but without further increases. When all the increases are finished there are 189-197-229-255-259 stitches. Now work pattern as follows: 6 band stitches in garter stitch, A.1 over 7 stitches, A.2 3-3-4-5-5 times, work 37-41-45-49-51 stitches in stockinette stitch, A.2 9-9-11-12-12 times, work 37-41-45-49-51 stitches in stockinette stitch, A.2 3-3-4-5-5 times, A.5 and 6 band stitches in garter stitch. Continue this pattern. When you work round 5 in A.2 on the back piece, knit the first stitch in the first repeat, the last stitch in the last repeat is worked over the first stitch on the sleeve. When the piece measures 12-13-14-15-16 cm = 4¾"-5⅛"-5½"-6"-6¼" from the cast-on edge, divide for the body and sleeves as follows: 6 band stitches in garter stitch, work 25-25-31-37-37 stitches as before, place the next 37-41-45-49-51 stitches on a thread for the sleeve, cast on 6 stitches under the sleeve, work 54-54-66-72-72 stitches, place the next 37-41-45-49-51 stitches on a thread for the sleeve, cast on 6 stitches under the sleeve, work 24-24-30-36-36 stitches as before and 6 band stitches in garter stitch. BODY: = 127-127-151-169-169 stitches. Continue back and forth as follows: 6 band stitches in garter stitch, work A.1, A.2 until there are 12 stitches left, work A.5 and 6 band stitches in garter stitch. When the piece measures 9-12-13-15-17 cm = 3½"-4¾"-5⅛"-6"-6¾" from the division, increase 20-20-22-26-26 stitches evenly spaced on the next row from the right side (do not increase over the bands) = 147-147-173-195-195 stitches. Change to circular needle size 2.5 MM = US 1.5 and work rib from the wrong side as follows: 6 band stitches in garter stitch, * purl 1, knit 1 *, work from *-* until there are 7 stitches left, purl 1 and 6 band stitches in garter stitch. Continue this rib for 3 cm = 1⅛". Bind off. The jacket measures approx. 24-28-30-33-36 cm = 9½"-11"-11¾"-13"-14¼" from the shoulder down. SLEEVES: Place the 37-41-45-49-51 stitches from the thread on the one side of the piece on double pointed needles size 3 MM = US 2.5 and knit up 1 stitch in each of the 6 stitches cast on under the sleeve = 43-47-51-55-57 stitches. Insert a marker thread in the middle of the new stitches under the sleeve. Start at the marker and work stockinette stitch in the round for 1 cm = ⅜". Now decrease 2 stitches under the sleeve – read DECREASE TIP. Decrease like this every 2½-2-2-2-2½ cm = 1"-¾"-¾"-¾"-1" a total of 3-5-6-7-8 times = 37-37-39-41-41 stitches. When the sleeve measures 10-12-15-16-22 cm = 4"-4¾"-6"-6¼"-8¾" from the division increase 5 stitches evenly spaced = 42-42-44-46-46 stitches. Change to double pointed needles size 2.5 MM = US 1.5 and work rib (knit 1, purl 1) for 3 cm = 1⅛". Bind off with knit over knit and purl over purl. The sleeve measures approx. 13-15-18-19-25 cm = 5⅛"-6"-7"-7½"-9¾" from the division. Work the other sleeve in the same way. ASSEMBLY: Sew the buttons onto the left band. |
||||||||||||||||||||||
Diagram explanations |
||||||||||||||||||||||
|
||||||||||||||||||||||
 |
||||||||||||||||||||||
Have you finished this pattern?Tag your pictures with #dropspattern #cotswoldscardigan or submit them to the #dropsfan gallery. Do you need help with this pattern?You'll find 30 tutorial videos, a Comments/Questions area and more by visiting the pattern on garnstudio.com. © 1982-2026 DROPS Design A/S. We reserve all rights. This document, including all its sub-sections, has copyrights. Read more about what you can do with our patterns at the bottom of each pattern on our site. |
||||||||||||||||||||||


With over 40 years in knitting and crochet design, DROPS Design offers one of the most extensive collections of free patterns on the internet - translated to 17 languages. As of today we count 324 catalogs and 12290 patterns - 12280 of which are translated into English (US/in).
We work hard to bring you the best knitting and crochet have to offer, inspiration and advice as well as great quality yarns at incredible prices! Would you like to use our patterns for other than personal use? You can read what you are allowed to do in the Copyright text at the bottom of all our patterns. Happy crafting!
Post a comment to pattern DROPS Baby 43-2
We would love to hear what you have to say about this pattern!
If you want to leave a question, please make sure you select the correct category in the form below, to speed up the answering process. Required fields are marked *.