DROPS Flora
DROPS Flora
65% Wool, 35% Alpaca
from 3.30 $ /50g
Get the yarn to make this pattern from 6.60$.

The yarn cost is calculated from the pattern’s smallest size and the yarn’s cheapest product type. Looking for an even better price? You might find it on the DROPS Deals!

DROPS Super Sale

Cotswolds Sweater

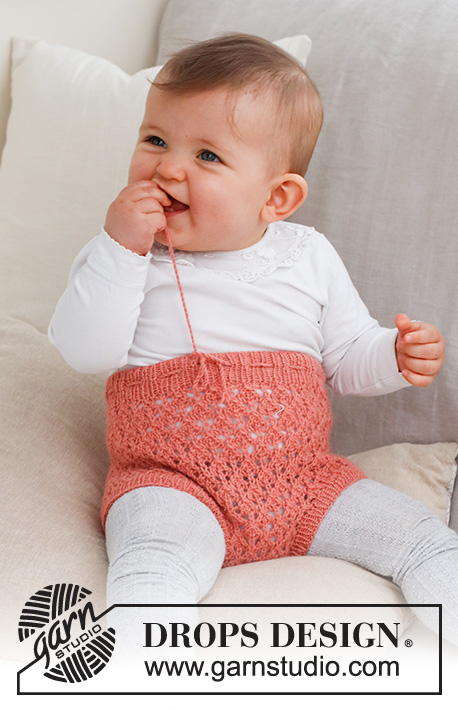
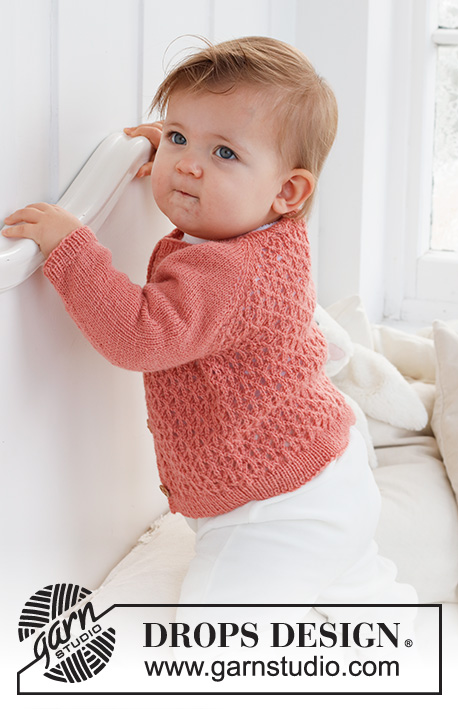
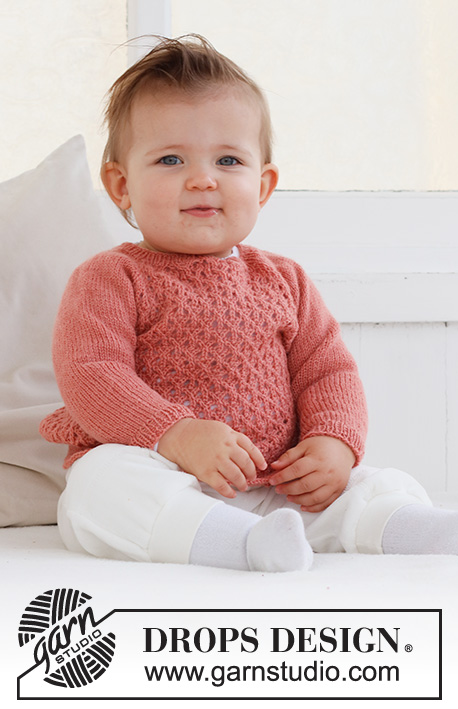
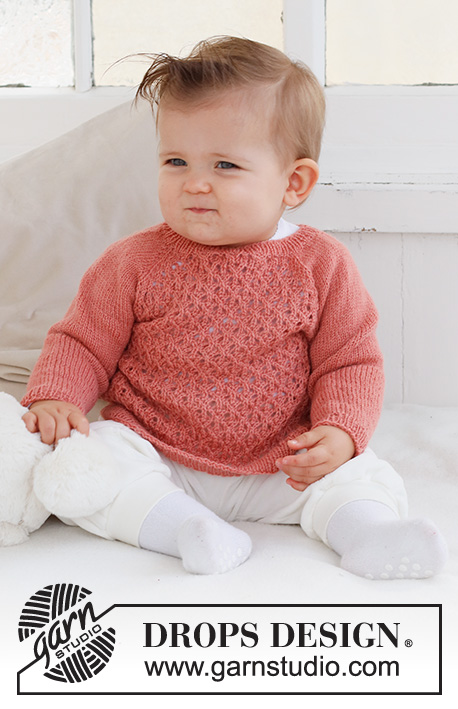
Knitted sweater for baby in DROPS Flora. The piece is worked top down, with raglan and lace pattern. Sizes 0 – 2 years.

DROPS Baby 43-1
DROPS Design: Pattern fl-005-by
Yarn group A
-----------------------------------------------------------

SIZES:
0/1 - 1/3 - 6/9 - 12/18 months (2) years
Child’s height in cm:
48/52 - 56/62 - 68/74 - 80/86 – 92
Child’s height in feet:
1ft/1ft8 - 1ft 10/2ft - 2ft3/2ft5 - 2ft7/2ft9 - 3ft

Finished measurements:
Chest measurements: 50-50-60-66-66 cm = 19 3/4"-19 3/4"-23 5/8"-26"-26"
Full length: 24-28-30-33-36 cm = 9 1/2"-11"-11 3/4"-13"-14 1/4"
All measurements in charts are in cm.

MATERIALS:
DROPS FLORA from Garnstudio (belongs to yarn group A)
100-100-100-150-150 g color 20, peach pink

NEEDLES:
DROPS CIRCULAR NEEDLE SIZE 3 MM = US 2.5: Length 40 cm = 16”.
DROPS CIRCULAR NEEDLE SIZE 2.5 MM = US 1.5: Length 40 cm = 16”.
DROPS DOUBLE POINTED NEEDLES SIZE 3 MM = US 2.5.
DROPS DOUBLE POINTED NEEDLES SIZE 2.5 MM = US 1.5.
The technique MAGIC LOOP can be used – you then only need circular needle of 80 cm = 32” in each size.

KNITTING GAUGE:
24 stitches in width and 32 rows in height with stockinette stitch = 10 x 10 cm = 4” x 4”.
NOTE: Needle size is only a guide. If you get too many stitches on 10 cm = 4”, change to a larger needle size. If you get too few stitches on 10 cm = 4”, change to a smaller needle size.

-------------------------------------------------------

Alternative Yarn – See how to change yarns here
Yarn Groups A to F – Use the same pattern and change the yarn here
Yarn usage using an alternative yarn – Use our yarn converter here

-------------------------------------------------------

DROPS Flora
DROPS Flora
65% Wool, 35% Alpaca
from 3.30 $ /50g
Get the yarn to make this pattern from 6.60$.

The yarn cost is calculated from the pattern’s smallest size and the yarn’s cheapest product type. Looking for an even better price? You might find it on the DROPS Deals!

DROPS Super Sale

SAVE 30% on 6 cotton favorites!
Valid until 04.12.2024

Pattern instructions

NOTE: This pattern is written in American English. All measurements in charts are in cm. For conversion from inches to cm - click here. There are different terms for crocheting in American and British English. If this pattern includes crochet, click for "crochet terms" here. For this pattern in British English, please click here.
-------------------------------------------------------

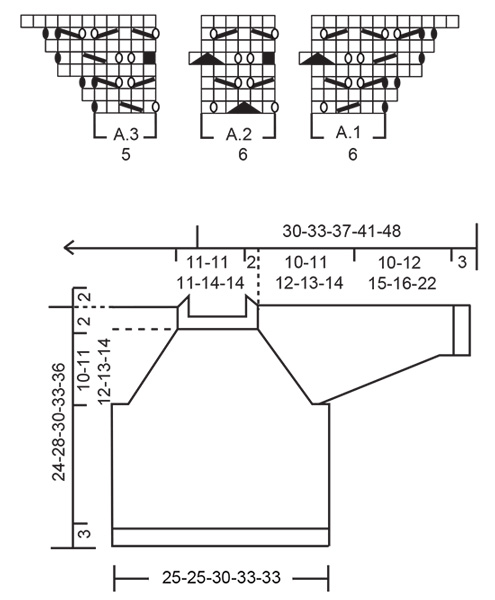
EXPLANATIONS FOR THE PATTERN:

-------------------------------------------------------

PATTERN:
See diagrams A.1, A.2 and A.3.

RAGLAN:
On the front and back pieces the increases are included in the diagram. Increase as follows on the sleeves:
Increase 1 stitch after markers 1 and 3. Knit the marker-stitch, make 1 yarn over.
Increase 1 stitch before markers 2 and 4. Work as far as the marker-stitch and make 1 yarn over, knit the marker-stitch.
On the next round work the yarn overs twisted to avoid holes!
Repeat this increase every 2nd round a total of 10-12-14-16-17 times

DECREASE TIP (for sleeves):
Decrease 1 stitch on either side of the marker as follows: Work until there are 3 stitches left before the marker, knit 2 together, knit 2 (marker sits between these 2 stitches), slip 1 stitch as if to knit, knit 1 and pass the slipped stitch over the knitted stitch.

-------------------------------------------------------

START THE PIECE HERE:

-------------------------------------------------------

SWEATER – SHORT OVERVIEW OF THE PIECE:
The neck and yoke are worked in the round with double pointed needles or short circular needle, top down. The yoke is divided for the body and sleeves and the body is continued in the round with circular needle. The sleeves are worked in the round with double pointed needles.

NECK:
Cast on 86-86-86-98-98 stitches with double pointed needles or short circular needle size 2.5 MM = US 1.5 and DROPS Flora.
Knit 1 round, then work rib (knit 1 purl 1) for 2 cm = 3/4". Change to circular needle size 3 MM = US 2.5.

YOKE:
On the next round insert 4 markers as follows:
Sleeve: Insert marker 1 in the first stitch, knit 12 and increase 4 stitches evenly spaced, insert marker 2 in the next stitch.
Front piece: Work A.1, A.2 3-3-3-4-4 times, A.3.
Sleeve: Insert marker 3 in the next stitch, knit 12 and increase 4 stitches evenly spaced, insert marker 4 in the next stitch.
Back piece: Work A.1, A.2 3-3-3-4-4 times, A.3.

Continue this pattern and increase to RAGLAN – read description above. REMEMBER THE KNITTING GAUGE!
When A.1 to A.3 have been completed in height, work the next round as follows:
Knit and increase over the sleeve as before as far as marker 2, work A.1, then A.2 5-5-5-6-6 times, A.3, knit and increase over the sleeve as before as far as marker 4, work A.1, then A.2 5-5-5-6-6 times, A.3.
Repeat this pattern in height. Each time A.1 and A.3 are repeated in height, there is room for 2 more repeats of A.2 on the front and back pieces. When A.1 and A.3 have been worked 2-2-3-3-3 times in height, the increases are finished on the front and back pieces; continue increasing only on the sleeves as explained above. Continue the pattern on the front and back pieces, but without further increases.
When all the increases are finished there are 182-190-222-242-246 stitches.
Continue with pattern as follows:
Start on the 2nd stitch on the round (the new beginning of the round), knit 37-41-45-49-51, work A.2 9-9-11-12-12 times, knit 37-41-45-49-51, work A.2 9-9-11-12-12 times (the last stitch in A.2 is the first stitch on the round). When you work round 5 in A.2, knit the first stitch in the first repeat on the front/back piece, the last stitch in the last repeat on the front/back piece is worked over the first stitch on the sleeve.
When the piece measures 12-13-14-15-16 cm = 4 3/4"-5 1/8"-5 1/2"-6"-6 1/4" from the cast-on edge, divide for the body and sleeves as follows:
Place the first 37-41-45-49-51 stitches on a thread for the sleeve, cast on 6 stitches under the sleeve, work 54-54-66-72-72 stitches as before, place the next 37-41-45-49-51 stitches on a thread for the sleeve, cast on 6 stitches under the sleeve, work the last 54-54-66-72-72 stitches.

BODY:
= 120-120-144-156-156 stitches. Continue in the round with A.2 over all stitches for a further 9-12-13-15-17 cm = 3 1/2"-4 3/4"-5 1/8"-6"-6 3/4". Increase 18-18-22-24-24 stitches evenly spaced on the next round = 138-138-166-180-180 stitches.
Change to circular needle size 2.5 MM = US 1.5 and work rib (knit 1, purl 1) for 3 cm = 1 1/8".
Bind off. The sweater measures approx. 24-28-30-33-36 cm = 9 1/2"-11"-11 3/4"-13"-14 1/4" from the shoulder down.

SLEEVES:
Place the 37-41-45-49-51 stitches from the thread on the one side of the piece on double pointed needles size 3 MM = US 2.5 and knit up 1 stitch in each of the 6 stitches cast on under the sleeve = 43-47-51-55-57 stitches. Insert a marker thread in the middle of the new stitches under the sleeve.
Start at the marker and work stockinette stitch in the round for 1 cm = 3/8". Now decrease 2 stitches under the sleeve – read DECREASE TIP. Decrease like this every 2½-2-2-2-2½ cm = 1"-3/4"-3/4"-3/4"-1" a total of 3-5-6-7-8 times = 37-37-39-41-41 stitches. When the sleeve measures 10-12-15-16-22 cm = 4"-4 3/4"-6"-6 1/4"-8 3/4" from the division increase 5 stitches evenly spaced = 42-42-44-46-46 stitches. Change to double pointed needles size 2.5 MM = US 1.5 and work rib (knit 1, purl 1) for 3 cm = 1 1/8". Bind off with knit over knit and purl over purl. The sleeve measures approx. 13-15-18-19-25 cm = 5 1/8"-6"-7"-7 1/2"-9 3/4" from the division.
Work the other sleeve in the same way.

Diagram

All measurements in charts are in cm.

symbols = knit
symbols = knit 2 together
symbols = slip 1 stitch as if to knit, knit 1 and pass the slipped stitch over the knitted stitch
symbols = slip 1 stitch as if to knit, knit 2 together and pass the slipped stitch over the knitted-together stitches
symbols = between 2 stitches make 1 yarn over; on the next round knit the yarn over to leave a hole
symbols = between 2 stitches make 1 yarn over; on the next round knit the yarn over twisted to avoid a hole
symbols = this square has no stitch as it was decreased earlier; go straight to the next symbol in the diagram
diagram

Each of our patterns has specific tutorial videos to help you.

Do you have a question? See a list of frequently asked questions (FAQ)

Knitting tension is what determines the final measurements of your work, and is usually measured per 10 x 10 cm. It is provided like so: number of stitches in width x number of rows in height - eg: 19 stitches x 26 rows = 10 x 10 cm.

The knitting tension is very individual; some people knit/crochet loosely while others work tightly. You adjust the knitting tension with the needle size, which is why the suggested needle size only serve as a guide! You need to adjust this (up or down) to ensure that YOUR knitting tension matches the knitting tension provided in the pattern. If you work with a different knitting tension than provided you will have a different yarn consumption, and your work will have different measurements than what the pattern suggests.

The knitting tension also determines which yarns can replace each other. As long as you achieve the same knitting tension you can replace one yarn with another.

See DROPS lesson: How to measure your tension/gauge

See DROPS video: How to make a gauge tension swatch

The required amount of yarn is provided in grams, eg: 450 g. To calculate how many balls you’ll need you first need to know how many grams are in 1 ball (25g, 50g or 100g). This information is available if you click on the individual yarn quality on our pages. Divide the amount required with the amount of each ball. For example, if each ball is 50g (the most common amount), the calculation will be as follows: 450 / 50 = 9 balls.

The important thing when changing from one yarn to another is that the knitting/crochet tension remains the same. This is so that the measurements of the finished piece will be the same as on the sketch provided. It is easier to achieve the same knitting tension using yarns from the same yarn group. It is also possible to work with multiple strands of a thinner yarn to achieve the knitting tension of a thicker one. Please try our yarn converter. We recommend you to always work a test swatch.

Please NOTE: when changing yarn the garment might have a different look and feel to the garment in the photo, due to individual properties and qualities of each yarn.

See DROPS lesson: Can I use a different yarn than the one mentioned in the pattern?

All our yarns are categorised into yarn groups (from A to F) according to thickness and knitting tension – group A contains the thinnest yarns and group F the thickest. This makes it easier for you to find alternative yarns to our patterns, should you wish to switch yarn. All yarns within the same group have a similar knitting tension and can easily replace each other. However, different yarn qualities have different structures and properties which will give the finished work a unique look and feel.

Click here for an overview of the yarns in each yarn group

At the top of all our patterns you’ll find a link to our yarn converter, which is a helpful tool should you wish to use a different yarn than suggested. By filling in the yarn quality you wish to replace, the amount (in your size) and number of strands, the converter will present good alternative yarns with the same knitting tension. Additionally it will tell you how much you’ll require in the new qualities and whether you’ll need to work with multiple strands. Most skeins are 50g (some are 25g or 100g).

If the pattern is worked with multiple colours, every colour will have to be converted separately. Similarly, if the pattern is worked with several strands of different yarns (for example 1 strand Alpaca and 1 strand Kid-Silk) you will have to find alternatives for each, individually.

Click here to see our yarn converter

Since different yarns have different qualities and textures we have chosen to keep the original yarn in our patterns. However, you can easily find options among our available qualities by using our yarn converter, or simply pick a yarn from the same yarn group.

It is possible that some retailers still have discontinued yarns in stock, or that someone has a few skeins at home that they would like to find patterns for.

The yarn converter will provide both alternative yarn as well as required amount in the new quality.

If you think it's hard to decide what size to make, it can be a good idea to measure a garment you own already and like the size of. Then you can pick the size by comparing those measures with the ones available in the pattern's size chart.

You'll find the size chart at the bottom of the pattern.

See DROPS lesson: How to read size chart

The needle size provided in the pattern serves only as a guide, the important thing is to follow the knitting tension. And since knitting tension is very individual, you will have to adjust the needle size to ensure that YOUR tension is the same as in the pattern – maybe you’ll have to adjust 1, or even 2 needle sizes, up or down to achieve the correct tension. For this, we recommend that you work test swatches.

Should you work with a different knitting tension than the one provided, the measurements of the finished garment might deviate from the measurement sketch.

See DROPS lesson: How to measure your tension/gauge

See DROPS video: How to make a gauge tension swatch

Working a garment top-down provides more flexibility and room for personal adjustment. For example it is easier to try the garment on while working, as well as making adjustments to length of yoke and shoulder caps.

The instructions are carefully explaining every step, in the correct order. Diagrams are adjusted to the knitting direction and are worked as usual.

The diagram depicts all rows/rounds, and every stitch seen from the right side. It is read from bottom to top, from right to left. 1 square = 1 stitch.

When working back and forth, every other row is worked from the right side and every other row is worked from the wrong side. When working from the wrong side, the diagram will have to be worked reversed: from left to right, knit stitches are purled, purl stitches are knit etc.

When working in the round every round is worked from the right side and the diagram are worked from right to left on all rounds.

See DROPS lesson: How to read knitting diagrams

The diagram depicts all rows/rounds, and every stitch seen from the right side. It is worked from bottom to top, from right to left.

When working back and forth every other row is worked from the right side: from right to left and every other row is worked from the wrong side: from left to right.

When working in the round, every row in the diagram are worked from the right side, from right to left.

When working a circular diagram you start in the middle and work your way outwards, counter clockwise, row by row.

The rows usually start with a given number of chain stitches (equivalent to the height of the following stitch), this will either be depicted in the diagram or explained in the pattern.

See DROPS lesson: How to read crochet diagrams

Instructions for working several diagrams after each other on the same row/round, will often be written like so: “work A.1, A.2, A.3 a total of 0-0-2-3-4 times". This means you work A.1 once, then A.2 is worked once, and A.3 is repeated (in width) the number of times provided for your size – in this case like so: S = 0 times, M = 0 times, L=2 times, XL= 3 times and XXL = 4 times.

The diagrams are worked as usual: begin with the first row in A.1, then work the first row in A.2 etc.

See DROPS lesson: How to read knitting diagrams

See DROPS lesson: How to read crochet diagrams

The total width of the garment (from wrist-to-wrist) will be larger in the larger sizes, despite the actual sleeves being shorter. The larger sizes have longer sleeve caps and wider shoulders, so there will be a good fit in all sizes.

The measurement sketch/schematic drawing provides information regarding the full length of the garment. If it’s a jumper or a jacket the length is measured from the highest point on the shoulder (usually closest to the neckline), and straight down to the bottom of the garment. It is NOT measured from the tip of shoulder. Similarly, the length of yoke is measured from the highest point on the shoulder and down to where yoke is split into body and sleeves.

See DROPS lesson: How to read a schematic drawing

Diagrams are often repeated on the round or in height. 1 repeat is the diagram the way it appears in the pattern. If it says to work 5 repeats of A.1 in the round, then you work A.1 a total of 5 times after/next to each other in the round. If it says to work 2 repeats of A.1 vertically/in height you work the entire diagram once, then begin again at the start and work the entire diagram one more time.

Chain stitches are slightly narrower than other stitches and to avoid working the cast-on edge too tight, we simply chain more stitches to begin with. The stitch count will be adjusted on the following row to fit the pattern and measurement sketch.

The rib edge is more elastic and will contract slightly compared to, for example, stocking stitch. By increasing before the rib edge, you avoid a visible difference in width between the rib edge and the rest of the body.

It’s very easy to cast off too tightly, and by making yarn overs while casting off (and simultaneously casting these off) you avoid a too tight cast off edge.

See DROPS video: How to bind off with yarn overs (yo)

To achieve an even increase (or decrease) you can increase on, for example: every 3rd and 4th row alternately, like so: work 2 rows and increase on the 3rd row, work 3 rows and increase on the 4th. Repeat this until the increase is complete.

See DROPS lesson: Increase or decrease 1 st on every 3rd and 4th row alternately

Should you prefer to work in the round instead of back and forth, you may of course adjust the pattern. You’ll need to add steeks mid-front (usually 5 stitches), and follow the instructions. When you would normally turn and work from the wrong side, simply work across the steek and continue in the round. At the end you’ll cut the piece open, pick up stitches to work bands, and cover the cut edges.

See DROPS video: How to knit steeks and cut open

Should you prefer to work back and forth instead of in the round, you may of course adjust the pattern so you work the pieces separately and then assemble them at the end. Divide the stitches for the body in 2, add 1 edge stitch in each side (for sewing) and work the front and back pieces separately.

See DROPS lesson: Can I adapt a pattern for circular needles into straight needles?

Pattern repeats can vary slightly in the different sizes, in order to get the correct proportions. If you’re not working the exact same size as the garment in the photo, yours might deviate slightly. This has been carefully developed and adjusted so that the complete impression of the garment is the same in all sizes.

Make sure to follow instructions and diagrams for your size!

If you have found a pattern you like which is available in women’s size it’s not very difficult to convert it to men’s size. The biggest difference will be the length of sleeves and body. Start working on the women size that you think would fit across the chest. The additional length will be worked right before you cast off for the armhole/sleeve cap. If the pattern is worked top-down you can add the length right after the armhole or before the first decrease on sleeve.

Regarding additional yarn amount, this will depend on how much length you add, but it is better with a skein too many than too few.

All yarns will have excess fibres (from production) that might come off as lint or shedding. Brushed yarns (ie hairier yarns) have more of these loose, excess fibres, causing more shedding.

Shedding also depends on what is worn under or over the garment, and whether this pulls at the yarn fibres. It’s therefore not possible to guarantee that there will be no shedding

Below are some tips on how to get the best result when working with hairier yarns:

1. When the garment is finished (before you wash it) shake it vigorously so the looser hairs come off. NOTE: do NOT use a lint roller, brush or any method that pulls at the yarn.

2. Place the garment in a plastic bag and put it in your freezer - the temperature will cause the fibres to become less attached to each other, and excess fibres will come off easier.

3. Leave in the freezer for a few hours before taking it out and shaking it again.

4. Wash the garment according to the instructions on the yarn label.

Pilling is a natural process that happens to even the most exclusive of fibers. It's a natural sign of wear and tear that is hard to avoid, and that is most visible in high friction areas of your garment like a sweater's arms and cuffs.

You can make your garment look as new by removing the pilling, using a fabric comb or a pill/lint remover.

Still can't find the answer you need? Then scroll down and leave your question so one of our experts can try to help you. This will be done normally within 5 to 10 working days.
In the meantime, you can read the questions and answers that others have left to this pattern or join the DROPS Workshop on Facebook to get help from fellow knitters/crocheters!

You might also like...

Post a comment to pattern DROPS Baby 43-1

We would love to hear what you have to say about this pattern!

If you want to leave a question, please make sure you select the correct category in the form below, to speed up the answering process. Required fields are marked *.

Comments / Questions (10)

country flag Anna wrote:

Hallo, Ich stricke in der Größe 12/18. Wenn ich A1 und A3 insgesamt 3x in der Höhe gestrickt habe und die Zunahmen im Vorder-/Rückenteil fertig sind. Wie kann ich dann weiter stricken ohne dort weiter zuzunehmen. Stricke ich dann nur noch A2 weiter. Vielen dank

31.07.2023 - 20:22

country flag Abby Hubbard wrote:

After you have worked A.1 and A.3 and need to just work the increases on the sleeves how does the pattern on the front and back continue without increases? Are you just knitting A.2?

29.04.2023 - 03:01

DROPS Design answered:

Dear Mrs Hubbard, note which stitch is the first one in A.1 and the last one in A.3 on front and back piece and mark it in the diagram, you will now work only the sts on the left of this first st in A.1 and only the first sts on the right of this last st in A.3. Make sure there will always be as many yarn overs as decreases in A.1/A.3 to avoid changing the number of sts. Happy knitting!

02.05.2023 - 08:07

country flag Pernille wrote:

Hei, jeg skal strikke denne genseren i str. 6/9, altså 86m halskant. Omgangen etter vrangborden skal strikkes slik: Erme: 12m (+4), Forstykke: A.1+A.2=12mx3= 36m + A.3 5m = 41m Erme: 12m (+4) Bakstykke: A.1+A.2=12mx3= 36m + A.3 5m = 41m Men 12+12+41+41= 106masker. Hva gjør jeg feil? Jeg har jo bare 86 masker

22.02.2023 - 19:58

DROPS Design answered:

Erme: sett 1.merke i første maske, strikk 12 masker glattstrikk og øk 4 masker jevnt fordelt, sett 2.merke i neste maske. = 14 Forstykke: A.1 =6, A.2=6 strikkes 3 ganger, A.3=5 = 29m. Erme: sett 1.merke i første maske, strikk 12 masker glattstrikk og øk 4 masker jevnt fordelt, sett 2.merke i neste maske. = 14 masker Bakstykke: A.1, A.2 strikkes 3 ganger, A.3= 29 masker. 14+29+14+29=86 masker + de masker du tager ud :)

24.02.2023 - 15:41

country flag Jytte Mørck wrote:

Hej Jeg strikker baby 43-1 i str 6-9 mdr Jeg har nu strikket de 3 gentagelser af mønsteret i højden og skal fortsætte for- og bagstykke uden udtagninger. Nu har jeg problemer i starten af 5 p A.1 Mønsteret forskubber sig på hele rækken når jeg gør som beskrevet. Håber i kan hjælpe mig. Har prøvet på forskellige måder, men kan ikke få det til at passe. Mvh Jytte

30.09.2022 - 20:42

DROPS Design answered:

Hei Jytte. Usikker på hvorfor det forskyver seg hos seg, men kanskje det er en økning (enten raglan økning på erme og i diagrammene) som er blitt glemt, slik at mønstret blir forskyvet? Har du riktig maskeantall på for-og bakstykket etter å ha strikket A.1, A.2 og A.3 1 gang i høyden? Og når du har strikket diagrammene 1 gang til i høyden har du da 12+12 flere masker (2 rapporter mer av A.2, både foran og bak). En god ide er å bruke maskemarkører mellom hvert diagram, slik at man enkelt skal sjekke at man har riktig maskeantall. mvh DROPS Design

10.10.2022 - 10:49

country flag Monica wrote:

Nella domanda di prima ho dimenticato di chiedere... lavorando le maniche devo sempre aumentare di 4 maglie oltre agli aumenti del raglan?

06.09.2022 - 17:58

DROPS Design answered:

Buonasera Monica, deve procedere con gli aumenti sulle maniche come indicato nelle spiegazioni. Buon lavoro!

27.09.2022 - 21:40

country flag Monica wrote:

Buongiorno, lavorando il collo, finiti i due cm, inizio con il diagramma ma alla fine del giro totale mi restano 4 maglie. E corretto? Si lavorano a dritto?

06.09.2022 - 17:56

DROPS Design answered:

Buonasera Monica, ha inserito i segnapunti NELLE maglie come indicato e non TRA le maglie? Buon lavoro!

12.09.2022 - 21:49

country flag Nat wrote:

Hi can you explain what “Continue this pattern and increase to RAGLAN” means? when do i follow what it says in the raglan section and when do i go back to what it says in the yoke section?

06.09.2022 - 06:29

DROPS Design answered:

Hi Nat, You begin to increase for raglan straight away when told to do so in the text (following the instructions under Raglan at the top of the pattern). When A.1 to A.3 are finished in height, you then follow the new increase instructions in the text. Happy knitting!

06.09.2022 - 06:52

country flag Edite wrote:

Bonjour,je me suis mal exprimée dans ma question précédente ,en fait c'est quand je commence l'empiecement avec les 12 mailles et les diagrammes à la fin du rang il me reste 4 mailles !!!Dois-je en tricoter 2 de plus avec les 12 soit 14 pour les manches.Merci pour l'aide.

10.05.2022 - 11:09

DROPS Design answered:

Bonjour Edite, attention, les marqueurs sont à insérer dans une maille, pas entre 2 mailles, autrement dit, vous aurez: 1 m avec 1 marqueur, 12 m + 4 m = 16 m, 1 m avec 1 marqueur (manche), A.1, 4xA.2 et A.3 (devant), 1 m avec 1 marqueur, 12 m + 4 m = 16 m, 1 m avec 1 marqueur (manche), A.1, 4xA.2 et A.3 (dos), soit: 1+16+1+6+24+5+1+16+1+6+24+5=106 m (et si on retire les 8 augmentations = 98 mailles). Bon tricot!

10.05.2022 - 14:04

country flag Edite wrote:

Quand je finis de tricoter l'empiecement avec les 12 mailles et les diagrammeset A1,A2 et A3 il me reste quatre mailles sur les aiguilles!!! Je tricote la taille deux ans.Merci pour l'aide

06.05.2022 - 18:50

DROPS Design answered:

Bonjour Edite, avez-vous bien 246 mailles avant la division? Si tel est le cas, vous devriez tomber juste: 51 mailles (manche) + 72 mailles (devant) + 51 mailles (manche) + 72 mailles (dos) soit 51+72+51+72=246 mailles. Bon tricot!

09.05.2022 - 07:53

country flag Susanne wrote:

Hej jag har nu stickat de tre rapportera tre ggr enligtbeskrivning för st 12-18mån. Men nu förstår jag inte. Det står fortsätt sticka med ökningarna för ärm men inte på fram och bakstycke, är det de svarta ökningarna i rapporten ni menar att jag inte ska göra? För sedan står det längre ner börja sticka på den andra maskan (antar att det är i mönstret ni syftar då och inte på arbetet) och då är det ju samma som det står högre upp när jag nu ska sticka utan ökningar?

06.04.2022 - 12:47