
Popular categories
Looking for a yarn?


Comments / Questions (16)
![]() Natalia wrote:
Natalia wrote:
Chciałabym wykonać komin Silver Birch z wykorzystaniem jednej nitki Drops Alaska. Ile motków potrzebowałabym na wykonanie komina w rozmiarze M/L?
05.01.2026 - 21:10DROPS Design answered:
Witaj Natalio, na komin w wybranym rozmiarze będziesz potrzebować ok. 200-250 g włóczki DROPS Alaska. Pozdrawiamy!
05.01.2026 - 21:17
![]() Susanna wrote:
Susanna wrote:
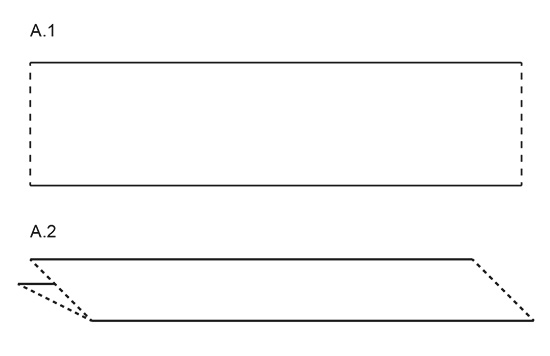
I am totally confused about how to finish this headband once I've finished knitting it. It starts as a tube, then it's a rectangle? I can't even begin to figure out how you get from A1 to A4 and A5. I don't suppose there's a video of how to assemble this is there? Or maybe actual pictures of the headband itself, not a drawing. Anything would be helpful. Thanks.
31.12.2025 - 05:03
![]() Eva-Lill wrote:
Eva-Lill wrote:
Är det meningen att halsöppningen ska vara lika på fram och bakstycket?
02.11.2025 - 19:26DROPS Design answered:
Hei Eva-Lill. Ja, på denne halsen er det det samme målet. mvh DROPS Design
17.11.2025 - 08:42
![]() Ana María wrote:
Ana María wrote:
Hola. Me gusta mucho la cinta para la cabeza. Quisiera saber si hay algún vídeo que muestre cómo se cose pues no logro darme cuenta de qué forma hacerlo. Desde ya agradezco su respuesta.
22.08.2025 - 16:12DROPS Design answered:
Hola Ana María, en la pestaña vídeos, debajo del título y el encabezado del patrón, puedes encontrar todos los videos relevantes para realizar la labor. Este video en concreto debería ayudarte a ensamblar la cinta para la cabeza.
25.08.2025 - 01:59
![]() Emilia wrote:
Emilia wrote:
Miten luodaan 1 silmukka 2 kertaa ja 2 silmukkaa 2 kertaa?
05.01.2025 - 21:19
![]() Claudia Carolina wrote:
Claudia Carolina wrote:
Buenos días y gracias por los modelos maravillosos. No entiendo porqué en el comienzo del cuello, si lo debo tejer de abajo hacia arriba en plano dice que hay que montar los puntos en agujas de doble punta. Gracias de nuevo. Claudia Carolina
30.12.2024 - 00:25DROPS Design answered:
Hola Claudia, se trata de una errata, se monta con una aguja circular y se trabaja de ida y vuelta con la aguja circular. Ya hemos corregido la errata.
31.12.2024 - 00:28
![]() Majsan wrote:
Majsan wrote:
Det står att man ska sticka tre kantmaskor. Finns ingen förklaring hur man gör.Men det står att förklaringen finns högst upp. Hittar ingen.
04.11.2024 - 17:27DROPS Design answered:
Hej Majsan; Jo de 3 kantmasker på halsen : RÄTSTICKNING (gäller halsvärmaren): Alla varv stickas räta.
05.11.2024 - 08:29
![]() Maria wrote:
Maria wrote:
Hei! tarvitseeko puikkokokoa vaihtaa jos korvaa kid silkin alpaca silkilla?
18.11.2023 - 11:43DROPS Design answered:
Tarkoitatko DROPS Brushed Alpaca Silk -lankaa? Tämä lanka on Kid-Silk -lankaa paksumpi lanka, joten neuletiheys muuttuu ja sinun tulee vaihtaa ohuempiin puikkoihin.
21.11.2023 - 18:15
![]() Janneke Arts wrote:
Janneke Arts wrote:
Het patroon voor de hoofdband beschrijft 40-44-48 steken rond breien op een rondbreinaald van 80 cm. Het lukt me dan niet de uiteinden te verbinden en rond te breien, wat doe ik fout? Ook met een kortere naald lukt het niet. Kan de hoofdband misschien alleen met losse naalden gebreid worden?
29.12.2022 - 11:55DROPS Design answered:
Dag Janneke,
Je zou dit ook met sokkenbreinaalden kunnen doen of de 'MAGIC LOOP' techniek kunnen gebruiken zoals uitgelegd in deze video.
01.01.2023 - 11:40
![]() Gina wrote:
Gina wrote:
Sehr schön. Ich stricke gleich ein zweites Set.
13.11.2022 - 18:12
|
|||||||
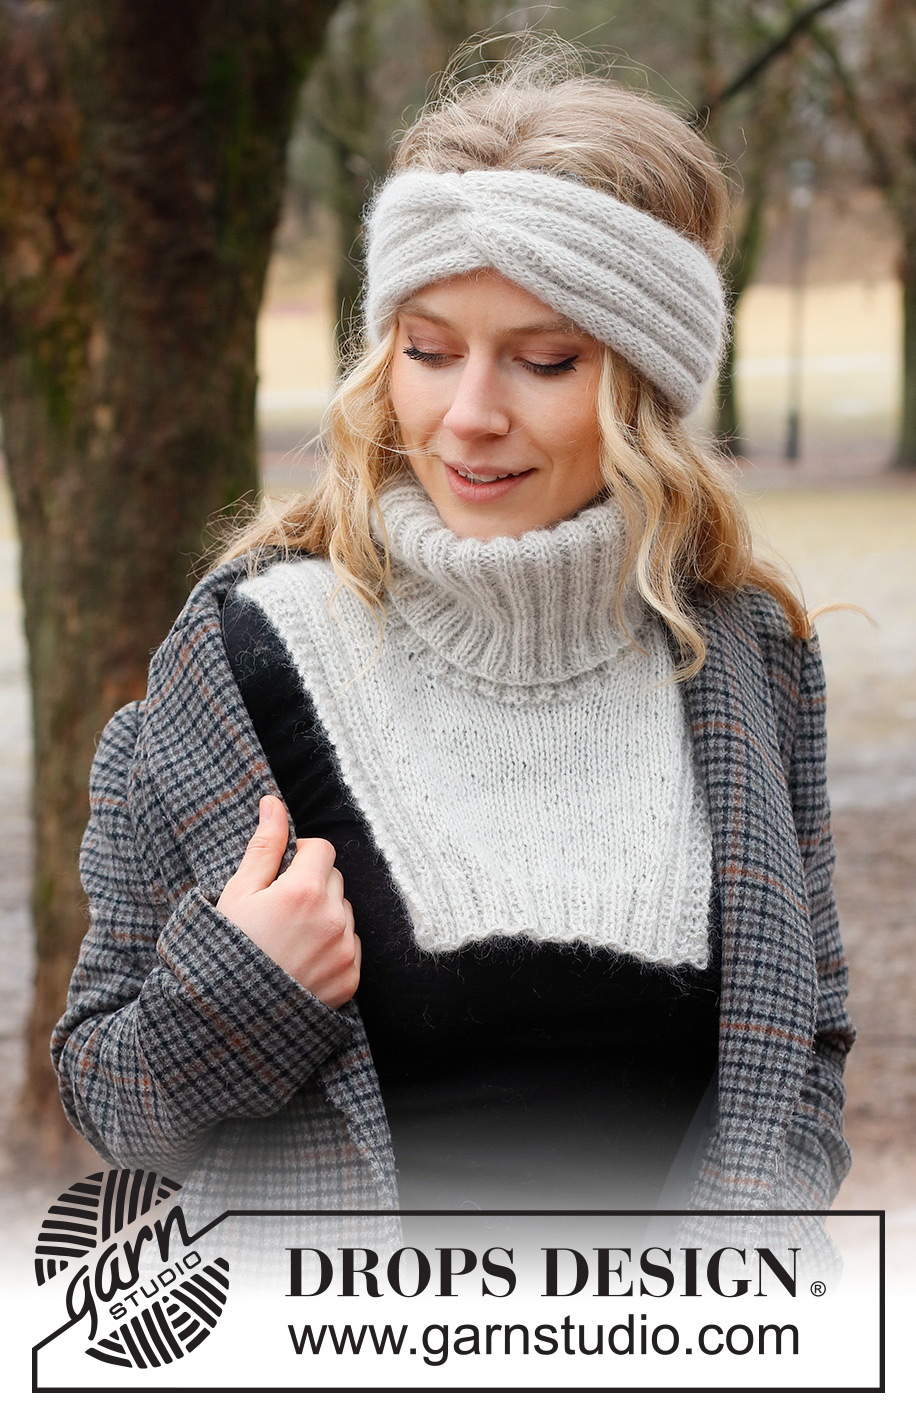
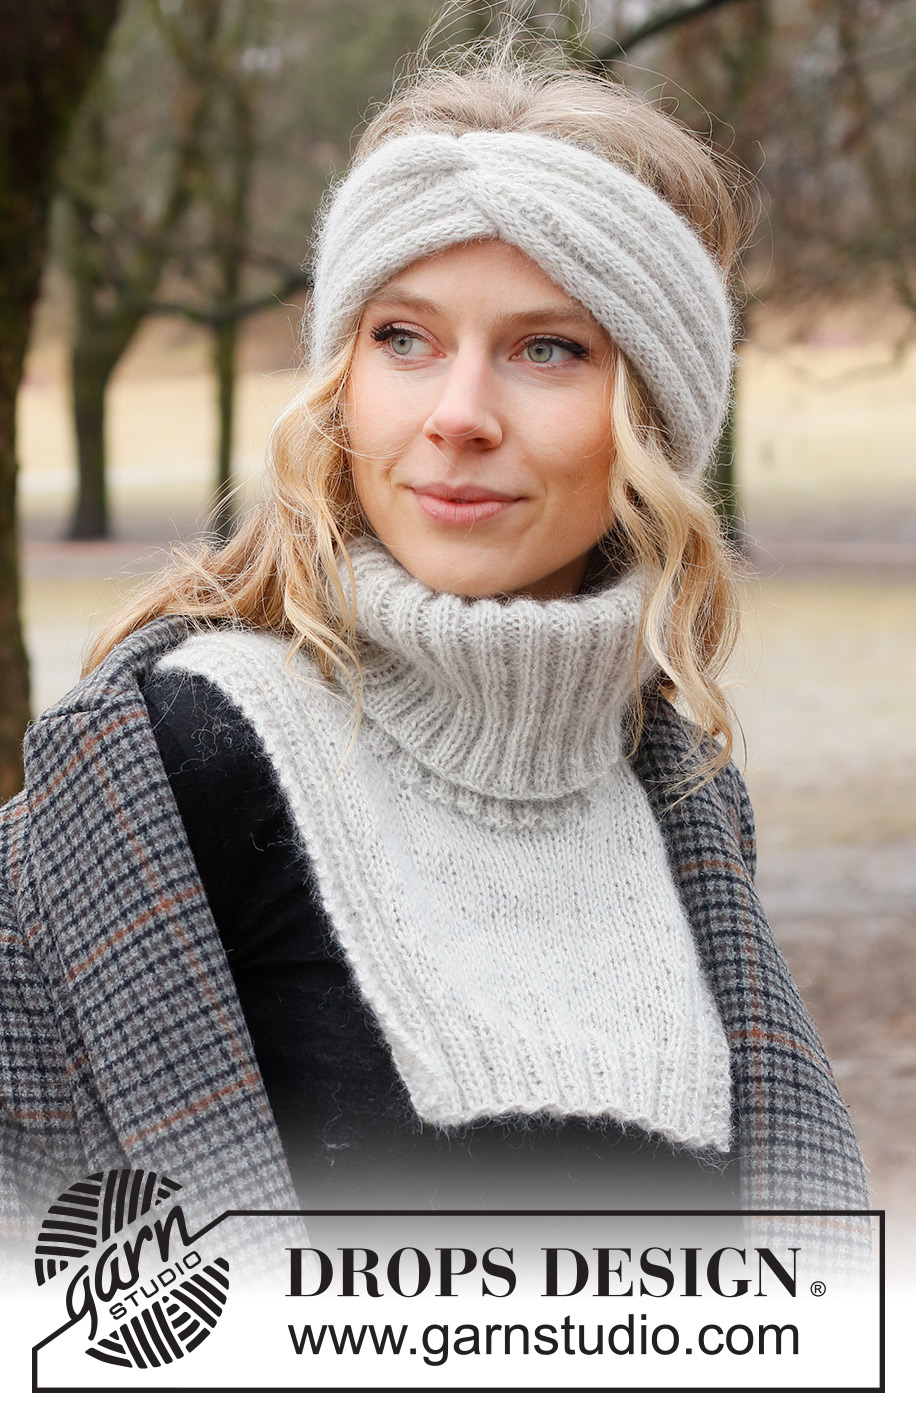
Silver Birch#silverbirchset |
|||||||
 |
 |
||||||
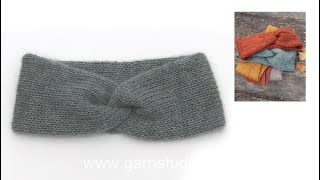
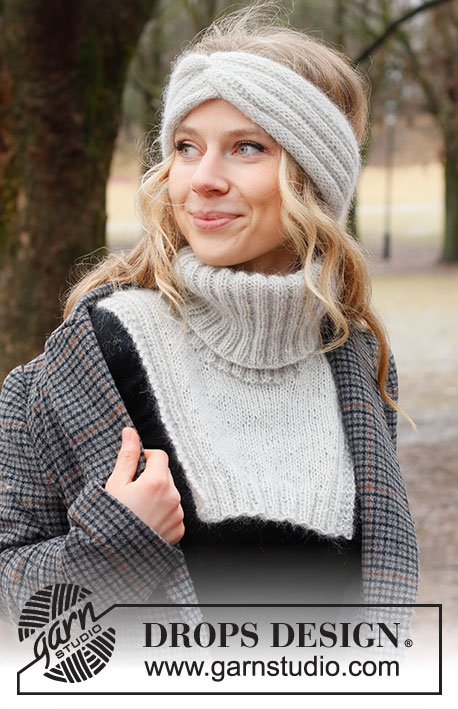
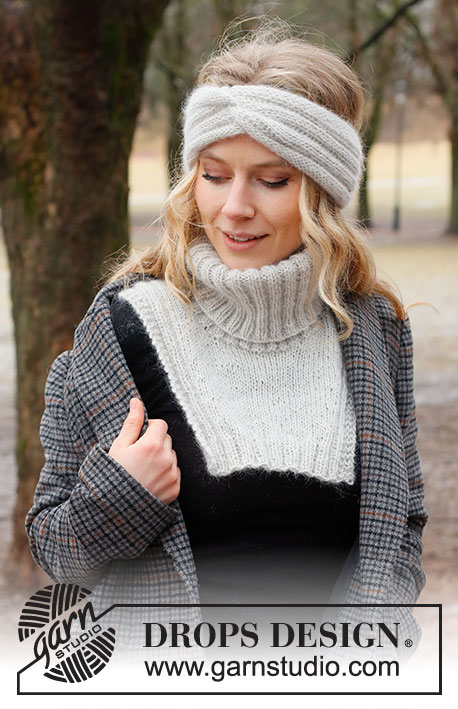
Knitted head band with cable and neck warmer in DROPS Alpaca and DROPS Kid-Silk or DROPS Flora and DROPS Kid-Silk. Piece is knitted with rib and stockinette stitch.
DROPS 226-56 |
|||||||
|
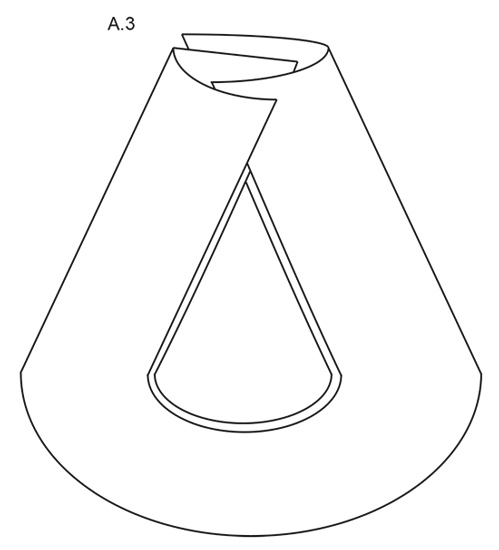
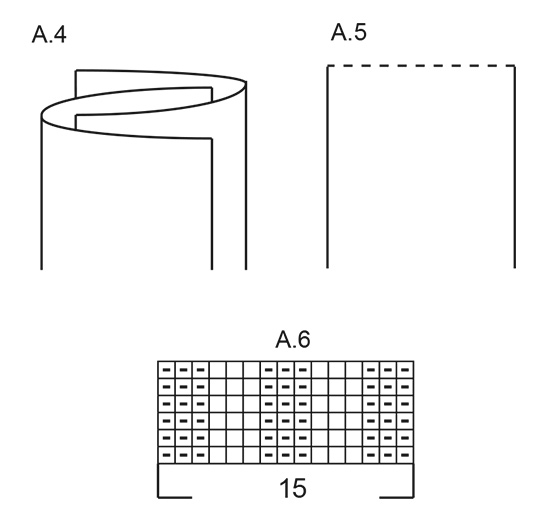
---------------------------------------------------------- EXPLANATION FOR THE PATTERN: ---------------------------------------------------------- PATTERN (applies to head band): See diagrams A.1 to A.6. Use diagram A.1 to A.5 when head band is assembled. GARTER STITCH (applies to neck warmer): Knit all rows. BIND-OFF TIP: To avoid a tight bind-off edge when binding off, you may use a larger needle. If this still is too tight make 1 yarn over after approx. every 4th stitch while binding off (bind off yarn overs as stitches). ---------------------------------------------------------- START THE PIECE HERE: ---------------------------------------------------------- HEAD BAND – SHORT OVERVIEW OF THE PIECE: Work piece in the round on double pointed needles as a tube. Sew end together to form a cable mid front on head band. HEAD BAND: Cast on 40-44-48 stitches on double pointed needles size 5 MM = US 8 with 1 strand DROPS Alpaca and 1 strand DROPS Kid-Silk or 1 strand DROPS Flora and 1 strand DROPS Kid-Silk (= 2 strands). Work in the round as follows: Work 12-14-16 stitches in stockinette stitch, work diagram A.6 (= 15 stitches), and work 13-15-17 stitches in stockinette stitch. REMEMBER THE KNITTING GAUGE! Work until piece measures approx. 49-51-53 cm = 19¼"-20"-21", or work to desired length - the head band should have a snug fit. Bind off by knitting. ASSEMBLY: The piece is now a tube with an opening at each end, place the tube flat - make sure that the tube is not twisted and that pattern A.6 is in the middle of tube (this should be the right side when piece is worn). Now close the openings at the ends with a seam in each side, sew in outermost loop of edge stitch to avoid a chunky seam - see dotted lines in diagram A.1. Piece is now a flat rectangle, fold it along the long side so that it is double with pattern on the right side of head band is inside the fold - see diagram A.2. Now place the long sides of head band in towards each other in layers without twisting the piece - see diagram A.3. The ends of the head band should now be alternately inside and outside of each other, and ends should be edge to edge - see diagram A.4. Now sew through all layers as follows: Sew along the dotted line in diagram A.5 (i.e. over the ends of piece), and sew with close whip stitches with 1 stitch in every stitch - it is important to sew through all layers to get an invisible seam when the piece is turned. Cut and fasten the yarn. Turn the piece so that the seam is on the inside of head band. ---------------------------------------------------------- NECK WARMER - SHORT OVERVIEW OF THE PIECE: Piece is worked back and forth bottom up. Begin piece at the bottom of front piece. Bind off for neck and finish each shoulder separately over shoulders. Then increase stitches towards the neck before slipping the shoulder stitches together and continue the back piece. Finish by picking up stitches around the neck and work rib. FRONT PIECE: Cast on 44-48-52 stitches on circular needle size 5 MM = US 8 with 1 strand DROPS Alpaca and 1 strand DROPS Kid-Silk or 1 strand DROPS Flora and 1 strand DROPS Kid-Silk (= 2 strands). Purl 1 row and work next row as follows from right side: Work 3 edge stitches in GARTER STITCH – read explanation above, work rib (= purl 2 / knit 2) until 5 stitches remain on round, purl 2 and 3 edge stitches in garter stitch. Continue with 3 edge stitches in garter stitch in each side and knit over knit and purl over purl until piece measures approx. 4 cm = 1½" and next row is from right side. Work as before over the first 9 stitches, work stockinette stitch over the next 26-30-34 stitches, work as before over the last 9 stitches. When piece measures 6 cm = 2⅜", increase in each side as follows from right side: Work as before over the first 10 stitches, make 1 yarn over, work as before until 10 stitches remain on needle, make 1 yarn over, work the rest of row. On next row work as before but purl yarn overs twisted. Repeat increase approx. every 2½ cm = 1" until 4-4-5 increases have been done in total in each side = 52-56-62 stitches. REMEMBER THE KNITTING GAUGE! Work until piece measures 17-18-19 cm = 6¾"-7"-7½" , now put stitches aside for neck on next row from right side as follows: Work the first 21-22-24 stitches as before and then slip them on a stitch holder for left shoulder, bind off the next 10-12-14 stitches for neck and work the rest of row. Now work shoulders separately. RIGHT SHOULDER: = 21-22-24 stitches. Begin from wrong side, and bind off for neck at the beginning of every row from right side as follows: Bind off 2 stitches 2 times and 1 stitch 2 times = 15-16-18 stitches. Work until piece measures 24-26-28 cm = 9½"-10¼"-11" from cast-on edge. Insert a marker in piece to measure from (= mid on top of shoulder). Work until piece measures 3-4-5 cm = 1⅛"-1½"-2" from marker on shoulder and next row is from wrong side, now cast on stitches towards the neck at the end of every row from wrong side as follows: cast on 1 stitch 2 times and 2 stitches 2 times = 21-22-24 stitches. Piece measures 7-8-9 cm = 2¾"-3⅛"-3½" from marker on shoulder. Cut the yarn and slip stitch on another stitch holder, now work left shoulder. LEFT SHOULDER: Slip the first 21-22-24 stitches from stitch holder back on needle. Begin from wrong side, and bind off for neck at the beginning of every row from wrong side as follows: Bind off 2 stitches 2 times and bind off 1 stitch 2 times = 15-16-18 stitches. Work until piece measures 24-26-28 cm = 9½"-10¼"-11" from cast-on edge. Insert a marker in piece to measure from (= mid on top of shoulder). Work until piece measures 3-4-5 cm = 1⅛"-1½"-2" from marker on shoulder and next row is from right side, now cast on stitches towards the neck at the end of row from right side as follows: cast on 1 stitch 2 times and 2 stitches 2 times, and cast on 10-12-14 stitches at the end of next row from right side = 31-34-38 stitches. Piece measures approx. 7-8-9 cm = 2¾"-3⅛"-3½" from marker on shoulder. Now put left and right shoulder together, and work back piece from here. Slip stitches from right shoulder back on needle size 5 MM = US 8 and work over these stitches from right side = 52-56-62 stitches. BACK PIECE: Continue with stockinette stitch and pattern as before, AT THE SAME TIME when piece measures 10½-12-12 cm = 4⅛"-4¾"-4¾" from marker on shoulder, decrease stitches inside the outermost 10 stitches in each side as follows from right side: Work pattern as before over the outermost 10 stitches, knit 2 together, work until 12 stitches remain on needle, slip 1 stitch knitwise, knit 1 and pass slipped stitch over, work as before over the last 10 stitches. Repeat decrease inside the 10 outermost stitches approx. every 2½ cm = 1" until 4-4-5 decreases have been done in total in each side = 44-48-52 stitches. Work until piece measures 20-22-24 cm = 8"-8¾"-9½" from marker on shoulder - adjust so that back piece is the same length as front piece (without rib). Work next row from right side as follows: Work 3 edge stitches in garter stitch, work rib (= purl 2 / knit 2) until 5 stitches remain on row, purl 2 and 3 edge stitches in garter stitch. Continue with 3 edge stitches in garter stitch in each side and knit over knit and purl over purl until piece measures approx. 4 cm = 1½" and next row is from right side. Piece measures approx. 24-26-28 cm = 9½"-10¼"-11" from marker on shoulder. Bind off with knit over knit and purl over purl - read BIND-OFF TIP. NECK EDGE: Use circular needle size 4 MM = US 6 and 1 strand of each quality (= 2 strands). Begin at the marker on shoulder and pick up approx. 96-102-110 stitches. Purl 1 round adjust evenly to 100-104-108 stitches - number of stitches must be divisible by 4. Work rib (= knit 2/purl 2). Work until rib measures approx. 24 cm = 9½". Bind off with knit over knit and purl over purl - remember BIND-OFF TIP. |
|||||||
Diagram explanations |
|||||||
|
|||||||
 |
|||||||
 |
|||||||
 |
|||||||
Have you finished this pattern?Tag your pictures with #dropspattern #silverbirchset or submit them to the #dropsfan gallery. Do you need help with this pattern?You'll find 26 tutorial videos, a Comments/Questions area and more by visiting the pattern on garnstudio.com. © 1982-2026 DROPS Design A/S. We reserve all rights. This document, including all its sub-sections, has copyrights. Read more about what you can do with our patterns at the bottom of each pattern on our site. |
|||||||


With over 40 years in knitting and crochet design, DROPS Design offers one of the most extensive collections of free patterns on the internet - translated to 17 languages. As of today we count 325 catalogs and 12298 patterns - 12288 of which are translated into English (US/in).
We work hard to bring you the best knitting and crochet have to offer, inspiration and advice as well as great quality yarns at incredible prices! Would you like to use our patterns for other than personal use? You can read what you are allowed to do in the Copyright text at the bottom of all our patterns. Happy crafting!
Post a comment to pattern DROPS 226-56
We would love to hear what you have to say about this pattern!
If you want to leave a question, please make sure you select the correct category in the form below, to speed up the answering process. Required fields are marked *.