
Popular categories
Looking for a yarn?


Comments / Questions (35)
![]() Marianne Rooijmans wrote:
Marianne Rooijmans wrote:
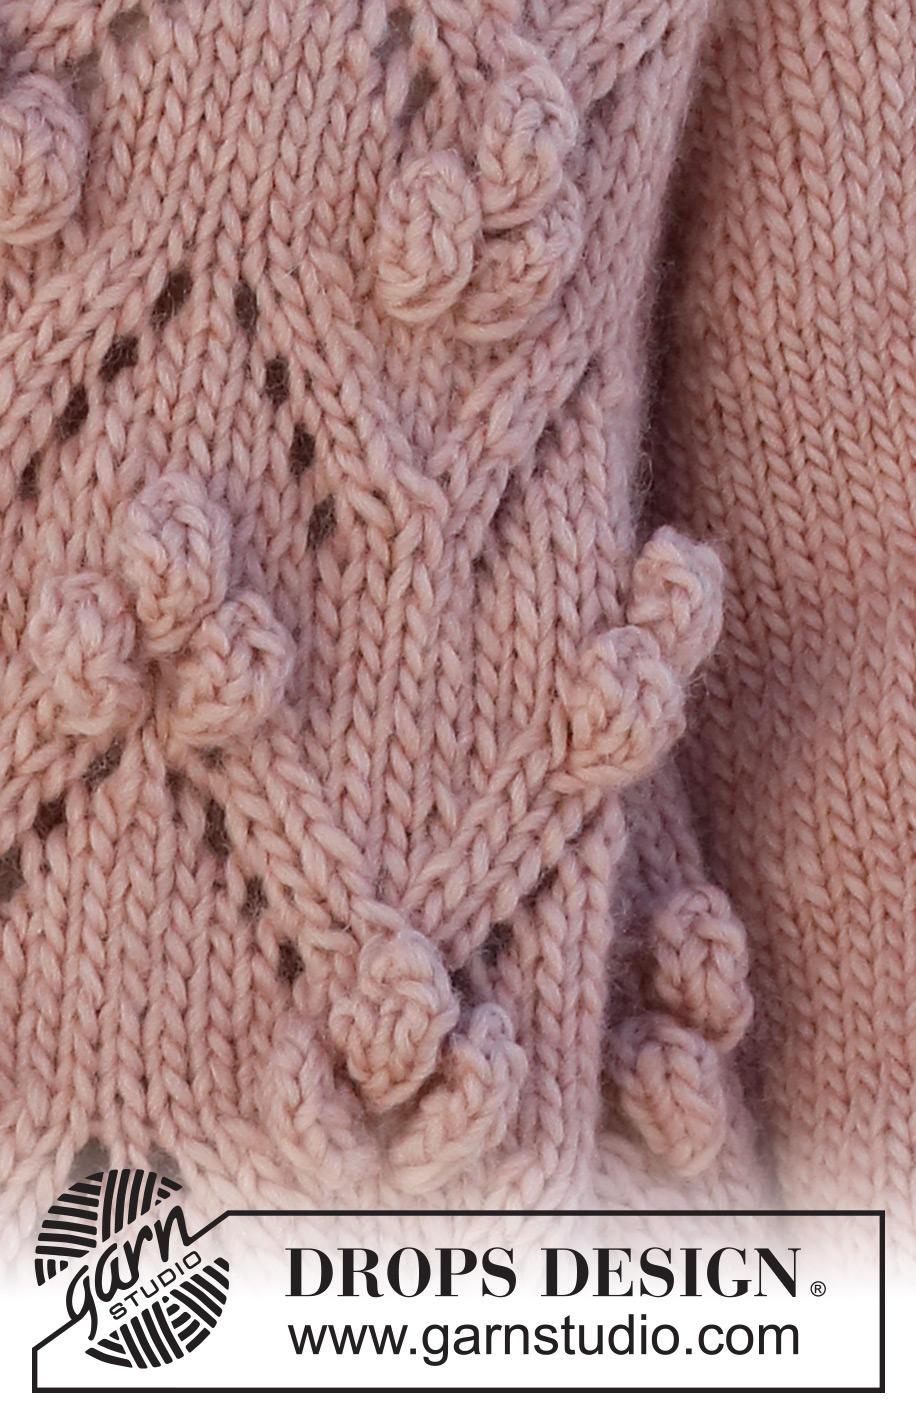
Thanks, but that is not mij problem. On the photos there seems to be a line of two stitches which are lying diagonally above the holes. But when I work the pattern, there only is one diagonal lying stitch.
14.01.2026 - 08:14DROPS Design answered:
Dear Mrs Rooijmans, sorry, I'm not sure which diagram you are working on nor which line you are talking about, maybe you could show your work to your store (even per mail) so that they can check together with you? Or please give us more info so that we can try to answer you. Thanks for your comprehension.
15.01.2026 - 09:12
![]() Marianne Rooijmans wrote:
Marianne Rooijmans wrote:
I just started with the pattern. So it are the first 10 rows.
12.01.2026 - 12:07DROPS Design answered:
Dear Mrs Roojimans, so you worked A.1? the 10th row is purled from WS, then you work the 11th row with 1 boble lined up over the knitted stitch between the 2 yarn overs on 3rd row. And on 13th row you work 2 bobles, 1 on each side of the previous one. Can this help?
14.01.2026 - 07:44
![]() Marianne Rooijmans wrote:
Marianne Rooijmans wrote:
I started the lace pattern as shown in A1 on a test piece. However, I only have one horizontal stitch next to the holes. The photo shows two diagonal horizontal stitches. Is that correct? Thanks, Marianne.
10.01.2026 - 11:19DROPS Design answered:
Dear Mrs Rooijmans, which row A.1 are you talking about? not sure how to check, thanks for your comprehension.
12.01.2026 - 10:01
![]() Marianne wrote:
Marianne wrote:
Op een proeflapje begonnen met het kantpatroon zoals in A1 staat. Maar daarbij heb ik maar 1 liggende steek naast de gaatjes. Op de foto staan er 2 schuine liggende steken. Klopt dat? Bedankt Marianne
07.01.2026 - 15:08
![]() Gosia wrote:
Gosia wrote:
Witam. Już na samym początku źle mi wychodziło ale czytając porady i komentarze rozszyfrowałam wzór i wychodzi bosko. Dziękuję
21.06.2025 - 08:08DROPS Design answered:
Super, miłej pracy i pięknego efektu końcowego!
22.06.2025 - 08:33
![]() Gosia wrote:
Gosia wrote:
Witam. Jeśli chodzi o wzór to przerabiamy ze schematu po prawej stronie a na lewej jak schodzą z drutów?? Ja tak robię i ciągle mam za dużo o 3 oczka do wzoru, dlaczego?
19.06.2025 - 09:22DROPS Design answered:
Witaj Gosiu, na prawej stronie przerabiasz oczka wg schematu od prawej do lewej strony i od dołu do góry schematu. Na lewej stronie przerabiasz schematy od lewej do prawej (w tym przypadku na lewo). Co do większej liczby oczek zastanawiam się czy nie mylisz się w jakimś symbolu, np. czarny trójkąt - z 3 oczek powinno zostać 1 oczko. Możesz powiedzieć w którym miejscu którego schematu jest ta rozbieżność?
20.06.2025 - 09:07
![]() Donatella Brighel wrote:
Donatella Brighel wrote:
Infatti, per questo sono in difficoltà.ho fatto la prova e per tensione e tipo di filato ho avuto bisogno di avviare 126 ,quindi ora dovendo centrare il disegno e dovendo dividere tra il dietro e i due davanti non so come fare.
16.12.2024 - 17:05DROPS Design answered:
Buonasera Donatella, per un aiuto così personalizzato può rivolgersi al suo rivenditore DROPS di fiducia. Buon lavoro!
17.12.2024 - 23:36
![]() Donatella wrote:
Donatella wrote:
Ho cominciato il lavoro con 126 maglie, ho fatto le prime diminuzioni.con 123 maglie comincio lo sprone :4 maglie legaccio, A1,1 gettato,1maglia diritto,1 gettato , quante maglie diritto ???grazie
08.12.2024 - 22:14DROPS Design answered:
Buonasera Donatella, quale taglia sta seguendo? In nessuna taglia di questo modello si avviano 126 maglie. Buon lavoro!
13.12.2024 - 22:43
![]() Dominika wrote:
Dominika wrote:
Witam! Nie rozumiem kiedy dokładnie mam przejść z wzorów A1-A3 do wzorów A4-A6. Robię sweter w rozmiarze S po dodaniu 11 razy oczek na reglan utknęłam w miejscu długość mojej robótki to 18 cm więc muszę jeszcze 3 cm dorobić żeby wykonać podział na przód , tył i rękawy. Nie mam pojęcia jakie schematy mam dalej przerabiać ,schematy A1-A3 są z oczkami dodawanymi a A4 A6 są schematami z liczbą dodanych oczek po podziale robótki . Pierwszy raz mam problem z waszym wzorem
10.02.2024 - 13:48DROPS Design answered:
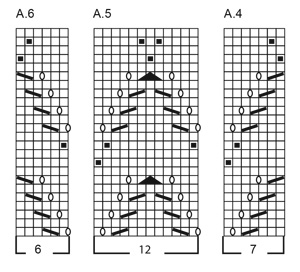
Witaj Dominiko, dalej przerabiasz jak wcześniej, jeszcze przez 3 cm, ale już nie dodajesz oczka na reglany. Trzymaj się dalej schematów A1-A.3, a pozostałe oczka przerabiaj dżersejem. Następnie przejdź do części TYŁ & PRZODY i do rzędu schematów A.4 - A.6 będącego kontynuacją schematów A.1 - A.3 i dalej przerabiaj zgodnie z opisem. Pozdrawiamy!
13.02.2024 - 09:58
![]() Eleonora wrote:
Eleonora wrote:
Buongiorno, dopo lo sprone con la taglia M ottengo 183 maglie, arrivo a 23 cm e mi presto a fare il ferro a rovescio...domanda: 30 maglie davanti dx, 36 maglie in sospeso, avvio 6 maglie...ma le 6 maglie le avvio attaccate alle 36 maglie sospese della manica o le avvio all'inizio delle 51 del dietro? e le successive 6 maglie le attacco alle 36 maglie della manica sospese o all'inizio delle 30 maglie davanti sx?
13.12.2023 - 15:44DROPS Design answered:
Buongiorno Eleonora, deve lavorare le 30 maglie del davanti, mettere in sospeso 36 maglie (manica) senza lavorarle, avviare le 6 maglie che si congiungono alle 51 maglie del dietro. Le 6 maglie avviate a ogni lato costituiscono il sottomanica, le 36 maglie in sospeso saranno le maniche che verranno lavorate in seguito. Buon lavoro!
19.12.2023 - 09:02
|
|||||||||||||||||||
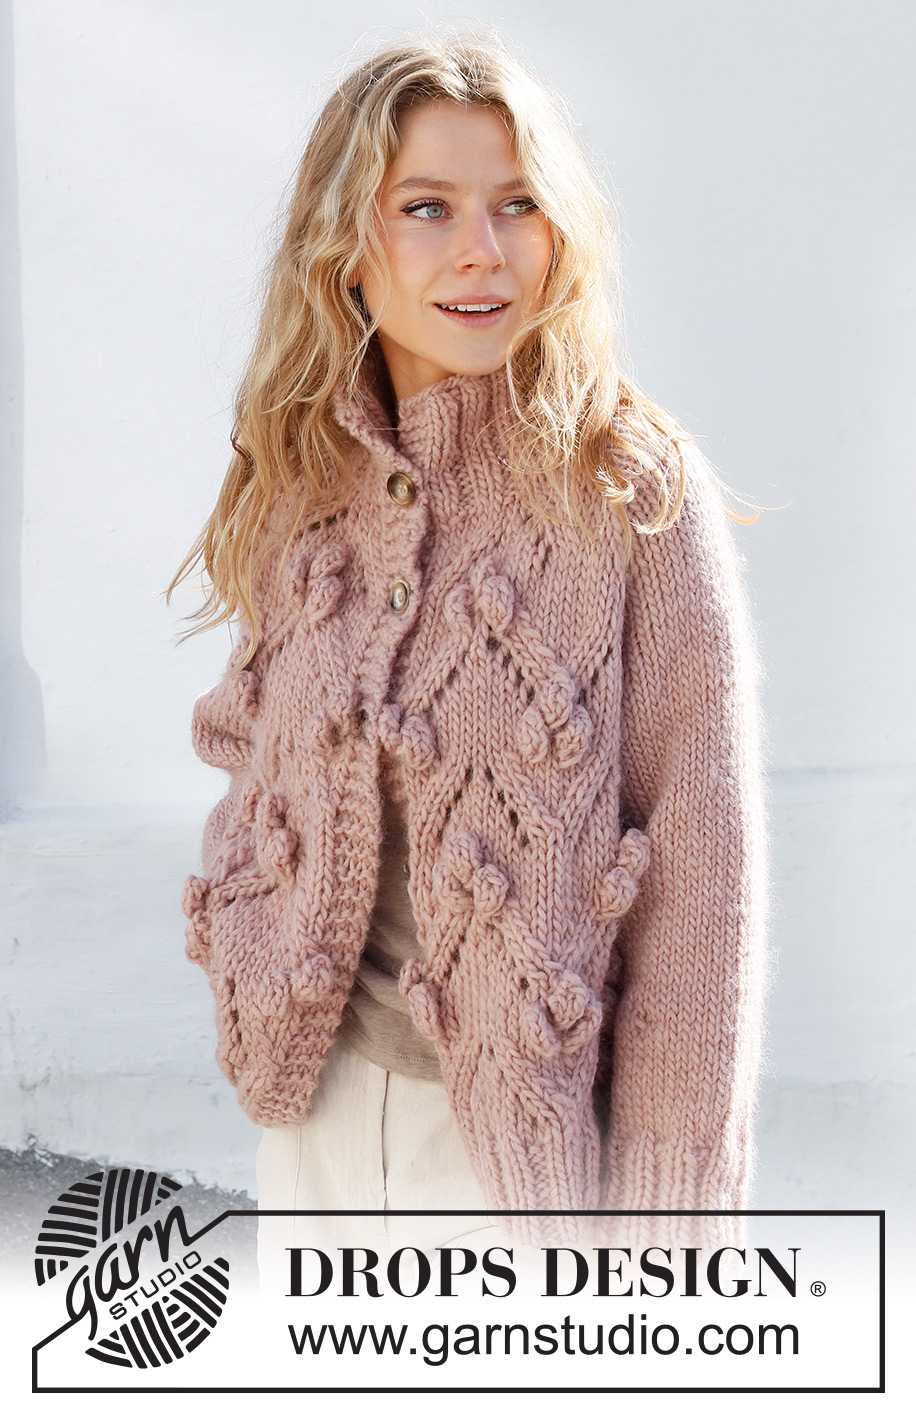
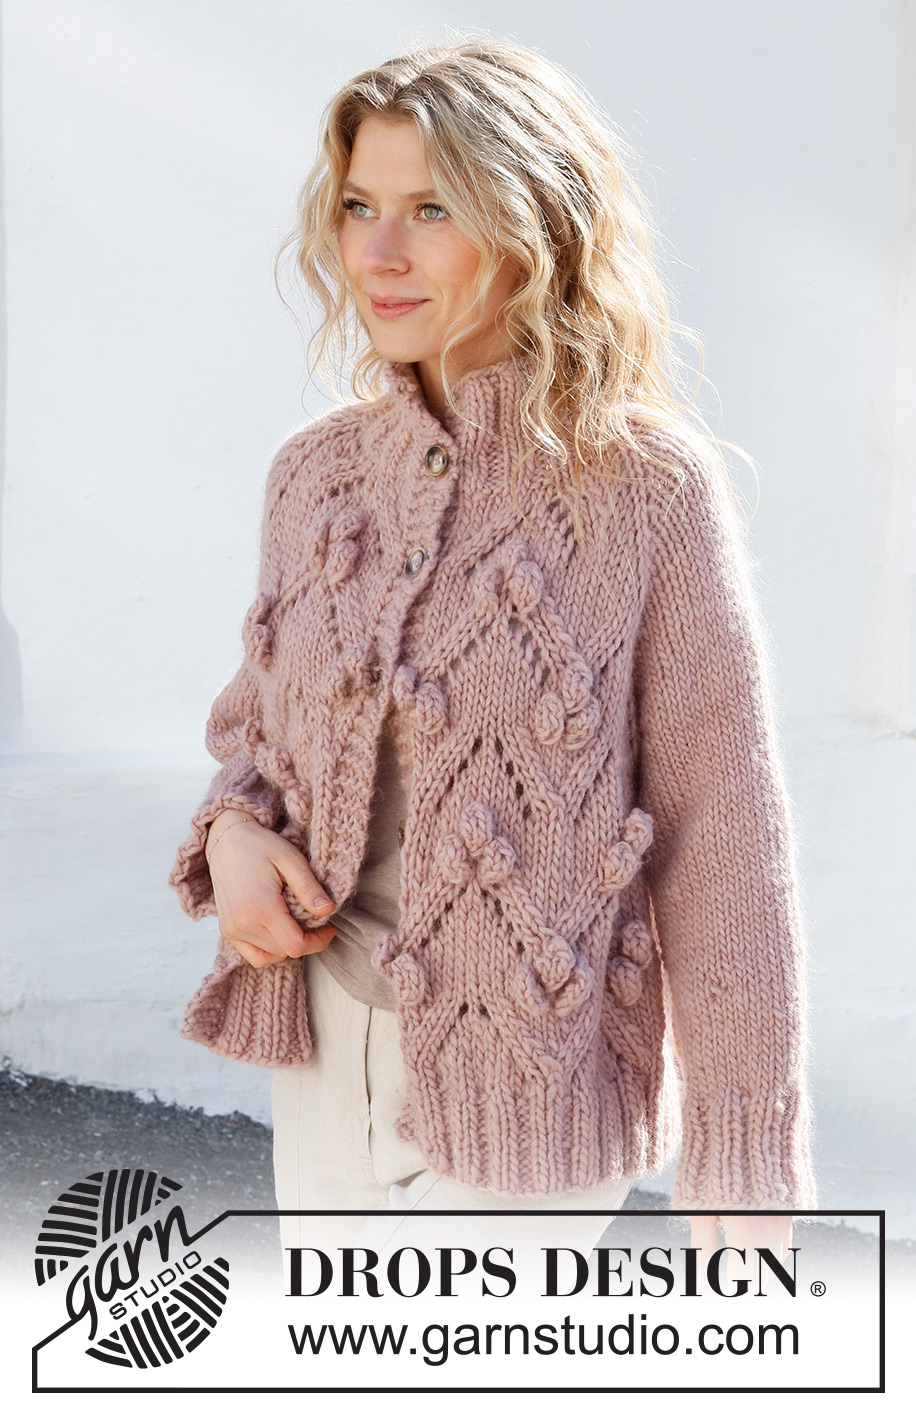
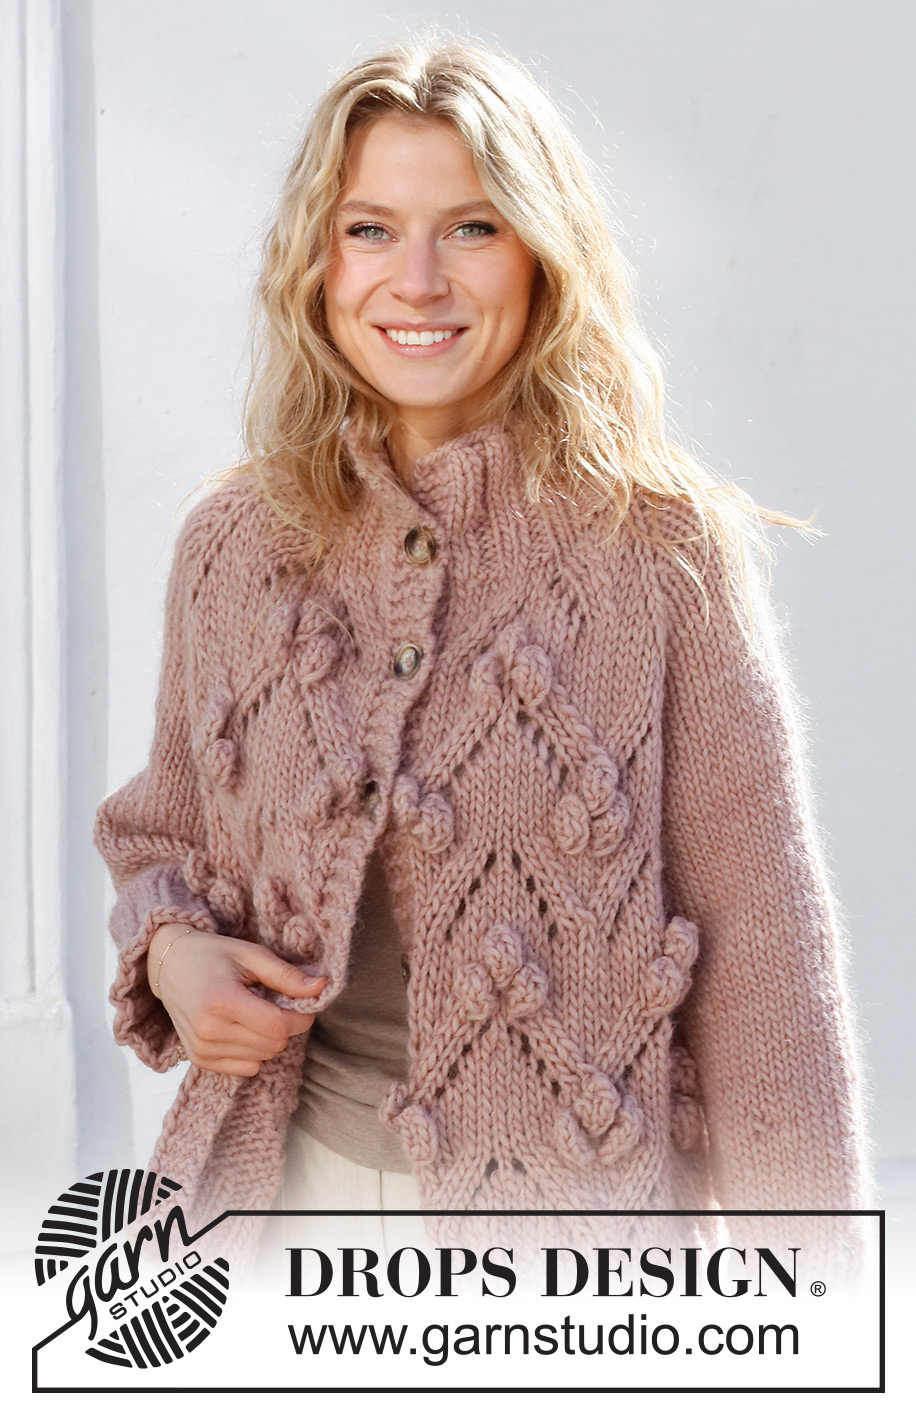
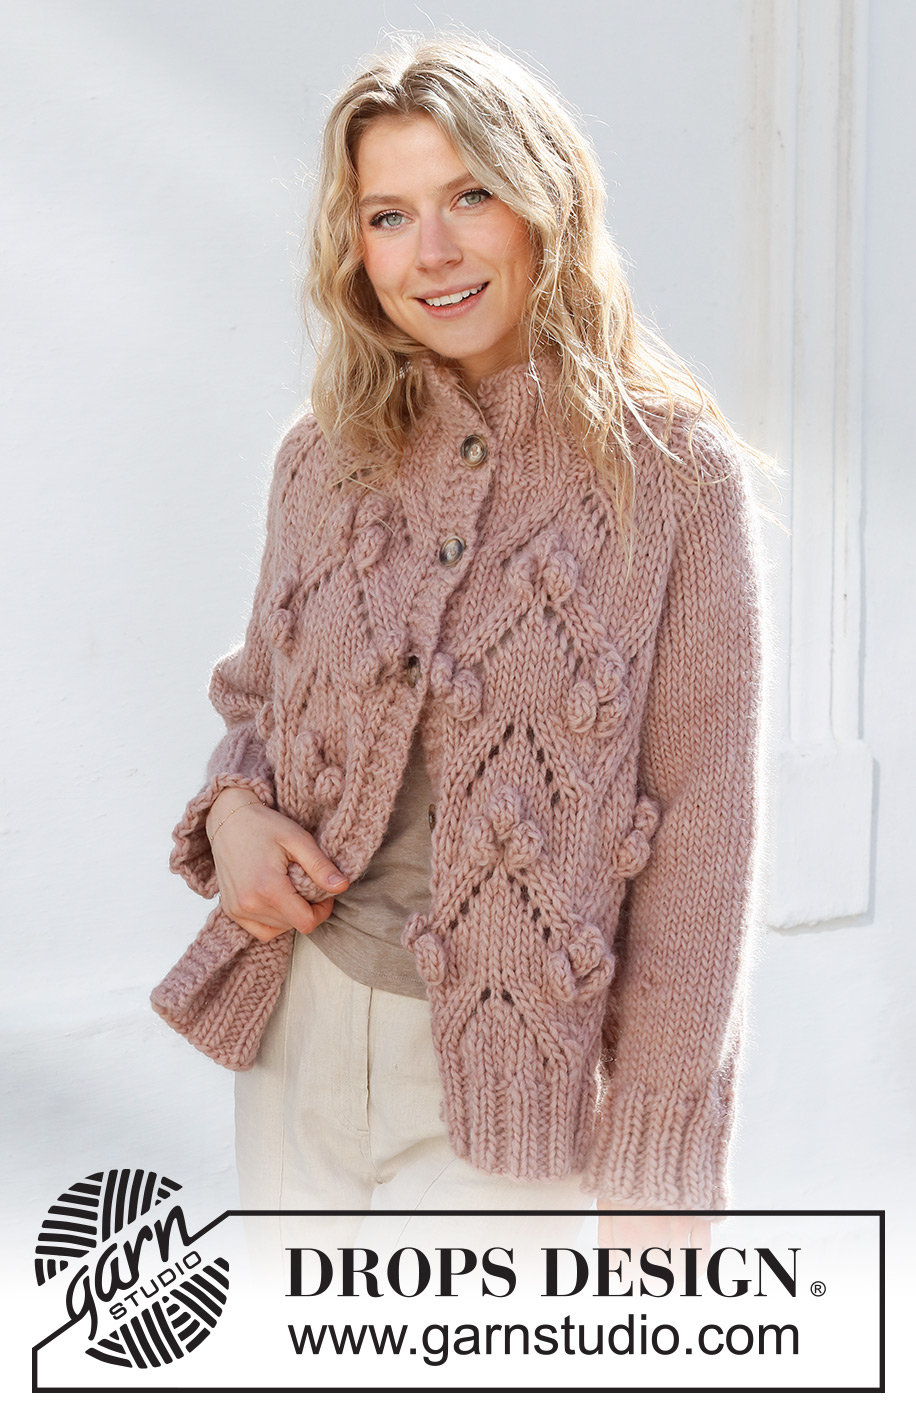
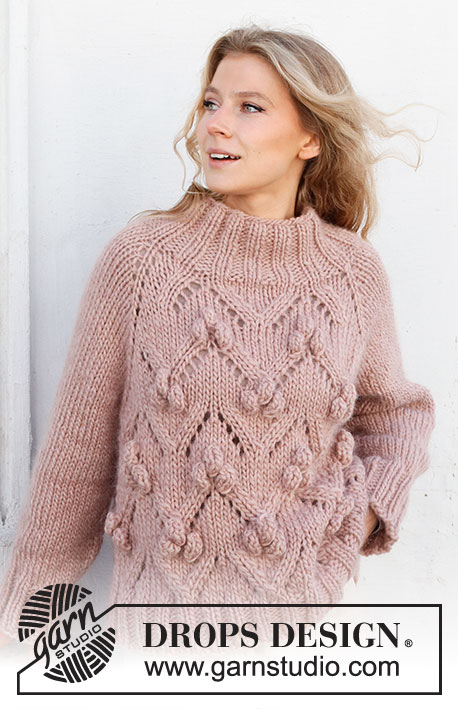
Rosé Bubbles Jacket#rosébubblesjacket |
|||||||||||||||||||
 |
 |
||||||||||||||||||
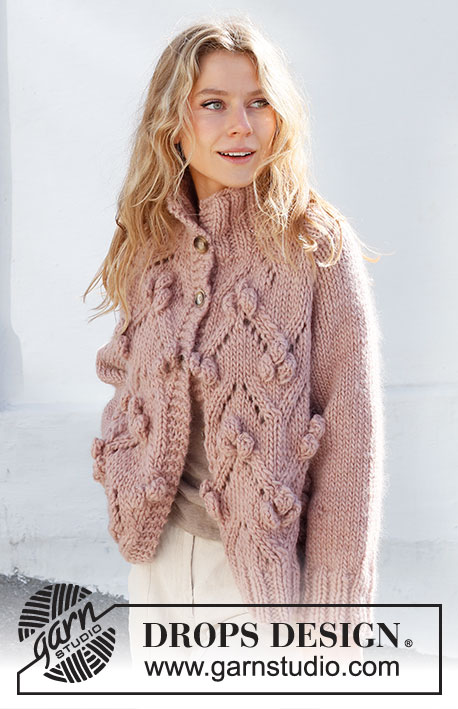
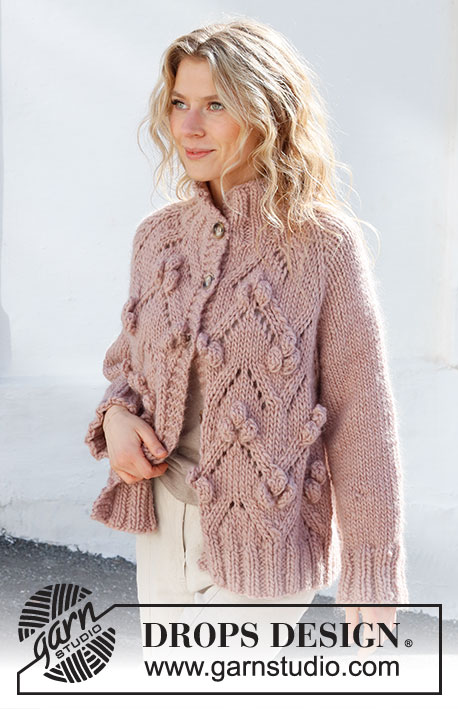
Knitted jacket in DROPS Snow or DROPS Wish. The piece is worked top down with raglan and lace pattern. Sizes S - XXXL.
DROPS 227-23 |
|||||||||||||||||||
|
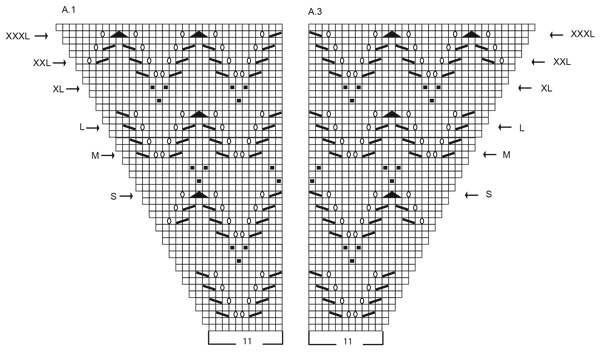
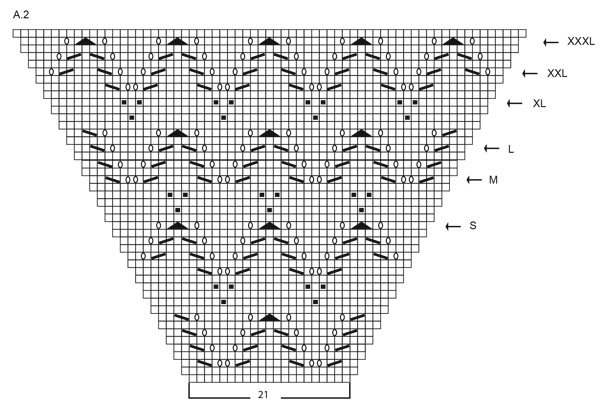
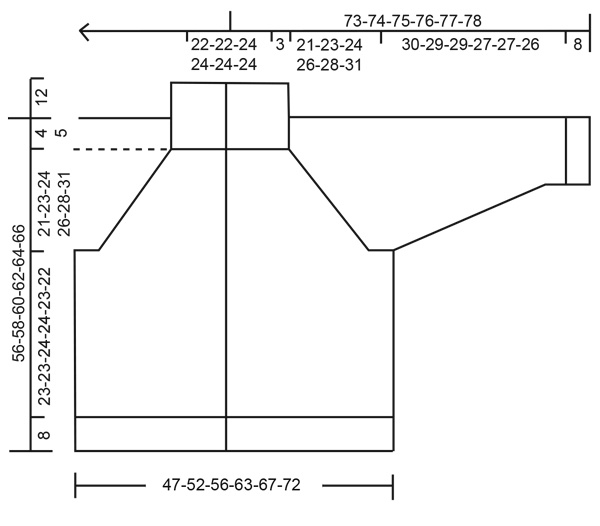
------------------------------------------------------- EXPLANATIONS FOR THE PATTERN: ------------------------------------------------------- RIDGE/GARTER STITCH (worked back and forth): Knit all rows. 1 ridge = knit 2 rows. RAGLAN: Increase by making 1 yarn over on each side of 1 knitted stitch (raglan-line), in each transition from body to sleeves (= 8 stitches increased on the row). On the next row (wrong side) work the yarn overs as follows: BEFORE RAGLAN-LINE: Purl in the back loop. No hole. AFTER RAGLAN-LINE: Slip the yarn over from the left needle and put it back the other way (insert the left needle from the back when placing it back on the needle). Purl in the front loop. No hole. Then work the increased stitches in stockinette stitch on the sleeves and in pattern on the front/back pieces. PATTERN: See diagrams A.1 to A.6. The diagrams show all rows in the pattern from the right side. INCREASE TIP (evenly spaced): To work out how to increase evenly, count the total number of stitches on the needle (e.g. 111 stitches) minus the bands (e.g. 8 stitches) and divide the remaining stitches by the number of increases to be made (e.g. 11) = 9.4. In this example, increase by making 1 yarn over after approx. each 9th stitch. Do not increase on the bands. On the next row work the yarn overs twisted to avoid holes. BINDING-OFF TIP: To avoid the bind-off edge being tight you can bind off with a larger size needle. If the edge is still tight, make 1 yarn over after approx. each 4th stitch at the same time as binding off; the yarn overs are bind off as normal stitches. DECREASE TIP (for sleeves): Decrease 1 stitch on either side of the marker thread as follows: Work until there are 3 stitches left before the marker thread, knit 2 together, knit 2 (marker thread sits between these 2 stitches), slip 1 stitch as if to knit, knit 1 and pass the slipped stitch over the knitted stitch (2 stitches decreased). BUTTONHOLES: Work buttonholes on the right band (when the garment is worn). Work from the right side when there are 3 stitches left on the row as follows: Make 1 yarn over, knit 2 together and knit 1. On the next row, knit the yarn over to leave a hole. The first buttonhole is worked when the rib on the neck measures 9 cm = 3½". Then work the other 4-4-5-5-5-5 buttonholes with approx. 9-9-8-8½-8½-9 cm = 3½"-3½"-3⅛"-3¼"-3¼"-3½" between each one. ------------------------------------------------------- START THE PIECE HERE: ------------------------------------------------------- JACKET - SHORT OVERVIEW OF THE PIECE: The neck, yoke and body are worked with circular needle, back and forth from mid-front. The sleeves are worked in the round with short circular needle/double pointed needles, top down. NECK: Cast on 74-74-78-78-82-82 stitches (including 4 band stitches on each side towards mid-front) with circular needle size 7 MM = US 10.75 and DROPS Snow or DROPS Wish. Purl 1 row from the wrong side, then work as follows from the right side: 4 band stitches in GARTER STITCH – read explanation above, * knit 2, purl 2 *, repeat *-* until there are 6 stitches left, knit 2 and 4 band stitches in garter stitch. Work this rib for 12 cm = 4¾". Remember the BUTTONHOLES on the right band. Purl 1 row from the wrong side where you decrease 3 stitches evenly spaced (do not decrease on the bands) = 71-71-75-75-79-79 stitches. Change to circular needle size 8 MM = US 11. Insert 1 marker, THE YOKE IS MEASURED FROM HERE! YOKE: Work as follows from the right side: 4 band stitches in garter stitch, A.1, 1 yarn over, knit 1 (= raglan-line), 1 yarn over, knit 8-8-10-10-12-12, 1 yarn over, knit 1 (= raglan-line), 1 yarn over, work A.2, 1 yarn over, knit 1 (= raglan-line), 1 yarn over, knit 8-8-10-10-12-12, 1 yarn over, knit 1 (= raglan-line), 1 yarn over, work A.3 and 4 band stitches in garter stitch. The first increase to RAGLAN – read description above, is now finished. Continue this pattern and increase to raglan every 2nd row (i.e. each row from the right side) a total of 11-14-16-19-21-23 times (see arrow for your size in A.1, A.2 and A.3). REMEMBER THE KNITTING GAUGE! After the last increase there are 159-183-203-227-247-263 stitches. Continue the pattern without further increases until the yoke measures 21-23-24-26-28-31 cm = 8¼"-9"-9½"-10¼"-11"-12¼" from the marker. The next row is worked as follows from the wrong side: Work 27-30-32-35-37-39 as before (= front piece), place the next 30-36-42-48-54-58 stitches on 1 thread for the sleeve, cast on 6-6-6-8-8-10 stitches (= in side under sleeve), purl 45-51-55-61-65-69 (= back piece), place the next 30-36-42-48-54-58 stitches on 1 thread for the sleeve, cast on 6-6-6-8-8-10 stitches (= in side under sleeve), work the last 27-30-32-35-37-39 stitches as before (= front piece). THE PIECE IS NOW MEASURED FROM HERE! BODY: = 111-123-131-147-155-167 stitches. Start on the rows in A.4 - A.6 which match the stitches from A.1 - A.3 and work as follows from the right side: 4 band stitches in garter stitch, A.4, A.5 is worked 1-1-1-1-2-2 times, A.6, knit 2-8-12-20-0-6, A.4, A.5 is worked 3-3-3-3-5-5 times, A.6, knit 2-8-12-20-0-6, A.4, A.5 is worked 1-1-1-1-2-2 times, A.6 and 4 band stitches in garter stitch. Continue this pattern until the body measures 23-23-24-24-23-22 cm = 9"-9"-9½"-9½"-9"-8¾" from the division. There is 8 cm = 3⅛" left to finished length; try the jacket on and work to desired length. To avoid the following rib being tight, knit 1 row from the right side where you increase 11-15-15-15-15-15 stitches evenly spaced – read INCREASE TIP = 122-138-146-162-170-182 stitches. Change to circular needle 7 and work the next row as follows from the wrong side: 4 band stitches in garter stitch, * purl 2, knit 2 *, repeat *-* until there are 6 stitches left, purl 2 and 4 band stitches in garter stitch. Continue this rib for 8 cm = 3⅛". Loosely bind off with garter stitch over garter stitch, knit over knit and purl over purl – read BINDING-OFF TIP. The jacket measures approx. 56-58-60-62-64-66 cm = 22"-22¾"-23⅝"-24⅜"-25¼"-26" from the shoulder down. SLEEVES: Place the 30-36-42-48-54-58 stitches from the thread on the one side of the piece on short circular needle size 8 MM = US 11 and knit up 1 stitch in each of the 6-6-6-8-8-10 stitches cast on under the sleeve = 36-42-48-56-62-68 stitches. Insert a marker thread in the middle of the new stitches under the sleeve. Start at the marker thread and work stockinette stitch in the round for 3 cm = 1⅛". Now decrease 2 stitches under the sleeve – read DECREASE TIP. Decrease like this every 15-8-8-4-3½-3 cm = 6"-3⅛"-3⅛"-1½"-1¼"-1⅛" a total of 2-3-4-6-7-8 times = 32-36-40-44-48-52 stitches. Continue working until the sleeve measures 30-29-29-27-27-26 cm = 11¾"-11⅜"-11⅜"-10⅝"-10⅝"-10¼" from the division. There is approx. 8 cm = 3⅛" left; try the jacket on and work to desired length – NOTE! Shorter measurements in larger sizes due to wider neck and longer yoke. Change to double pointed needles size 7 MM = US 10.75 and work rib (knit 2, purl 2) for 8 cm = 3⅛". Bind off with knit over knit and purl over purl – remember BINDING-OFF TIP! The sleeve measures approx. 38-37-37-35-35-34 cm = 15"-14½"-14½"-13¾"-13¾"-13⅜" from the division. Work the other sleeve in the same way.. ASSEMBLY: Sew the buttons onto the left band. |
|||||||||||||||||||
Diagram explanations |
|||||||||||||||||||
|
|||||||||||||||||||
 |
|||||||||||||||||||
 |
|||||||||||||||||||
 |
|||||||||||||||||||
 |
|||||||||||||||||||
Have you finished this pattern?Tag your pictures with #dropspattern #rosébubblesjacket or submit them to the #dropsfan gallery. Do you need help with this pattern?You'll find 29 tutorial videos, a Comments/Questions area and more by visiting the pattern on garnstudio.com. © 1982-2026 DROPS Design A/S. We reserve all rights. This document, including all its sub-sections, has copyrights. Read more about what you can do with our patterns at the bottom of each pattern on our site. |
|||||||||||||||||||


With over 40 years in knitting and crochet design, DROPS Design offers one of the most extensive collections of free patterns on the internet - translated to 17 languages. As of today we count 324 catalogs and 12290 patterns - 12280 of which are translated into English (US/in).
We work hard to bring you the best knitting and crochet have to offer, inspiration and advice as well as great quality yarns at incredible prices! Would you like to use our patterns for other than personal use? You can read what you are allowed to do in the Copyright text at the bottom of all our patterns. Happy crafting!
Post a comment to pattern DROPS 227-23
We would love to hear what you have to say about this pattern!
If you want to leave a question, please make sure you select the correct category in the form below, to speed up the answering process. Required fields are marked *.