
Popular categories
Looking for a yarn?


Comments / Questions (78)
![]() Myriam DEVAUCHELLE wrote:
Myriam DEVAUCHELLE wrote:
Bonjour, la réhausse se tricote t'elle quand on a fini le col avant d'entamer l'empiècement? Merci d'avance de votre réponse
23.06.2022 - 15:57DROPS Design answered:
Bonjour Mme Devauchelle, tout à fait, vous la tricotez quand le col est fait. Puis, quand la réhausse est terminée, vous tricotez l'empiècement. Bon tricot!
23.06.2022 - 16:14
![]() Silke Steding wrote:
Silke Steding wrote:
Die Krausrippen laufen in der hinteren Mitte am Ende der Runde nicht aufeinander zu, sondern es entsteht eine Stufe. Kann ich das vermeiden?
16.04.2022 - 22:06DROPS Design answered:
Liebe Frau Steding, Sie können mal versuchen, den Faden etwas fester zu ziehen, wenn Sie die erste Masche der nächsten Runde (mit rechten Maschen) stricken. Ihr DROPS Laden hat vielleicht noch mehr Tipps für Sie, gerne könnnen Sie dort mal - auch telefonisch oder per E-Mail fragen. Viel Spaß beim stricken!
19.04.2022 - 10:58
![]() Jonette R Kreideweis wrote:
Jonette R Kreideweis wrote:
Jonette here. I am back again with a quick question. I have finished my sweater. I love it. The Drops Nord is so soft and cozy. However, I did the two-rib hem and bound off loosely. Now my bottom hem is rolling up quite a bit. Do you have any suggestions? Should I extend the ribs for a couple more or go to a garter stitch bind-off. Your help is much appreciated. Thank you so much.
30.03.2022 - 21:19DROPS Design answered:
Dear Jonette, If the 4 rounds of garter stitch (that makes up the 2 ribs) is not enough to stop the wais rolling up, you can add some more rows of garter stitch. Happy Stitching!
31.03.2022 - 01:12
![]() Eva Svobodová wrote:
Eva Svobodová wrote:
Dobrý den, jestliže udáváte 24 ok na 10 cm, pak začít průkrčník na 110 ok znamená mít jeho obvod asi 45, 4 cm. Přetáhne se pulovr vůbec přes hlavu (běžný obvod hlavy je 55 cm)?
28.02.2022 - 19:28DROPS Design answered:
Hi Eva, if you could write your question in English, we will try to answer :)
22.04.2022 - 11:48
![]() Anne Bernard wrote:
Anne Bernard wrote:
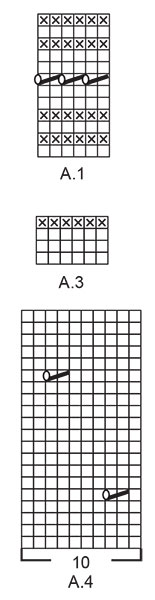
Bonjour Je tricote ce modèle en taille M Après A2 terminé je dois augmenter 7 m sur A3 soit 377:7=53.85 donc j'ai augmenté à 53 et 54 m mais à la fin j'ai 56 m à la place de 53. Comment faire ? Merci
21.02.2022 - 12:09DROPS Design answered:
Bonjour Mme Bernard, vous pouvez laisser ainsi, ou bien augmenter après chaque 54 et chaque 55ème maille, mais alors vous aurez moins de mailles avant la fin du tour. Bon tricot!
21.02.2022 - 13:24
![]() Jonette wrote:
Jonette wrote:
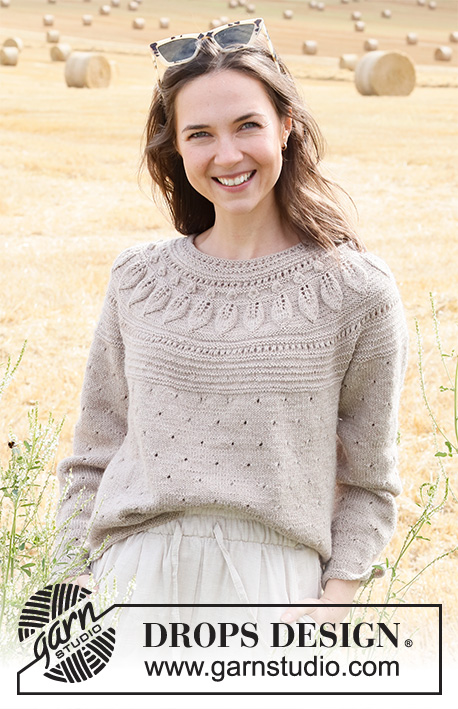
Quick question. Should I be knitting into the back of all my yarn overs? For example, in the. 7th row of A-1, should I knit into the back of those yarn overs on the next round? Any assistance is greatly appreciated. Thanks much.
12.02.2022 - 03:33DROPS Design answered:
Dear Jonette, only the yarn overs drawn as black ovals (= 4th symbol) will be worked twisted; the white ones (= 3rd symbol)should we worked as in diagram but not twisted to make holes. Happy knitting!
14.02.2022 - 11:12
![]() Anne BERNARD wrote:
Anne BERNARD wrote:
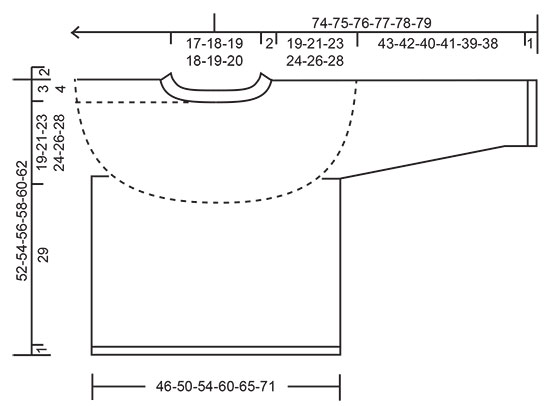
Bonjour Dans l'empiecement pour une taille L vous mettez de tricoter A3 jusqu'à 23 cm depuis le marqueur mais si j'ai fait une rehausse pour l'encolure du dos la mesure du dos et du devant ne sera pas la même ? Donc je voudrais savoir s'il faut mesurer avec ou sans la rehausse ? En attendant votre réponse je vous souhaite une bonne journée. Anne
06.01.2022 - 10:02DROPS Design answered:
Bonjour Mme Bernard, vous devez mesurer au milieu du devant, à partir du marqueur placé après le col (les rangs de la réhausse ne sont pas compris dans cette mesure). Bonne continuation!
06.01.2022 - 14:05
![]() Samira BRIKI wrote:
Samira BRIKI wrote:
Bonjour Je commence le modèle 223-11 et je bloque au diagramme A.1 . Je ne comprend pas le point qui est destiné au 7ème rang , je ne le vois pas dans la légende du diagramme. C'est une barre oblique avec un petit rond. Merci d'avance pour la solution. Cordialement
22.11.2021 - 23:24DROPS Design answered:
Bonjour Mme Briki, ce sont en fait 2 symboles qu'il faut lire séparément: la barre oblique = 6ème symbole soit 2 mailles ensemble à l'endroit et l'ovale = 3ème symbole = 1 jeté à tricoter à l'endroit au tour suivant pour qu'il forme un trou. Bon tricot!
23.11.2021 - 08:30
![]() Ros wrote:
Ros wrote:
What is the meaning of the symbol of an open 0 joined with a bold stroke from bottom left to top right across to stitches? (Most clearly shown in A4)
27.10.2021 - 16:51DROPS Design answered:
Dear Ros, this is actually two symbols: bold stroke = knit 2 together, 0 = between 2 stitches make 1 yarn over; on the next round knit the yarn over (leaves a hole) . Happy knitting!
27.10.2021 - 17:59
![]() Tanja wrote:
Tanja wrote:
Nachtrag : es fehlen 32 Maschen am Rumpf . Ich musste bei Größe L ja nur 40 Maschen aufnehmen . Das Muster A 2 mit den Zunahmen ist auch richtig gestrickt und trotzdem sind es zu wenig Maschen .
21.09.2021 - 22:50DROPS Design answered:
Liebe Tanja, vor A.2 haben Sie 160 M und Sie stricken A.2 (= 5 M) x 32 - wenn A.2 fertig ist haben Sie 13 M in jedem A.2 und 13 M x 32 = 416 M. Schauen Sie mal bei A.2 , einige Zunahmen wurden sicher verpasst. Viel Spaß beim stricken!
22.09.2021 - 07:25
|
|||||||||||||||||||||||||||||||
Sparrow Song#sparrowsongsweater |
|||||||||||||||||||||||||||||||
 |
 |
||||||||||||||||||||||||||||||
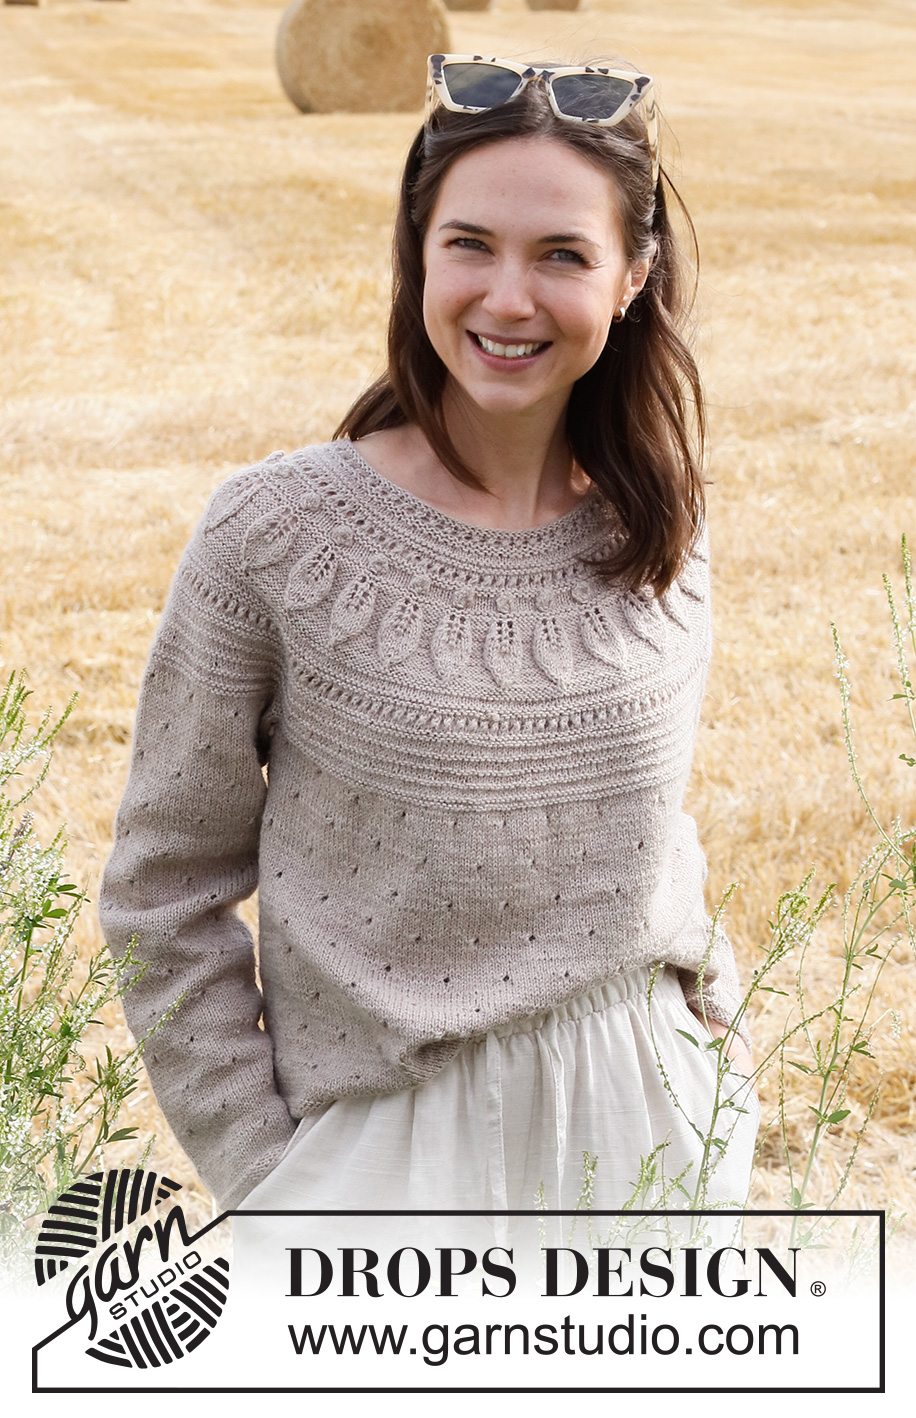
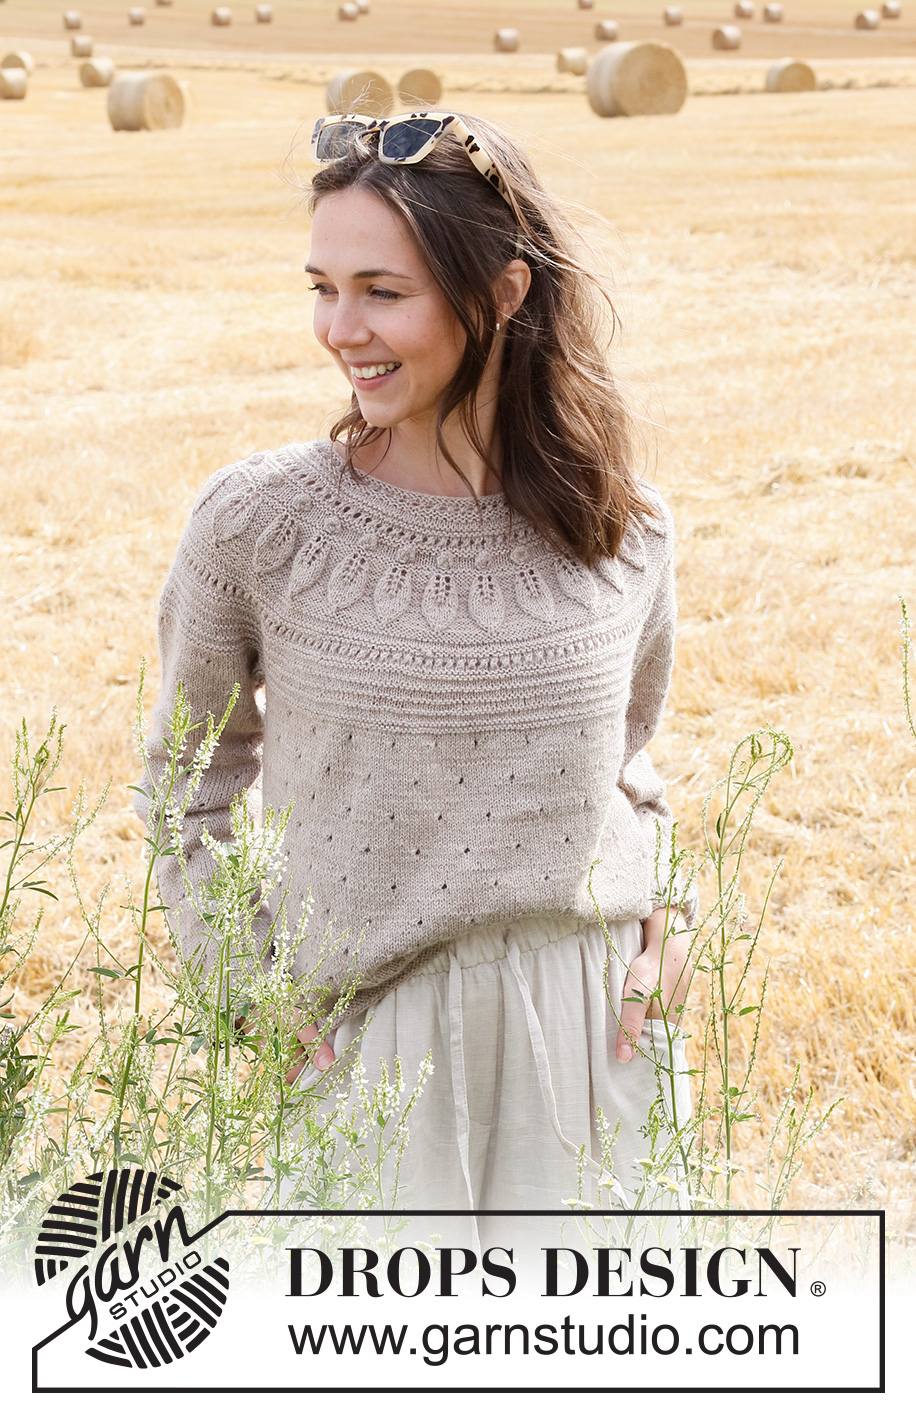
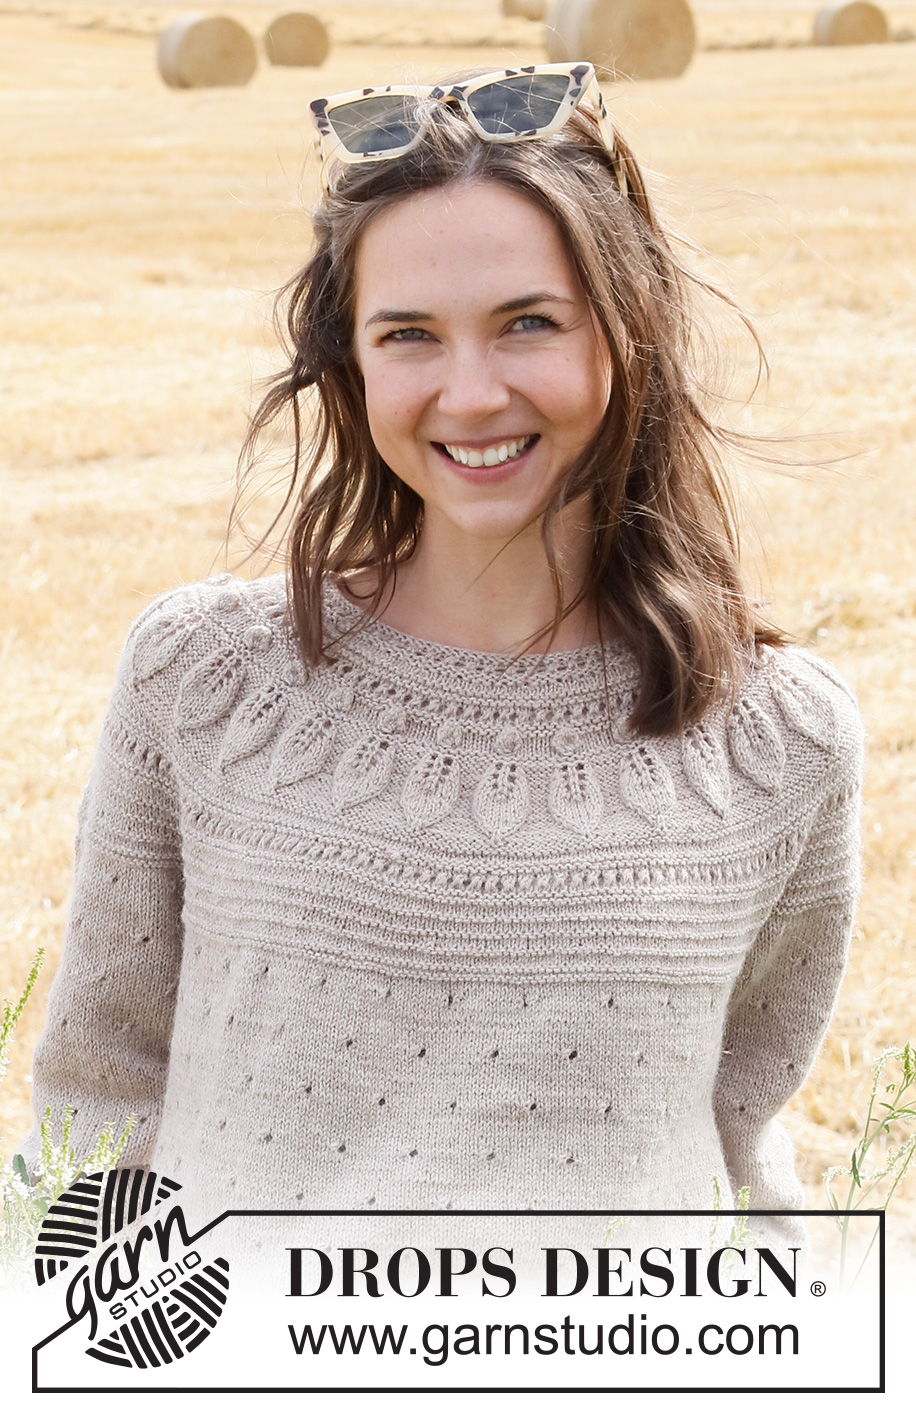
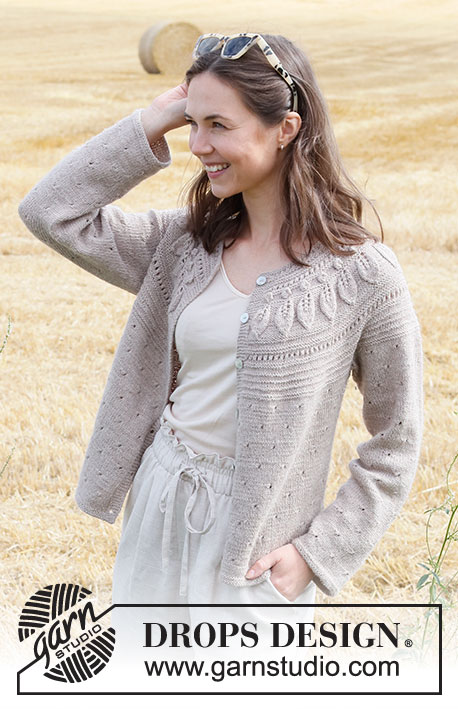
Knitted sweater in DROPS Nord. The piece is worked top down with round yoke, leaf pattern and lace pattern. Sizes S - XXXL.
DROPS 223-11 |
|||||||||||||||||||||||||||||||
|
------------------------------------------------------- EXPLANATIONS FOR THE PATTERN: ------------------------------------------------------- RIDGE/GARTER STITCH (worked in the round): 1 ridge in height = 2 rounds; Knit 1 round and purl 1 round. PATTERN: See diagrams A.1 to A.4. Choose diagram for your size (applies to A.2). INCREASE TIP (evenly spaced): To work out how to increase evenly, count the total number of stitches on the needle (e.g. 110 stitches) and divide by the number of increases to be made (e.g. 25) = 4.4. In this example, increase by making 1 yarn over after alternately each 4th and 5th stitch. On the next round knit the yarn overs twisted to avoid holes. ELEVATION (back of neck): To make the back of the neck slightly higher when working a round yoke, work an elevation as described here. Skip this section if you do not want an elevation. Insert 1 marker at the beginning of the round (mid-back). Start from the right side and knit 16-17-18-20-21-22 stitches past the marker, turn, tighten the strand and purl 32-34-36-40-42-44 stitches back. Turn, tighten the strand and knit 48-51-54-60-63-66 stitches, turn, tighten the strand and purl 64-68-72-80-84-88 stitches back. Turn, tighten the strand and knit 80-85-90-100-105-110 stitches, turn, tighten the strand and purl 96-102-108-120-126-132 stitches. Turn, tighten the strand and knit to mid-back. Then work YOKE as described in the text. DECREASE TIP (for sleeves): Decrease 1 stitch on either side of the marker thread as follows: Work until there are 3 stitches left before the marker thread, knit 2 together, knit 2 (marker thread sits between these 2 stitches), slip 1 stitch as if to knit, knit 1 and pass the slipped stitch over the knitted stitch (2 stitches decreased). BINDING-OFF TIP: To avoid the bind-off edge being tight you can bind off with a larger size needle. If the edge is still tight, make 1 yarn over after approx. each 4th stitch at the same time as binding off; the yarn overs are bind off as normal stitches. ------------------------------------------------------- START THE PIECE HERE: ------------------------------------------------------- SWEATER – SHORT OVERVIEW OF THE PIECE: The neck and yoke are worked in the round with circular needle, top down from mid back. The yoke is divided for body and sleeves and the body continued in the round with circular needle. The sleeves are worked in the round with short circular needle/double pointed needles, top down. NECK: Cast on 110-116-120-124-130-134 stitches with short circular needle size 2.5 MM = US 1.5 and Nord. Work A.1 in the round. When A.1 has been completed, knit 1 round where you increase 25-29-40-44-44-46 stitches evenly spaced – read INCREASE TIP = 135-145-160-168-174-180 stitches. Knit 1 round (yarn overs knitted twisted). Change to circular needle size 3 MM = US 2.5. Insert 1 marker in the middle of the round – the yoke is measured from this marker. You can now work an ELEVATION at the back of the neck – read description above. If you do not want an elevation, go straight to YOKE. YOKE: Work A.2 in the round (= 27-29-32-28-29-30 repeats of 5-5-5-6-6-6 stitches). Continue this pattern and increase as shown in the diagram. REMEMBER THE KNITTING GAUGE! When A.2 has been completed in height, there are 351-377-416-448-464-480 stitches and the piece measures approx. 15-15-15-17-17-17 cm = 6"-6"-6"-6¾"-6¾"-6¾" from the marker on the neck. Now work A.3 in the round – AT THE SAME TIME, on the first round in A.3, increase 5-7-0-18-22-36 stitches evenly spaced = 356-384-416-466-486-516 stitches. Work A.3 until the yoke measures approx. 19-21-23-24-26-28 cm = 7½"-8¼"-9"-9½"-10¼"-11" from the marker on the neck; finishing after a complete repeat in height. Knit 1 round. Purl 1 round AT THE SAME TIME as the yoke is divided for the body and sleeves as follows: Purl the first 52-57-61-69-73-79 stitches (= ½ back piece), place the next 74-78-86-96-98-100 stitches on a thread for the sleeve, cast on 6-6-8-8-10-12 stitches (= in side under sleeve), purl 104-114-122-137-145-158 stitches (= front piece), place the next 74-78-86-96-98-100 stitches on a thread for the sleeve, cast on 6-6-8-8-10-12 stitches (= in side under sleeve) and purl the last 52-57-61-68-72-79 stitches (= ½ back piece). Body and sleeves are finished separately. THE PIECE IS NOW MEASURED FROM HERE! BODY: = 220-240-260-290-310-340 stitches. Start the round on one side – in the middle of the 6-6-8-8-10-12 stitches cast on under the sleeve, and work A.4 in the round (= 22-24-26-29-31-34 repeats of 10 stitches). Continue this pattern until the piece measures 29 cm = 11⅜" from the division. There is approx. 1 cm = ⅜" left to finished length; try the sweater on and work to desired length. Change to circular needle size 2.5 MM = US 1.5 and work 2 RIDGES over all stitches - read description above. Bind off with knit – read BINDING-OFF TIP! The sweater measures approx. 52-54-56-58-60-62 cm = 20½"-21¼"-22"-22¾"-23⅝"-24⅜" from the shoulder down. SLEEVES: Place the 74-78-86-96-98-100 stitches from the thread on the one side of the piece on double pointed needles/short circular needle size 3 MM = US 2.5 and knit up 1 stitch in each of the stitches cast on under the sleeve = 80-84-94-104-108-112 stitches. Insert a marker thread in the middle of the 6-6-8-8-10-12 stitches under the sleeve. Allow the thread to follow your work onwards; it will be used when decreasing under the sleeve. Start at the marker thread and work in the round as follows: 0-2-2-2-4-1 stitches in stockinette stitch, work A.4 over the next 80-80-90-100-100-110 stitches (= 8-8-9-10-10-11 repeats of 10 stitches) and 0-2-2-2-4-1 stitches in stockinette stitch. Continue this pattern until the sleeve measures 3-3-3-2-2-2 cm = 1⅛"-1⅛"-1⅛"-¾"-¾"-¾" from the division. Now decrease 2 stitches under the sleeve - read DECREASE TIP. Decrease like this every 2½-2-1½-1½-1-1 cm = 1"-¾"-½"-½"-⅜"-⅜" a total of 15-16-19-23-24-25 times = 50-52-56-58-60-62 stitches. Continue working until the sleeve measures 43-42-40-41-39-38 cm = 17"-16½"-15¾"-16⅛"-15¼"-15" from the division (shorter measurements in larger sizes due to wider neck and longer yoke). There is approx. 1 cm = ⅜" left to finished length; try the sweater on and work to desired length. Change to double pointed needles size 2.5 MM = US 1.5. Work 2 RIDGES– read description above. Bind off with knit – remember BINDING-OFF TIP! The sleeve measures approx. 44-43-41-42-42-39 cm = 17¼"-17"-16⅛"-16½"-16½"-15¼" from the division. Work the other sleeve in the same way. |
|||||||||||||||||||||||||||||||
Diagram explanations |
|||||||||||||||||||||||||||||||
|
|||||||||||||||||||||||||||||||
 |
|||||||||||||||||||||||||||||||
 |
|||||||||||||||||||||||||||||||
 |
|||||||||||||||||||||||||||||||
Have you finished this pattern?Tag your pictures with #dropspattern #sparrowsongsweater or submit them to the #dropsfan gallery. Do you need help with this pattern?You'll find 34 tutorial videos, a Comments/Questions area and more by visiting the pattern on garnstudio.com. © 1982-2026 DROPS Design A/S. We reserve all rights. This document, including all its sub-sections, has copyrights. Read more about what you can do with our patterns at the bottom of each pattern on our site. |
|||||||||||||||||||||||||||||||


With over 40 years in knitting and crochet design, DROPS Design offers one of the most extensive collections of free patterns on the internet - translated to 17 languages. As of today we count 324 catalogs and 12290 patterns - 12280 of which are translated into English (US/in).
We work hard to bring you the best knitting and crochet have to offer, inspiration and advice as well as great quality yarns at incredible prices! Would you like to use our patterns for other than personal use? You can read what you are allowed to do in the Copyright text at the bottom of all our patterns. Happy crafting!
Post a comment to pattern DROPS 223-11
We would love to hear what you have to say about this pattern!
If you want to leave a question, please make sure you select the correct category in the form below, to speed up the answering process. Required fields are marked *.