
Popular categories
Looking for a yarn?


Comments / Questions (78)
![]() Francine Lévesque wrote:
Francine Lévesque wrote:
Bonjour je me demande s’il y a une erreur dans le diagramme A2, ça fonctionne jusqu’au rang où il y a 2 mailles env. gl 1maille, tricoter la suivante et passer par dessus, 5 m end, 2 m ens à l’end et 2 m env. Le Rg suivant 3 m env 7 m end 3 m env ça ne fonctionne pas. Merci beaucoup.
04.08.2024 - 23:03DROPS Design answered:
Bonjour Mme Lévesque, A.2 devrait être juste, mais je ne suis pas bien sûre de comprendre de quel rang vous parlez, pouvez-vous nous dire quelle taille vous tricotez et quel est le rang du diagramme qui vous pose problème pour que l'on puisse vérifier? Merci pour votre compréhension.
05.08.2024 - 08:06
![]() Marianne Eriksson wrote:
Marianne Eriksson wrote:
Stämmer A2. Från varv 25 jag får det till 7räta maskor.
19.06.2024 - 21:07DROPS Design answered:
Hej Marianne, hvilket størrelse?
25.06.2024 - 12:28
![]() Leroux Michèle wrote:
Leroux Michèle wrote:
Bonjour, j'aimerais savoir comment faire car tous les modèles que je fais, font des roulottes dans le bas du coups, ce n'est pas joli.?
22.04.2024 - 08:49DROPS Design answered:
Bonjour Mme Leroux, si la bordure du bas de votre pull se retourne/s'enroule, vous pouvez le bloquer ou simplement le laver (suivez attentivement les consignes d'entretien de la laine choisie) en ajoutant des épingles si besoin. Bonne continuation!
22.04.2024 - 09:06
![]() Paule Hourdebaigt wrote:
Paule Hourdebaigt wrote:
Je reviens vers vous par rapport aux échantillons. Ce pull est fait en laine Nord, 24 m pour 10 cm, 170 mètres de fil. Flora est également annoncée 24m pour 10cm mais 210 mètres de fil. Je pense qu\'il y a une incohérence dans le nombre de mailles données pour les échantillons. il en est de même pour Fabel (205 m) avec laquelle je tricote beaucoup de chaussettes. Mon échantillon pour cette laine est de 32 mailles.
03.01.2024 - 20:58DROPS Design answered:
Bonjour Mme Hourdebaigt, en fonction de sa composition, le métrage peut varier d'une laine à l'autre, pour le même poids, toutefois, ce qui compte pour obtenir le résultat final, c'est bien la tension, si vous avez 32 mailles au lieu de 24 pour ce modèle, votre pull sera beaucoup trop petit, il vous faudra donc utiliser des aiguilles plus grosses pour obtenir les 24 mailles demandées ici et ainsi obtenir les mesures finales indiquées dans le schéma. Bon tricot!
04.01.2024 - 08:46
![]() Paule Hourdebaigt wrote:
Paule Hourdebaigt wrote:
Bonjour. Pour faire ce pull j\'ai acheté la qualité Flora. J\'ai fait comme d\'habitude un échantillon. Pour 24 m j\'obtiens 7,5 centimètres en aiguilles 3 et en aiguilles 3,5 pour 24 m j\'obtiens 8 cm. Je ne comprends cette énorme différence et pourtant je suis une tricoteuse expérimentée. Avez vous déjà eu ce problème? Je ne sais pas quoi faire avec cette laine et suis bien déçue.
03.01.2024 - 20:36
![]() Julia Schwarz wrote:
Julia Schwarz wrote:
Bei mir rollen sich die Saumabschlüsse (Krausrippen) nach oben. 😔 Wie kann ich das korrigieren? Liebe Grüße
16.12.2023 - 08:45DROPS Design answered:
Liebe Frau Schwarz, ie können den Pullover mit Stecknadeln auf einer geeigneten Unterlage spannen, anfeuchten (z.B. mit einer Sprühflasche für Blumen) und trocknen lassen, danach entfernen Sie die Stecknadeln, dann sollte sich der Rand nicht mehr rollen.
18.12.2023 - 08:17
![]() Rene Tepper wrote:
Rene Tepper wrote:
Many thanks for your prompt reply! Regards.
11.12.2023 - 14:49
![]() Rene Tepper wrote:
Rene Tepper wrote:
Good day! Thank you for your previous reply. Now I have another question: I'm starting the sleeves now and I am not certain about the 2 STOCKING STITCH stitches on either side of the underarm. In other words do I knit one row and purl the next over these 4 stitches? If so, what significance would this have or can I just knit those stitches? Thank you for your time. Kind regards.
09.12.2023 - 10:57DROPS Design answered:
Dear Rene, these are to ensure the pattern fits in the sleeve stitches. The sleeves are worked in the round, so you don't work in rows. Therefore, when working in stocking stitch, you will knit all rounds. So you will always knit these stitches. Happy knitting!
10.12.2023 - 21:22
![]() R Tepper wrote:
R Tepper wrote:
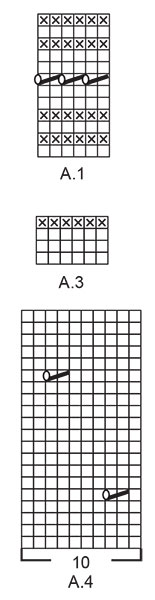
Goodday! Hope this is not a silly question. I am knitting the large size in this pattern and I am nearly finished with A2 - 416 sts. A3 no increased sts for this size. A3 is a 6 st repeat which is not evenly divisible into 416sts. As it is just 3 knit rows and 1 purl row, should I just carry on or am I missing something? Thank you for your assistance,
20.10.2023 - 17:42DROPS Design answered:
Dear R Tepper, as you can see, all stitches in the same round of A.3 are worked in the same way. You knit 3 rounds and purl the 4th one and repeat as necessary. So, even though we chose to represent as a 6-stitch pattern, since all stitches are worked in the same way, it doesn't matter that 416 isn't divided by 6. Simply knit all stitches on the first 3 rounds and purl them on the 4th one. Happy knitting!
22.10.2023 - 23:21
![]() Pam Schmidt wrote:
Pam Schmidt wrote:
I am interested in knitting the "Sparrow Song". Lovely design. I am curious if you would have the pattern in written form rather than as a knitting diagram? Reading a diagram is visually difficult to follow even with enlarging the pattern. Thank you
28.07.2022 - 00:25DROPS Design answered:
Dear Pam, all patterns are only available in the format they are published in. We don't make custom patterns. Happy knitting!
28.07.2022 - 13:25
|
|||||||||||||||||||||||||||||||
Sparrow Song#sparrowsongsweater |
|||||||||||||||||||||||||||||||
 |
 |
||||||||||||||||||||||||||||||
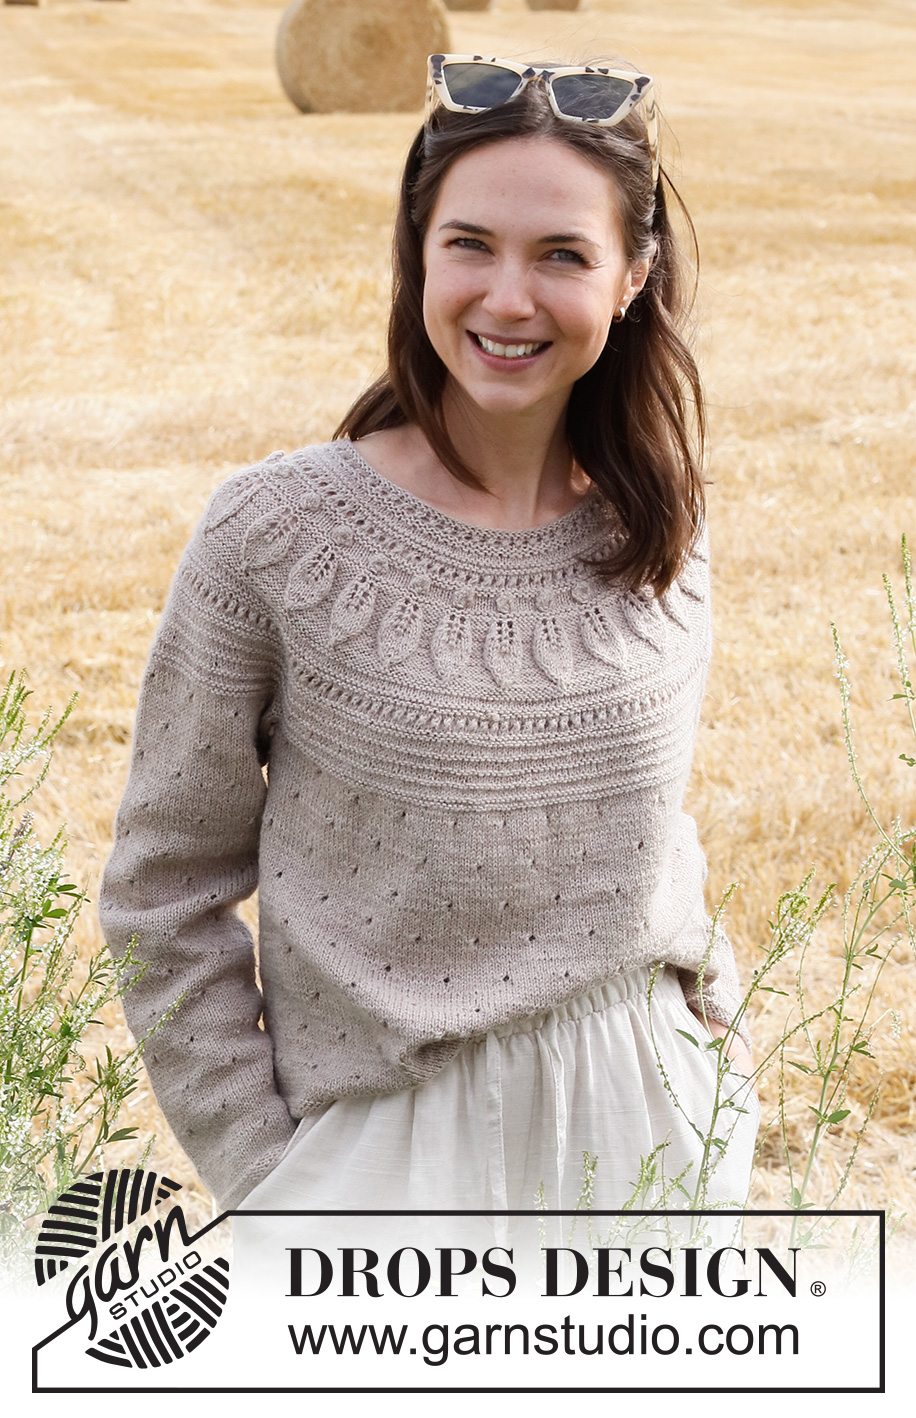
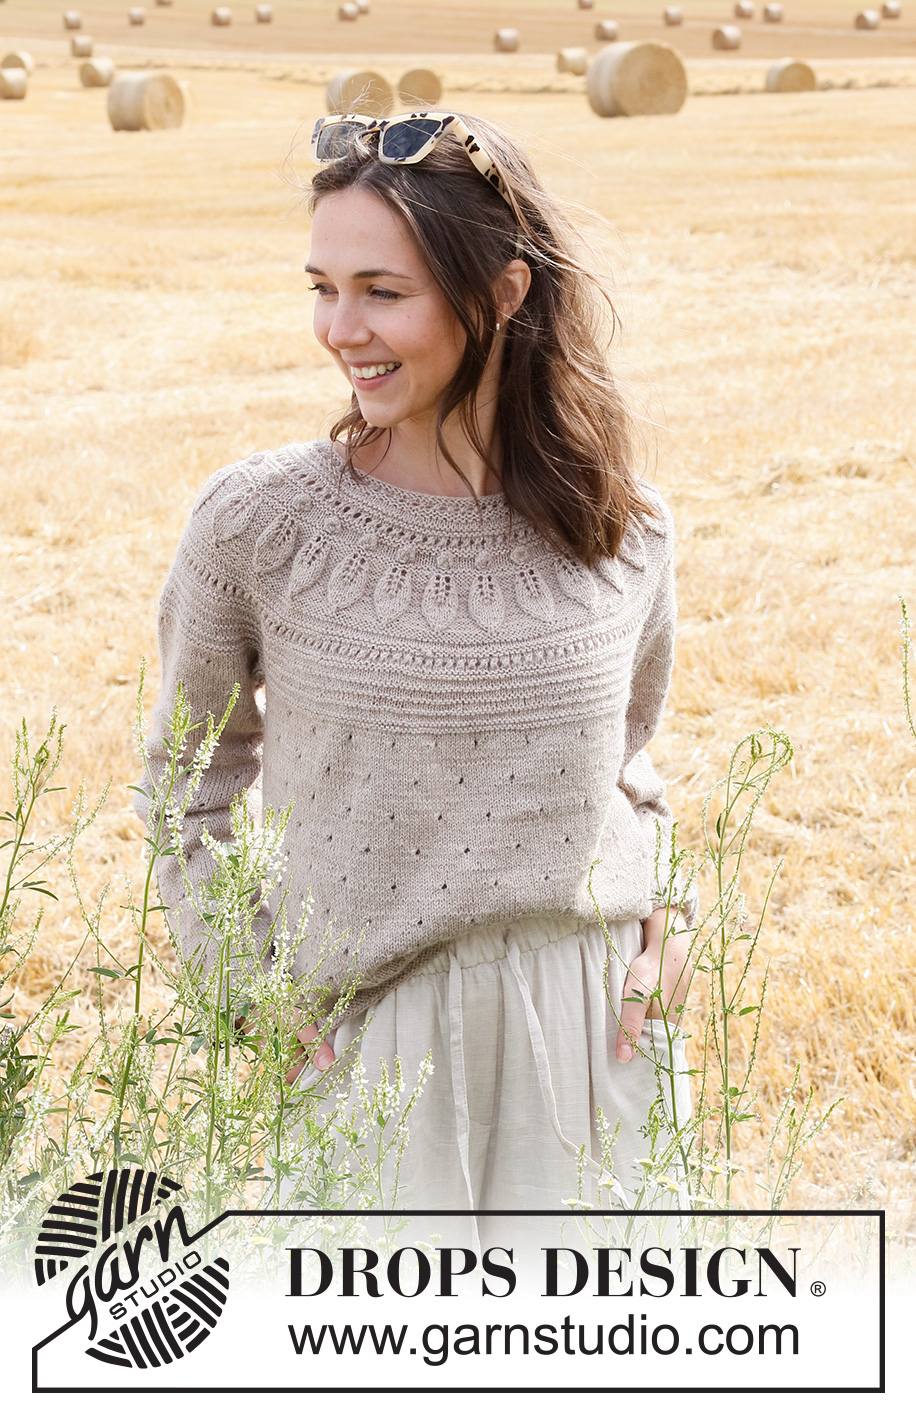
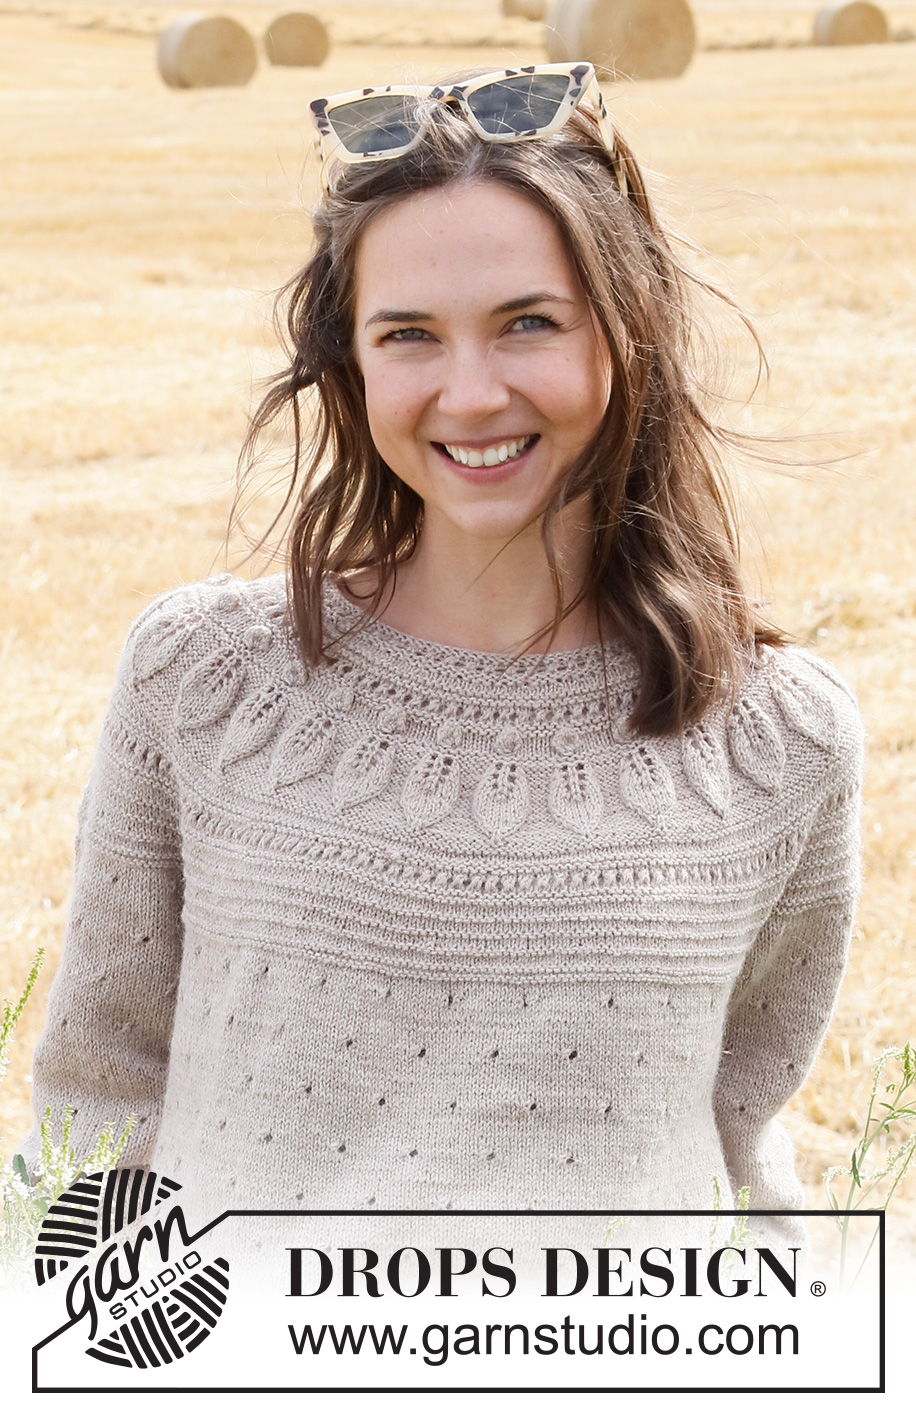
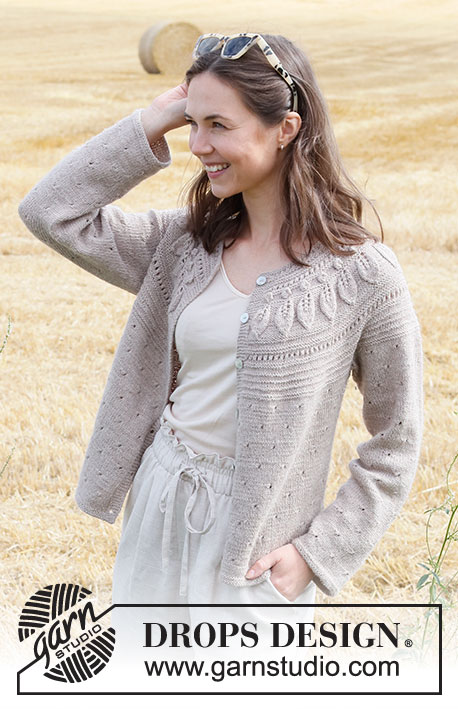
Knitted sweater in DROPS Nord. The piece is worked top down with round yoke, leaf pattern and lace pattern. Sizes S - XXXL.
DROPS 223-11 |
|||||||||||||||||||||||||||||||
|
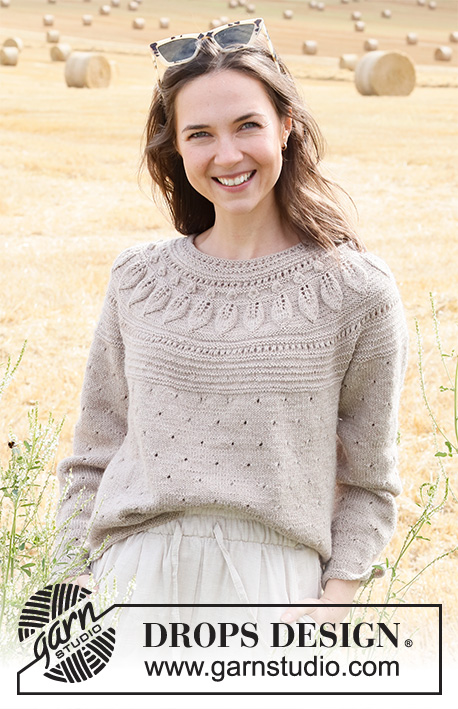
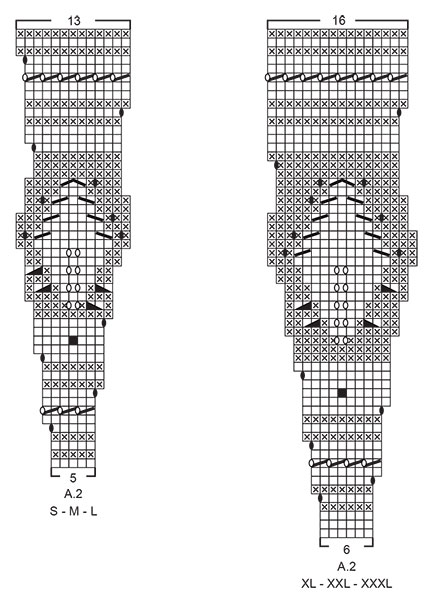
------------------------------------------------------- EXPLANATIONS FOR THE PATTERN: ------------------------------------------------------- RIDGE/GARTER STITCH (worked in the round): 1 ridge in height = 2 rounds; Knit 1 round and purl 1 round. PATTERN: See diagrams A.1 to A.4. Choose diagram for your size (applies to A.2). INCREASE TIP (evenly spaced): To work out how to increase evenly, count the total number of stitches on the needle (e.g. 110 stitches) and divide by the number of increases to be made (e.g. 25) = 4.4. In this example, increase by making 1 yarn over after alternately each 4th and 5th stitch. On the next round knit the yarn overs twisted to avoid holes. ELEVATION (back of neck): To make the back of the neck slightly higher when working a round yoke, work an elevation as described here. Skip this section if you do not want an elevation. Insert 1 marker at the beginning of the round (mid-back). Start from the right side and knit 16-17-18-20-21-22 stitches past the marker, turn, tighten the strand and purl 32-34-36-40-42-44 stitches back. Turn, tighten the strand and knit 48-51-54-60-63-66 stitches, turn, tighten the strand and purl 64-68-72-80-84-88 stitches back. Turn, tighten the strand and knit 80-85-90-100-105-110 stitches, turn, tighten the strand and purl 96-102-108-120-126-132 stitches. Turn, tighten the strand and knit to mid-back. Then work YOKE as described in the text. DECREASE TIP (for sleeves): Decrease 1 stitch on either side of the marker thread as follows: Work until there are 3 stitches left before the marker thread, knit 2 together, knit 2 (marker thread sits between these 2 stitches), slip 1 stitch as if to knit, knit 1 and pass the slipped stitch over the knitted stitch (2 stitches decreased). BINDING-OFF TIP: To avoid the bind-off edge being tight you can bind off with a larger size needle. If the edge is still tight, make 1 yarn over after approx. each 4th stitch at the same time as binding off; the yarn overs are bind off as normal stitches. ------------------------------------------------------- START THE PIECE HERE: ------------------------------------------------------- SWEATER – SHORT OVERVIEW OF THE PIECE: The neck and yoke are worked in the round with circular needle, top down from mid back. The yoke is divided for body and sleeves and the body continued in the round with circular needle. The sleeves are worked in the round with short circular needle/double pointed needles, top down. NECK: Cast on 110-116-120-124-130-134 stitches with short circular needle size 2.5 MM = US 1.5 and Nord. Work A.1 in the round. When A.1 has been completed, knit 1 round where you increase 25-29-40-44-44-46 stitches evenly spaced – read INCREASE TIP = 135-145-160-168-174-180 stitches. Knit 1 round (yarn overs knitted twisted). Change to circular needle size 3 MM = US 2.5. Insert 1 marker in the middle of the round – the yoke is measured from this marker. You can now work an ELEVATION at the back of the neck – read description above. If you do not want an elevation, go straight to YOKE. YOKE: Work A.2 in the round (= 27-29-32-28-29-30 repeats of 5-5-5-6-6-6 stitches). Continue this pattern and increase as shown in the diagram. REMEMBER THE KNITTING GAUGE! When A.2 has been completed in height, there are 351-377-416-448-464-480 stitches and the piece measures approx. 15-15-15-17-17-17 cm = 6"-6"-6"-6¾"-6¾"-6¾" from the marker on the neck. Now work A.3 in the round – AT THE SAME TIME, on the first round in A.3, increase 5-7-0-18-22-36 stitches evenly spaced = 356-384-416-466-486-516 stitches. Work A.3 until the yoke measures approx. 19-21-23-24-26-28 cm = 7½"-8¼"-9"-9½"-10¼"-11" from the marker on the neck; finishing after a complete repeat in height. Knit 1 round. Purl 1 round AT THE SAME TIME as the yoke is divided for the body and sleeves as follows: Purl the first 52-57-61-69-73-79 stitches (= ½ back piece), place the next 74-78-86-96-98-100 stitches on a thread for the sleeve, cast on 6-6-8-8-10-12 stitches (= in side under sleeve), purl 104-114-122-137-145-158 stitches (= front piece), place the next 74-78-86-96-98-100 stitches on a thread for the sleeve, cast on 6-6-8-8-10-12 stitches (= in side under sleeve) and purl the last 52-57-61-68-72-79 stitches (= ½ back piece). Body and sleeves are finished separately. THE PIECE IS NOW MEASURED FROM HERE! BODY: = 220-240-260-290-310-340 stitches. Start the round on one side – in the middle of the 6-6-8-8-10-12 stitches cast on under the sleeve, and work A.4 in the round (= 22-24-26-29-31-34 repeats of 10 stitches). Continue this pattern until the piece measures 29 cm = 11⅜" from the division. There is approx. 1 cm = ⅜" left to finished length; try the sweater on and work to desired length. Change to circular needle size 2.5 MM = US 1.5 and work 2 RIDGES over all stitches - read description above. Bind off with knit – read BINDING-OFF TIP! The sweater measures approx. 52-54-56-58-60-62 cm = 20½"-21¼"-22"-22¾"-23⅝"-24⅜" from the shoulder down. SLEEVES: Place the 74-78-86-96-98-100 stitches from the thread on the one side of the piece on double pointed needles/short circular needle size 3 MM = US 2.5 and knit up 1 stitch in each of the stitches cast on under the sleeve = 80-84-94-104-108-112 stitches. Insert a marker thread in the middle of the 6-6-8-8-10-12 stitches under the sleeve. Allow the thread to follow your work onwards; it will be used when decreasing under the sleeve. Start at the marker thread and work in the round as follows: 0-2-2-2-4-1 stitches in stockinette stitch, work A.4 over the next 80-80-90-100-100-110 stitches (= 8-8-9-10-10-11 repeats of 10 stitches) and 0-2-2-2-4-1 stitches in stockinette stitch. Continue this pattern until the sleeve measures 3-3-3-2-2-2 cm = 1⅛"-1⅛"-1⅛"-¾"-¾"-¾" from the division. Now decrease 2 stitches under the sleeve - read DECREASE TIP. Decrease like this every 2½-2-1½-1½-1-1 cm = 1"-¾"-½"-½"-⅜"-⅜" a total of 15-16-19-23-24-25 times = 50-52-56-58-60-62 stitches. Continue working until the sleeve measures 43-42-40-41-39-38 cm = 17"-16½"-15¾"-16⅛"-15¼"-15" from the division (shorter measurements in larger sizes due to wider neck and longer yoke). There is approx. 1 cm = ⅜" left to finished length; try the sweater on and work to desired length. Change to double pointed needles size 2.5 MM = US 1.5. Work 2 RIDGES– read description above. Bind off with knit – remember BINDING-OFF TIP! The sleeve measures approx. 44-43-41-42-42-39 cm = 17¼"-17"-16⅛"-16½"-16½"-15¼" from the division. Work the other sleeve in the same way. |
|||||||||||||||||||||||||||||||
Diagram explanations |
|||||||||||||||||||||||||||||||
|
|||||||||||||||||||||||||||||||
 |
|||||||||||||||||||||||||||||||
 |
|||||||||||||||||||||||||||||||
 |
|||||||||||||||||||||||||||||||
Have you finished this pattern?Tag your pictures with #dropspattern #sparrowsongsweater or submit them to the #dropsfan gallery. Do you need help with this pattern?You'll find 34 tutorial videos, a Comments/Questions area and more by visiting the pattern on garnstudio.com. © 1982-2026 DROPS Design A/S. We reserve all rights. This document, including all its sub-sections, has copyrights. Read more about what you can do with our patterns at the bottom of each pattern on our site. |
|||||||||||||||||||||||||||||||


With over 40 years in knitting and crochet design, DROPS Design offers one of the most extensive collections of free patterns on the internet - translated to 17 languages. As of today we count 324 catalogs and 12290 patterns - 12280 of which are translated into English (US/in).
We work hard to bring you the best knitting and crochet have to offer, inspiration and advice as well as great quality yarns at incredible prices! Would you like to use our patterns for other than personal use? You can read what you are allowed to do in the Copyright text at the bottom of all our patterns. Happy crafting!
Post a comment to pattern DROPS 223-11
We would love to hear what you have to say about this pattern!
If you want to leave a question, please make sure you select the correct category in the form below, to speed up the answering process. Required fields are marked *.