
Popular categories
Looking for a yarn?


Comments / Questions (24)
![]() Cat wrote:
Cat wrote:
What type of file is this? My Android can not open the downloaded file. Is it available as pdf?
31.12.2024 - 16:28DROPS Design answered:
Dear Cat, you can check this pattern fully online or download it by clicking on the print button. Then, it should show a prompt to select a printer or "Save it as PDF", you can choose the latter to get a pdf version of the pattern. Happy knitting!
31.12.2024 - 19:10
![]() Heidi Martens wrote:
Heidi Martens wrote:
Hei! Nå har jeg prøvd meg tre ganger, men det bare feiler. Hvordan kan jeg øke på denne måten må samme sted i hver omgang? Når jeg har kommet omgangen rundt og skal øke før merket igjen så «mangler» den tråden mellom maskene som jeg skal øke i.. Forsøkte å legge inn en omgang uten økninger mellom hver omgang med økninger, men det fungerte ikke. Hvordan gjør man økningen på hver omgang? Videoen stopper etter bare én omgang.
20.10.2022 - 14:14DROPS Design answered:
Hei Heidi, Det må være en tråd mellom de 2 maskene du skal øke i (ellers hadde de ikke hengt sammen) som du da plukker opp og strikker i som forklart under øketips-1. God fornøyelse!
21.10.2022 - 06:57
![]() Emma wrote:
Emma wrote:
Hej Drops. Der står under udtagning ved ærmer, "tag ud således på hver omgang totalt 3-3-4-6-6-6 gange og på hver 2.omgang 8-8-8-8-8-9 gange = 156-172-180-196-212-224 masker." hvordan tager jeg 8 masker ud på hver 2. omgang, når man kun kan tage 4 masker ud ved ærmerne (alt før og efter maskemarkør)?
14.09.2022 - 21:17DROPS Design answered:
Hei Emma. Du skal ikke øke med 8 masker, men 8 ganger på hver 2. omgang. Så først skal du øke på hver omgang totalt 3-3-4-6-6-6 ganger og deretter på hver 2.omgang 8-8-8-8-8-9 ganger = 156-172-180-196-212-224 masker. mvh DROPS Design
19.09.2022 - 09:03
![]() Claodia wrote:
Claodia wrote:
Bonjour pourriez-vous me dire à quoi servent les aiguilles double pointe demandées dans les fournitures Merci beaucoup
08.01.2022 - 08:26DROPS Design answered:
Bonjour Claudia, tout à fait, on utilise les aiguilles doubles pointes pour tricoter les manches. Vous pouvez également utiliser simplement une aiguille circulaire de 80 cm de chaque taille et la technique dite du magic loop. Bon tricot!
10.01.2022 - 07:44
![]() Esther wrote:
Esther wrote:
IK heb een vraag over de mouwmeerderingen: Meerder zo op iedere naald 3-3-4-6-6-6 keer in totaal en in iedere tweede naald 8-8-8-8-8-9 keer = 156-172-180-196-212-224 steken. Ik snap de 4 keer meerderen per naald, maar ik snap de 8 keer meerderen niet.
13.10.2021 - 12:56DROPS Design answered:
Dag Esther,
Je meerdert eerst op iedere naald en dit doe je 4 keer in totaal. Als dat klaar is ga je verder met de mouw en meerder je om de naald, dus de ene naald wel en de andere naald niet en dit doe je in totaal 8 keer.
15.10.2021 - 17:55
![]() Angelika Kuhnert wrote:
Angelika Kuhnert wrote:
Könnte ich diese Anleitung auch in deutsch bekommen? Besten Dank
23.05.2021 - 22:47DROPS Design answered:
Liebe Frau Kuhnert, ja sicher, alle unsere Anleitungen sind auch in Deutsch erhältlick; klicken Sie auf das drop-down Menu unter das Foto um die Sprache zu ändern. Viel Spaß beim stricken!
25.05.2021 - 08:04
![]() Patrizia wrote:
Patrizia wrote:
Buona sera Sto lavorando questo maglione e sono agli aumenti dello sprone( 1dietro e 2 davanti per la mia taglia).Potreste darmi un consiglio su come è meglio farli? Grazie
27.04.2021 - 18:43DROPS Design answered:
Buonasera, se non espressamente indicato, può utilizzare la tecnica che preferisce per gli aumenti, anche semplicemente lavorando 2 maglie in 1. Buon lavoro!
27.04.2021 - 19:50
![]() Elisabeth Frettem wrote:
Elisabeth Frettem wrote:
Hei, Jeg forstår ikke ermeøkningen. Det står at økningen skal være ETTER 1. og 3. merke og FØR 2. og 4. merke. (Motsatt på sadeløkning) Skal man øke rett Etter og FØR A01 slik at de to siste rettmaskene ikke er med i ermene?
23.04.2021 - 11:33DROPS Design answered:
Hei Elisabeth. Du øker rett etter merke 1 og 3 og rett før merke 2 og 4. Diagrammet strikkes som før (rett over rett og vrang over vrang). Du vil da strikke 1 maske mer før diagrammet og 1 maske mer etter diagrammet, etter hver gang det er økt. mvh DROPS design
03.05.2021 - 11:15
![]() Pia Paaske wrote:
Pia Paaske wrote:
Model Outback Model ee-702 - Mystisk - There are only increases on back piece and front piece, the number of shoulder stitches remains the same. Der tages kun ud på bagstykket og forstykket og antal skuldermasker forbliver det samme. There are only increases on back piece and front piece, the number of shoulder stitches remains the same. Der tages nu kun ud på ærmerne og antal masker på bagstykket og forstykket forbliver det samme. Vh Pia
03.02.2021 - 16:23
![]() Pia wrote:
Pia wrote:
Hej Der står ved udtagning sadelskulder: Der tages ud ETTER 1. og 3.mærke, og FØR 2. og 4.mærke og så længere nede ved udtagning ærmer i opskiften står det omvendte. Jeg forstår ikke hvordan man kan tale om efter og før, når man tager ud i en maske imellem to masker? Vh Pia
03.02.2021 - 08:55DROPS Design answered:
Hej Pia, under udtagning sadelskulder skriver vi: Der tages ud FØR 1. og 3.mærke, og EFTER 2. og 4.mærke – læs UDTAGNINGSTIPS-1. Men når du kommer længere i opskriften og tager ud til ærmer, så bliver det omvendt. Vi beskriver altså hvordan man tager ud før et mærke og efter et mærke. God fornøjelse!
03.02.2021 - 15:25
|
|||||||||||||
Outback#outbacksweater |
|||||||||||||
 |
 |
||||||||||||
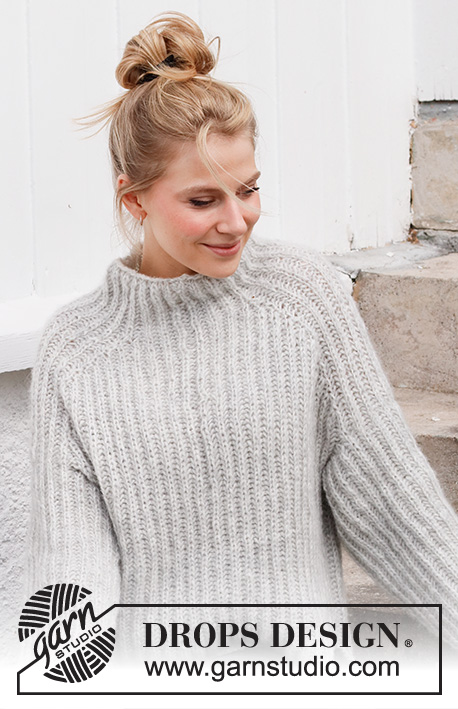
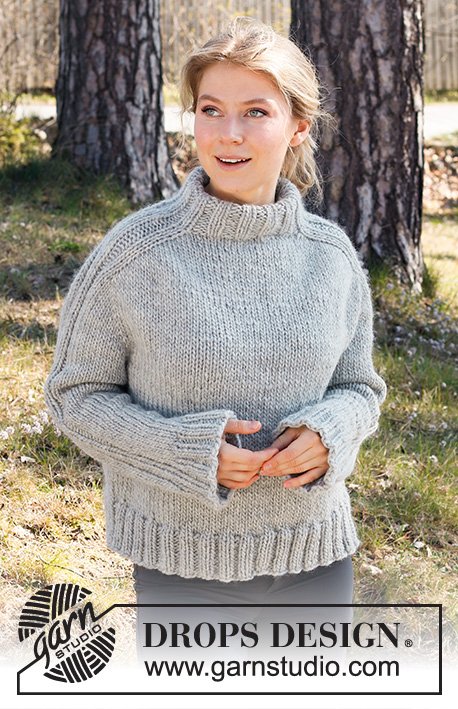
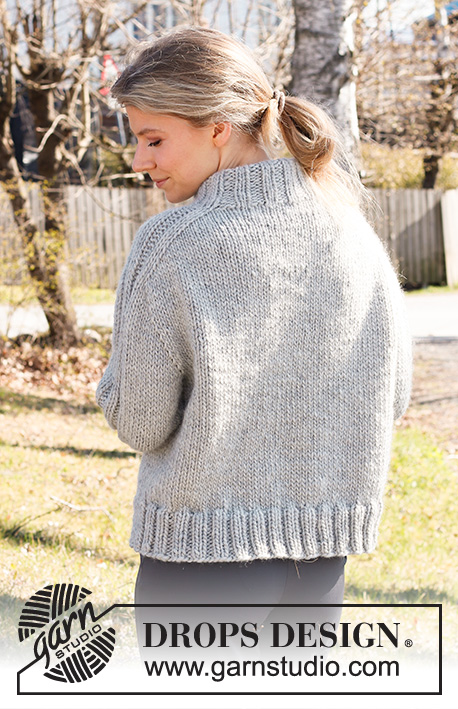
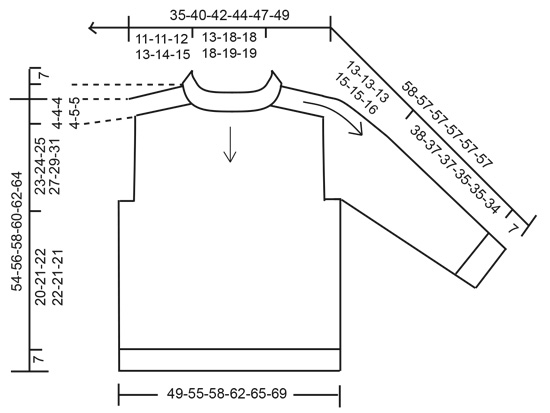
Knitted sweater in DROPS Snow or DROPS Wish. Piece is knitted top down with saddle shoulder. Size XS–XXL.
DROPS 217-23 |
|||||||||||||
|
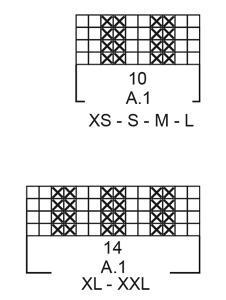
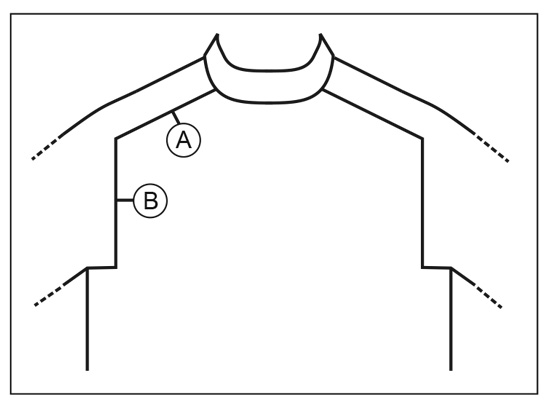
------------------------------------------------------- EXPLANATION FOR THE PATTERN: ------------------------------------------------------- PATTERN: See diagram A.1. Choose diagram for your size. INCREASE TIP-1: BEFORE MARKER: The new stitch will be twisted, leaning towards the right. Use left needle to pick up strand between 2 stitches from the row below, pick up strand from behind and knit stitch in front loop. AFTER MARKER: The new stitch will be twisted, leaning towards the left. Use left needle to pick up strand between 2 stitches from the row below, pick up strand from the front and knit stitch in back loop. INCREASE TIP-2 (evenly): To calculate how to increase evenly, use the total number of stitches on row (e.g. 104 stitches) and divide stitches by number of increases to be done (e.g. 20) = 5.2. In this example increase by making 1 yarn over after approx. every 5th stitch. On next round work yarn over twisted DECREASE TIP (applies to sleeves): Decrease 1 stitch on each side of marker thread as follows: Work until 3 stitches remain before marker thread and knit 2 together, knit 2 (marker thread is between these stitches), slip 1 stitch knitwise, knit 1, pass slipped stitch over stitch worked. BIND-OFF TIP: To avoid a tight bind-off edge you may use a larger needle size. If this also is too tight, work a 1 yarn over after approx. every 4th stitch while binding off (bind off yarn overs as regular stitches). ------------------------------------------------------- START THE PIECE HERE: ------------------------------------------------------- SWEATER - SHORT OVERVIEW OF THE PIECE: Work neck edge and yoke in the round on circular needle from mid back, top down. Then divide the piece for body and sleeves. Work body in the round on circular needle. Work sleeves in the round, top down. DOUBLE NECK EDGE: Cast on 48-56-56-56-64-64 stitches on a short circular needle size 7 mm = US 10,75 with Snow or Wish. Work rib (knit 2/purl 2) in the round for 13 cm = 5⅛". Insert a marker at beginning of round = approx. mid back. NOW MEASURE PIECE FROM HERE! Switch to circular needle size 8 mm = US 11. YOKE: Work next round as follows: Knit the first 8-8-8-8-8-8 stitches while increasing 0-1-1-2-2-2 stitches (= approx. half back piece), insert 1st marker here, work A.1 (choose diagram for correct size) over the next 10-10-10-10-14-14 stitches (= shoulder stitches), insert 2nd marker here, knit the next 14-18-18-18-18-18 stitches while increasing 0-2-2-4-4-4 stitches (= front piece), insert 3rd marker here, work A.1 over the next 10-10-10-10-14-14 stitches (= shoulder stitches), insert 4th marker here, knit over the last 6-10-10-10-10-10 stitches while increasing 0-1-1-2-2-2 stitches evenly (= approx. half back piece) = 48-60-60-64-72-72 stitches. SADDLE SHOULDER INCREASE: Knit over stitches on back and front piece and work pattern according to diagram A.1 over the 10-10-10-10-14-14 stitches for each shoulder. AT THE SAME TIME Increase 4 stitches on round as follows: Increase BEFORE 1st and 3rd marker, and AFTER 2nd and 4th marker – read INCREASE TIP-1. There are only increases on back piece and front piece and number of shoulder stitches remains the same. Increase like this every round 16-17-18-19-21-23 times in total = 112-128-132-140-156-164 stitches. REMEMBER THE KNITTING GAUGE! SLEEVE INCREASE: Knit over stitches on front piece and back piece, and work pattern after diagram A.1 over the 10-10-10-10-14-14 stitches on each shoulder. AT THE SAME TIME increase 4 stitches on the round as follows: Increase AFTER 1st and 3rd marker, and BEFORE 2nd and 4th marker – remember INCREASE TIP-1. There are only increases on shoulder stitches and number of stitches on front piece and back piece remains the same. Increase like this on every round 3-3-4-6-6-6 times in total and on every other round 8-8-8-8-8-9 times = 156-172-180-196-212-224 stitches. Piece should now measure approx. 23-24-25-27-29-31 cm = 9"-9½"-9¾"-10⅝"-11⅜"-12¼" from marker thread and down mid back. If the piece is shorter than this, continue in stockinette stitch and A.1 until correct measurements. Now divide piece for body and sleeves. Work next round as follows: Knit the first 25-26-27-29-31-33 stitches (= approx. half back piece), slip the next 30-32-34-38-42-44 stitches on a stitch holder for sleeve and cast on 6-6-8-8-8-8 new stitches on needle (= in the side under sleeve), knit the next 48-54-56-60-64-68 stitches, slip the next 30-32-34-38-42-44 stitches on a stitch holder for sleeve and cast on 6-6-8-8-8-8 new stitches on needle (= in the side under sleeve), knit the last 23-28-29-31-33-35 stitches. Then finish body and sleeves separately. NOW MEASURE PIECE FROM HERE! BODY: = 108-120-128-136-144-152 stitches. Work in stockinette stitch in the round. When piece measures 20-21-22-22-21-21 cm = 8"-8¼"-8¾"-8¾"-8¼"-8¼" from division, knit 1 round while increasing 16-20-20-20-24-24 stitches evenly - read INCREASE TIP-2= 124-140-148-156-168-176 stitches. Switch to circular needle size 7 mm = US 10,75. Work rib (knit 2/purl 2) in the round for 7 cm = 2¾". Bind off with knit over knit and purl over purl - read BIND-OFF TIP. Sweater measures approx. 54-56-58-60-62-64 cm = 21¼"-22"-22¾"-23⅝"-24⅜"-25¼" from marker after neck edge and down. SLEEVES: Slip the 30-32-34-38-42-44 stitches from stitch holder in one side of piece back on a short circular needle/double pointed needles size 8 mm = US 11, and pick in addition up 1 stitch in each of the new 6-6-8-8-8-8 stitches under sleeve = 36-38-42-46-50-52 stitches. Insert a marker thread in the middle of the new stitches under sleeve (= 3-3-4-4-4-4 new stitches on each side of marker thread). This is the beginning of round. Knit over knit and purl over purl. When sleeve measures 4 cm = 1½" from division, decrease 1 stitch on each side of marker thread - read DECREASE TIP. Decrease like this every 5½-6½-4-3-2½-2½ cm = 2⅛"-2½"-1½"-1⅛"-½"-½", 2-2-4-5-6-6 times in total = 32-34-34-36-38-40 stitches. Work until sleeve measures 38-37-37-35-35-34 cm = 15"-14½"-14½"-13¾"-13¾"-13⅜" from division. Now work 1 round in pattern as before while increasing 8-10-10-8-10-12 stitches evenly over stitches in stockinette stitch = 40-44-44-44-48-52 stitches. Switch to double pointed needles size 7 mm = US 10,75. Work rib (= knit 2/purl 2) in the round - adjust so that rib fits the entire round, and to work rib as before over the 10-10-10-10-14-14 stitches (= shoulder stitches). When rib measures 7 cm = 2¾", bind off with knit over knit and purl over purl - remember BIND-OFF TIP. Sleeve measures 45-44-44-42-42-41 cm = 17¾"-17¼"-17¼"-16½"-16½"-16⅛" in total from division. Work the other sleeve the same way. ASSEMBLY: Fold rib at the top of neck down on the inside of garment. Fasten rib to form a double neck edge. To avoid a tight neck edge and avoiding the edge to tip outwards, it is important to make the seam elastic. |
|||||||||||||
Diagram explanations |
|||||||||||||
|
|||||||||||||
 |
|||||||||||||
 |
|||||||||||||
 |
|||||||||||||
Have you finished this pattern?Tag your pictures with #dropspattern #outbacksweater or submit them to the #dropsfan gallery. Do you need help with this pattern?You'll find 29 tutorial videos, a Comments/Questions area and more by visiting the pattern on garnstudio.com. © 1982-2026 DROPS Design A/S. We reserve all rights. This document, including all its sub-sections, has copyrights. Read more about what you can do with our patterns at the bottom of each pattern on our site. |
|||||||||||||


With over 40 years in knitting and crochet design, DROPS Design offers one of the most extensive collections of free patterns on the internet - translated to 17 languages. As of today we count 324 catalogs and 12290 patterns - 12280 of which are translated into English (US/in).
We work hard to bring you the best knitting and crochet have to offer, inspiration and advice as well as great quality yarns at incredible prices! Would you like to use our patterns for other than personal use? You can read what you are allowed to do in the Copyright text at the bottom of all our patterns. Happy crafting!
Post a comment to pattern DROPS 217-23
We would love to hear what you have to say about this pattern!
If you want to leave a question, please make sure you select the correct category in the form below, to speed up the answering process. Required fields are marked *.