
Popular categories
Looking for a yarn?


Comments / Questions (98)
![]() Jenny wrote:
Jenny wrote:
Jag förstår inte. Ärmhål: Öka 1 maska innanför 2 maskor i början av varje varv från rätsidan 2-1-1 gånger, sedan läggs det upp nya maskor till ärmhål i slutet av varje varv från avigsidan så här: Lägg upp 2 maskor 0-2-2 gånger och 3 maskor 0-0-1 gånger. Nu till min fråga - Med hur många varvs mellanrum ska jag lägga upp 2 maskor 2 ggr, respektive 3 maskor 1 ggr? Det framgår inte i stickbekrivningen.
05.02.2022 - 09:28DROPS Design answered:
Hei Jenny. Jo, i oppskriften står det "Öka 1 maska innanför 2 maskor i slutet av varje varv från rätsidan". mvh DROPS Design
07.02.2022 - 13:52
![]() Jenny wrote:
Jenny wrote:
Jag förstår inte. Det står så här: V-hals: Öka 1 maska innanför 2 maskor i slutet av nästa varv från rätsidan. Öka så varannan gång på vartannat och vart 4:e varv totalt 19-19-20-20-21-21 gånger. Menar ni att man ska öka 1 m både vartannat varv och vart 4.e varv? Iså fall hade det ju varit enklare att ni bara skrev öka 1 m på vartannat varv totalt 19-19-20-20-21-21 ggr. Eller menar ni att man ska öka 1 m vart 4:e varv X antal ggr? Tacksam för svar!
05.02.2022 - 09:15DROPS Design answered:
Hei Jenny. Du bytter på. Først øker du på 2. pinne, så øker du på 4. pinne, så 2. pinne, så 4. pinne osv til du har økt totalt 19-19-20-20-21-21 ganger. mvh DROPS Design
07.02.2022 - 13:49
![]() Teddy wrote:
Teddy wrote:
Hi, please explain where the 5cm is measured from in Body section, the statement "when the piece measures 5cm" and similarly "when the piece measures 36cm" thanks
29.01.2022 - 22:20DROPS Design answered:
Dear Teddy, if it does not mention to insert a marker (and then measure from there), then it's always measured from the cast on edge. Happy knitting!
30.01.2022 - 23:55
![]() Delphine Roland wrote:
Delphine Roland wrote:
Bonjour J'ai du mal à comprendre les explications pour les bordures devant et demi-col: "augmenter avec des jetés au niveau de la fin de l'encolure V (36 cm (taille XL) à partir des mailles rabattues)". En partant du haut (mailles rabattues) je ne suis pas à 36 cm mais environ 22 cm. Pourriez vous m'aider ? Merci
11.01.2022 - 21:13DROPS Design answered:
Bonjour Mme Roland, le gilet se tricote de haut en bas, donc les mailles rabattues sont en bas, on va donc mesurer ces 36 cm à partir du bas du gilet jusqu'au début de l'encolure V (dans ce sens, mais en fait, il s'agissait de la fin des augmentations quand on a tricoté les devants). Il s'agit ici d'augmenter pour bien former l'angle de l'encolure V. Bon tricot!
12.01.2022 - 07:23
![]() Teresa wrote:
Teresa wrote:
Jeg forstår ikke helt med ærmegab. Skal man tage 1 maske ud indenfor 2 masker i starten af hver pind fra retsiden, og derefter skal man lave en ny maske i slutningen på vrangenside?
21.11.2021 - 00:19DROPS Design answered:
Hei Teresa. Du skal først øke med 1 maske på starten av hver pinne fra RETTEN 2-1-1-3-4 eller 4 ganger (avhengig av hvilken str du strikker). Deretter legges det opp nye masker til ermehull på slutten av hver pinne fra VRANGEN, se i oppskriften på hvor mange masker og hvor mange ganger i den str. du strikker. mvh DROPS Design
23.11.2021 - 11:34
![]() Susanne wrote:
Susanne wrote:
Hallo Drops, Wieso werden die linke Blende/Halsblende und die rechte Blende/Halsblende getrennt gestrickt und anschließend zusammengenäht? Könnte man das nicht in einem Stück stricken? Danke für Ihre Hilfe.
25.10.2021 - 12:07DROPS Design answered:
Liebe Susanne, wenn Sie die vorderen Blenden samt Halsblende in einem Stück anstricken, haben Sie sehr viele Maschen auf der Nadel und die gesamte Blende wäre sehr unpraktisch zu stricken. Daher wird die Blende geteilt und an der hinteren Mitte zusammengenäht. Viel Spaß beim Stricken!
25.10.2021 - 19:39
![]() J Bourque wrote:
J Bourque wrote:
Taille XL. Devant droit : quand la pièce mesure 6cm augmenter pour l’encolure V. Quand la pièce mesure 17cm augmenter pour emmanchures. Don 11cm au total pour encolure V (20 augmentations tous les 2 et 4 rangs ? Augmentation : rang 1 aug, rang 2-3-4 non, rang 5 aug, rang 6 non, rang 7 aug, rang 8-9-10 non …). Mon problème: Après 10 augmentation (30 rangs) seulement la pièce mesure 17cm et je dois passer à l‘emmanchure. Quel est le problème? Aidez-moi rapidement svp. Merci.
24.10.2021 - 19:00DROPS Design answered:
Bonjour Mme Bourque. Tout est correct. Les augmentations de l'encolure V ne sont pas terminées quand les emmanchures sont finies, elles continuent après les emmanchures, quand on tricote le dos/les devants. Bon tricot!
25.10.2021 - 11:43
![]() Lennart wrote:
Lennart wrote:
Hallöchen, Ich stricke die Veste in XXXL Bei de Zumahmen, in dem Text steht, dass im jeder 2. Und 4 Reihe zugenommen wird. Aber man braucht doch mehr als 4 Reihen für die Breite? Und ist bei jeder 2. Reihe der Ausschnitt dann nicht zu flach? Danke schon Mal für die Antwort :)
06.10.2021 - 13:22DROPS Design answered:
Liebe Frau Lennart, es wird für den Halsausschnitt nach 7 cm (vor den 2 letzten Maschen am Ende einer Hinreihe) nur 1 Maschen jeweils zugenommen, und diese Zunahme wird so wiederholt (= 1 Hin-Reihe mit Zunahme, 1 Rück-Reihe ohne Zunahme, 1 Hin-Reihe mit Zunahmen, 3 Reihen ohne Zunahmen( = 1 Rück-R + 1 Hin-R + 1 Rück-R) ) und so von (bis) wiederholen bis 21 Mal zugenommen wurden. Und gleichzeitig, nach 16 cm nehmen Sie am Anfang den Hinreihen 1 Masche 4 Mal und dann schlagen Sie am Ende den Rückreihen: 4 M x 2 Mal und 3 M x 3 Mal. Kann das helfen?
06.10.2021 - 16:35
![]() Narcissus wrote:
Narcissus wrote:
Hello. Sorry, but how should I read the diagram? And I don't understand the size chart :( Can you please help me?
03.10.2021 - 17:33DROPS Design answered:
Dear Narcissus, please see THIS lesson about how to read diagram. For sizing, you can see all the relevant measurements of the finished item on the shcematic drawing just below the pattern. We suggest that you take a garnment that fits the intended user and compare the measurements. Happy Stitching!
04.10.2021 - 00:35
![]() Maja wrote:
Maja wrote:
When it says "Increase like this alternately every 2nd and 4th row" does this mean on every other row, or on the 2nd row, then fourth row, then 2nd row? Option 1: increase (right side) no increase (wrong side) increase (right side) no increase (wrong side) Option 2: increase (right side) no increase (wrong side) increase (right side) no increase (wrong side) no increase (right side) no increase (wrong side) increase (right side)
29.05.2021 - 21:02DROPS Design answered:
Dear Maja, it is option 2. Happy Knitting!
29.05.2021 - 22:46
|
||||
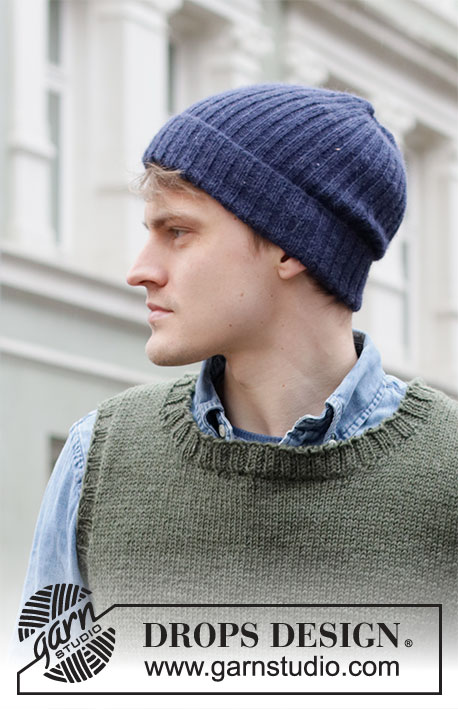
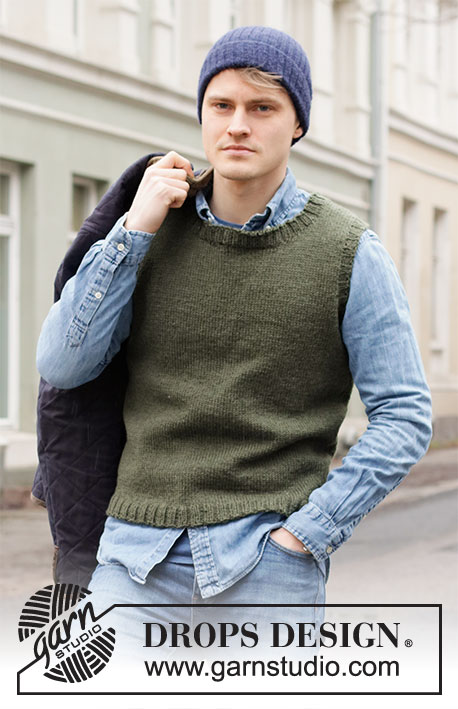
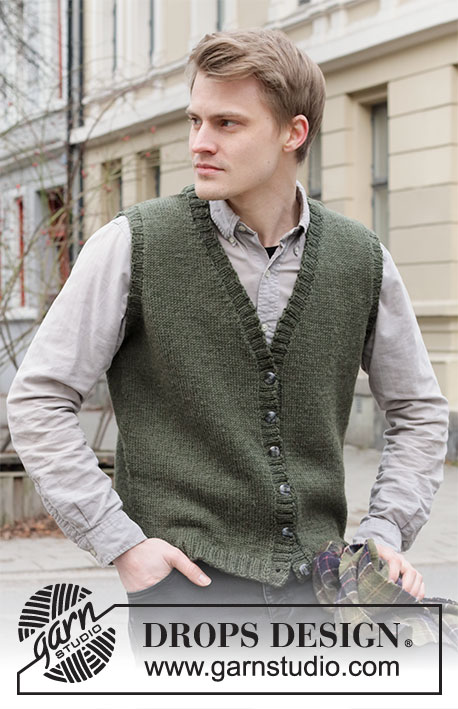
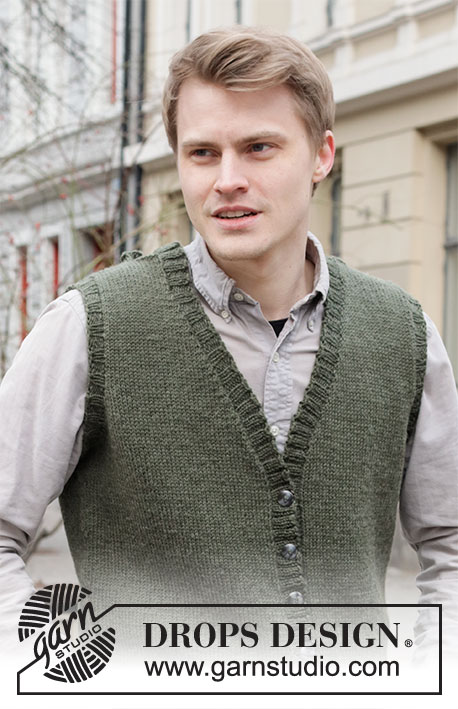
Boston Vest#bostonvest |
||||
 |
 |
|||
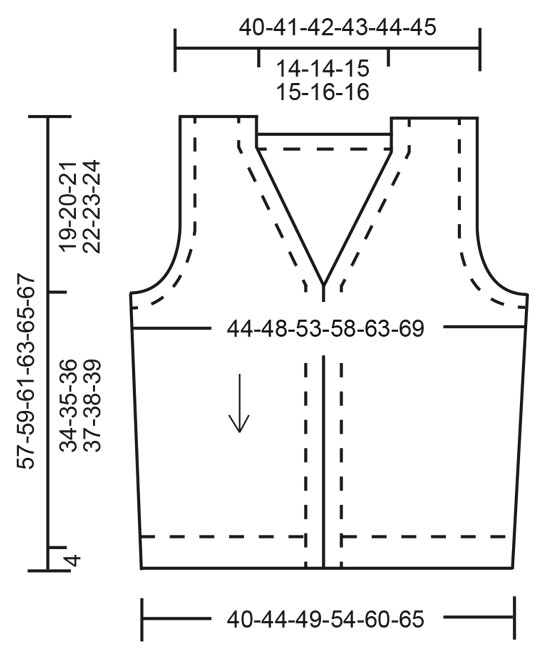
Knitted vest for men in DROPS Karisma. The piece is worked top down with V-neck and ribbed edges. Sizes S - XXXL.
DROPS 219-3 |
||||
|
------------------------------------------------------- EXPLANATIONS FOR THE PATTERN: ------------------------------------------------------- RIDGE/GARTER STITCH (worked back and forth): Knit all rows. 1 ridge in height = Knit 2 rows. INCREASE TIP (for V-neck): Make 1 yarn over between 2 stitches. On the next row, work the yarn over twisted to avoid a hole. DECREASE TIP (for sides of body): Decrease 1 stitch on each side of the stitch with the marker thread as follows: Work until there are 3 stitches left before the stitch with the marker thread, knit 2 together, knit 2, slip 1 stitch as if to knit, knit 1 and pass the slipped stitch over the knitted stitch. BUTTONHOLES: Work buttonholes from the right side and on the right band. The bottom buttonhole is worked approx. 2 cm = ¾" from the bottom edge, the top buttonhole approx.1 cm = ⅜" from the beginning of the v-neck (approx. 32-33-34-35-36-37 cm = 12½"-13"-13⅜"-13¾"-14¼"-14½" measured from the bottom of the vest). Work a total of 6 buttonholes with approx. 6-6-6½-6½-7-7 cm = 2⅜"-2⅜"-2½"-2½"-2¾"-2¾" between each one. Position them in the purled sections (seen from the right side). 1 buttonhole = purl 2 together, 1 yarn over. On the next row (wrong side) knit the yarn to leave a hole. BINDING-OFF TIP: To avoid the bind-off edge being tight you can bind off with a larger size needle. If the edge is still tight, make 1 yarn over after approx. each 4th stitch at the same time as binding off; the yarn overs are bind off as normal stitches. ------------------------------------------------------- START THE PIECE HERE: ------------------------------------------------------- VEST – SHORT OVERVIEW OF THE PIECE: The vest is worked top down. Each shoulder is worked separately, back and forth, and stitches are increased/cast on for the V-neck and armholes. Then all pieces are joined together and the body finished working back and forth. Stiches are picked up for the neck, sleeve edges and bands, which are worked in rib to finish. FRONT PIECES: Right front piece: Cast on 20-21-21-22-22-23 stitches (including 1 edge stitch on each side) using circular needle size 4 mm = US 6 and Karisma. Work 1 edge stitch in GARTER STITCH – read description above, work stockinette stitch until there is 1 stitch left on the row and then 1 edge stitch in garter stitch. Continue like this back and forth. When the piece measures 4-5-5-6-6-7 cm = 1½"-2"-2"-2⅜"-2⅜"-2¾", start to increase for the V-neck and when the piece measures 18-18-18-17-17-16 cm = 7"-7"-7"-6¾"-6¾"-6¼", increase for the armholes, read description below: V-neck: Increase 1 stitch inside the last 2 stitches on the next row from the right side – read INCREASE TIP. Increase like this alternately every 2nd and 4th row a total of 19-19-20-20-21-21 times (increases for the V-neck are not finished when the armhole is finished, but are continued on the body). REMEMBER THE KNITTING GAUGE! Armhole: Increase 1 stitch inside the first 2 stitches on every row from the right side 2-1-1-3-4-4 times, then cast on new stitches at the end of every row from the wrong side as follows: Cast on 2 stitches 0-2-2-3-3-4 times and 3 stitches 0-0-1-1-2-3 times (= a total of 2-5-8-12-16-21 stitches increased). Lay the piece to one side and work the left front piece. Left front piece: Cast on 20-21-21-22-22-23 stitches (including 1 edge stitch on each side) using circular needle size 4 mm = US 6 and Karisma. Work 1 edge stitch in garter stitch, stockinette stitch until there is 1 stitch left on the row and then 1 edge stitch in garter stitch. Continue like this back and forth. When the piece measures 4-5-5-6-6-7 cm = 1½"-2"-2"-2⅜"-2⅜"-2¾", start to increase for the V-neck and when the piece measures 18-18-18-17-17-16 cm = 7"-7"-7"-6¾"-6¾"-6¼", increase for the armholes, read description below: V-neck: Increase 1 stitch inside the first 2 stitches on the next row from the right side – remember INCREASE TIP. Increase like this alternately every 2nd and 4th row a total of 19-19-20-20-21-21 times. Armhole: Increase 1 stitch inside the last 2 stitches on each row from the right side 2-1-1-3-4-4 times, then cast on new stitches at the end of every row from the right side as follows: Cast on 2 stitches 0-2-2-3-3-4 times and 3 stitches 0-0-1-1-2-3 times (= a total of 2-5-8-12-16-21 stitches increased). Lay the piece to one side and work the back piece. BACK PIECE: Each shoulder is worked separately before being joined together. Right shoulder: Cast on 20-21-21-22-22-23 stitches (including 1 edge stitch on each side) using circular needle size 4 mm = US 6 and Karisma. Work 1 edge stitch in garter stitch, stockinette stitch until there is 1 stitch left on the row and then 1 edge stitch in garter stitch. Continue like this back and forth. When the piece measures 4 cm = 1½" increase 1 stitch inside the first 2 stitches on the next row from the right side = 21-22-22-23-23-24 stitches. Work 1 row back from the wrong side. Lay the piece to one side and work the left shoulder. Left shoulder: Cast on 20-21-21-22-22-23 stitches (including 1 edge stitch on each side) using circular needle size 4 mm = US 6 and Karisma. Work 1 edge stitch in garter stitch, stockinette stitch until there is 1 stitch left on the row and then 1 edge stitch in garter stitch. Continue like this back and forth. When the piece measures 4 cm = 1½" increase 1 stitch inside the last 2 stitches on the next row from the right side = 21-22-22-23-23-24 stitches. Work 1 row back from the wrong side. Now work the 2 shoulders together as follows: Work the 21-22-22-23-23-24 stitches from the left shoulder as before, cast on 36-36-38-38-40-40 stitches (= neck) work the 21-22-22-23-23-24 stitches from the right shoulder as before = 78-80-82-84-86-88 stitches. Work stockinette stitch back and forth with 1 stitch in garter stitch on each side. When the piece measures 18-18-18-17-17-16 cm = 7"-7"-7"-6¾"-6¾"-6¼", increase/cast on stitches on each side of the piece for the armholes, in the same way as on the front pieces (= a total of 2-5-8-12-16-21 stitches increased for each armhole) = 82-90-98-108-118-130 stitches. When all the increases are finished, work the body. THE PIECE IS NOW MEASURED FROM HERE! BODY: Now join all the pieces together from the right side as follows: Starting with the left front piece, work 1 edge stitch in garter stitch and stockinette stitch as before, then cast on 11-11-13-13-15-15 new stitches (= in side under sleeve), stockinette stitch over the 82-90-98-108-118-130 stitches on the back piece, cast on 11-11-13-13-15-15 new stitches (= in side under sleeve), stockinette stitch over the right front piece until there is 1 stitch left and finish with 1 edge stitch in garter stitch. The number of stitches on the needle is dependent on how many increases still remain for the V-neck. Insert 1 marker in the middle stitch of the 11-11-13-13-15-15 new stitches in each side. Allow the markers to follow your work onwards; stitches will later be decreased on each side of both markers. When all the increases for the V-neck are finished there are = 186-202-222-242-266-290 stitches on the needle. When the piece measures 5 cm = 2", decrease on both sides of each marker – read DECREASE TIP (= 4 stitches decreased). Decrease like this every 9-9-10-10-10-11 cm = 3½"-3½"-4"-4"-4"-4⅜" a total of 4 times = 170-186-206-226-250-274 stitches. When the piece measures 34-35-36-37-38-39 cm = 13⅜"-13¾"-14¼"-14½"-15"-15¼" increase 26-26-30-34-38-42 stitches evenly spaced = 196-212-236-260-288-316 stitches. Change to circular needle size 3 mm = US 2,5 and work rib, starting from the right side (= knit 2 / purl 2) with 1 edge stitch in garter stitch on each side until the rib measures 4 cm = 1½". Bind off with knit over knit and purl over purl – read BINDING-OFF TIP. The vest measures approx.57-59-61-63-65-67 cm = 22½"-23¼"-24"-24¾"-25½"-26⅜" from the shoulder down. ASSEMBLY: Sew the shoulder seams with grafting stitches. ARMHOLE EDGE: Knit up 88-132 stitches inside the 1 edge stitch around the armhole with short circular needle size 3 mm = US 2,5 and Karisma; adjust so the number of stitches is divisible by 4. Work rib in the round (= knit 2 / purl 2) for 2 cm = ¾". Bind off with knit over knit and purl over purl – remember BINDING-OFF TIP! Work the other sleeve edge in the same way. RIGHT BAND AND NECK: Starting from the right side at the bottom of the right front piece, knit up 144-172 stitches with short circular needle size 3 mm = US 2,5 and Karisma, inside the 1 edge stitch, and as far as mid-back of the neck. Adjust so the number of stitches is divisible by 4. Purl 1 row from the wrong side and increase using yarn overs just where the V-neck finishes (i.e. the point, approx. 33-34-35-36-37-38 cm = 13"-13⅜"-13¾"-14¼"-14½"-15" from the bind-off edge upwards), * purl 1, 1 yarn over *, work from *-* a total of 4 times (= 4 stitches increased). On the next row from the right side work as follows: 2 edge stitches in garter stitch, then rib (= knit 2 / purl 2) to end of row (yarn overs worked twisted to avoid holes). Make sure the band is neither too tight nor too loose for the length of the front piece; knit up more/less stitches if necessary. When the band measures 1 cm = ⅜" work the BUTTONHOLES – read description above. When the band/neck measures 2½ cm = ⅞", Bind off with knit over knit and purl over purl – remember BINDING-OFF TIP. LEFT BAND AND NECK: Starting mid-back of neck with circular needle size 3 mm = US 2,5 and Karisma and working from the right side, knit up the same number of stitches as on the right band and neck inside the 1 edge stitch down the left front piece. Purl 1 row from the wrong side and increase with yarn overs just where the V-neck finishes (i.e. the point, approx. 33-34-35-36-37-38 cm = 13"-13⅜"-13¾"-14¼"-14½"-15" from the bind-off edge upwards), * purl 1, 1 yarn over *, work from *-* a total of 4 times (= 4 stitches increased). On the next row from the right side work as follows: Work rib (= knit 2 / purl 2) until there are 2 stitches left and finish with 2 stitches in garter stitch (yarn overs worked twisted to avoid holes). When the band/neck measures 2½ cm = ⅞", Bind off with knit over knit and purl over purl – remember BINDING-OFF TIP. ASSEMBLY: Sew buttons onto the left band. |
||||
Diagram explanations |
||||
|
||||
 |
||||
Have you finished this pattern?Tag your pictures with #dropspattern #bostonvest or submit them to the #dropsfan gallery. Do you need help with this pattern?You'll find 25 tutorial videos, a Comments/Questions area and more by visiting the pattern on garnstudio.com. © 1982-2026 DROPS Design A/S. We reserve all rights. This document, including all its sub-sections, has copyrights. Read more about what you can do with our patterns at the bottom of each pattern on our site. |
||||


With over 40 years in knitting and crochet design, DROPS Design offers one of the most extensive collections of free patterns on the internet - translated to 17 languages. As of today we count 324 catalogs and 12290 patterns - 12280 of which are translated into English (US/in).
We work hard to bring you the best knitting and crochet have to offer, inspiration and advice as well as great quality yarns at incredible prices! Would you like to use our patterns for other than personal use? You can read what you are allowed to do in the Copyright text at the bottom of all our patterns. Happy crafting!
Post a comment to pattern DROPS 219-3
We would love to hear what you have to say about this pattern!
If you want to leave a question, please make sure you select the correct category in the form below, to speed up the answering process. Required fields are marked *.