
Popular categories
Looking for a yarn?


Comments / Questions (98)
![]() Solveig Madsen wrote:
Solveig Madsen wrote:
På opskriften herover kan jeg se at der mangler et afsnit ( 4 linier) i min opskrift. Det forklarer problemet.
03.11.2024 - 03:34
![]() Solveig Madsen wrote:
Solveig Madsen wrote:
Strikker Boston vest i str L . Opskriften ufuldstændig, man strikker hø og ve skulder men der står ikke noget om at slå ekstra masker op til hals eller hvordan skal man samle dem???
03.11.2024 - 03:25DROPS Design answered:
Hei Solveig. Jo det står under BAGSTYKKE og 3. avsnitt. Når du har strikket højre og venstre skulder, står det: Nu strikkes de 2 dele sammen således: Strik de 22 masker på venstre skulder som før, slå 38 masker op på pinden (= hals) strik de 22 masker på højre skulder som før = 82 masker. Strik glatstrik frem og tilbage med 1 kantmaske retstrik i hver side. mvh DROPS Design
04.11.2024 - 11:06
![]() Søren Oscar wrote:
Søren Oscar wrote:
Jeg har fået svaret på mit spørgsmål, gennem svaret til Linda 12.08.2024-1415 Mvh Søren Oscar
18.09.2024 - 12:37DROPS Design answered:
Hej, fint at du selv fandt svaret :)
18.09.2024 - 13:40
![]() Søren Oscar wrote:
Søren Oscar wrote:
Hej! Er startet på opskrift Drops 219-3 - Boston Vest , og er godt i gang med højre forstykke. Ved. udtagning , tag 1 maske ud indenfor 2 masker i slutningen af næste pind fra retsiden. 1.næste pind vrang. 2.næste pind ret, udtagning 3.næste pind vrang 4.næste pind ret 5.næste pind vrang 6.næste pind ret, udtagning. Gentages ialt 20 gange, altså 40 udtagninger. Er det rigtig forstået Mvh Søren Oscar
17.09.2024 - 17:06DROPS Design answered:
Hej, fint at du selv fandt svaret :)
18.09.2024 - 13:40
![]() Linda Vikman wrote:
Linda Vikman wrote:
Vad innebär vartannan gång och vart fjärde varv (beskrivning av V-hals-ökning). Innebär det ökningar på vartannat varv eller?
06.08.2024 - 21:20DROPS Design answered:
Hei Linda. Det betyr at du øker annenhver gang på hver 2. og hver 4. pinne. F.eks strikk 1 pinne uten økning deretter strikkes det 1 pinne med økninger. Så strikkes det 3 pinner uten økning, mens det økes på 4. pinne. Så økes det det på hver 2. pinne igjen (strikk 1 pinne uten økning deretter strikkes det 1 pinne med økninger). Så økes det det på hver 4. pinne igjen (strikk 3 pinner uten økning deretter strikkes det 1 pinne med økninger), osv. mvh DROPS Design
12.08.2024 - 14:15
![]() Debra Anderson wrote:
Debra Anderson wrote:
Body instructions are unclear…I am having problem with instructions on the body when I need to increase for the vneck for extra stitches. Do I follow increase method for every 2nd row? Can you explain how to do this? Then it says to decrease after 2 inches. , then increase again. Can you provide more details? Thx.
05.08.2024 - 20:34DROPS Design answered:
Dear Debra, you increase alternately in every 2nd or 4th row. This means that you increase as follows: increase row, 1 row without increases, increase row, 3 rows without increases and repeat. When you join both front pieces and the back, there should be some stitches remaining to increase for the V-neck, first finish these increases. Then start decreasing in the mid under sleeve on each side of each marker when the piece measures 2 inches since you joined the body. Finally, when you are nearly done with the sleeve decreases increase stitches evenly on the round for a larger and more elastic rib edge. Happy knitting!
06.08.2024 - 00:27
![]() Debra Anderson wrote:
Debra Anderson wrote:
Body instructions are unclear…I am having problem with instructions on the body when I need to increase for the vneck for extra stitches. Do I follow increase method for every 2nd row? Can you explain how to do this? Then it says to decrease after 2 inches. , then increase again. Can you provide more details? Thx.
05.08.2024 - 20:33DROPS Design answered:
Dear Debra, you increase alternately in every 2nd or 4th row. This means that you increase as follows: increase row, 1 row without increases, increase row, 3 rows without increases and repeat. When you join both front pieces and the back, there should be some stitches remaining to increase for the V-neck, first finish these increases. Then start decreasing in the mid under sleeve on each side of each marker when the piece measures 2 inches since you joined the body. Finally, when you are nearly done with the sleeve decreases increase stitches evenly on the round for a larger and more elastic rib edge. Happy knitting!
06.08.2024 - 00:27
![]() Françoise wrote:
Françoise wrote:
Lorsque vous dites : Monter 20 mailles (y compris 1 maille lisière de chaque côté) = cela veut dire que les 2 mailles lisière sont inclues où qu'il faut les ajouter ? Soit 22 mailles au total.
07.07.2024 - 17:17DROPS Design answered:
Bonjour Françoise, les mailles lisières sont comprises dans le nombre de mailles à monter et ne doivent pas être ajoutées; ainsi, vous allez monter simplement 20 mailles en taille S. Bon tricot!
29.07.2024 - 08:22
![]() Mathilde wrote:
Mathilde wrote:
Kan jeg strikke denne vest i Alpaca Bouclé? Og i så fald, hvordan omregner jeg garnforbrug?
24.03.2024 - 15:10DROPS Design answered:
Hej Mathilde, den vil blive lidt kompakt hvis du strikker den i Alpaca Boucle, men det gør måske ikke noget. Prøv at strikke en strikkeprøve og se om du synes om det :)
03.04.2024 - 13:55
![]() Linda Nardin wrote:
Linda Nardin wrote:
Buonasera. Sto facendo questo bel gilet. Lo trovo molto interessante. Ho fatto davanti sinistro e destro e li ho messi da parte, spalla destra e sinistra e li devo unire ...trovo difficoltà nel mettere tutti in un unico ferro per lavorare il corpo.. aiuto😊 Grazie mille
06.02.2024 - 17:59
|
||||
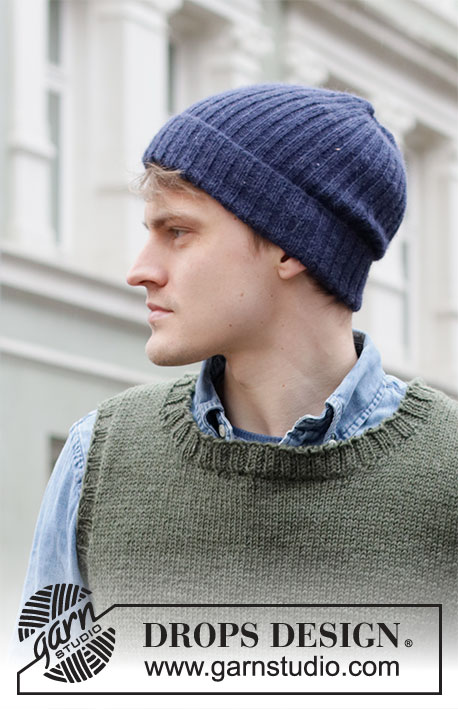
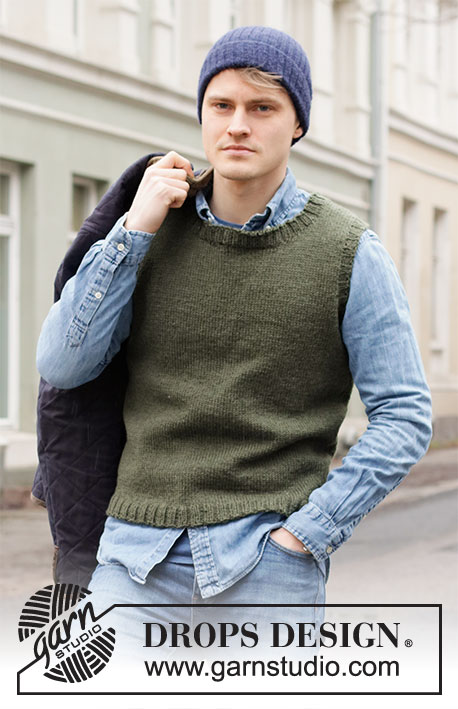
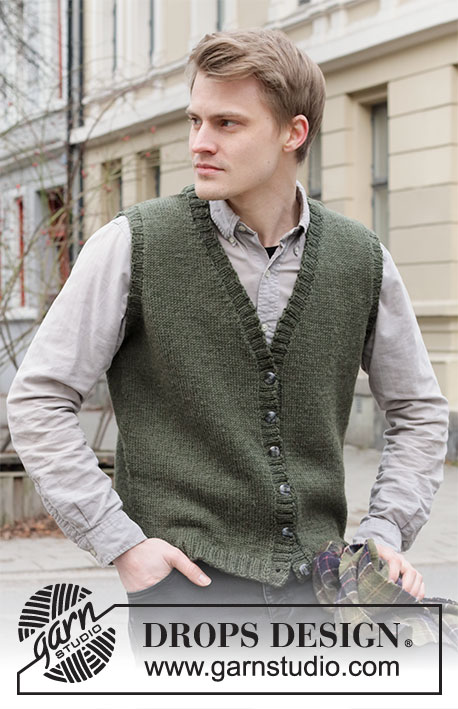
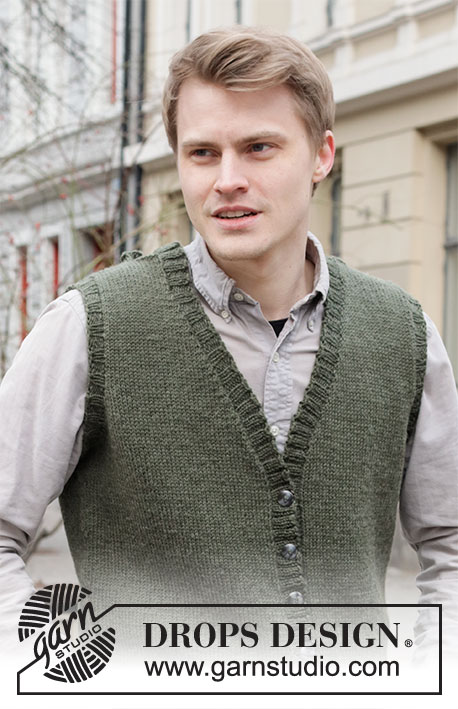
Boston Vest#bostonvest |
||||
 |
 |
|||
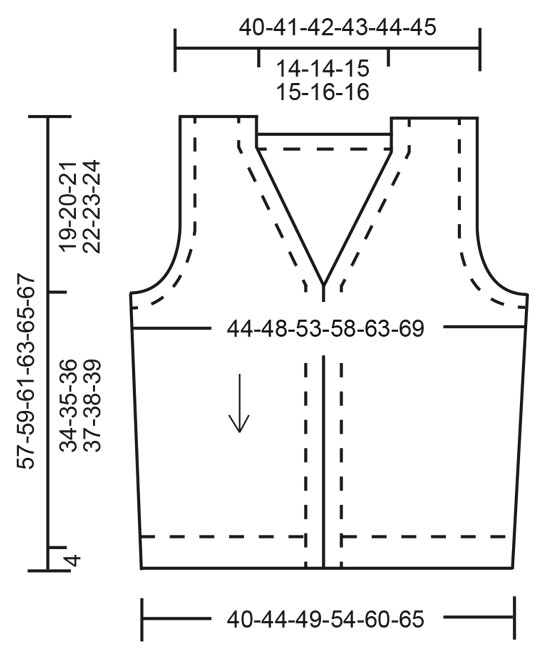
Knitted vest for men in DROPS Karisma. The piece is worked top down with V-neck and ribbed edges. Sizes S - XXXL.
DROPS 219-3 |
||||
|
------------------------------------------------------- EXPLANATIONS FOR THE PATTERN: ------------------------------------------------------- RIDGE/GARTER STITCH (worked back and forth): Knit all rows. 1 ridge in height = Knit 2 rows. INCREASE TIP (for V-neck): Make 1 yarn over between 2 stitches. On the next row, work the yarn over twisted to avoid a hole. DECREASE TIP (for sides of body): Decrease 1 stitch on each side of the stitch with the marker thread as follows: Work until there are 3 stitches left before the stitch with the marker thread, knit 2 together, knit 2, slip 1 stitch as if to knit, knit 1 and pass the slipped stitch over the knitted stitch. BUTTONHOLES: Work buttonholes from the right side and on the right band. The bottom buttonhole is worked approx. 2 cm = ¾" from the bottom edge, the top buttonhole approx.1 cm = ⅜" from the beginning of the v-neck (approx. 32-33-34-35-36-37 cm = 12½"-13"-13⅜"-13¾"-14¼"-14½" measured from the bottom of the vest). Work a total of 6 buttonholes with approx. 6-6-6½-6½-7-7 cm = 2⅜"-2⅜"-2½"-2½"-2¾"-2¾" between each one. Position them in the purled sections (seen from the right side). 1 buttonhole = purl 2 together, 1 yarn over. On the next row (wrong side) knit the yarn to leave a hole. BINDING-OFF TIP: To avoid the bind-off edge being tight you can bind off with a larger size needle. If the edge is still tight, make 1 yarn over after approx. each 4th stitch at the same time as binding off; the yarn overs are bind off as normal stitches. ------------------------------------------------------- START THE PIECE HERE: ------------------------------------------------------- VEST – SHORT OVERVIEW OF THE PIECE: The vest is worked top down. Each shoulder is worked separately, back and forth, and stitches are increased/cast on for the V-neck and armholes. Then all pieces are joined together and the body finished working back and forth. Stiches are picked up for the neck, sleeve edges and bands, which are worked in rib to finish. FRONT PIECES: Right front piece: Cast on 20-21-21-22-22-23 stitches (including 1 edge stitch on each side) using circular needle size 4 mm = US 6 and Karisma. Work 1 edge stitch in GARTER STITCH – read description above, work stockinette stitch until there is 1 stitch left on the row and then 1 edge stitch in garter stitch. Continue like this back and forth. When the piece measures 4-5-5-6-6-7 cm = 1½"-2"-2"-2⅜"-2⅜"-2¾", start to increase for the V-neck and when the piece measures 18-18-18-17-17-16 cm = 7"-7"-7"-6¾"-6¾"-6¼", increase for the armholes, read description below: V-neck: Increase 1 stitch inside the last 2 stitches on the next row from the right side – read INCREASE TIP. Increase like this alternately every 2nd and 4th row a total of 19-19-20-20-21-21 times (increases for the V-neck are not finished when the armhole is finished, but are continued on the body). REMEMBER THE KNITTING GAUGE! Armhole: Increase 1 stitch inside the first 2 stitches on every row from the right side 2-1-1-3-4-4 times, then cast on new stitches at the end of every row from the wrong side as follows: Cast on 2 stitches 0-2-2-3-3-4 times and 3 stitches 0-0-1-1-2-3 times (= a total of 2-5-8-12-16-21 stitches increased). Lay the piece to one side and work the left front piece. Left front piece: Cast on 20-21-21-22-22-23 stitches (including 1 edge stitch on each side) using circular needle size 4 mm = US 6 and Karisma. Work 1 edge stitch in garter stitch, stockinette stitch until there is 1 stitch left on the row and then 1 edge stitch in garter stitch. Continue like this back and forth. When the piece measures 4-5-5-6-6-7 cm = 1½"-2"-2"-2⅜"-2⅜"-2¾", start to increase for the V-neck and when the piece measures 18-18-18-17-17-16 cm = 7"-7"-7"-6¾"-6¾"-6¼", increase for the armholes, read description below: V-neck: Increase 1 stitch inside the first 2 stitches on the next row from the right side – remember INCREASE TIP. Increase like this alternately every 2nd and 4th row a total of 19-19-20-20-21-21 times. Armhole: Increase 1 stitch inside the last 2 stitches on each row from the right side 2-1-1-3-4-4 times, then cast on new stitches at the end of every row from the right side as follows: Cast on 2 stitches 0-2-2-3-3-4 times and 3 stitches 0-0-1-1-2-3 times (= a total of 2-5-8-12-16-21 stitches increased). Lay the piece to one side and work the back piece. BACK PIECE: Each shoulder is worked separately before being joined together. Right shoulder: Cast on 20-21-21-22-22-23 stitches (including 1 edge stitch on each side) using circular needle size 4 mm = US 6 and Karisma. Work 1 edge stitch in garter stitch, stockinette stitch until there is 1 stitch left on the row and then 1 edge stitch in garter stitch. Continue like this back and forth. When the piece measures 4 cm = 1½" increase 1 stitch inside the first 2 stitches on the next row from the right side = 21-22-22-23-23-24 stitches. Work 1 row back from the wrong side. Lay the piece to one side and work the left shoulder. Left shoulder: Cast on 20-21-21-22-22-23 stitches (including 1 edge stitch on each side) using circular needle size 4 mm = US 6 and Karisma. Work 1 edge stitch in garter stitch, stockinette stitch until there is 1 stitch left on the row and then 1 edge stitch in garter stitch. Continue like this back and forth. When the piece measures 4 cm = 1½" increase 1 stitch inside the last 2 stitches on the next row from the right side = 21-22-22-23-23-24 stitches. Work 1 row back from the wrong side. Now work the 2 shoulders together as follows: Work the 21-22-22-23-23-24 stitches from the left shoulder as before, cast on 36-36-38-38-40-40 stitches (= neck) work the 21-22-22-23-23-24 stitches from the right shoulder as before = 78-80-82-84-86-88 stitches. Work stockinette stitch back and forth with 1 stitch in garter stitch on each side. When the piece measures 18-18-18-17-17-16 cm = 7"-7"-7"-6¾"-6¾"-6¼", increase/cast on stitches on each side of the piece for the armholes, in the same way as on the front pieces (= a total of 2-5-8-12-16-21 stitches increased for each armhole) = 82-90-98-108-118-130 stitches. When all the increases are finished, work the body. THE PIECE IS NOW MEASURED FROM HERE! BODY: Now join all the pieces together from the right side as follows: Starting with the left front piece, work 1 edge stitch in garter stitch and stockinette stitch as before, then cast on 11-11-13-13-15-15 new stitches (= in side under sleeve), stockinette stitch over the 82-90-98-108-118-130 stitches on the back piece, cast on 11-11-13-13-15-15 new stitches (= in side under sleeve), stockinette stitch over the right front piece until there is 1 stitch left and finish with 1 edge stitch in garter stitch. The number of stitches on the needle is dependent on how many increases still remain for the V-neck. Insert 1 marker in the middle stitch of the 11-11-13-13-15-15 new stitches in each side. Allow the markers to follow your work onwards; stitches will later be decreased on each side of both markers. When all the increases for the V-neck are finished there are = 186-202-222-242-266-290 stitches on the needle. When the piece measures 5 cm = 2", decrease on both sides of each marker – read DECREASE TIP (= 4 stitches decreased). Decrease like this every 9-9-10-10-10-11 cm = 3½"-3½"-4"-4"-4"-4⅜" a total of 4 times = 170-186-206-226-250-274 stitches. When the piece measures 34-35-36-37-38-39 cm = 13⅜"-13¾"-14¼"-14½"-15"-15¼" increase 26-26-30-34-38-42 stitches evenly spaced = 196-212-236-260-288-316 stitches. Change to circular needle size 3 mm = US 2,5 and work rib, starting from the right side (= knit 2 / purl 2) with 1 edge stitch in garter stitch on each side until the rib measures 4 cm = 1½". Bind off with knit over knit and purl over purl – read BINDING-OFF TIP. The vest measures approx.57-59-61-63-65-67 cm = 22½"-23¼"-24"-24¾"-25½"-26⅜" from the shoulder down. ASSEMBLY: Sew the shoulder seams with grafting stitches. ARMHOLE EDGE: Knit up 88-132 stitches inside the 1 edge stitch around the armhole with short circular needle size 3 mm = US 2,5 and Karisma; adjust so the number of stitches is divisible by 4. Work rib in the round (= knit 2 / purl 2) for 2 cm = ¾". Bind off with knit over knit and purl over purl – remember BINDING-OFF TIP! Work the other sleeve edge in the same way. RIGHT BAND AND NECK: Starting from the right side at the bottom of the right front piece, knit up 144-172 stitches with short circular needle size 3 mm = US 2,5 and Karisma, inside the 1 edge stitch, and as far as mid-back of the neck. Adjust so the number of stitches is divisible by 4. Purl 1 row from the wrong side and increase using yarn overs just where the V-neck finishes (i.e. the point, approx. 33-34-35-36-37-38 cm = 13"-13⅜"-13¾"-14¼"-14½"-15" from the bind-off edge upwards), * purl 1, 1 yarn over *, work from *-* a total of 4 times (= 4 stitches increased). On the next row from the right side work as follows: 2 edge stitches in garter stitch, then rib (= knit 2 / purl 2) to end of row (yarn overs worked twisted to avoid holes). Make sure the band is neither too tight nor too loose for the length of the front piece; knit up more/less stitches if necessary. When the band measures 1 cm = ⅜" work the BUTTONHOLES – read description above. When the band/neck measures 2½ cm = ⅞", Bind off with knit over knit and purl over purl – remember BINDING-OFF TIP. LEFT BAND AND NECK: Starting mid-back of neck with circular needle size 3 mm = US 2,5 and Karisma and working from the right side, knit up the same number of stitches as on the right band and neck inside the 1 edge stitch down the left front piece. Purl 1 row from the wrong side and increase with yarn overs just where the V-neck finishes (i.e. the point, approx. 33-34-35-36-37-38 cm = 13"-13⅜"-13¾"-14¼"-14½"-15" from the bind-off edge upwards), * purl 1, 1 yarn over *, work from *-* a total of 4 times (= 4 stitches increased). On the next row from the right side work as follows: Work rib (= knit 2 / purl 2) until there are 2 stitches left and finish with 2 stitches in garter stitch (yarn overs worked twisted to avoid holes). When the band/neck measures 2½ cm = ⅞", Bind off with knit over knit and purl over purl – remember BINDING-OFF TIP. ASSEMBLY: Sew buttons onto the left band. |
||||
Diagram explanations |
||||
|
||||
 |
||||
Have you finished this pattern?Tag your pictures with #dropspattern #bostonvest or submit them to the #dropsfan gallery. Do you need help with this pattern?You'll find 25 tutorial videos, a Comments/Questions area and more by visiting the pattern on garnstudio.com. © 1982-2026 DROPS Design A/S. We reserve all rights. This document, including all its sub-sections, has copyrights. Read more about what you can do with our patterns at the bottom of each pattern on our site. |
||||


With over 40 years in knitting and crochet design, DROPS Design offers one of the most extensive collections of free patterns on the internet - translated to 17 languages. As of today we count 324 catalogs and 12290 patterns - 12280 of which are translated into English (US/in).
We work hard to bring you the best knitting and crochet have to offer, inspiration and advice as well as great quality yarns at incredible prices! Would you like to use our patterns for other than personal use? You can read what you are allowed to do in the Copyright text at the bottom of all our patterns. Happy crafting!
Post a comment to pattern DROPS 219-3
We would love to hear what you have to say about this pattern!
If you want to leave a question, please make sure you select the correct category in the form below, to speed up the answering process. Required fields are marked *.