
Popular categories
Looking for a yarn?


Comments / Questions (80)
![]() Parul Gupta wrote:
Parul Gupta wrote:
I knitted this pattern until leaves portion to make a shoulder warmer. It came out beautifully, I can share the pictures of my work. I think the pattern owner will like it.
01.03.2022 - 14:18
![]() Marianne wrote:
Marianne wrote:
Hej . Nu har jeg forsøgt at strikke mønsteret 7 gange og kan ikke få mønsteret til at passe. Er der fejl i mønsteret?
17.02.2022 - 15:35
![]() Anita Hansson wrote:
Anita Hansson wrote:
Har stickat Lavender Charm Top men i garnet Cottonmerino. Stickfastheten stämmer på slätstickning, 21 maskor med stickor 4. MEN oket blev alldeles för stort. Jag vinnlade mig om att hålla rejält i tråden så att stickningen inte blev för lös. Vidden stämmer när jag kommer ner till kroppen. Några tips?
12.12.2021 - 11:26DROPS Design answered:
Hei Anita. Mulig du da har strikket bærestykket / mønstret for løst, slik at den har blitt for stor. Du kan evnt strikke en prøvelapp med bare 1 gjentakelse av diagrammet med en mindre pinne størrelse for å se hvor stor forskjell det blir og se om det blir bedre (altså strikke bærestykket med en mindre pinnestr. enn resten av bolen/der det strikkes glattstrikk). mvh DROPS Design
14.12.2021 - 10:22
![]() Sarangi Ketola wrote:
Sarangi Ketola wrote:
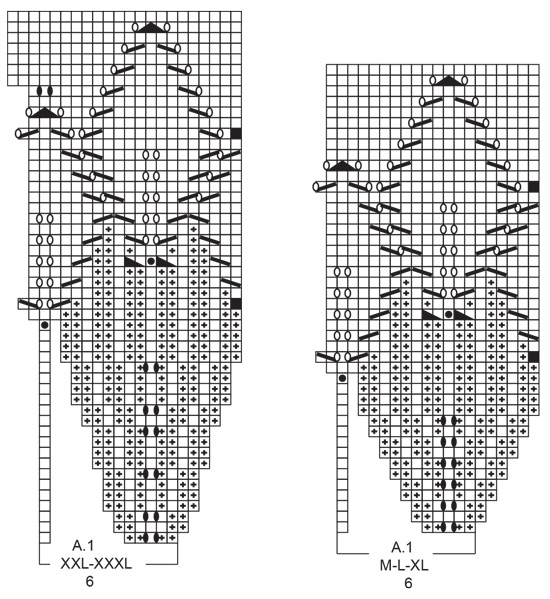
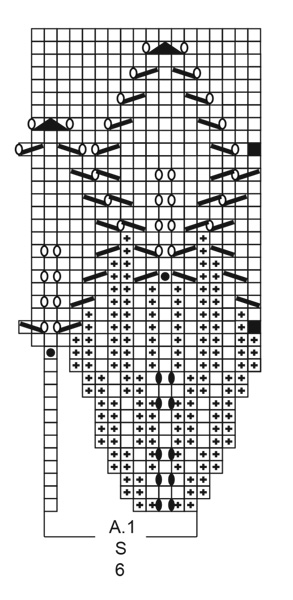
Hello. In diagram describe that "Work 3 stitches on Stitch as follows: Knut The Stitch nyt wait to stop The Stitch off, Make 1 hän ovet on right needle..........' . I didn't t understand what must do ? Do you have description video related to this Part ?
30.09.2021 - 17:56DROPS Design answered:
Dear Sarangi, you can find all the revelant videos linked just below the pattern and the diagrams. For that symbol, you should work 3 stitches in stitch as follows: "knit the stitch but wait to drop the stitch off the needle, make 1 yarn over on right needle and knit the stitch 1 more time, then drop the stitches of the needle = 3 stitches (= 2 stitches increased). " ou can find teh tutorial video here. Happy Stitching!
30.09.2021 - 20:26
![]() Annemette Ottesen wrote:
Annemette Ottesen wrote:
Jeg har prøvet forskellige opskrifter nu, hvor der strikkes oppefra og ned. Jeg synes de alle lider under, at halsen foran kommer til at sidde på for højt oppe, fordi den er helt lige med nakken. Man får lidt "kvælningsfornemmelse". Giver det mening? På forhånd tak.
24.08.2021 - 06:14DROPS Design answered:
Hej Annemette, nej det er egentlig ikke et problem med "kvælningsfornemmelse" i halsen, men du kan altid se på måleskitsen hvor stor halsen vil blive (ifølge strikkefastheden i opskriften), og så har vi også modeller hvor der strikkes flere pinde i nakken :)
25.08.2021 - 08:38
![]() Inge Christiansen wrote:
Inge Christiansen wrote:
Jeg forstaar ikke i beyndelsen siger ved baerestykke: strik A 1 (=6 masker) rundt over all masker (-16 gange i bredden)Naar A1 er strikket i gang i hoejden er der nu 288 masker....... Hvor skal jeg indtage maskerne? Hvooedan kan jeg foelge moensteret saa??? Undskyld, jeg er ikke saa god til at strikke......
04.08.2021 - 22:21DROPS Design answered:
Hej Inge. Du börjar med 96 m (strl S) och stickar efter halskanten A.1 (=6 m) runt över alla maskor; 16 ganger x 6 m= 96 m. Följer du sedan bara diagrammet och gör de uttagningar som är utritade i diagrammet så kommer du ha 288 m när A.1 har stickats 1 gång på höjden. Läs gärna mer om hur du läser ett stickdiagram här. Mvh DROPS Design
20.08.2021 - 11:13
![]() Helle Bentsen wrote:
Helle Bentsen wrote:
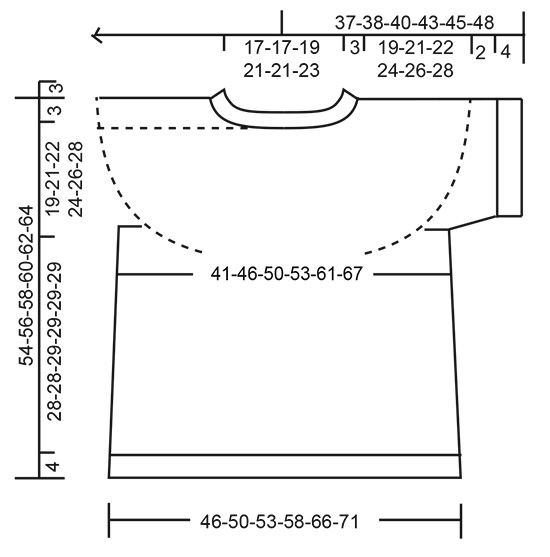
Hvor ser man brystmålene for diverse str ?
21.07.2021 - 19:44DROPS Design answered:
Hei Helle, Du finner en måleskisse for alle størrelsene på bunnen av sida. God fornøyelse!
22.07.2021 - 09:55
![]() Ildiko Szabo wrote:
Ildiko Szabo wrote:
Justement c’est la que au lieu du dessin il est juste écrit ‘symbols’ ????merci de m’envoyer les dessins ☺️
19.07.2021 - 13:57DROPS Design answered:
Bonjour Mme Szabo, nous n'avons aucun retour semblable sur aucun autre modèle et n'avons pu trouver l'erreur sur aucun navigateur. Essayez de rafraîchir la page (touche Ctrl + F5), ceci pourrait débloquer un problème d'affichage momentané, ou bien tentez avec un autre navigateur. Bon tricot!
21.07.2021 - 09:27
![]() Ildiko Szabo wrote:
Ildiko Szabo wrote:
J’aimerais réaliser le modèle r-764 . Dans mon diagramme il n’est pas dessiné le plupart des points c’est juste écrit symbole au lieu du dessin. Comment savoir quelle symbole est lequel? Merci ☺️
18.07.2021 - 14:03DROPS Design answered:
Bonjour Mme Szabo, vous trouverez la légende de tous les symboles utilisés dans le diagramme juste sous Diagramme, entre la dernière phrase des explications écrites et les premiers diagrammes (A.1 en XXL-XXXL et A.1 en M-L-XL). Bon tricot!
19.07.2021 - 09:00
![]() Aase Andersen wrote:
Aase Andersen wrote:
Spørgsmål. Forstår ikke start på A1 str, l.hvis man har 6 masker til start hvad jeg ikke kan se og slår om pinden 2 gange og så kun 7 masker på næste pind.
08.07.2021 - 23:38DROPS Design answered:
Hej Aase. Du startar diagram A.1 med 6 maskor pind 1 och sen på pind 2 har du 8 maskor (det är en maska helt till venstre i diagrammet). Mvh DROPS Design
09.07.2021 - 09:08
|
|||||||||||||||||||||||||||||||
Lavender Charm Top#lavendercharmtop |
|||||||||||||||||||||||||||||||
 |
 |
||||||||||||||||||||||||||||||
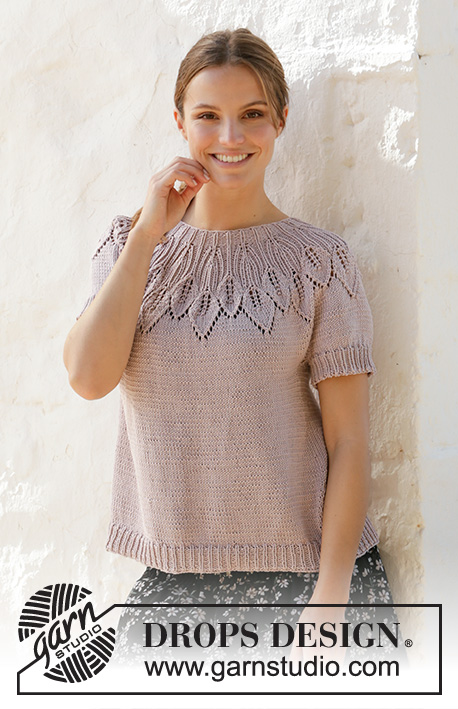
Knitted top with round yoke in DROPS Muskat. The piece is worked top down with leaf pattern and lace pattern. Sizes S - XXXL.
DROPS 213-22 |
|||||||||||||||||||||||||||||||
|
------------------------------------------------------- EXPLANATIONS FOR THE PATTERN: ------------------------------------------------------- PATTERN: See diagram A.1. Choose diagram for your size. INCREASE TIP (for sides of body): Work until there are 2 stitches left before the marker thread, make 1 yarn over, knit 4 (marker thread sits between these 4 stitches) make 1 yarn over. On the next round knit the yarn overs twisted to avoid holes. Then work the new stitches in stockinette stitch. DECREASE TIP (for sleeves): Decrease 1 stitch on each side of the marker thread as follows: Work until there are 3 stitches left before the marker thread, knit 2 together, knit 2 (marker thread sits between these 2 stitches), slip 1 stitch as if to knit, knit 1 and pass the slipped stitch over the knitted stitch. BINDING-OFF TIP: To avoid the bind-off edge being tight you can bind off with a larger size needle. If the edge is still tight, make 1 yarn over after approx. each 4th stitch at the same time as binding off and the yarn overs are bind off as normal stitches. ------------------------------------------------------- START THE PIECE HERE: ------------------------------------------------------- TOP – SHORT OVERVIEW OF THE PIECE: The neck and yoke are worked in the round with circular needle, from mid back and top down. The yoke is divided for body and sleeve-edges and the body is continued in the round with circular needle. The sleeve-edges are worked in the round with double pointed needles, top down. NECK: Cast on 96-96-102-114-114-120 stitches with circular needle size 3 mm = US 2,5 and Muskat. Knit 1 round. Work rib (= purl 2 / knit 1). When the piece measures 3 cm = 1⅛", change to circular needle size 4 mm = US 6. Insert 1 marker at the beginning of the round, mid-back; the yoke will be measured from this marker! YOKE: Work A.1 (= 6 stitches) in the round over all stitches (= 16-16-17-19-19-20 times in width). REMEMBER THE KNITTING GAUGE! When A.1 has been worked 1 time in height there are 288-320-340-380-418-440 stitches on the needle and the piece measures approx. 14-16-16-16-18-18 cm = 5½"-6¼"-6¼"-6¼"-7"-7" from the marker. Knit in the round until the piece measures 19-21-22-24-26-28 cm = 7½"-8¼"-8¾"-9½"-10¼"-11" from the marker. Now divide the piece for body and sleeves as follows: Work the first 40-45-49-53-60-65 stitches (= half back-piece), place the next 63-69-72-84-89-90 stitches on a thread for the sleeve-edge and cast on 6-6-6-6-8-10 new stitches under the sleeve, work the next 81-91-98-106-120-130 stitches (= front piece), place the next 63-69-72-84-89-90 stitches on a thread for the sleeve-edge and cast on 6-6-6-6-8-10 new stitches under the sleeve, work the last 41-46-49-53-60-65 stitches (= half back-piece). BODY: = 174-194-208-224-256-280 stitches. Insert 1 marker thread in the middle of the 6-6-6-6-8-10 stitches under each sleeve (= sides of body). There are 87-97-104-112-128-140 stitches between threads on both front and back pieces. Allow the threads to follow your work onwards; they will be used when increasing in the sides. Knit. When the piece measures 4 cm = 1½" from the division, increase 1 stitch on each side of both marker threads – read INCREASE TIP (= 4 stitches increased). Increase like this every 4 cm = 1½" a total of 5-4-4-5-5-5 times = 194-210-224-244-276-300 stitches. When the piece measures 28-28-29-29-29-29 cm = 11"-11"-11⅜"-11⅜"-11⅜"-11⅜" from the division, increase 13-12-13-14-15-15 stitches evenly spaced = 207-222-237-258-291-315 stitches. Change to circular needle size 3 mm = US 2,5 and work rib (= knit 1 / purl 2) for 4 cm = 1½". Bind off with knit – read BINDING-OFF TIP. The piece measures 32-32-33-33-33-33 cm = 12½"-12½"-13"-13"-13"-13" from the division. SLEEVE-EDGE: Place the 63-69-72-84-89-90 stitches from the thread on the one side of the piece on double pointed needles size 4 mm = US 6 and knit up 1 stitch in each of the 6-6-6-6-8-10 stitches cast on under the sleeve = 69-75-78-90-97-100 stitches. Work stockinette stitch in the round for 2 cm = ¾". Change to double pointed needles size 3 mm = US 2,5 and work rib (= knit 1 / purl 2) AT THE SAME TIME as you decrease, on the first round, 0-0-0-0-1-1 stitch = 69-75-78-90-96-99 stitches. Bind off when the rib measures 4 cm = 1½", with knit over knit and purl over purl. Work the other sleeve-edge in the same way. |
|||||||||||||||||||||||||||||||
Diagram explanations |
|||||||||||||||||||||||||||||||
|
|||||||||||||||||||||||||||||||
 |
|||||||||||||||||||||||||||||||
 |
|||||||||||||||||||||||||||||||
 |
|||||||||||||||||||||||||||||||
Have you finished this pattern?Tag your pictures with #dropspattern #lavendercharmtop or submit them to the #dropsfan gallery. Do you need help with this pattern?You'll find 27 tutorial videos, a Comments/Questions area and more by visiting the pattern on garnstudio.com. © 1982-2026 DROPS Design A/S. We reserve all rights. This document, including all its sub-sections, has copyrights. Read more about what you can do with our patterns at the bottom of each pattern on our site. |
|||||||||||||||||||||||||||||||


With over 40 years in knitting and crochet design, DROPS Design offers one of the most extensive collections of free patterns on the internet - translated to 17 languages. As of today we count 324 catalogs and 12290 patterns - 12280 of which are translated into English (US/in).
We work hard to bring you the best knitting and crochet have to offer, inspiration and advice as well as great quality yarns at incredible prices! Would you like to use our patterns for other than personal use? You can read what you are allowed to do in the Copyright text at the bottom of all our patterns. Happy crafting!
Post a comment to pattern DROPS 213-22
We would love to hear what you have to say about this pattern!
If you want to leave a question, please make sure you select the correct category in the form below, to speed up the answering process. Required fields are marked *.