
Popular categories
Looking for a yarn?


Comments / Questions (61)
![]() Rosario Elias Liñero wrote:
Rosario Elias Liñero wrote:
Hola Mira estoy muy confundida Para la talla mediana me pusiste así 1 der hebra, A 1 hebra mira aquí tengo dos hebras seguidas, 1 der MP 2 der hebra hebra 2 derechos aquí pasa lo mismo dos hebras seguidas que tengo que hacer? Muchas gracias por todo
26.04.2022 - 04:13DROPS Design answered:
Hola Rosario, en la Fila 1, trabajas 1d, 1 heb, A.1 ( todos los puntos de derecho, no hay hebras). El resto de la fila trabajas según te indica el patrón. En la Fila 2, trabajas según el patrón y las hebras de la fila anterior se trabajan de derecho retorcido. En la Fila 3, trabajar 1 d, 1 hebra, 1d (el punto aumentado en la fila 1), A.1. Trabajas la fila 4 como en la fila 2. En la Fila 5, A.1 empieza con una hebra. Entonces, comienzas trabajando 1 derecho, 1 hebra, 2 derechos (puntos aumentados en la fila 1 y 3) y A.1 (comienza con una hebra, pero no hay hebras seguidas).
27.04.2022 - 21:26
![]() Rosario Elias Liñero wrote:
Rosario Elias Liñero wrote:
Hola Perdón otra vez por molestarte es que se me juntan las hebras y me salen 8 pts sin contar las hebras Discúlpame por favor por escribirte tanto y te doy las gracias Saludos
25.04.2022 - 05:23DROPS Design answered:
Hola Rosario, puedes ver la respuesta debajo.
25.04.2022 - 21:31
![]() Rosario Elias Liñero wrote:
Rosario Elias Liñero wrote:
Hola Muchas gracias por tu explicación Te pido disculpas por volver a escribir, pero es que no entiendo Me pones que para la talla M teja así 1 der hebra y empezar con A1 lo que no entiendo es que se empieza con hebra esto es que son dos hebras seguidas? Aquí es donde me confundo Muchas gracias Saludos
25.04.2022 - 04:48DROPS Design answered:
Hola Rosario, en la primera fila de A.1 se trabaja todo de derecho (recuerda que el diagrama se lee de abajo arriba y derecha a izquierda), por lo que no deberían coincidir las hebras. Hasta la fila 5 no hay lazadas de calados. Para que no coincidan las hebras, es recomendable que, como se aumenta en vueltas alternas, intentar no aumentar para el raglán en las filas impares, sino que en las pares, ya que en estas últimas no se está trabajando el dibujo de calados.
25.04.2022 - 21:31
![]() Rosario Elias Liñero wrote:
Rosario Elias Liñero wrote:
Hola Tengo un problema con el canesú ya hice los 8 aumentos para la talla mediana tengo 112 puntos, perla talla dice 0 para hacer el diagrama A1 yo lo estoy tejiendo con las indicaciones de la talla L pero al final me sobran 2 puntos Esta bien o como teji lis pts sobre los 10 en talla mediana Muchas gracias Un saludo
24.04.2022 - 06:19DROPS Design answered:
Hola Rosario, cuando pone que se teje 0 veces sobre 10 puntos, pasas a las siguientes instrucciones del patrón, es decir, en vez de trabajar A.1 completo, trabajas los primeros 5 puntos en A.1, y continúas. Para la talla M, la primera fila del canesú: *1 derecho, 1 hebra, A.1 (= 10 puntos) 3 veces, 5 puntos de A.1, 1 hebra, 1 derecho, MP, 2 derechos, 1 hebra, 5 puntos de A.1, 1 hebra, 2 derechos, MP, *, repetir de * a * 1 vez más. En total, trabajas 112 puntos + 8 aumentos.
24.04.2022 - 22:19
![]() Unni Mossestad wrote:
Unni Mossestad wrote:
Hei, jeg lurte på diagrammet på bærestykket på denne toppen. Det står at at jeg skal strikke de 5 første maskene i diagram A.1 når diagrammet viser at begynner med 4 masker? håper dere forstår spørsmålet mitt og at dere kan forklare det nærmere for meg. Vennlig hilsen Unni G. Mossestad.
12.05.2021 - 21:26DROPS Design answered:
Hej Unni, jeg kan ikke finde det du beskriver i opskriften. Hvis du strikker den største størrelse strikker du således: 1r, 1oms, 4 ret, A.1 (10m)x3, 5 masker fra A.1, så 4 ret, 1 omslag, 1 ret, mærketråd osv....
14.05.2021 - 09:34
![]() Evelyn wrote:
Evelyn wrote:
Hello, for the raglan increase of 1 stitch on each side, do I knit 3 stitches first and then make 1 yarn over for the increase (after the marker) and 1 yo, knit 3 stitches before the marker? If so, how do I knit row 5 of A1 since the increase is between the eyelets. Thank you Evelyn
06.03.2021 - 09:23DROPS Design answered:
Dear Evelyn, you should continue to increase for raglan as explained under row 1? in other words: either make 1 yarn over, knit 1, the marker thread is here, knit 2, make 1 yarn over or make 1 yarn over, knit 2, the marker thread is here, make 1 yarn over, so that there is 1 yarn over on each side of the 3 knitted stitches with a marker inbetween. Happy knitting!
08.03.2021 - 10:00
![]() Ann wrote:
Ann wrote:
I wanted to add to my previous post that in order to obtain gauge, I had to move up a needle size. Instead of a US 6, I am using a US 7. I also increased the size of needle for ribbing. US 3 which is 3.25mm.
26.01.2021 - 18:33DROPS Design answered:
Dear Ann, try the suggestions in the previous answer - you can also contact the store where you bought the yarn, they might have even more tipps for you. Happy knitting!
27.01.2021 - 07:25
![]() Ann wrote:
Ann wrote:
I am a new knitter and have only knitted a couple pairs of socks. This is the first top I am attempting. I obtained the gauge and cast on the required 115 stitches and worked the ribbing, however, the circumference doesn't look like it will fit over my head ,let alone provide a neckline as pictured . I used a long tail cast on. Not sure what is going on or what I need to change?
26.01.2021 - 18:26DROPS Design answered:
Dear Ann, you can try using the continental cast-on - make sure the cast on edge is elastic enough, use even a larger needle to cast on or even try castin on with double strand. Happy knitting!
27.01.2021 - 07:24
![]() Ann wrote:
Ann wrote:
Because there are 2 needle sizes used in this pattern, can you please tell me if the gauge is made with the bigger or smaller needle size? Also, if I have to go to a bigger needle size to obtain the gauge, do I increase the other needle a size bigger too?
25.01.2021 - 20:47DROPS Design answered:
Hi Ann, the gauge is made with the bigger needle size (needles 4). If the gauge is correct, use needles no 3 for ribs. Please also see the lesson HERE. Happy knitting!
25.01.2021 - 20:56
![]() Diana wrote:
Diana wrote:
Hi, Do you have a size chart anywhere so I know which size to follow? Thanks
09.11.2020 - 12:48DROPS Design answered:
Dear Diana, measure a similar garment you have and like the shape and compare them to the measurements in chart - this is the best way to find out the matching size for each pattern - read more about charts here. Happy knitting!
09.11.2020 - 12:52
|
||||||||||||||||
Flocking Gulls#flockinggullssweater |
||||||||||||||||
 |
 |
|||||||||||||||
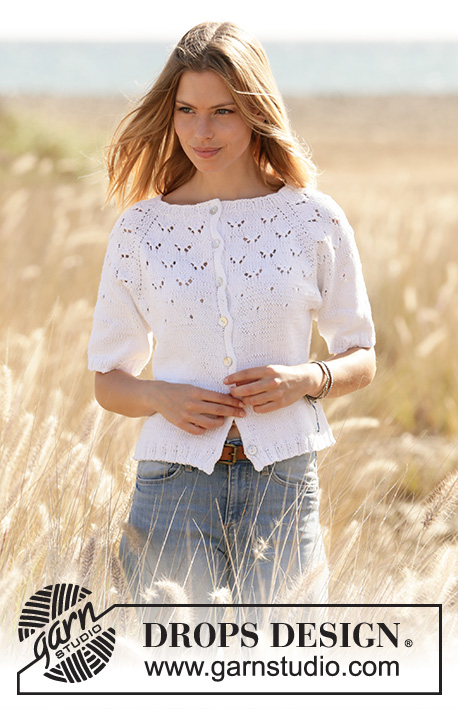
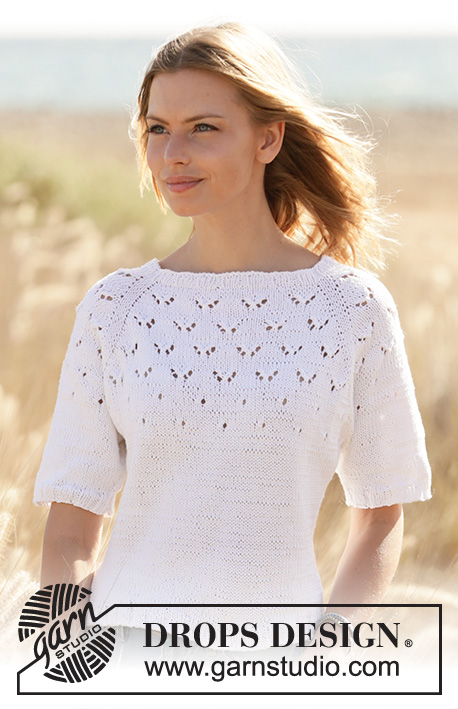
Knitted sweater with short sleeves and raglan in DROPS Muskat. Piece is knitted top down with lace pattern. Size: S - XXXL
DROPS 210-15 |
||||||||||||||||
|
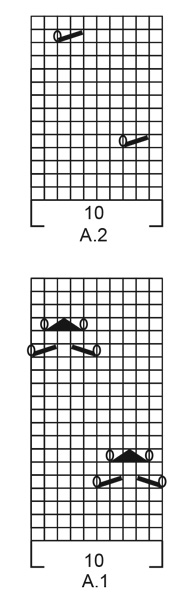
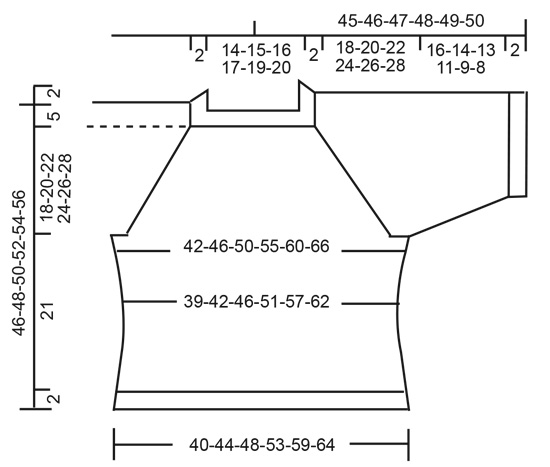
---------------------------------------------------------- EXPLANATION FOR THE PATTERN: ---------------------------------------------------------- PATTERN: See diagrams A.1 and A.2. INCREASE TIP-1 (evenly): To calculate how to increase evenly, use the total number of stitches on row (e.g. 100 stitches) and divide stitches by number of increases to be done (e.g. 12) = 8.3. In this example increase by making 1 yarn over after approx. every 8th stitch. On next round work yarn overs twisted to avoid holes. INCREASE TIP-2 (applies to sides of body): Work until 2 stitches remain before marker thread, 1 yarn over, knit 4 (marker thread is in the middle of these stitches), 1 yarn over. On next round knit yarn overs twisted to avoid holes. Then work the new stitches in stockinette stitch. RAGLAN: Increase 1 stitch on each side of 3 knit stitches in every transition between front/back piece and sleeves (= 8 stitches increased on round). Increase 1 stitch by making 1 yarn over. On next round knit yarn overs twisted to avoid holes. Then work the new stitches in pattern/stockinette stitch. DECREASE TIP: Decrease 1 stitch on each side of marker thread as follows: Work until 3 stitches remain before marker thread and knit 2 together, knit 2 (marker thread is between these stitches), slip 1 stitch knitwise, knit 1, pass slipped stitch over stitch worked. BIND-OFF TIP: To avoid a tight bind-off edge you may use a larger needle. If this also is too tight, make 1 yarn over after approx. every 4th stitch and bind off these as regular stitches. ---------------------------------------------------------- START THE PIECE HERE: ---------------------------------------------------------- SWEATER - SHORT OVERVIEW OF THE PIECE: Neck edge and yoke are worked in the round on circular needle, top down. Now divide yoke for body and sleeves. Then work the body in the round on circular needle. Work sleeves in the round on double pointed needles/short circular needle, top down. NECK EDGE: Cast on 100-105-110-115-120-125 stitches on circular needle size 3 mm = US 2,5 with Muskat. Knit 1 round. Then work rib (= knit 3/purl 2) in the round for 2 cm = ¾". When rib is done, knit 1 round while increasing 12-7-10-5-16-19 stitches evenly - read INCREASE TIP-1 = 112-112-120-120-136-144 stitches. Knit 1 round (knit yarn overs twisted to avoid holes). Switch to circular needle size 4 mm = US 6. Insert 1 marker after rib at the beginning of round, measure yoke from this marker! YOKE: Now insert 4 marker threads in piece, work pattern as follows: Insert a marker thread at the beginning of round (= in transition between left sleeve and back piece), * knit 1, make 1 yarn over, knit 0-0-1-1-3-4, A.1 (= 10 stitches) over the next 30 stitches, work the first 5 stitches in A.1, knit 0-0-1-1-3-4, make 1 yarn over, knit 1, insert a marker thread here, knit 2, make 1 yarn over, knit 0-0-1-1-3-4, A.1 over the next 10 stitches, work the first 5 stitches in A.1, knit 0-0-1-1-3-4, make 1 yarn over, knit 2, insert a marker thread here *, work from *-* 1 more time on round, but do not insert a marker thread at the end of round. There are now 4 marker threads in piece (i.e. 1 marker thread in every transition between body and sleeves), and 1 stitches has been increased on each side of every marker thread for RAGLAN - read explanation above. REMEMBER THE KNITTING GAUGE. READ THE WHOLE NEXT SECTION BEFORE WORKING – increase for raglan and work pattern as follows: Increase for raglan every other round 20-24-27-30-32-35 times in total = 272-304-336-360-392-424 stitches. Then increase 1 more time in each side of front piece and back piece (but do not increase in each side of sleeves) = 276-308-340-364-396-428 stitches. AT THE SAME TIME when increasing stitches, there is room for more repetitions with lace pattern towards each raglan. There should always be 2-2-3-3-5-6 knit stitches between increase for raglan and the outermost yarn over towards raglan on 5th and 15th round in A.1. When A.1 has been worked 1 time vertically, repeat diagram 1 more time vertically. Then work A.2 (= 10 stitches) over A.1, and work as many lace patterns you can towards every raglan when increasing stitches. When A.2 has been worked vertically, continue with stockinette stitch until finished measurements. When all increases are done, the piece measures approx. 15-18-20-22-24-26 cm = 6"-7"-8"-8¾"-9½"-10¼". Continue to work until piece measures 18-20-22-24-26-28 cm = 7"-8"-8¾"-9½"-10¼"-11". Now divide piece for body and sleeves. In size S, M and L divide piece for body at the marker threads and in size XL, XXL and XXXL work 1-3-4 stitches from each side of sleeve in on front and back piece. Work next round as follows: Knit the first 79-87-95-102-112-121 stitches (= back piece), slip the next 59-67-75-79-83-89 stitches on a stitch holder for sleeve, cast on 10-10-10-12-12-14 new stitches on needle (= in the side under sleeve), work the next 79-87-95-103-115-125 stitches (= front piece), insert the next 59-67-75-79-83-89 stitches on a stitch holder for sleeve, cast on 10-10-10-12-12-14 new stitches on needle (= in the side under sleeve), work the last 0-0-0-1-3-4 stitches (= 79-87-95-103-115-125 stitches for back piece). Cut the yarn. Then finish body and sleeves separately. NOW MEASURE PIECE FROM HERE! BODY: = 178-194-210-230-254-278 stitches. Insert 1 marker thread in the middle of the new stitches cast on in the side under the sleeves (= 89-97-105-115-127-139 stitches between marker threads). Move the marker threads upwards when working; they are used when increasing and decreasing in the sides later. Begin round at marker thread in one of the sides. Continue in the round in stockinette stitch. When piece measures 3 cm = 1⅛" from division, decrease 1 stitch on each side of marker threads - read DECREASE TIP. Decrease like this approx. every 2½ cm = ⅞" 4 times in total = 162-178-194-214-238-262 stitches. When piece measures 14 cm = 5½" from division in all sizes, increase 1 stitch on each side of marker thread - read INCREASE TIP-2. Repeat increase when piece measures 16 cm = 6¼" = 170-186-202-222-246-270 stitches. When piece measures 21 cm = 8¼" from division, increase 15-19-23-23-29-35 stitches evenly = 185-205-225-245-275-305 stitches. Switch to circular needle size 3 mm = US 2,5. Work rib (knit 3/purl 2) in the round for 2 cm = ¾". Bind off with knit over knit and purl over purl - read BIND-OFF TIP. Sweater measures approx. 46-48-50-52-54-56 cm = 18"-19"-19¾"-20½"-21¼"-22" from shoulder and down. SLEEVES: Slip the 59-67-75-79-83-89 stitches from stitch holder in one side back on a short circular needle/double pointed needles size 4 mm = US 6 and pick in addition up 1 stitch in each of the new 10-10-10-12-12-14 stitches cast on in the side under sleeve = 69-77-85-91-95-103 stitches. Insert a marker thread in the middle of the new stitches cast on under sleeve. Move the marker thread upwards when working. Use marker later when decreasing under sleeve. Work in stockinette stitch in the round. When sleeve measures 3-3-3-3-2-2 cm = 1⅛"-1⅛"-1⅛"-1⅛"-¾"-¾" from division, decrease 1 stitch on each side of marker thread - remember DECREASE TIP. Decrease like this approx. every 3-2-1½1-1-1 cm = 1⅛"-¾"-½"-⅜"-⅜"-⅜" 5-6-7-7-7-6 times in total = 59-65-71-77-81-91 stitches. When all decreases are done, work in stockinette stitch until sleeve measures 16-14-13-11-9-8 cm = 6¼"-5½"-5⅛"-4⅜"-3½"-3⅛" (shorter measurements in the larger sizes because of longer yoke). Knit 1 round while increasing 1-0-4-3-4-4 stitches evenly = 60-65-75-80-85-95 stitches. Switch to double pointed needles size 3 mm = US 2,5. Work rib (knit 3/purl 2) in the round for 2 cm = ¾". Bind off with knit over knit and purl over purl - remember BIND-OFF TIP. Work the other sleeve the same way. |
||||||||||||||||
Diagram explanations |
||||||||||||||||
|
||||||||||||||||
 |
||||||||||||||||
 |
||||||||||||||||
Have you finished this pattern?Tag your pictures with #dropspattern #flockinggullssweater or submit them to the #dropsfan gallery. Do you need help with this pattern?You'll find 25 tutorial videos, a Comments/Questions area and more by visiting the pattern on garnstudio.com. © 1982-2026 DROPS Design A/S. We reserve all rights. This document, including all its sub-sections, has copyrights. Read more about what you can do with our patterns at the bottom of each pattern on our site. |
||||||||||||||||


With over 40 years in knitting and crochet design, DROPS Design offers one of the most extensive collections of free patterns on the internet - translated to 17 languages. As of today we count 324 catalogs and 12290 patterns - 12280 of which are translated into English (US/in).
We work hard to bring you the best knitting and crochet have to offer, inspiration and advice as well as great quality yarns at incredible prices! Would you like to use our patterns for other than personal use? You can read what you are allowed to do in the Copyright text at the bottom of all our patterns. Happy crafting!
Post a comment to pattern DROPS 210-15
We would love to hear what you have to say about this pattern!
If you want to leave a question, please make sure you select the correct category in the form below, to speed up the answering process. Required fields are marked *.