
Popular categories
Looking for a yarn?


Comments / Questions (69)
![]() Bonnie Stoner wrote:
Bonnie Stoner wrote:
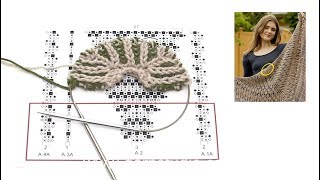
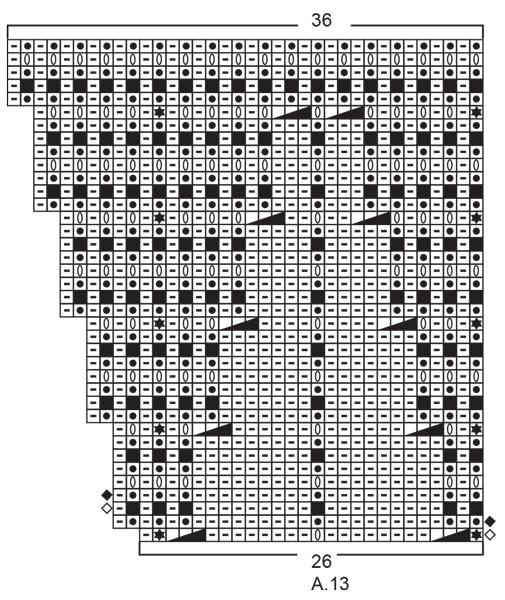
On charts for fans A11, A12, A13 Line #8 All stitches under the * on Line #9 Shouldn’t this be a yarn over instead of knit the stitch and yarn over together? There is not a yarn over created in Line #7 so knitting this symbol isn’t possible.
11.03.2020 - 17:12DROPS Design answered:
Dear Mrs Stoner, it looks like you are right, you shouldn't have the 5th symbol here but rather the 4th one. Our design team will check and make the corrections. Thanks for your feedback. Happy knitting!
12.03.2020 - 09:18
![]() Nancy wrote:
Nancy wrote:
Hej, jag är på A.12-A.13 och förstår inte varv 8 i diagrammet. Där kommer upp symbolen för "omslaget och maskan stickas räta tillsammans", men på varv 7 har det inte gjorts några omslag. Hur ska jag sticka varv 8?
10.03.2020 - 21:27DROPS Design answered:
Hej Nancy, har du set de 3 videoer af diagrammerne nederst i opskriften?
18.03.2020 - 14:35
![]() Claudia wrote:
Claudia wrote:
Hallo 👋 Ich habe jetzt mal eine sehr „doofe“ Frage. Sind die Rückreihen in den Diagrammen enthalten 🙈 Vielen lieben Dank schon mal
12.12.2019 - 15:29DROPS Design answered:
Liebe Claudia, ja alle Reihen sind in den Diagramme gezeigt, es wird stets 2 Hin-Reihen und dann 2 Rück-Reihen im Wechsel gestrickt . Viel Spaß beim stricken!
12.12.2019 - 15:47
![]() Vy Chan wrote:
Vy Chan wrote:
Very nice pattern, thank you
16.11.2019 - 07:39
![]() Grenier wrote:
Grenier wrote:
Bonjour, je ne comprends pas les explications du modèle 203-13 Je viens de finir le premier diagramme mais mon problème est doit t on faire chaque diagramme indépendant ou dois t on faire tout les diagramme en même temps. donc soit je continue étape par étape soit je dois recommencer tout en rajoutant les maille des autre diagramme. pas très clair. Merci pour vos explications
06.11.2019 - 12:21DROPS Design answered:
Bonjour Mme Grenier, quand vous tricotez les diagrammes A.1A, A.2, A.3A, A.2, A.4A, vous tricotez le 1er rang de chaque diagramme, puis le 2ème rang de chaque diagramme et ainsi de suite - cf comment lire plusieurs diagrammes consécutivement. Bon tricot!
06.11.2019 - 12:29
![]() Bonnie Stoner wrote:
Bonnie Stoner wrote:
Very interested in making Owl Feathers shawl but Drops Delight no longer has Fall Forest as a color. What happened to this color?
06.11.2019 - 05:31DROPS Design answered:
Hi Bonnie, Fall Forest is still available in Drops Delight, yarn no 18. Happy crafting!
06.11.2019 - 07:18
![]() Rocio wrote:
Rocio wrote:
Hola. Quiero hacer este chal y leo que ha sufrido correcciones, mi pregunta es ¿ya está solucionado sobte el diagrama que acompaña al patrón, o debo buscar las correcciones en otro sitio? Gracias!!
29.10.2019 - 10:25DROPS Design answered:
Hola Rocio. Todas las correcciones han sido añadidas y los diagramas cambiados.
12.11.2019 - 22:36
![]() Maria wrote:
Maria wrote:
Nu har jag kommit till avmaskningen. Jag förstår inte. Det står att omslagen maskas av som egen maska. Men jag har inga omslag kvar efter sista varvet på A 12. Jag stickade ju ihop omslag och maska rät på sista varvet. Och det extra omslaget man ska göra mellan maskor utan omslag måste väl stickas ett varv innan det kan avmaskas?
06.10.2019 - 11:09DROPS Design answered:
Hei Maria. På siste rad på A.12 strikkes det slik: Lag 1 kast om høyre pinne, løft 1 maske løs over på høyre pinne som om den skulle strikkes vrang og vrang fra retten, rett fra vrangen. Når du begynner å felle av skal du ha kast som felles av som egen maske. MEN har du fått med deg rettelsene som har vært på dette sjalet/nye diagram, se rød rettelse linje? Men du kan fint felle av med kast selv om du ikke har kastet som vises i A.12. God Fornøyelse!
07.10.2019 - 11:30
![]() Anna wrote:
Anna wrote:
Kan det passe at der er 15 blade ned langs midten, efter a1b, a5, a6, a7, a3b og a4b er strikket?
05.10.2019 - 17:49DROPS Design answered:
Hei Anna. Når alle bladmønster er strikker skal det være 16 blader ned langs midten, 16 blader fra midten og ut (32 blader tilsammen nederst) og 16 blader fra foran og ut til siden. God Fornøyelse!
07.10.2019 - 10:30
![]() Maria wrote:
Maria wrote:
Är alla fel i diagrammen rättade nu? Jag har börjat om tre gånger och nu inser jag att det måste bli en fjärde gång.... Sjalen är verkligen vacker och jag vill lyckas med den..
16.09.2019 - 21:14DROPS Design answered:
Hej Maria, skriv ut mönstret igen, så du får de riktiga diagrammer med. Lycka till :)
17.09.2019 - 14:44
|
|||||||||||||||||||||||||||||||||||||
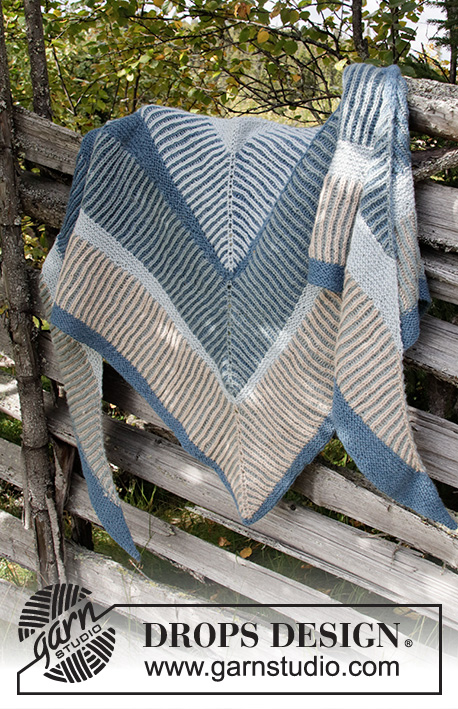
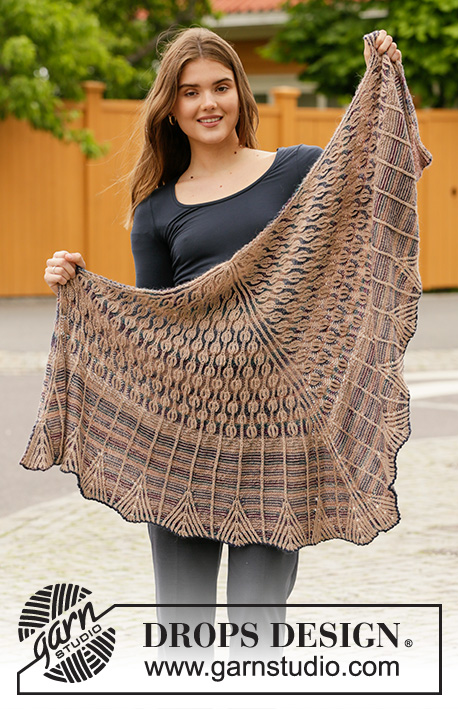
Owl Feathers#owlfeathersshawl |
|||||||||||||||||||||||||||||||||||||
 |
 |
||||||||||||||||||||||||||||||||||||
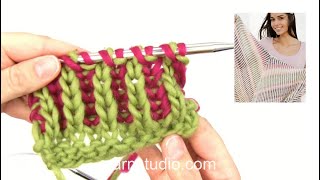
Knitted shawl in DROPS Delight and DROPS Alpaca. The piece is worked top down with stripes and 2-colored leaf pattern in English rib.
DROPS 203-13 |
|||||||||||||||||||||||||||||||||||||
|
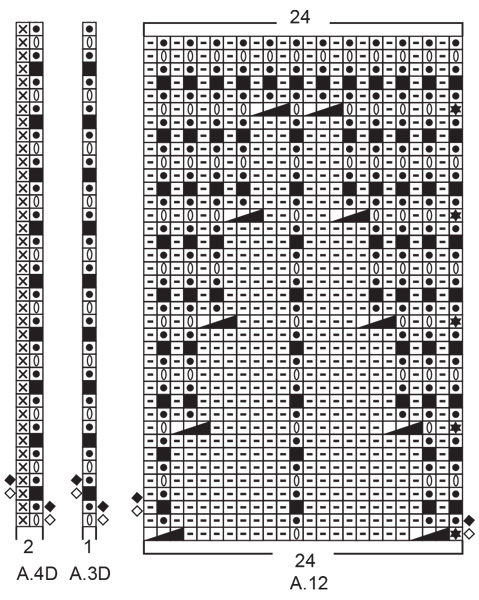
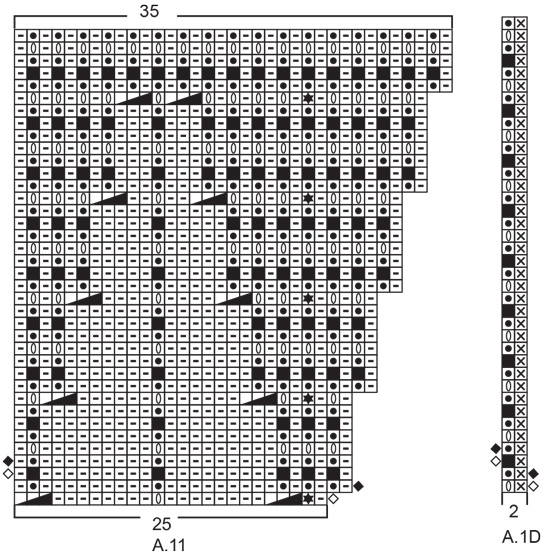
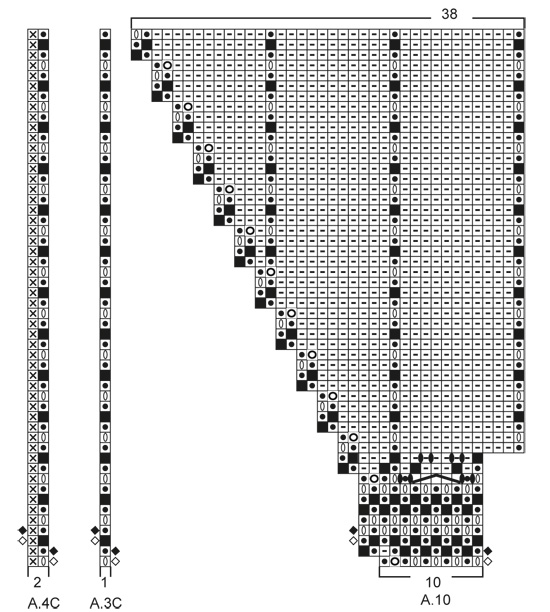
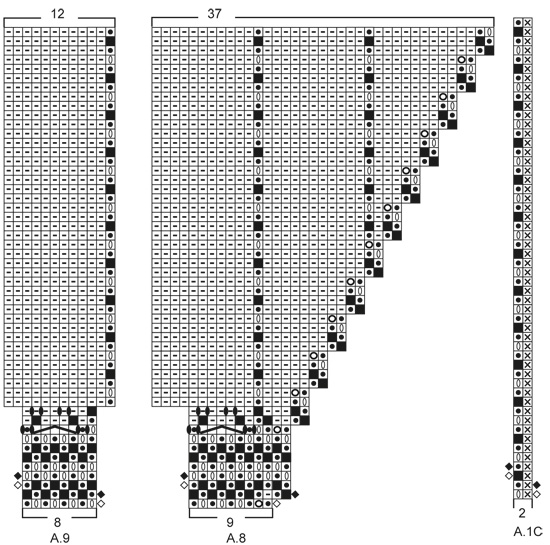
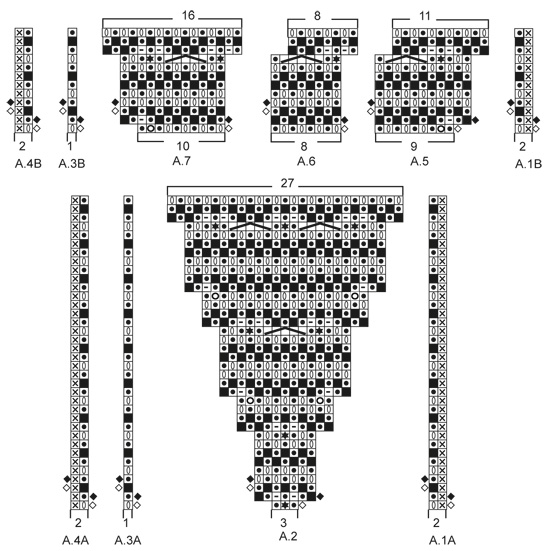
------------------------------------------------------- EXPLANATIONS FOR THE PATTERN: ------------------------------------------------------- RIDGE/GARTER STITCH (worked back and forth): Knit all rows. 1 ridge in height = Knit 2 rows. EDGE STITCH IN GARTER STITCH: As the pattern includes working 2 rows from the right side followed by 2 rows from the wrong side, the garter stitches need to be worked as follows: * Knit from the right side, purl from the right side, purl from the wrong side, knit from the wrong side *, work from *-*. The edge stitches are worked with double strand each time there are 2 strands on the same side. PATTERN: See diagrams A.1 to A.13. A.1 and A.4 = sides of shawl. A.3 = mid-stitch on shawl. 2-COLORED PATTERN IN ENGLISH RIB (back and forth): The striped pattern is worked in English rib as shown in diagrams A.1 to A.13. To get the 2-colored effect, the stripes are worked alternately with 1 row camel beige and 1 row fall forest. * Work 1 row from the right side with camel beige, push the stitches back to the far end of the needle, so the next row is also worked from the right side. Work this row with fall forest. Work 1 row from the wrong side with camel beige, push the stitches back to the far end of the needle, so the next row is also worked from the wrong side. Work this row with fall forest *, work from *-* to finished length. Empty and filled squares (outside the diagram); show if the row is worked from the right or wrong side. The square also shows whether the row is worked with camel beige or fall forest. Read KNITTING TIP-1 below. KNITTING TIP-1: If you are unsure which color to use on the next row when working 2-colored English rib, you can see the color used on the previous round by looking at the edge stitches. KNITTING TIP-2 (number of stitches): All stitch-counts given when working English rib do not include the yarn overs; the yarn overs belong to the knitted stitches and they are counted together as 1 stitch. ------------------------------------------------------- START THE PIECE HERE: ------------------------------------------------------- SHAWL – SHORT OVERVIEW OF THE PIECE: The piece is worked back and forth with stripes and 2-colored leaf pattern in English rib. The English rib pattern changes to reversed stockinette stitch, with English rib stitches in vertical stripes between. Then the English rib stitches change to fan-pattern with reversed stockinette stitch between. SHAWL: Cast on 6 stitches with circular needle size 3.5 mm = US 4 and camel beige. Work the first row as follows (= wrong side): 1 edge stitch in GARTER STITCH – read description above, * 1 yarn over, purl 1 *, work from *-* until there is 1 stitch left on the row, 1 yarn over and finish with 1 edge stitch in garter stitch = 11 stitches. Work the next row with camel beige (= right side): 1 edge stitch in garter stitch, knit until there is 1 stitch left on the row (yarn overs are knitted twisted to avoid holes) and finish with 1 edge stitch in garter stitch. Work the next row with camel beige (= wrong side): 1 edge stitch in garter stitch, * 1 yarn over, slip 1 stitch as if to purl, knit 1 *, work from *-* until there is 1 stitch left before the edge stitch, 1 yarn over, slip 1 stitch as if to purl and finish with 1 edge stitch in garter stitch. Turn the piece. Then work 2-COLORED PATTERN IN ENGLISH RIB and EDGE STITCH IN GARTER STITCH – read descriptions above. WORK A.1A, A.2, A.3A AND A.4A AS FOLLOWS: Starting from the right side, work A.1A (= 2 stitches), A.2 (= 3 stitches), A.3A (= 1 mid-stitch), work A.2 (= 3 stitches) and finish with A.4A (= 2 stitches). Continue this pattern. When A.2 has been completed in height there are 59 stitches on the needle – read KNITTING TIP-2. The piece measures approx. 9 cm = 3½" down the mid-stitch. WORK A.1B, A.5, A.6, A.7, A.3B AND A.4B AS FOLLOWS: Starting from the right side: Work A.1B (= 2 stitches), A.5 (= 9 stitches), A.6 (= 8 stitches), A.7 (= 10 stitches), work A.3B (= 1 mid-stitch), A.5 (= 9 stitches), A.6 (= 8 stitches), A.7 (= 10 stitches) and finish with A.4B (= 2 stitches). Continue this pattern. When A.6 has been completed in height there are 75 stitches on the needle. Continue by repeating A.1B, A.5, A.6, A.7, A.3B and A.4B in height; each time you have repeated the diagrams in height, you increase 16 stitches on the row and there is room for 1 more repeat of A.6 in width between each A.5 and A.7. Continue like this until A.6 has been worked a total of 13 times in height = 267 stitches on the row. The piece measures approx. 50 cm = 19¾" along the mid-stitch. WORK A.1C, A.8, A.9, A.10, A.3C AND A.4C AS FOLLOWS: Starting from the right side: Work A.1C (= 2 stitches), A.8 (= 9 stitches), A.9 over the next 112 stitches (= 14 repeats of 8 stitches), work A.10 (= 10 stitches), A.3C (= 1 mid-stitch), work A.8 (= 9 stitches), A.9 over the next 112 stitches (= 14 repeats of 8 stitches), A.10 (= 10 stitches) and finish with A.4C (= 2 stitches). Continue this pattern. When A.9 has been completed in height there are 491 stitches on the needle and the piece measures approx. 70 cm = 27½" down the mid-stitch. WORK A.1D, A.11, A.12, A.13, A.3D AND A.4D AS FOLLOWS: Starting from the right side: Work A.1D (= 2 stitches), A.11 (= 25 stitches), A.12 over the next 192 stitches (= 8 repeats of 24 stitches), work A.13 (= 26 stitches), A.3D (= 1 mid-stitch), work A.11 (= 25 stitches), A.12 over the next 192 stitches (= 8 repeats of 24 stitches), A.13 (= 26 stitches) and finish with A.4D (= 2 stitches). Continue this pattern. When A.12 has been completed in height there are 531 stitches on the needle and the piece measures approx. 80 cm = 31½" down the mid-stitch. Bind off using fall forest from the wrong side – with knit over knit, purl over purl – NOTE: The yarn overs are bind off as normal stitches – in addition make 1 extra yarn over between each stitch without a yarn over (this yarn over is worked as 1 stitch and then bind off as normal). Doing this gives the fans a nice, arched finish. |
|||||||||||||||||||||||||||||||||||||
Diagram explanations |
|||||||||||||||||||||||||||||||||||||
|
|||||||||||||||||||||||||||||||||||||
 |
|||||||||||||||||||||||||||||||||||||
 |
|||||||||||||||||||||||||||||||||||||
 |
|||||||||||||||||||||||||||||||||||||
 |
|||||||||||||||||||||||||||||||||||||
 |
|||||||||||||||||||||||||||||||||||||
 |
|||||||||||||||||||||||||||||||||||||
Have you finished this pattern?Tag your pictures with #dropspattern #owlfeathersshawl or submit them to the #dropsfan gallery. Do you need help with this pattern?You'll find 17 tutorial videos, a Comments/Questions area and more by visiting the pattern on garnstudio.com. © 1982-2026 DROPS Design A/S. We reserve all rights. This document, including all its sub-sections, has copyrights. Read more about what you can do with our patterns at the bottom of each pattern on our site. |
|||||||||||||||||||||||||||||||||||||


With over 40 years in knitting and crochet design, DROPS Design offers one of the most extensive collections of free patterns on the internet - translated to 17 languages. As of today we count 324 catalogs and 12252 patterns - 12242 of which are translated into English (US/in).
We work hard to bring you the best knitting and crochet have to offer, inspiration and advice as well as great quality yarns at incredible prices! Would you like to use our patterns for other than personal use? You can read what you are allowed to do in the Copyright text at the bottom of all our patterns. Happy crafting!
Post a comment to pattern DROPS 203-13
We would love to hear what you have to say about this pattern!
If you want to leave a question, please make sure you select the correct category in the form below, to speed up the answering process. Required fields are marked *.