
Popular categories
Looking for a yarn?


Comments / Questions (71)
![]() Nathalie wrote:
Nathalie wrote:
Bonjour. Est-ce que vous avez les vidéos pour ce châle aussi avec la méthode à l'anglaise. Je n'arrive as à saisir avec la méthode continentale. Aussi, au 4e rang, lorsque l'on commence le bicolore, je me retrouve avec plus de mailles de 11...
02.04.2026 - 06:53DROPS Design answered:
Bonjour Nathalie, lorsque vous regardez les vidéos, regardez bien l'emplacement du fil par rapport à l'aiguille, peu importe comment et dans quelle main le fil est tenu. Lorsque l'on tricote les côtes anglaises, les jetés ne sont pas comptés dans le nombre de mailles car ils appartiennent à la maille glissée correspondante. Bon tricot!
07.04.2026 - 16:45
![]() Nathalie wrote:
Nathalie wrote:
Bonjour, J'aimerais faire ce patron, mais je ne saisis pas comment "tricoter 3 fois la maille endroit et jeté" et "tricoter 3 fois la maille endroit et jeté". Je suis allée voir vos tutoriels, mais ils sont réalisés avec la méthode de tricot continentale et je n'y comprends rien. Avez-vous ces vidéos avec la méthode à l'anglaise? Aussi, pour les jetés, il n'est jamais écrit s'ils sont endroit ou envers. Merci à l'avance pour vos réponses.
01.04.2026 - 05:13DROPS Design answered:
Bonjour Nathalie, j'ai modifié pour "et son jeté" en espérant que ce soit plus clair, quand vous regardez les vidéos, ne regardez pas la main qui tient le fil mais le mouvement du fil sur l'aiguille, la technique est la même: piquez l'aiguille dans la maille endroit et son jeté et vous ramenez 1 maille, 1 jeté, piquez l'aiguille dans la même maille et vous ramenez une maille = vous avez maintenant 3 mailles (et augmenté 2 m) - de même pour augmenter 4 m. Au rang suivant, tricotez simplement ces jetés soit à l'endroit soit à l'envers dans les côtes anglaises: glissez 1 m, tricotez 1 m end, glissez 1 m (2 augm) ou glissez 1 m, tricotez 1 m end, glissez 1 m, tricotez 1 m (4 augm). Bon tricot!
07.04.2026 - 15:59
![]() Delattre wrote:
Delattre wrote:
Bonjour. J'ai réalisé ce châle il y a 2 ou 3 ans mais malheureusement je n'ai pas pu le porter et suis en train de le détricoter. La raison : au lieu d'être droit dans sa partie haute, ou légèrement creusé vers l'intérieur, il fait une pointe en l'air, ce qui fait que pour le porter, il fait comme un col châle sur 8 à 9 cm. J'adore ce modèle que j'aimerais refaire mais pourquoi cette "pointe"? J'ai peut être raté quelque chose ? Merci. Bien cordialement
03.07.2025 - 20:54DROPS Design answered:
Bonjour Mme Delattre, je ne suis pas bien sûre de visualiser ce dont vous parlez, je viens de consulter les châles réalisés et publiés sur Ravelry et je n'ai pas trouvé ce type de pointe. Essayez de bien vérifier votre tension/diagrammes/nombre de mailles - en cas de doute, montrez votre ouvrage à votre magasin (même en photo par mail), cela pourra peut-être aider à visualiser et à vous aider. Merci pour votre compréhension. Bon tricot!
04.07.2025 - 10:28
![]() Jeannette Hofstee wrote:
Jeannette Hofstee wrote:
A10, regel 9 Ik begrijp niet hoe de omslag tussen 2 steken gebreid moet worden. Ik heb net 1 steek en 1 omslag samengebreid ( leeg bolletje) Hoe nu verder?
29.03.2025 - 19:58DROPS Design answered:
Dag Jeannette,
Die omslag tussen 2 steken maak je door de draad om de naald te slaan. De volgende steek is een dicht bolletje waarbij je 1 omslag maakt en dan 1 steek averecht af haalt. Je maakt daar door in de praktijk 2 omslagen achter elkaar. De tweede omslag hoort a.h.w. bij de averechte steek. De eerste omslag brei je op de volgende naald gedraaid om een gaatje te voorkomen. (Na de omslag en averechte steek maak je weer een omslag die je op de volgende naald gedraaid breit.)
30.03.2025 - 09:52
![]() Dubois Diane wrote:
Dubois Diane wrote:
Modèle 203-13 est ce qu’il reste de cette laine ou bien si c’est comme l’autre en brun et beige discontinuer
30.01.2025 - 02:36DROPS Design answered:
Bonjour Mme Dubois, la laine DROPS Delight n'est effectivement plus disponible, utilisez le convertisseur pour voir les alternatives; pour conserver un esprit dégradé, pensez à DROPS Fabel. Bon tricot!
30.01.2025 - 10:33
![]() Heidi wrote:
Heidi wrote:
Hallo, ich möchte dieses Tuch für meine Schwiegertochter stricken. Da sie sehr groß ist, möchte ich fragen, ob man das Tuch auch verlängern kann. Und wenn ja, wie. Vielen Dank für Ihre Hilfe. Liebe Grüße und danke für die tollen Anleitungen. Ich habe schon einige davon gestrickt.
11.05.2023 - 08:57DROPS Design answered:
Liebe Heidi, leider können wir nicht jede Anleitung nach jeder Anfrage anpassen, gerne können Sie mal Ihr DROPS Laden nach persönnlicher Hilfe bitten - oder schauen Sie vielleicht, ob Ihnen ein größres Tuch gefällt. Viel Spaß beim stricken!
11.05.2023 - 16:26
![]() Monica wrote:
Monica wrote:
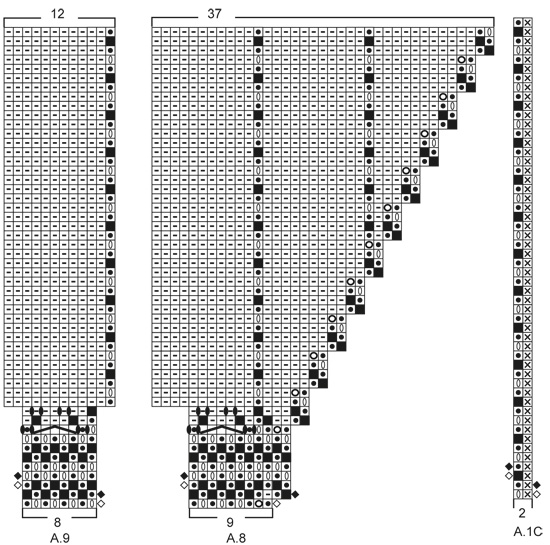
Ik zit helemaal vast in het gedeelte van A1c, A8, A9, A3C en A4C. Op rij 10 staan zwarte vakjes, maar er is niet bij elke steek een omslag. Bijv. de 1e 3 zwarte vakjes van A8 kloppen, maar de 4e heeft dus geen omslag. Dit zelfde probleem is ook bij A9 en A10 van dezelfde rij. Wat doe ik hier fout? Alvast bedankt voor de hulp.
03.01.2023 - 18:16DROPS Design answered:
Dag Monica,
Bij de vierde steek in A.8 heb je op de vorige naald een omslag gemaakt en de steek averecht afgehaald. Deze omslag en afhaling brei je nu, in rij 10, samen. Bij A.10 is dit ook het geval, maar dan op het einde. Kan het zijn dat het 7e de symbool in de lijst, waarbij je 2 steken meerdert door 3 steken in een rechte steek en omslag te breien, verwarring heeft opgeleverd?
04.01.2023 - 21:01
![]() Carolyn Bremner wrote:
Carolyn Bremner wrote:
Why did you take the zoom feature off your patterns? I really miss it.
21.07.2022 - 17:19
![]() Monika Koster wrote:
Monika Koster wrote:
Kann ich alles bei Drops einssehen
08.06.2022 - 21:50DROPS Design answered:
Liebe Frau Koster, alle unsere Anleitungen können kostenlos gelesen und gedruckt werden. Am Ende jeder Anleitung-Seite finden Sie auch eine Liste von Lektionnen sowie Videotutorials, die Ihnen auch helfen kann. Gerne können Sie auch Ihre Frage hier stellen. Viel Spaß beim stricken!
09.06.2022 - 08:28
![]() Sab wrote:
Sab wrote:
Ce modèle est très joli mais pour tricoteurs/euses confirmé/es. J'ai pas mal galéré à le réaliser. Je tricote serré donc le châle est plus petit que sur l'image même si je l'ai étiré au maximum
05.02.2022 - 12:50
|
|||||||||||||||||||||||||||||||||||||
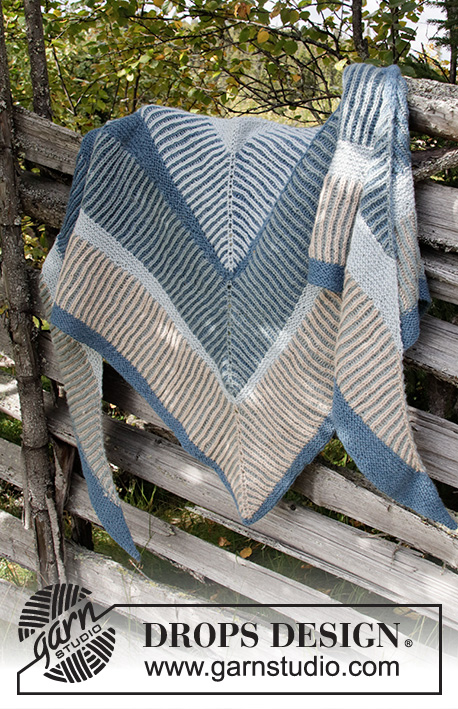
Owl Feathers#owlfeathersshawl |
|||||||||||||||||||||||||||||||||||||
 |
 |
||||||||||||||||||||||||||||||||||||
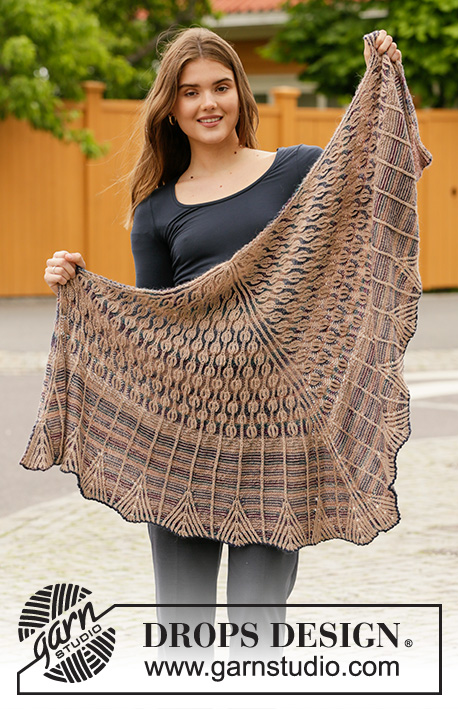
Knitted shawl in DROPS Delight and DROPS Alpaca. The piece is worked top down with stripes and 2-colored leaf pattern in English rib.
DROPS 203-13 |
|||||||||||||||||||||||||||||||||||||
|
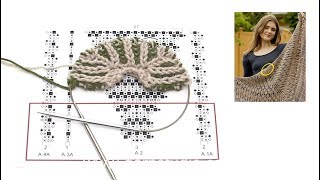
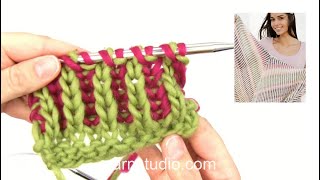
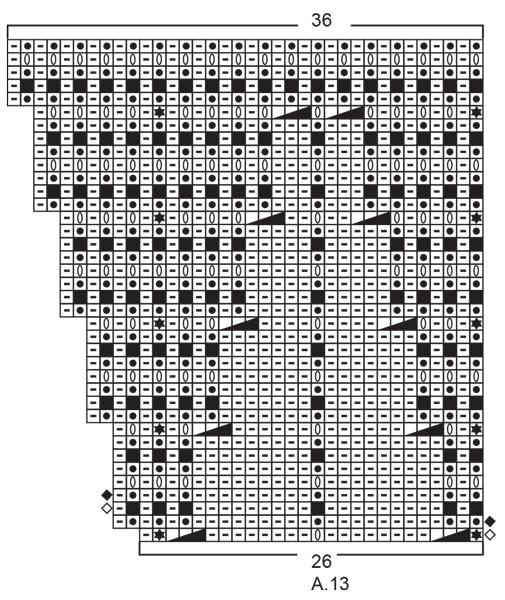
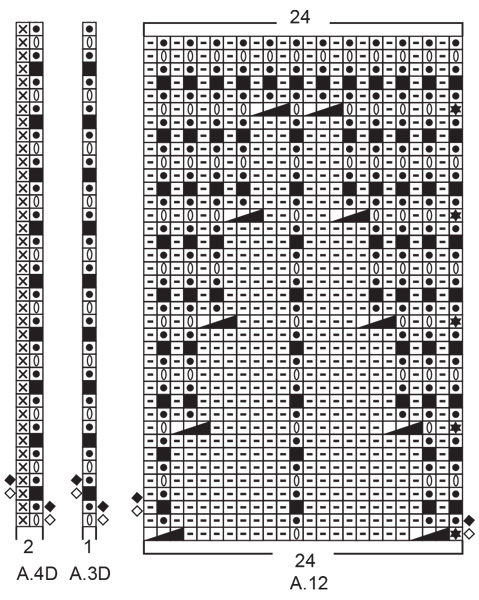
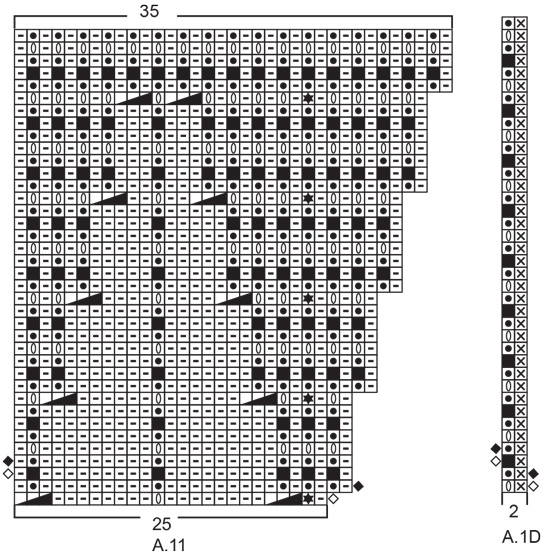
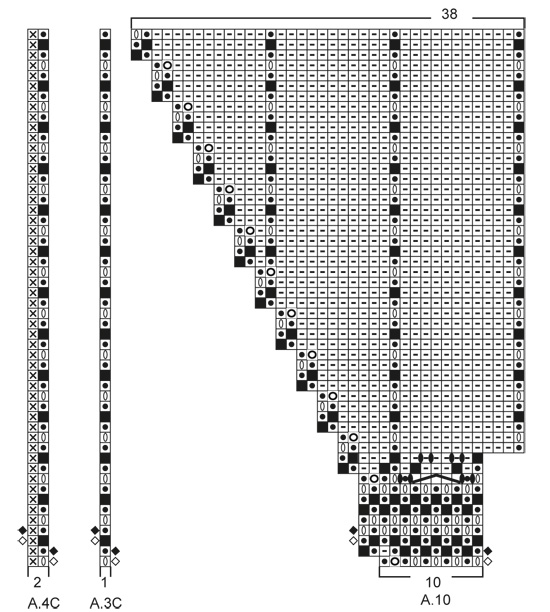
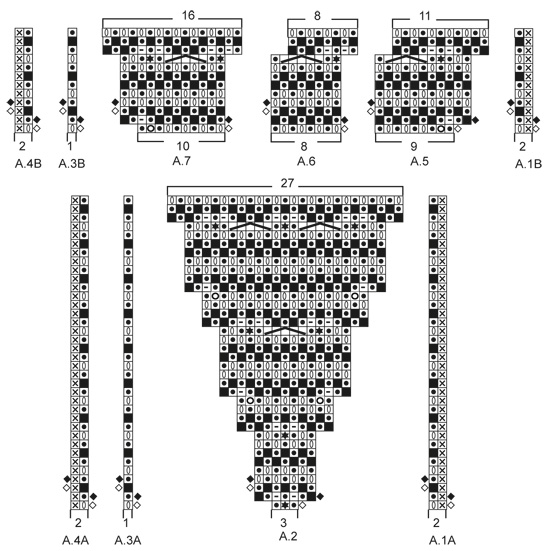
------------------------------------------------------- EXPLANATIONS FOR THE PATTERN: ------------------------------------------------------- RIDGE/GARTER STITCH (worked back and forth): Knit all rows. 1 ridge in height = Knit 2 rows. EDGE STITCH IN GARTER STITCH: As the pattern includes working 2 rows from the right side followed by 2 rows from the wrong side, the garter stitches need to be worked as follows: * Knit from the right side, purl from the right side, purl from the wrong side, knit from the wrong side *, work from *-*. The edge stitches are worked with double strand each time there are 2 strands on the same side. PATTERN: See diagrams A.1 to A.13. A.1 and A.4 = sides of shawl. A.3 = mid-stitch on shawl. 2-COLORED PATTERN IN ENGLISH RIB (back and forth): The striped pattern is worked in English rib as shown in diagrams A.1 to A.13. To get the 2-colored effect, the stripes are worked alternately with 1 row camel beige and 1 row fall forest. * Work 1 row from the right side with camel beige, push the stitches back to the far end of the needle, so the next row is also worked from the right side. Work this row with fall forest. Work 1 row from the wrong side with camel beige, push the stitches back to the far end of the needle, so the next row is also worked from the wrong side. Work this row with fall forest *, work from *-* to finished length. Empty and filled squares (outside the diagram); show if the row is worked from the right or wrong side. The square also shows whether the row is worked with camel beige or fall forest. Read KNITTING TIP-1 below. KNITTING TIP-1: If you are unsure which color to use on the next row when working 2-colored English rib, you can see the color used on the previous round by looking at the edge stitches. KNITTING TIP-2 (number of stitches): All stitch-counts given when working English rib do not include the yarn overs; the yarn overs belong to the knitted stitches and they are counted together as 1 stitch. ------------------------------------------------------- START THE PIECE HERE: ------------------------------------------------------- SHAWL – SHORT OVERVIEW OF THE PIECE: The piece is worked back and forth with stripes and 2-colored leaf pattern in English rib. The English rib pattern changes to reversed stockinette stitch, with English rib stitches in vertical stripes between. Then the English rib stitches change to fan-pattern with reversed stockinette stitch between. SHAWL: Cast on 6 stitches with circular needle size 3.5 mm = US 4 and camel beige. Work the first row as follows (= wrong side): 1 edge stitch in GARTER STITCH – read description above, * 1 yarn over, purl 1 *, work from *-* until there is 1 stitch left on the row, 1 yarn over and finish with 1 edge stitch in garter stitch = 11 stitches. Work the next row with camel beige (= right side): 1 edge stitch in garter stitch, knit until there is 1 stitch left on the row (yarn overs are knitted twisted to avoid holes) and finish with 1 edge stitch in garter stitch. Work the next row with camel beige (= wrong side): 1 edge stitch in garter stitch, * 1 yarn over, slip 1 stitch as if to purl, knit 1 *, work from *-* until there is 1 stitch left before the edge stitch, 1 yarn over, slip 1 stitch as if to purl and finish with 1 edge stitch in garter stitch. Turn the piece. Then work 2-COLORED PATTERN IN ENGLISH RIB and EDGE STITCH IN GARTER STITCH – read descriptions above. WORK A.1A, A.2, A.3A AND A.4A AS FOLLOWS: Starting from the right side, work A.1A (= 2 stitches), A.2 (= 3 stitches), A.3A (= 1 mid-stitch), work A.2 (= 3 stitches) and finish with A.4A (= 2 stitches). Continue this pattern. When A.2 has been completed in height there are 59 stitches on the needle – read KNITTING TIP-2. The piece measures approx. 9 cm = 3½" down the mid-stitch. WORK A.1B, A.5, A.6, A.7, A.3B AND A.4B AS FOLLOWS: Starting from the right side: Work A.1B (= 2 stitches), A.5 (= 9 stitches), A.6 (= 8 stitches), A.7 (= 10 stitches), work A.3B (= 1 mid-stitch), A.5 (= 9 stitches), A.6 (= 8 stitches), A.7 (= 10 stitches) and finish with A.4B (= 2 stitches). Continue this pattern. When A.6 has been completed in height there are 75 stitches on the needle. Continue by repeating A.1B, A.5, A.6, A.7, A.3B and A.4B in height; each time you have repeated the diagrams in height, you increase 16 stitches on the row and there is room for 1 more repeat of A.6 in width between each A.5 and A.7. Continue like this until A.6 has been worked a total of 13 times in height = 267 stitches on the row. The piece measures approx. 50 cm = 19¾" along the mid-stitch. WORK A.1C, A.8, A.9, A.10, A.3C AND A.4C AS FOLLOWS: Starting from the right side: Work A.1C (= 2 stitches), A.8 (= 9 stitches), A.9 over the next 112 stitches (= 14 repeats of 8 stitches), work A.10 (= 10 stitches), A.3C (= 1 mid-stitch), work A.8 (= 9 stitches), A.9 over the next 112 stitches (= 14 repeats of 8 stitches), A.10 (= 10 stitches) and finish with A.4C (= 2 stitches). Continue this pattern. When A.9 has been completed in height there are 491 stitches on the needle and the piece measures approx. 70 cm = 27½" down the mid-stitch. WORK A.1D, A.11, A.12, A.13, A.3D AND A.4D AS FOLLOWS: Starting from the right side: Work A.1D (= 2 stitches), A.11 (= 25 stitches), A.12 over the next 192 stitches (= 8 repeats of 24 stitches), work A.13 (= 26 stitches), A.3D (= 1 mid-stitch), work A.11 (= 25 stitches), A.12 over the next 192 stitches (= 8 repeats of 24 stitches), A.13 (= 26 stitches) and finish with A.4D (= 2 stitches). Continue this pattern. When A.12 has been completed in height there are 531 stitches on the needle and the piece measures approx. 80 cm = 31½" down the mid-stitch. Bind off using fall forest from the wrong side – with knit over knit, purl over purl – NOTE: The yarn overs are bind off as normal stitches – in addition make 1 extra yarn over between each stitch without a yarn over (this yarn over is worked as 1 stitch and then bind off as normal). Doing this gives the fans a nice, arched finish. |
|||||||||||||||||||||||||||||||||||||
Diagram explanations |
|||||||||||||||||||||||||||||||||||||
|
|||||||||||||||||||||||||||||||||||||
 |
|||||||||||||||||||||||||||||||||||||
 |
|||||||||||||||||||||||||||||||||||||
 |
|||||||||||||||||||||||||||||||||||||
 |
|||||||||||||||||||||||||||||||||||||
 |
|||||||||||||||||||||||||||||||||||||
 |
|||||||||||||||||||||||||||||||||||||
Have you finished this pattern?Tag your pictures with #dropspattern #owlfeathersshawl or submit them to the #dropsfan gallery. Do you need help with this pattern?You'll find 17 tutorial videos, a Comments/Questions area and more by visiting the pattern on garnstudio.com. © 1982-2026 DROPS Design A/S. We reserve all rights. This document, including all its sub-sections, has copyrights. Read more about what you can do with our patterns at the bottom of each pattern on our site. |
|||||||||||||||||||||||||||||||||||||


With over 40 years in knitting and crochet design, DROPS Design offers one of the most extensive collections of free patterns on the internet - translated to 17 languages. As of today we count 325 catalogs and 12298 patterns - 12288 of which are translated into English (US/in).
We work hard to bring you the best knitting and crochet have to offer, inspiration and advice as well as great quality yarns at incredible prices! Would you like to use our patterns for other than personal use? You can read what you are allowed to do in the Copyright text at the bottom of all our patterns. Happy crafting!
Post a comment to pattern DROPS 203-13
We would love to hear what you have to say about this pattern!
If you want to leave a question, please make sure you select the correct category in the form below, to speed up the answering process. Required fields are marked *.