
Popular categories
Looking for a yarn?


Comments / Questions (31)
![]() Dea wrote:
Dea wrote:
Scusate lavorando il FERRO 27 rimangono 3 magli e non va bene nemmno lavorare comeil FERRO 21 perchè è un'altra cosa, comunque dove sta l'errore? Grazie
27.09.2019 - 15:57DROPS Design answered:
Buongiorno Dea. Inoltreremo la sua segnalazione al settore design. Provi a verificare se il ferro 27 deve essere lavorato come il ferro 33. La correzione verrà inserita nel testo online. Buon lavoro!
27.09.2019 - 17:00
![]() Dea wrote:
Dea wrote:
Buongiorno, sto lavorando la RIGA 27, ma seguendo ciò che è scritto non rimangono 2 maglie, per otternerle devo lavorare come la RIGA 21...c'è qualche errore? Grazie.
27.09.2019 - 15:39
![]() Claudia wrote:
Claudia wrote:
Spett.le Drops, grazie mille per tutti i modelli fantastici; avrei una domanda, per i gomitoli dei primi tre colori: 100 g colore 3250, rosa antico chiaro 100 g colore 0100, panna 100 g colore 4088, erica .... si usano completamente o si usa parte dei 100 gr... ??? Perché vorrei fare questo scialle con vari avanzi di altri progetti... GRAZIE MILLE DI NUOVO.
17.06.2019 - 16:45DROPS Design answered:
Buongiorno Claudia. Le consigliamo di prevedere la quantità di filato indicata nel modello. Il suo rivenditore Drops di fiducia è a sua disposizione per ulteriori consigli. Buon lavoro!
19.06.2019 - 08:59
![]() Astrid wrote:
Astrid wrote:
Mir ist nicht klar, wie ich die Umschläge in der folgenden Reihe stricken muss. Verschränkt, so dass kein Loch ensteht oder rechts, dann entsteht ja ein Loch
25.05.2019 - 11:45DROPS Design answered:
Liebe Astrid, die Umschläge werden "normal" gestrickt, dh nicht verschränkt. Viel Spaß beim stricken!
27.05.2019 - 09:57
![]() Dea wrote:
Dea wrote:
Esiste un video che spieghi la prima parte? SCIALLE: Avviare 13 maglie con i ferri circolari n° 3,5 ed il colore rosa antico chiaro. Lavorare 1 ferro a diritto sul rovescio del lavoro. Lavorare il ferro successivo come segue: FERRO 1 (= diritto del lavoro): 1 maglia gettata, 1 maglia diritto, 1 maglia gettata e lavorare a diritto fino alla fine del ferro (= 2 maglie aumentate). La gettata ad inizio ferro è particolare in un lavoro in piano.
07.05.2019 - 18:33DROPS Design answered:
Buongiorno Dea. L'istruzione è corretta. Purtroppo un video che spieghi la prima parte dello scialle non è disponibile. Deve fare un gettato, avvolgendo il filo tutto intorno al ferro e poi lavorare 1 m diritto. In questo modo il bordo è meno tirato. Buon lavoro!
07.05.2019 - 19:22
![]() Nina wrote:
Nina wrote:
ROW 1 (= right side): 1 yarn over, knit 1, 1 yarn over and knit to end of row (= 2 stitches increased). ROW 2 (= wrong side): 1 yarn over, knit 1, 1 yarn over and knit to end of row (= 2 stitches increased). It says here that you start with a yarn over. So should I start with Knit 1, 1 yarn over?
02.04.2019 - 13:50DROPS Design answered:
Dear Nina, sorry, I misread this :) yes right, just start with a yarn over on the right needle, and continue working starting with the first stitch. Happy knitting!
02.04.2019 - 15:30
![]() Nina wrote:
Nina wrote:
How can you start the needle with a yarn over? That's not possible right?
31.03.2019 - 23:08DROPS Design answered:
Dear Nina, on row 1 you first work 1 st before 1st yarn over, on row 2 you work 3 sts before 1st yarn over, on row 3 you work 1 stitch before 1st yarn over and on row 4 you work first 4 sts before the decrease and the yarn over. Happy knitting!
01.04.2019 - 14:30
![]() Roberta wrote:
Roberta wrote:
Buongiorno, al ferro 1 - ferro 2 - ferro 7 - ferro 8 il lavoro inizia con una gettata, come si esegue? non ho mai iniziato un lavoro con una gettata. Grazie per la risposta Roberta
30.03.2019 - 12:42DROPS Design answered:
Buonasera Roberta, si lavora sempre una maglia diritto ad inizio ferro prima di lavorare il gettato. Buon lavoro!
01.04.2019 - 21:31
![]() Tina wrote:
Tina wrote:
Finished and took just a month to make - I am an evening knitter :). I used 1101 white, 0100 natural, 2110 light yellow, 8112 iceblue and 6235 greyblue and it turned out really nice, summary and delicate. Thank you for the easy and well understandable instructions - again. Next project is in my head. Best regards from Hamburg
10.03.2019 - 19:50
![]() Kariñe Idigoras wrote:
Kariñe Idigoras wrote:
Sorry, but when you change to ice blue, row 16, you say: "knit 21, 1 yo", where I guess it should be "knit 1, 1 yo" as has been all the time.
23.02.2019 - 01:09DROPS Design answered:
Hi Karine, The knit 21 is correct, then 1 yarn over and knit to end of row. Happy knitting!
23.02.2019 - 06:44
|
|||||||||||||
Pink Moon#pinkmoonwrap |
|||||||||||||
 |
 |
||||||||||||
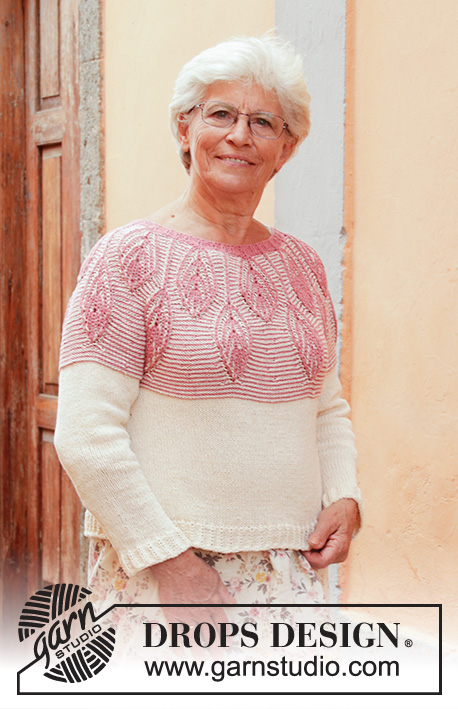
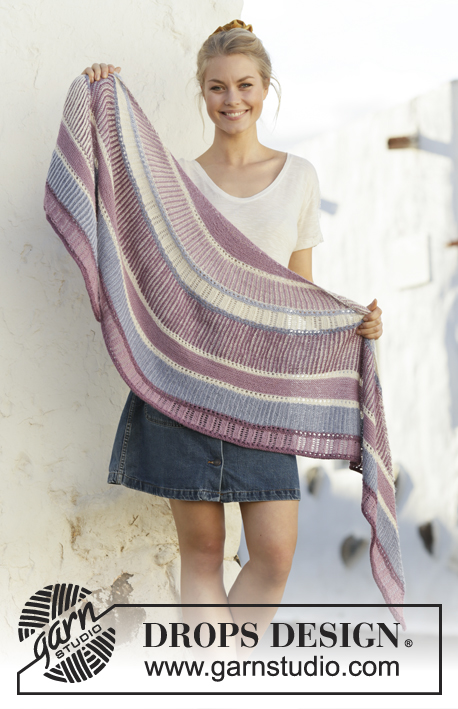
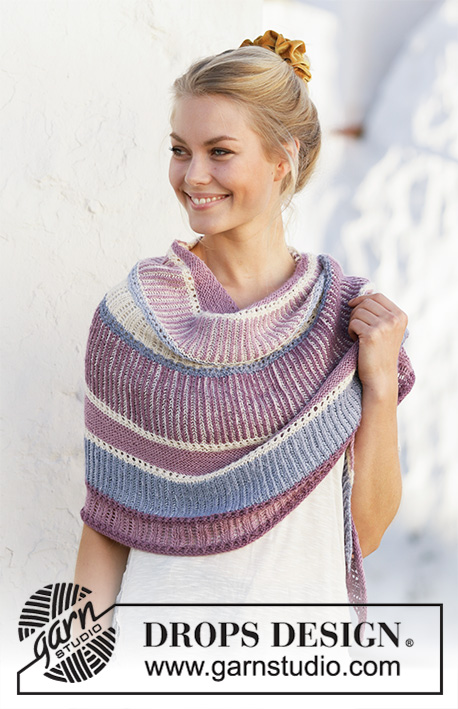
Knitted shawl in DROPS BabyAlpaca Silk. The piece is worked top down with garter stitch, lace pattern and 2-colored English rib.
DROPS 201-4 |
|||||||||||||
|
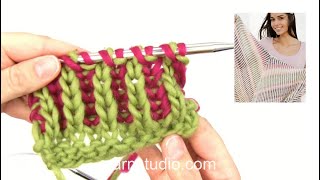
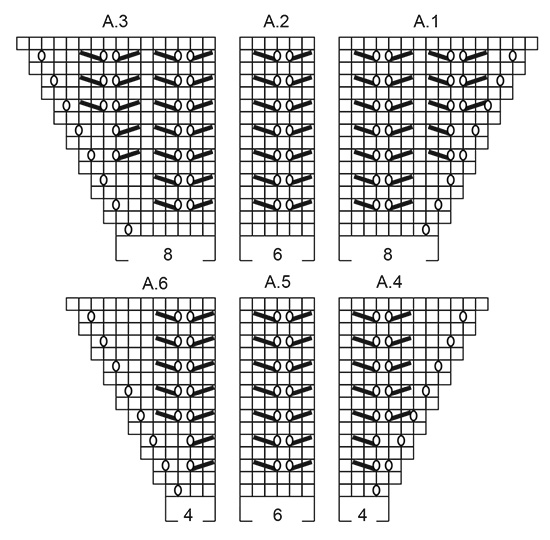
------------------------------------------------------- EXPLANATION FOR PATTERN: ------------------------------------------------------- RIDGE/GARTER STITCH (worked back and forth): Knit all rows. 1 ridge in height = Knit 2 rows. PATTERN: See diagrams A.1 to A.6. The diagrams show all the rows in the pattern seen from the right side. 2-COLORED ENGLISH RIB (back and forth): ROW 1 from the right side: Knit 1, 1 yarn over, knit 1, insert a marker here * knit 1, 1 yarn over and pass the next stitch onto the right needle as if to purl *, work from *-* until there are 2 stitches left, insert a marker here, knit 1, 1 yarn over and knit 1. Do not turn the piece; the next row is also worked from the right side (= 2 stitches increased). ROW 2 from the right side: Knit 3 (the marker sits here), * 1 yarn over, pass the next stitch onto right needle as if to purl, purl next yarn over and stitch together *, work from *-* until there are 3 stitches left (marker is here), knit 3. Turn the piece; the next row is worked from the wrong side. ROW 3 from the wrong side: Knit 1, 1 yarn over, knit 2 (marker sits here), * 1 yarn over, pass next stitch onto right needle as if to purl, purl next yarn over and stitch together*, work from *-* until there are 3 stitches left (marker sits here), knit 2, 1 yarn over and knit 1. Do not turn the piece; the next row is also worked from the wrong side (= 2 stitches increased). ROW 4 from the wrong side: Knit 4 (marker sits here), * knit the next yarn over and stitch together, 1 yarn over and pass the next stitch onto right needle as if to purl *, work from *-* until there are 4 stitches left (marker sits here), knit 4. Turn the piece; the next row is worked from the right side. After ROWS 1-4 you have increased a total of 4 stitches (2 stitches on each side). Now these stitches are worked into the English rib. ROW 5 from the right side: Knit 1, 1 yarn over, knit 1. There are now 2 stitches left before the marker, move the marker here and work the 2 stitches into the English rib as follows: Knit 1, 1 yarn over and pass the next stitch onto the right needle as if to purl. Now the 2 increased stitches have been worked into the English rib. Work as follows over the next stitches: * Knit together the next yarn over and stitch, 1 yarn over and pass the next stitch onto the right needle as if to purl *, work from *-* until there are 4 stitches left (you have worked to the marker). Remove the marker and work the next 2 stitches into the English rib as follows: Knit 1, 1 yarn over and pass the next stitch onto the right needle as if to purl. Now the 2 increased stitches have been worked into the English rib. Insert the marker here. Knit 1, 1 yarn over and knit 1 (= 2 stitches increased). Then repeat ROWS 2-5 onwards (= 4 stitches increased on each repeat). SHAPING: Dampen the shawl and lay out carefully in the right shape. Allow it to dry. Repeat this process after each wash. ------------------------------------------------------- START THE PIECE HERE: ------------------------------------------------------- SHAWL - SHORT OVERVIEW OF THE PIECE: The piece is worked back and forth with circular needle so that you have room for all the stitches. Due to the different textures in the shawl, you will need to shape it when you have finished – read SHAPING in the explanations above. SHAWL: Cast on 13 stitches with circular needle size 3.5 mm = US 4 and light old pink. Knit 1 row from the wrong side. The next row is worked as follows: ROW 1 (= right side): 1 yarn over, knit 1, 1 yarn over and knit to end of row (= 2 stitches increased). ROW 2 (= wrong side): 1 yarn over, knit 1, 1 yarn over and knit to end of row (= 2 stitches increased). Work ROWS 1-2 three more times (a total of 4 times) = 29 stitches on needle. Then work the next row as follows: ROW 3 (= right side): 1 yarn over, knit 1, 1 yarn over, knit 1, * 1 yarn over, knit 2 together, 1 yarn over, knit 1 *, work from *-* a total of 8 times, knit 3 (= 10 stitches increased) = 39 stitches on needle. ROW 4 (= wrong side): 1 yarn over, knit 1, 1 yarn over and knit to end of row (= 2 stitches increased) = 41 stitches on needle. REMEMBER THE KNITTING GAUGE! Work ROWS 1-2 a total of 10 times = 81 stitches on needle. Change to off white and work as follows: ROW 5: Knit 2 stitches in the first stitch (work in both front and back loops), 1 yarn over, knit to end of row (= 2 stitches increased) = 83 stitches. ROW 6: Knit 2 stitches in first stitch (work in both front and back loops), 1 yarn over and knit to end of row (= 2 stitches increased) = 85 stitches. ROW 7 (= right side): 1 yarn over, knit 1, 1 yarn over, knit 1, * 1 yarn over, knit 2 together, 1 yarn over, knit 1 *, work from *-* until there are 2 stitches left and knit these 2 stitches (= 29 stitches increased) = 114 stitches on needle. ROW 8 (= wrong side): 1 yarn over, knit 1, 1 yarn over and knit to end of row (= 2 stitches increased) = 116 stitches on needle. ROW 9: Knit 2 stitches in first stitch (work in both front and back loops), 1 yarn over, knit to end of row (= 2 stitches increased) = 118 stitches on needle. ROW 10: Knit 2 stitches in first stitch (work in both front and back loops), 1 yarn over, knit to end of row (= 2 stitches increased) = 120 stitches on needle. Now work 2-colored English rib with light old pink and off white as follows from the right side: Change to light old pink and work ROW 1 of 2-COLORED ENGLISH RIB – read description above (= 2 stitches increased). * Change to off white and work ROW 2 of 2-COLORED ENGLISH RIB. Change to light old pink and work ROW 3 of 2-COLORED ENGLISH RIB (= 2 stitches increased). Change to off white and work ROW 4 of 2-COLORED ENGLISH RIB. Change to light old pink and work ROW 5 of 2-COLORED ENGLISH RIB (= 2 stitches increased) *. Work from *-* until ROWS 2-5 have been worked a total of 8 times in height = 154 stitches on needle. Do not turn the piece; the next row is also worked from the right side. ROW 11 (= right side): Change to off white and knit all stitches; all the stitches with a yarn over are knitted together with the yarn over. Turn the piece. ROW 12 (= wrong side): Knit all stitches. Turn the piece. Change to ice blue and work as follows: ROW 13: Knit 1, 1 yarn over, knit to end of row (= 1 stitch increased) = 155 stitches on needle. ROW 14: Knit 1, 1 yarn over and knit to end of row (= 1 stitch increased) = 156 stitches on needle. ROW 15 (= right side): Knit 1, 1 yarn over and knit 2, * 1 yarn over, knit 1, 1 yarn over, knit 2 together, 1 yarn over, knit 2 together *, work from *-* until there are 3 stitches left and knit 3 (= 31 stitches increased) = 187 stitches on needle. ROW 16 (= wrong side): Knit 21, 1 yarn over and knit to end of row (= 1 stitch increased) = 188 stitches on needle. ROW 17: Knit 1, 1 yarn over, knit to end of row (= 1 stitch increased) = 189 stitches on needle. ROW 18: Knit 1, 1 yarn over and knit to end of row (= 1 stitch increased) = 190 stitches on needle. Change to off white and work as follows: Work A.1 over 8 stitches, work A.2 until there are 8 stitches left (29 repeats in width), work A.3 over 8 stitches. Work the diagram 1 time in height; there are now 206 stitches on the needle. Change to blue purple and work as follows: ROW 19 (= right side): Knit 1, 1 yarn over and knit to end of row (= 1 stitch increased) = 207 stitches on needle. ROW 20 (= wrong side): Knit 1, 1 yarn over and knit to end of row (= 1 stitch increased) = 208 stitches on needle. ROW 21 (= right side): Knit 1, 1 yarn over, knit 1, * 1 yarn over, knit 2 together, 1 yarn over, knit 1 *, work from *-* until there are 2 stitches left and knit these 2 stitches (= 69 stitches increased) = 277 stitches on needle. ROW 22 (= wrong side): Knit 1, 1 yarn over and knit to end of row (= 1 stitch increased) = 278 stitches on needle. ROW 23 (= right side): Knit 1, 1 yarn over and knit to end of row (= 1 stitch increased) = 279 stitches on needle. ROW 24 (= wrong side): Knit 1, 1 yarn over and knit to end of row (= 1 stitch increased) = 280 stitches on needle. Now work 2-colored English rib with heather and off white. Change to heather, work ROW 1 of 2-COLORED ENGLISH RIB – read description above. * Change to off white and work ROW 2 of 2- COLORED ENGLISH RIB. Change to heather and work ROW 3 of 2- COLORED ENGLISH RIB. Change to off white and work ROW 4 of 2- COLORED ENGLISH RIB. Change to heather and work ROW 5 of 2- COLORED ENGLISH RIB *. Work from *-* until ROWS 2-5 have been worked a total of 12 times in height (= 50 stitches increased) = 330 stitches on needle. Do not turn the piece; the next row is also worked from the right side. Change to off white and work as follows: ROW 25 (= right side): Knit 1, 1 yarn over and knit to end of row (= 1 stitch increased) = 331 stitches on needle. ROW 26 (= wrong side): Knit 1, 1 yarn over and knit to end of row (= 1 stitch increased) = 332 stitches on needle. ROW 27 (= right side): Knit 1, 1 yarn over, * knit 2 together, 1 yarn over *, work from *-* until there are 2 stitches left and knit these 2 stitches (= 1 stitch increased) = 333 stitches on needle. ROW 28 (= wrong side): Knit 1, 1 yarn over and knit to end of row (= 1 stitch increased) = 334 stitches on needle. ROW 29 (= right side): Knit 1, 1 yarn over and knit to end of row (= 1 stitch increased) = 335 stitches on needle. ROW 30 (= wrong side): Knit 1, 1 yarn over and knit to end of row (= 1 stitch increased) = 336 stitches on needle. Change to light old pink and work ROWS 29-30 ten times (10 ridges where you increase 2 stitches per ridge = 20 stitches increased) = 356 stitches on needle. Change to off white and work as follows: ROW 31 (= right side): Knit 1, 1 yarn over and knit to end of row (= 1 stitch increased) = 357 stitches on needle. ROW 32 (= wrong side): Knit 1, 1 yarn over and knit to end of row (= 1 stitch increased) = 358 stitches on needle. ROW 33 (= right side): Knit 1, 1 yarn over, knit 1, * 1 yarn over, knit 2 together *, work from *-* until there are 2 stitches left and knit these 2 stitches (= 1 stitch increased) = 359 stitches on needle. ROW 34 (= wrong side): Knit 1, 1 yarn over and knit to end of row (= 1 stitch increased) = 360 stitches on needle. ROW 35: Knit 1, 1 yarn over and knit to end of row (= 1 stitch increased) = 361 stitches on needle. ROW 36: Knit 1, 1 yarn over and knit to end of row (= 1 stitch increased) = 362 stitches on needle. Now work 2-colored English rib with blue purple and ice blue. Change to blue purple and work ROW 1 of 2-COLORED ENGLISH RIB – read description above. * Change to ice blue and work ROW 2 of 2- COLORED ENGLISH RIB. Change to blue purple and work ROW 3 of 2- COLORED ENGLISH RIB. Change to ice blue and work ROW 4 of 2- COLORED ENGLISH RIB. Change to blue purple and work ROW 5 of 2- COLORED ENGLISH RIB *. Work from *-* until ROWS 2-5 have been worked a total of 8 times in height (34 stitches increased) = 396 stitches on needle. Change to heather and work as follows: ROW 37: Knit 1, 1 yarn over and knit to end of row (= 1 stitch increased) = 397 stitches on needle. ROW 38: Knit 1, 1 yarn over and knit to end of row (= 1 stitch increased) = 398 stitches on needle. ROW 39 (= right side): Knit 1, 1 yarn over and knit 1, * 1 yarn over, knit 2 together *, work from *-* until there are 2 stitches left and knit these stitches (= 1 stitch increased) = 399 stitches on needle. ROW 40 (= wrong side): Knit 1, 1 yarn over and knit to end of row (= 1 stitch increased) = 400 stitches on needle. ROW 41: Knit 1, 1 yarn over, knit 1, 1 yarn over and knit to end of row (= 2 stitches increased) = 402 stitches on needle. ROW 42: Knit 1, 1 yarn over, knit 1, 1 yarn over and knit to end of row (= 2 stitches increased) = 404 stitches on needle. Change to light old pink and work as follows: Work A.4 over 4 stitches, work A.5 until there are 4 stitches left (66 repeats in width), work A.6 over 4 stitches. Work the diagrams 1 time in height, there are now 420 stitches on the needle. Change to heather and work as follows: ROW 43: Knit 1, 1 yarn over and knit to end of row (= 1 stitch increased) = 421 stitches on needle. ROW 44: Knit 1, 1 yarn over and knit to end of row (= 1 stitch increased) = 422 stitches on needle. ROW 45 (= right side): Knit 1, 1 yarn over, knit 1, * 1 yarn over, knit 2 together *, work from *-* until there are 2 stitches left and knit these stitches (= 1 stitch increased) = 423 stitches on needle. ROW 46 (= wrong side): Knit 1, 1 yarn over and knit to end of row (= 1 stitch increased) = 424 stitches on needle. ROW 47: Knit 1, 1 yarn over and knit to end of row (= 1 stitch increased) = 425 stitches on needle . ROW 48: Knit 1, 1 yarn over and knit to end of row (= 1 stitch increased) = 426 stitches on the needle. BINDING OFF: On the next row from the right side, bind off with an i-cord bind off. It is important that the bind-off edge is loose so that the shawl has a good shape and hangs nicely. You can use a size larger needle for casting off; make sure you work loose stitches. Work and bind off as follows: * Knit 2 and then knit twisted together the next 2 stitches. Slip the 3 stitches from the right needle back onto the left needle (in the order they are in) *, work from *-* until all stitches on the left needle have been bind off and you have 3 stitches left on the right needle. Slip these 3 stitches onto the left needle and bind them off in knit. Cut and fasten the strand. |
|||||||||||||
Diagram explanations |
|||||||||||||
|
|||||||||||||
 |
|||||||||||||
Have you finished this pattern?Tag your pictures with #dropspattern #pinkmoonwrap or submit them to the #dropsfan gallery. Do you need help with this pattern?You'll find 19 tutorial videos, a Comments/Questions area and more by visiting the pattern on garnstudio.com. © 1982-2026 DROPS Design A/S. We reserve all rights. This document, including all its sub-sections, has copyrights. Read more about what you can do with our patterns at the bottom of each pattern on our site. |
|||||||||||||


With over 40 years in knitting and crochet design, DROPS Design offers one of the most extensive collections of free patterns on the internet - translated to 17 languages. As of today we count 324 catalogs and 12290 patterns - 12280 of which are translated into English (US/in).
We work hard to bring you the best knitting and crochet have to offer, inspiration and advice as well as great quality yarns at incredible prices! Would you like to use our patterns for other than personal use? You can read what you are allowed to do in the Copyright text at the bottom of all our patterns. Happy crafting!
Post a comment to pattern DROPS 201-4
We would love to hear what you have to say about this pattern!
If you want to leave a question, please make sure you select the correct category in the form below, to speed up the answering process. Required fields are marked *.