
Popular categories
Looking for a yarn?


Comments / Questions (51)
Ulla wrote:
I started this sweater and got as far as the elevation in the neck. When I got to the last turn the instructions say to \"...knit until mid back - cut the yarn - begin next round (i.e. yoke) after the first 13-14-14-15-16-17 stitches on round.\" How do I start after the first 14 stitches when my knitting has stopped in the mid back? Do I move the 14 stitches to the right and start with new yarn?
20.09.2018 - 22:36DROPS Design answered:
Dear Ulla, that's right, just slip the 14 sts from left to right needle without working them and then join the yarn and continue working in the round. Happy knitting!
21.09.2018 - 08:00
![]() Karin Jensen wrote:
Karin Jensen wrote:
Hej\\r\\nJeg har været lidt hurtig og købt SKYgarn som jeg er blevet meget glad for til 2 bluser som desværre ikke kom med i Efterår vinter 2018.\\r\\nKan jeg være heldig at de bliver lagt ud senere?
15.08.2018 - 21:29DROPS Design answered:
Hej Karin, Ja der kommer mange flere opskrifter i DROPS Sky, de kommer snart og bliver lagt ud løbende, så følg med :)
20.08.2018 - 11:13
![]() Karin Jensen wrote:
Karin Jensen wrote:
Hej\\r\\nJeg har været lidt hurtig og købt SKYgarn som jeg er blevet meget glad for til 2 bluser som desværre ikke kom med i Efterår vinter 2018.\\r\\nKan jeg være heldig at de bliver lagt ud senere?
15.08.2018 - 15:42
![]() Paula wrote:
Paula wrote:
Hallo, waarom staat er op de lebel om pennen 4 te gebruiken en in het patroon spreek men van pennen 4,5 wel raar . graag uitleg wand ik brei al met de wolsoort sky op pen 4 en dat is goed ? vriendelijke groeten Paula.
31.07.2018 - 20:37DROPS Design answered:
Dag Paula, Informatie over te gebruiken pennen die op het label staat is algemene informatie over het betreffende garen. De stekenverhouding en de te gebruiken pennen in het patroon kan altijd afwijken. Belangrijk is dat de stekenverhouding die staat aangegeven in het patroon klopt. Maak dus altijd even een proeflapje en pas evt. de naalddikte aan, zodat de stekenverhouding overeenkomt.
01.08.2018 - 21:29
![]() Olga wrote:
Olga wrote:
Kann ich diesen Pullover auch mit Puna stricken? Es sind keine Garnalternativen angegeben.
26.07.2018 - 16:50DROPS Design answered:
Liebe Olga, gerne können Sie einen anderen Garn derselben Garngruppe benutzen, vergessen Sie nur nicht, daß unterschiedlichen Garne unterschiedlichen Ergebnisse geben - Hier lesen Sie mehr über Garnalternativen. Viel Spaß beim stricken!
27.07.2018 - 09:44
![]() Sivet wrote:
Sivet wrote:
Je ne comprend pas cette augmentation! j'ai augmenter comme indiquer entre les marqueurs (1er fils marqueur a 3 mailles, ensuite a 12 mailles etc...) 8fois tout les deux tours se qui forme les trous du raglan et j'ai le bon nombre de maille a la fin des 23 augmentations ... se que j'ai recalculer me parait bien les trous de raglan tombe au bon endroit.
25.07.2018 - 11:57DROPS Design answered:
Bonjour Mme Sivet et merci pour votre retour, nos stylistes vont étudier la question qui semble ne pas concerner que la taille S. Bonne continuation!
25.07.2018 - 12:58
![]() Sivet wrote:
Sivet wrote:
J'ai recalculer pour moi c'est les 30 première maille en jersey on glisse les 50 suivantes sur un arrêt(manche), monter 8 maille; on tricote les 86 suivante en jersey ( devant) ,on met les 50 suivantes sur un arrêt de maille ( manche n°2), monter 8 mailles et les 56 dernières mailles en jersey ...
24.07.2018 - 15:28DROPS Design answered:
Bonjour Mme Sivet, aviez-vous bien augmenté pour le raglan comme indiqué? cf dernière réponse - les premières mailles du tour sont les 6 m du raglan entre le dos et la manche, on augmente en début de tour après ces 6 m (pour la manche) et on augmente à la fin du tour, avant ces 6 m (pour le dos).
24.07.2018 - 16:07
![]() Sivet wrote:
Sivet wrote:
Je fait le modèle en taille S je tricote 2 mailles aprés le début de tour et je glisse les 56 mailles suivante sur un arrêt pour la manche etc... mais rien ne correspond.
24.07.2018 - 15:06DROPS Design answered:
Bonjour Mme Sivet, avez-vous bien augmenté pour le raglan de part et d'autre des 6 m (avec le marqueur au milieu)? soit après les 6 premières mailles au début du tour et juste avant la fin du tour?
24.07.2018 - 16:04
![]() Sivet wrote:
Sivet wrote:
Rectification c'est comme si les manches étais décaler pas au bonne endroit ....
24.07.2018 - 13:51DROPS Design answered:
Bonjour Mme Sivet, n'hésitez pas à bien indiquer la taille suivie pour que les vérifications d'usage puissent être faites. Bon tricot!
24.07.2018 - 14:49
![]() Sivet wrote:
Sivet wrote:
Bonjour, j'ai commencer le pull mais vaut nombre de maille a glisser pour les manches ne sont pas au bonne endroit ... je me retrouve avec une manche avec les raglans de chaque coté et l'autre complétement décaler que faire ?
24.07.2018 - 13:48DROPS Design answered:
Bonjour Mme Sivet, les tours commencent pour l'empiècement à la transition entre le dos (= les 3 dernières m du début de l'empiècement et les 2-3-2-1-0-0 mailles jersey à la fin de l'empiècement) et la manche gauche (quand on porte le pull). On va ainsi tricoter (ou non en fonction de la taille) quelques mailles et glisser les mailles suivantes pour la manche, tricoter le devant, glisser les mailles suivantes pour la manche et terminer par le dos. Bon tricot!
24.07.2018 - 14:49
|
|
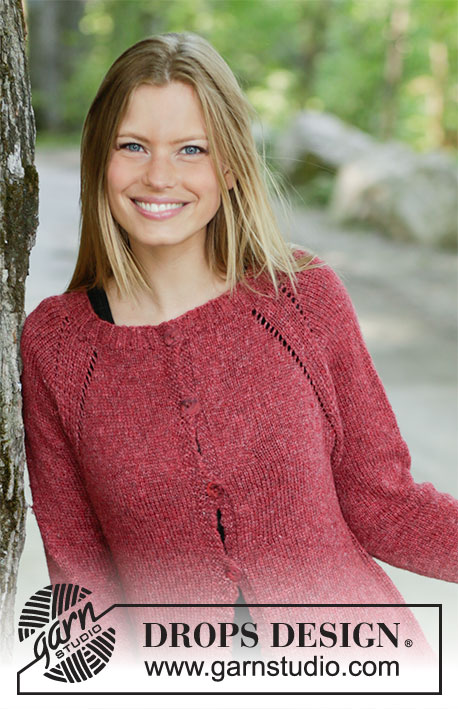
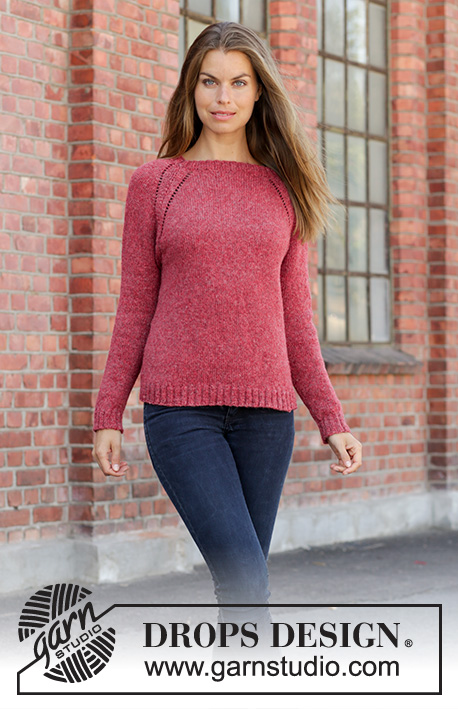
Red Sky#redskysweater |
|
 |
 |
Knitted sweater with raglan in DROPS Sky. Piece is knitted top down. Size: S - XXXL
DROPS 197-23 |
|
|
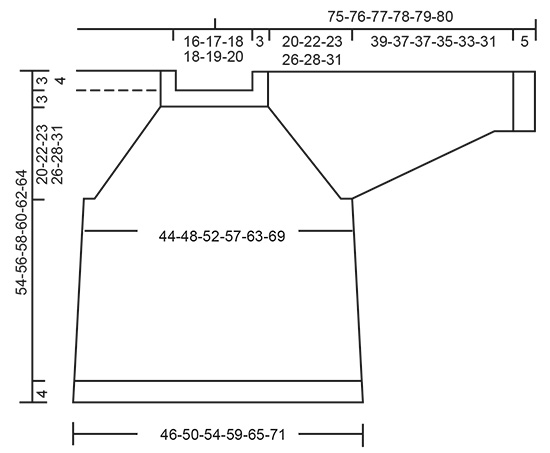
---------------------------------------------------------- EXPLANATION FOR THE PATTERN: ---------------------------------------------------------- DECREASE/INCREASE TIP (evenly): To calculate how to decrease/increase evenly, use the total number of stitches to be decreased/increased over (e.g. 96 stitches) and divide stitches by number of decreases/increases to be done (e.g. 8) = 12. In this example decrease by knitting every 11th and 12th stitch together. When increasing evenly make 1 yarn over after every 12th stitch. On next round knit yarn over twisted to avoid holes. RAGLAN: Increase 2 stitches in every transition between body and sleeves as follows: Work until 3 stitches remain before marker thread, 1 yarn over, knit 6 (marker thread is in the middle of these stitches), 1 yarn over. On next round knit the yarn overs to make holes. Then work the new stitches in stockinette stitch. INCREASE TIP (applies to sides of body): Work until 2 stitches remain before marker thread, 1 yarn over, knit 4 (marker thread is in the middle of these stitches), 1 yarn over. On next round knit yarn over twisted to avoid holes. Then work the new stitches in stockinette stitch. DECREASE TIP (applies to sleeves): Decrease 1 stitch on each side of marker thread as follows: Work until 3 stitches remain before marker thread and knit 2 together, knit 2 (marker thread is between these stitches), slip 1 stitch knitwise, knit 1, pass slipped stitch over stitch worked. ---------------------------------------------------------- START THE PIECE HERE: ---------------------------------------------------------- SWEATER - SHORT OVERVIEW OF THE PIECE: Worked in the round on circular needle, top down. An elevation in the back of neck can be worked to get a better fit so that yoke is somewhat higher in the neck. This elevation can be skipped, to make the neck the same at the front and back - see explanation on elevation in pattern. After yoke work body in the round on circular needle. Work sleeves in the round on double pointed needles/a short circular needle. NECK EDGE: Cast on 96-100-104-112-120-124 stitches on circular needle size 3.5 mm / US 4 with Sky. Knit 1 round. Then work rib (= knit 2/purl 2) for 3 cm / 1". Knit 1 round while decreasing 8-8-8-12-12-12 stitches evenly - read DECREASE/INCREASE TIP = 88-92-96-100-108-112 stitches. Switch to circular needle size 4.5 mm / US 7. Now work elevation in the back of neck or start to work the yoke if you don’t want an elevation. ELEVATION IN BACK OF NECK: Skip this paragraph if you do not want an elevation. Insert 1 marker at beginning of round = mid back. Begin from right side and knit 6-6-7-7-8-8 stitches past marker, turn, tighten yarn and purl 12-12-14-14-16-16 stitches from wrong side, turn, tighten yarn and knit 18-18-21-21-24-24 stitches, turn, tighten yarn and purl 24-24-28-28-32-32 stitches, turn, tighten yarn and knit 30-30-35-35-40-40 stitches, turn, tighten yarn and purl 36-36-42-42-48-48 stitches, turn, tighten yarn and knit 42-42-49-49-56-56 stitches, turn, tighten yarn and purl 48-48-56-56-64-64 stitches, turn, tighten yarn and knit until mid back. Cut the yarn. Begin next round (i.e. yoke) after the first 13-14-14-15-16-17 stitches on round. YOKE: Insert 1 marker here - NOW MEASURE PIECE FROM HERE! Now insert 4 marker threads in the piece while working in stockinette stitch in the round as follows: Knit 3 stitches (= 3 stitches on back piece), insert 1 marker thread here, knit the next 12-12-14-14-16-16 stitches (= sleeve), insert 1 marker thread here, knit the next 32-34-34-36-38-40 stitches (= front piece), insert 1 marker thread here, knit 12-12-14-14-16-16 stitches (= sleeve), insert 1 marker thread here, knit the last 29-31-31-33-35-37 stitches (= back piece) after last marker (3 stitches remain before first marker thread). Work next round as follows: Knit 6 (marker is in the middle of these 6 stitches), make 1 yarn over, knit 6-6-8-8-10-10 (= sleeve), make 1 yarn over, knit 6 (marker thread is in the middle of these 6 stitches), make 1 yarn over, knit 26-28-28-30-32-34 (= front piece), make 1 yarn over, knit 6 (marker is in the middle of these 6 stitches), make 1 yarn over, knit 6-6-8-8-10-10 (= sleeve), make 1 yarn over, knit 6 (marker thread is in the middle of these 6 stitches), make 1 yarn over, knit 26-28-28-30-32-34 (= back piece), make 1 yarn over. First increase for RAGLAN - read explanation above, is now done (= 8 stitches increased on round). Continue with stockinette stitch and increase every other round 23-27-29-32-34-39 times in total (including first increase explained above). After last increase for raglan there are 272-308-328-356-380-424 stitches on needle. Continue in stockinette stitch without increases until piece measures 20-22-23-26-28-31 cm/8"-8¾"-9"-10¼"-11"-12¼" from marker at the beginning of yoke. Work next round as follows: Work 4-3-4-5-7-7 stitches in stockinette stitch (= on back piece), slip the next 56-66-70-74-76-86 stitches on 1 stitch holder for sleeve, cast on 8-8-10-10-12-12 new stitches on needle (= in the side under sleeve), work in stockinette stitch over the next 80-88-94-104-114-126 stitches (= front piece), slip the next 56-66-70-74-76-86 stitches on 1 stitch holder for sleeve, cast on 8-8-10-10-12-12 new stitches on needle (= in the side under sleeve), work in stockinette stitch over the last 76-85-90-99-107-119 stitches (= back piece). Finish body and sleeves separately. NOW MEASURE PIECE FROM HERE! BODY: = 176-192-208-228-252-276 stitches. Insert 1 marker thread in the middle of the 8-8-10-10-12-12 new stitches that were cast on under sleeve in each side. Begin round at one of the marker thread and move the marker threads when working. Continue in stockinette stitch. When piece measures 8 cm / 3⅛" from division, increase 1 stitch on each side of both marker threads - read INCREASE TIP (= 4 stitches increased). Repeat increase when piece measures 17 cm/6¾" from division = 184-200-216-236-260-284 stitches. When piece measures 27-27-28-26-26-25 cm from division (approx. 50-52-54-56-58-60 cm / 19¾"-20½"-21¼"-22"-22¾"-23⅝" from shoulder), knit 1 round while increasing 36-40-44-48-52-56 stitches evenly = 220-240-260-284-312-340 stitches. Switch to circular needle size 3.5 mm / US 4 and work rib = knit 2/purl 2 for 4 cm / 1½". Bind off with knit over knit and purl over purl (to avoid a tight bind-off edge use needle size 4.5 mm / US 7). Sweater measures approx. 54-56-58-60-62-64 cm / 21¼"-22"-22¾"-23⅝"-24⅜"-25¼" from shoulder. SLEEVE: Slip the 56-66-70-74-76-86 stitches from stitch holder in one side of piece on circular needle/double pointed needles size 4.5 mm / US 7 and pick in addition up 1 stitch in each of the 8-8-10-10-12-12 new stitches cast on under sleeve = 64-74-80-84-88-98 stitches. Insert 1 marker thread in the middle of the 8-8-10-10-12-12 stitches under sleeve and begin round here. Work in stockinette stitch in the round. When piece measures 2 cm / ¾" from division, decrease 2 stitches mid under sleeve - read DECREASE TIP. Decrease like this every 7th-5th-4th-4th-3rd-3rd round 13-17-19-20-21-25 times in total = 38-40-42-44-46-48 stitches. Continue until sleeve measures 39-37-37-35-33-31 cm/15¼"-14½"-14½"-13¾"-13"-12¼" from division (shorter measurements in the larger sizes because of longer yoke). Knit 1 round while increasing 6-4-6-8-6-8 stitches evenly = 44-44-48-52-52-56 stitches. Switch to double pointed needles size 3.5 mm / US 4 and work rib = knit 2/purl 2 for 5 cm / 2". Sleeve measures approx. 44-42-42-40-38-36 cm/17¼"-16½"-16½"-15¾"-15"-14¼" from division. Bind off with knit over knit and purl over purl (to avoid a tight bind-off edge use needle size 4.5 mm / US 7). Work the other sleeve the same way. |
|
 |
|
Have you finished this pattern?Tag your pictures with #dropspattern #redskysweater or submit them to the #dropsfan gallery. Do you need help with this pattern?You'll find 28 tutorial videos, a Comments/Questions area and more by visiting the pattern on garnstudio.com. © 1982-2026 DROPS Design A/S. We reserve all rights. This document, including all its sub-sections, has copyrights. Read more about what you can do with our patterns at the bottom of each pattern on our site. |
|


With over 40 years in knitting and crochet design, DROPS Design offers one of the most extensive collections of free patterns on the internet - translated to 17 languages. As of today we count 324 catalogs and 12290 patterns - 12280 of which are translated into English (US/in).
We work hard to bring you the best knitting and crochet have to offer, inspiration and advice as well as great quality yarns at incredible prices! Would you like to use our patterns for other than personal use? You can read what you are allowed to do in the Copyright text at the bottom of all our patterns. Happy crafting!
Post a comment to pattern DROPS 197-23
We would love to hear what you have to say about this pattern!
If you want to leave a question, please make sure you select the correct category in the form below, to speed up the answering process. Required fields are marked *.