
Popular categories
Looking for a yarn?


Comments / Questions (51)
![]() Hannie Van Ballegooy wrote:
Hannie Van Ballegooy wrote:
Hebt u ook tips hoe ik het beste de gaten onder de arm kan dichtmaken?
26.01.2019 - 09:45DROPS Design answered:
Dag Hannie
Je kunt beide delen met de goede kant tegen elkaar aan leggen en dan met naald en draad met kleine steken dicht naaien.
27.01.2019 - 13:38
![]() Krista wrote:
Krista wrote:
Na de raglan meerderingen moet ik verder breien tot 23cm. Meet ik dit loodrecht op boord of wordt dit gemeten lzngs de raglanmeerderingen?
04.01.2019 - 22:50DROPS Design answered:
Dag Krist,
Dit wordt loodrecht vanaf de boord gemeten.
06.01.2019 - 13:21
![]() Elizabeth Hillier wrote:
Elizabeth Hillier wrote:
What are the measurements for the sizes?
31.12.2018 - 15:58DROPS Design answered:
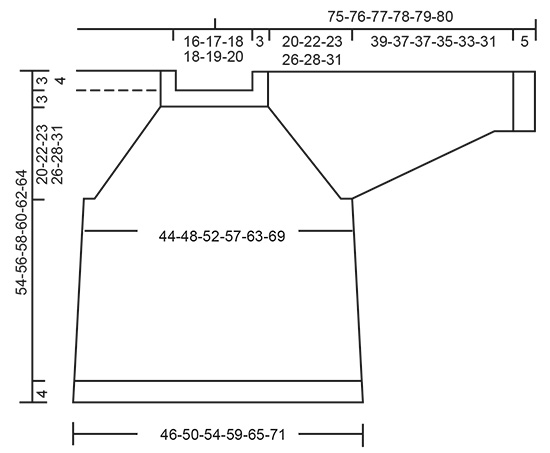
Dear Elizabeth, at the bottom of the page you can find a sketch with the sizes measures. Happy knitting!
31.12.2018 - 18:23
![]() Monica wrote:
Monica wrote:
Quando faccio l'ultimo gettato per il primo aumento raglan mi si forma poi un buco grande, non riesco a capire perché, ho seguito le istruzioni passo passo...
18.11.2018 - 11:56
![]() Roos wrote:
Roos wrote:
Ik kom er niet uit bij de PAS. Op een gegeven moment meet ik 22cm en moet ik de volgende naald 3 steken breien. ik vraag me af op welke plek ik die steken moet breien op het achterpand? aan het begin of in het midden of zo?
17.11.2018 - 11:48DROPS Design answered:
Dag Roos,
Deze 3 steken zitten op het achterpand vlak bij de mouw. (Het begin van de naald zit zeg maar op het achterpand, 3 steken naast de rechter mouw). Na deze drie steken zet je een aantal steken op een hulpdraad voor de mouw en zet je steken op voor onder de mouw.
19.11.2018 - 08:08
![]() Monica wrote:
Monica wrote:
Buonasera Drops, sto cercando di realizzare il modello e mi trovo al primo aumento raglan così come spiegato, adesso per i successivi aumenti come devo fare? Grazie, saluti.
16.11.2018 - 22:17DROPS Design answered:
Buongiorno Monica. Gli aumenti per il raglan sono spiegati nel paragrafo RAGLAN, all'inizio del testo.Deve fare un gettato 3 m prima e 3 m dopo il segnapunti. Buon lavoro!
19.11.2018 - 16:05
![]() Mc wrote:
Mc wrote:
Bonjour, J'ai terminé la première augmentation raglan, telle qu'elle a été expliquée. Le second tour doit se faire tout à l’endroit ? après le dernier jeté ? Si j'ai bien compris, celles ci se font tous les 2 tours ? Merci
29.10.2018 - 15:03DROPS Design answered:
Bonjour Mc, tout à fait, vous tricotez le rang suivant la 1ère augmentation tout à l'endroit (les jetés aussi pour qu'ils forment des trous), et répétez les augmentations de chaque côté des 6 m end (présentées ainsi: 3m end, fil marqueur, 3 m end) comme indiqué sous RAGLAN. Bon tricot!
29.10.2018 - 15:36
![]() Mc wrote:
Mc wrote:
Bonjour, Pour réaliser l'échantillon quelle grosseur d'aiguilles préconisez vous ? 4 ou 4,5
21.10.2018 - 15:04DROPS Design answered:
Bonjour Mc, l'échantillon de 20 m x 26 rangs se tricote sur les aiguilles 4,5 - n'hésitez pas à ajuster la taille des aiguilles si besoin. Bon tricot!
22.10.2018 - 09:33
![]() Mia wrote:
Mia wrote:
Hallo ! HALSBLENDE: Zu Rundnadel Nr. 4,5 wechseln. Wenn ich die Erhöhung weglassen möchte, strickt man dann mit der Rundnadel Nr. 3,5 weiter oder nimmt man dann die Rundnadel Nr. 4,5 (für die Erhöhung ) ?
29.09.2018 - 16:52DROPS Design answered:
Liebe Mia, wenn Sie keine Erhöhung möchten, stricken Sie mit dem Rundnadel Nr 4,5 weiter (= Passe, usw). Viel Spaß beim stricken!
01.10.2018 - 08:25
![]() Anne wrote:
Anne wrote:
Bonjour, Le modèle est-il fait pour une débutant en tricot. D'avance, merci. Anne
21.09.2018 - 08:59DROPS Design answered:
Bonjour Anne, lisez avant tout l'intégralité des explications et suivez-les bien pas à pas. Vous pourrez volontiers poser votre question ici ou contacter votre magasin DROPS pour toute assistance personnalisée. Bon tricot!
21.09.2018 - 09:16
|
|
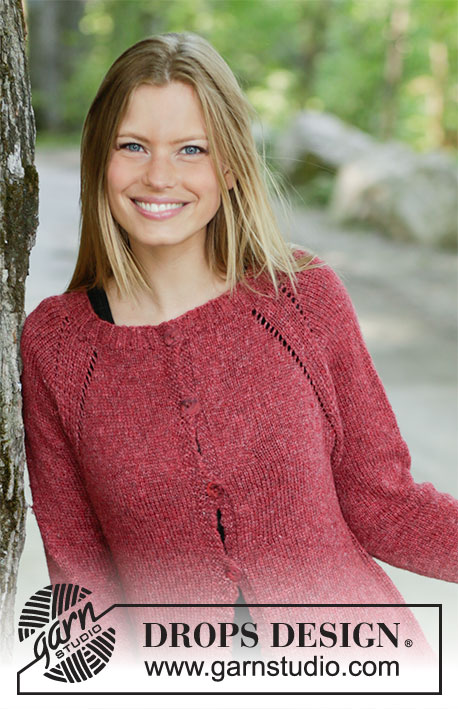
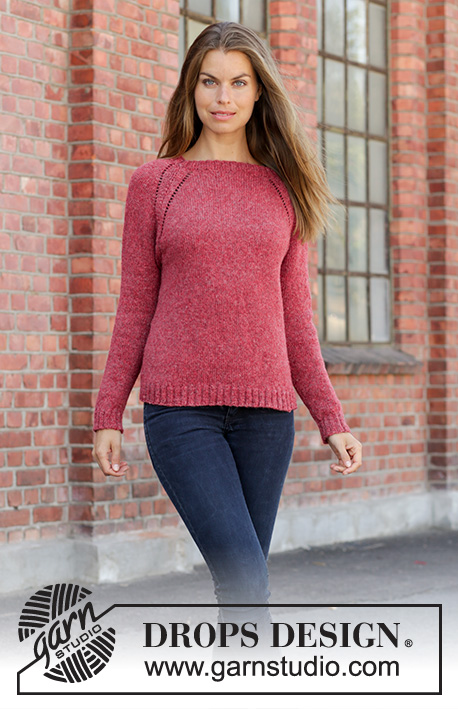
Red Sky#redskysweater |
|
 |
 |
Knitted sweater with raglan in DROPS Sky. Piece is knitted top down. Size: S - XXXL
DROPS 197-23 |
|
|
---------------------------------------------------------- EXPLANATION FOR THE PATTERN: ---------------------------------------------------------- DECREASE/INCREASE TIP (evenly): To calculate how to decrease/increase evenly, use the total number of stitches to be decreased/increased over (e.g. 96 stitches) and divide stitches by number of decreases/increases to be done (e.g. 8) = 12. In this example decrease by knitting every 11th and 12th stitch together. When increasing evenly make 1 yarn over after every 12th stitch. On next round knit yarn over twisted to avoid holes. RAGLAN: Increase 2 stitches in every transition between body and sleeves as follows: Work until 3 stitches remain before marker thread, 1 yarn over, knit 6 (marker thread is in the middle of these stitches), 1 yarn over. On next round knit the yarn overs to make holes. Then work the new stitches in stockinette stitch. INCREASE TIP (applies to sides of body): Work until 2 stitches remain before marker thread, 1 yarn over, knit 4 (marker thread is in the middle of these stitches), 1 yarn over. On next round knit yarn over twisted to avoid holes. Then work the new stitches in stockinette stitch. DECREASE TIP (applies to sleeves): Decrease 1 stitch on each side of marker thread as follows: Work until 3 stitches remain before marker thread and knit 2 together, knit 2 (marker thread is between these stitches), slip 1 stitch knitwise, knit 1, pass slipped stitch over stitch worked. ---------------------------------------------------------- START THE PIECE HERE: ---------------------------------------------------------- SWEATER - SHORT OVERVIEW OF THE PIECE: Worked in the round on circular needle, top down. An elevation in the back of neck can be worked to get a better fit so that yoke is somewhat higher in the neck. This elevation can be skipped, to make the neck the same at the front and back - see explanation on elevation in pattern. After yoke work body in the round on circular needle. Work sleeves in the round on double pointed needles/a short circular needle. NECK EDGE: Cast on 96-100-104-112-120-124 stitches on circular needle size 3.5 mm / US 4 with Sky. Knit 1 round. Then work rib (= knit 2/purl 2) for 3 cm / 1". Knit 1 round while decreasing 8-8-8-12-12-12 stitches evenly - read DECREASE/INCREASE TIP = 88-92-96-100-108-112 stitches. Switch to circular needle size 4.5 mm / US 7. Now work elevation in the back of neck or start to work the yoke if you don’t want an elevation. ELEVATION IN BACK OF NECK: Skip this paragraph if you do not want an elevation. Insert 1 marker at beginning of round = mid back. Begin from right side and knit 6-6-7-7-8-8 stitches past marker, turn, tighten yarn and purl 12-12-14-14-16-16 stitches from wrong side, turn, tighten yarn and knit 18-18-21-21-24-24 stitches, turn, tighten yarn and purl 24-24-28-28-32-32 stitches, turn, tighten yarn and knit 30-30-35-35-40-40 stitches, turn, tighten yarn and purl 36-36-42-42-48-48 stitches, turn, tighten yarn and knit 42-42-49-49-56-56 stitches, turn, tighten yarn and purl 48-48-56-56-64-64 stitches, turn, tighten yarn and knit until mid back. Cut the yarn. Begin next round (i.e. yoke) after the first 13-14-14-15-16-17 stitches on round. YOKE: Insert 1 marker here - NOW MEASURE PIECE FROM HERE! Now insert 4 marker threads in the piece while working in stockinette stitch in the round as follows: Knit 3 stitches (= 3 stitches on back piece), insert 1 marker thread here, knit the next 12-12-14-14-16-16 stitches (= sleeve), insert 1 marker thread here, knit the next 32-34-34-36-38-40 stitches (= front piece), insert 1 marker thread here, knit 12-12-14-14-16-16 stitches (= sleeve), insert 1 marker thread here, knit the last 29-31-31-33-35-37 stitches (= back piece) after last marker (3 stitches remain before first marker thread). Work next round as follows: Knit 6 (marker is in the middle of these 6 stitches), make 1 yarn over, knit 6-6-8-8-10-10 (= sleeve), make 1 yarn over, knit 6 (marker thread is in the middle of these 6 stitches), make 1 yarn over, knit 26-28-28-30-32-34 (= front piece), make 1 yarn over, knit 6 (marker is in the middle of these 6 stitches), make 1 yarn over, knit 6-6-8-8-10-10 (= sleeve), make 1 yarn over, knit 6 (marker thread is in the middle of these 6 stitches), make 1 yarn over, knit 26-28-28-30-32-34 (= back piece), make 1 yarn over. First increase for RAGLAN - read explanation above, is now done (= 8 stitches increased on round). Continue with stockinette stitch and increase every other round 23-27-29-32-34-39 times in total (including first increase explained above). After last increase for raglan there are 272-308-328-356-380-424 stitches on needle. Continue in stockinette stitch without increases until piece measures 20-22-23-26-28-31 cm/8"-8¾"-9"-10¼"-11"-12¼" from marker at the beginning of yoke. Work next round as follows: Work 4-3-4-5-7-7 stitches in stockinette stitch (= on back piece), slip the next 56-66-70-74-76-86 stitches on 1 stitch holder for sleeve, cast on 8-8-10-10-12-12 new stitches on needle (= in the side under sleeve), work in stockinette stitch over the next 80-88-94-104-114-126 stitches (= front piece), slip the next 56-66-70-74-76-86 stitches on 1 stitch holder for sleeve, cast on 8-8-10-10-12-12 new stitches on needle (= in the side under sleeve), work in stockinette stitch over the last 76-85-90-99-107-119 stitches (= back piece). Finish body and sleeves separately. NOW MEASURE PIECE FROM HERE! BODY: = 176-192-208-228-252-276 stitches. Insert 1 marker thread in the middle of the 8-8-10-10-12-12 new stitches that were cast on under sleeve in each side. Begin round at one of the marker thread and move the marker threads when working. Continue in stockinette stitch. When piece measures 8 cm / 3⅛" from division, increase 1 stitch on each side of both marker threads - read INCREASE TIP (= 4 stitches increased). Repeat increase when piece measures 17 cm/6¾" from division = 184-200-216-236-260-284 stitches. When piece measures 27-27-28-26-26-25 cm from division (approx. 50-52-54-56-58-60 cm / 19¾"-20½"-21¼"-22"-22¾"-23⅝" from shoulder), knit 1 round while increasing 36-40-44-48-52-56 stitches evenly = 220-240-260-284-312-340 stitches. Switch to circular needle size 3.5 mm / US 4 and work rib = knit 2/purl 2 for 4 cm / 1½". Bind off with knit over knit and purl over purl (to avoid a tight bind-off edge use needle size 4.5 mm / US 7). Sweater measures approx. 54-56-58-60-62-64 cm / 21¼"-22"-22¾"-23⅝"-24⅜"-25¼" from shoulder. SLEEVE: Slip the 56-66-70-74-76-86 stitches from stitch holder in one side of piece on circular needle/double pointed needles size 4.5 mm / US 7 and pick in addition up 1 stitch in each of the 8-8-10-10-12-12 new stitches cast on under sleeve = 64-74-80-84-88-98 stitches. Insert 1 marker thread in the middle of the 8-8-10-10-12-12 stitches under sleeve and begin round here. Work in stockinette stitch in the round. When piece measures 2 cm / ¾" from division, decrease 2 stitches mid under sleeve - read DECREASE TIP. Decrease like this every 7th-5th-4th-4th-3rd-3rd round 13-17-19-20-21-25 times in total = 38-40-42-44-46-48 stitches. Continue until sleeve measures 39-37-37-35-33-31 cm/15¼"-14½"-14½"-13¾"-13"-12¼" from division (shorter measurements in the larger sizes because of longer yoke). Knit 1 round while increasing 6-4-6-8-6-8 stitches evenly = 44-44-48-52-52-56 stitches. Switch to double pointed needles size 3.5 mm / US 4 and work rib = knit 2/purl 2 for 5 cm / 2". Sleeve measures approx. 44-42-42-40-38-36 cm/17¼"-16½"-16½"-15¾"-15"-14¼" from division. Bind off with knit over knit and purl over purl (to avoid a tight bind-off edge use needle size 4.5 mm / US 7). Work the other sleeve the same way. |
|
 |
|
Have you finished this pattern?Tag your pictures with #dropspattern #redskysweater or submit them to the #dropsfan gallery. Do you need help with this pattern?You'll find 28 tutorial videos, a Comments/Questions area and more by visiting the pattern on garnstudio.com. © 1982-2026 DROPS Design A/S. We reserve all rights. This document, including all its sub-sections, has copyrights. Read more about what you can do with our patterns at the bottom of each pattern on our site. |
|


With over 40 years in knitting and crochet design, DROPS Design offers one of the most extensive collections of free patterns on the internet - translated to 17 languages. As of today we count 324 catalogs and 12290 patterns - 12280 of which are translated into English (US/in).
We work hard to bring you the best knitting and crochet have to offer, inspiration and advice as well as great quality yarns at incredible prices! Would you like to use our patterns for other than personal use? You can read what you are allowed to do in the Copyright text at the bottom of all our patterns. Happy crafting!
Post a comment to pattern DROPS 197-23
We would love to hear what you have to say about this pattern!
If you want to leave a question, please make sure you select the correct category in the form below, to speed up the answering process. Required fields are marked *.