
Popular categories
Looking for a yarn?


Comments / Questions (92)
![]() Helen wrote:
Helen wrote:
Cancel request - I've fixed it!
13.03.2021 - 13:08
![]() Helen wrote:
Helen wrote:
This is driving me crazy. I can't work out the pattern (and I've done yours before)! I've got the first round (after the chain circle) I think (although the joining doesn't look right) and then I have the second round that eventually has six trebles and 14 chains? I have no idea about the three chains to the left. I have five chains and 11 trebles on the next row but where do the three trebles on the left go? Do NOT say 'happy crocheting' - not happy! Also, you need helpful translations!
12.03.2021 - 20:26
![]() Denise Williams wrote:
Denise Williams wrote:
Does Drops have a SHAWL version of the Butterfly Queen? Thank You
16.01.2021 - 22:19DROPS Design answered:
Dear Mrs Williams, we don't, sorry. You will find our crochet patterns to shawls here. Happy crocheting!
18.01.2021 - 09:01
![]() Maria Concepcion Felix-Corral wrote:
Maria Concepcion Felix-Corral wrote:
Me encantó el modelo drops 186-11, sólo que los diagramas están segmentados, lo que complica su comprensión. ¿Podrían ayudarme?
28.10.2020 - 02:25DROPS Design answered:
Hola María, los patrones Drops están generalmente escritos en formato mixto: parte está explicado en texto escrito y otra parte está en forma de diagrama. Para saber qué diagrama hay que trabajar en qué momento, tienes que seguir las explicaciones en el texto. Si te resulta difícil seguir los diagramas, puedes leer la siguiente lección: https://www.garnstudio.com/lesson.php?id=68&cid=23
19.11.2020 - 11:57
![]() Sarah Walker wrote:
Sarah Walker wrote:
This pattern is extremely complicated and the chart uses symbols I haven't seen anywhere else. I may not even try to attempt this.
13.09.2020 - 23:13DROPS Design answered:
Dear Mrs Walker, you will find the diagram key between written pattern and diagrams and this lesson explains how to read crochet diagrams. Happy crocheting!
14.09.2020 - 09:58
![]() Jo Harvey wrote:
Jo Harvey wrote:
In round 8 of A.1b -first round with treble crochet groups- there is an arrow to show continuation of the pattern. Should there be a } to indicate 5 chain stitches there like at the other end of the treble group and as it is in the following row. Doesn't look even without it
19.08.2020 - 13:39DROPS Design answered:
Dear Mrs Harvey, it looks like you are right, our design team will check out diagram and make any adjustements. thanks for your feedback, Happy crocheting!
19.08.2020 - 15:58
![]() Anett wrote:
Anett wrote:
Jag har problem att tyda vad det är för symbol i A1a varv 5 och kommande varv. Ser inte om det är en oval ring så det är 14 luftmaskor eller om det är en annan symbol. Sen är det en pil på varv 8 på höger sida om bladet. Men 5 lm till vänster om bladet på samma rad. Ska det inte vara 5 lm på höger sida på rad 8 tacksam för svar så jag kört fast och vill komma vidare.
14.04.2020 - 00:53DROPS Design answered:
Hej Anett, det er den her: = varvet börjar med 1 luftmaskebåge och avslutas med 1 smygmaska i 1:A luftmaskan i början av varvet, därefter virkas det smygmaskor fram till första luftmaskebågen
29.04.2020 - 09:30
![]() Karin wrote:
Karin wrote:
Guten Tag, es heißt beim Beenden des Rumpfteils: "A.3 in Runden weiterhäkeln (d.h. die 9 Runde in der Höhe wiederholen), ....daran angepasst, dass nach einer Runde mit Stäbchengruppen geendet wird. " Ist die letze Runde nun eine Stäbchenbruppenrunde oder folgt noch eine mit Luftmaschenbögen....bei A4 ist die die Vorrunde nämlich mit Luftmaschenbögen dargestellt. Vielen Dank im Voraus!
20.02.2020 - 19:16DROPS Design answered:
Liebe Karin, die letzte Reihe A.3 muss eine mit Stäbchengruppen, dann häkeln Sie A.4 über diese Stäbchengruppen wie zuvor mit Luftmaschenbogen und Stäbchengruppen, aber nur zwischen 2 Ecke (und gerade für jedes Vorderteil). Viel Spaß beim häkeln!
21.02.2020 - 07:48
![]() Jannicke wrote:
Jannicke wrote:
Hei Jeg lurer på følgende i starten: heklet 3 + 5 lm og fortsatte med to staver sammen, 4 lm, to staver sammen, gjentok 5, lm, 2 st sm, 4 lm, 2 st sm, slik at det ble fire slike grupper. Det står at omgangen avsluttes ved å hekle kj.m i 3. lm fra starten på omgangen. Da får jeg to st.sm og tre lm (som blir en st) ved siden av hverandre og det er vel ikke riktig? Stusser også på at det skal hekles kj.m frem til første lm.bue, men jeg er jo allerede ved den? På forhånd takk.
16.02.2020 - 11:01DROPS Design answered:
Hej Jannicke, de 3 lm i A.1a behøver du for at komme op på næste rad i diagrammet, de hækles i tillæg til A.1b. Kædemaskerne behøves ikke første gang, men dem behøver du senere i diagrammet. God fornøjelse!
20.02.2020 - 09:15
![]() Magdolna wrote:
Magdolna wrote:
The diagrams are disappeared from english (US) and hungarian version. I found them in norvegian version, but I dont speak norvegian :-( Last week , when I ordered the yarn, diagramms were visible. I can't crochet this beautiful jacket :-( Please help !
12.02.2020 - 18:10DROPS Design answered:
Dear Magdolna, diagram text should be updated and visible soon in US-English, thanks in advance for your comprehension. Happy crocheting!
13.02.2020 - 11:46
|
|||||||||||||||||||||||||||||||||||||||||||||||||||||||||||||||||||||||||||||||||||||
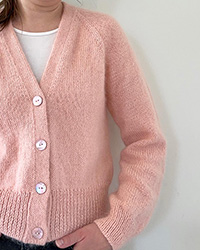
Butterfly Queen#butterflyqueenjacket |
|||||||||||||||||||||||||||||||||||||||||||||||||||||||||||||||||||||||||||||||||||||
 |
 |
||||||||||||||||||||||||||||||||||||||||||||||||||||||||||||||||||||||||||||||||||||
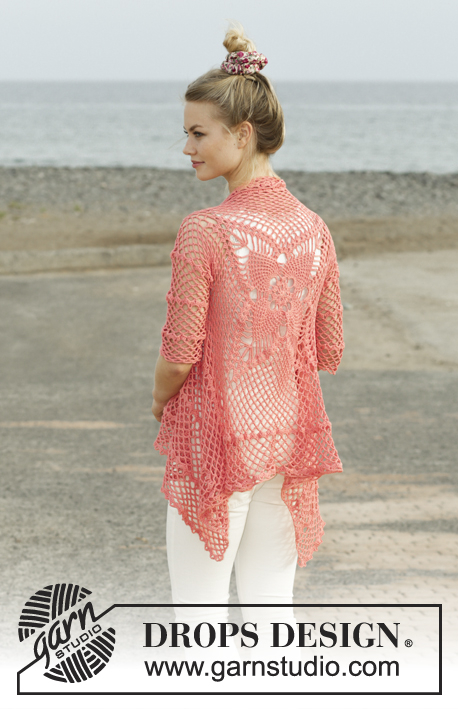
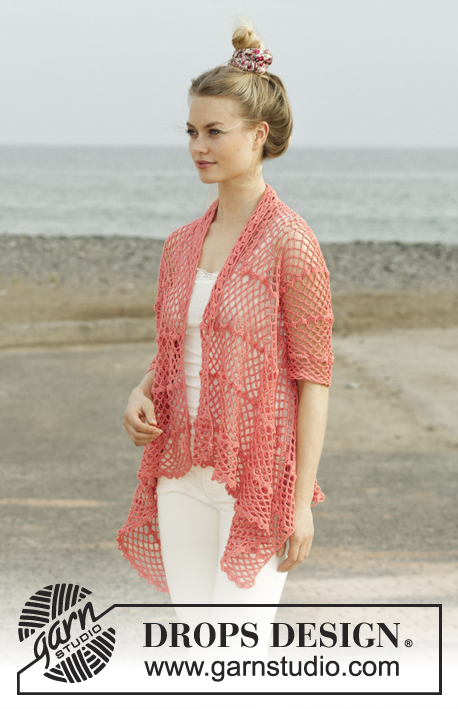
Crocheted jacket worked in a square with lace pattern. Size: S - XXXL Piece is crocheted in DROPS Flora.
DROPS 186-11 |
|||||||||||||||||||||||||||||||||||||||||||||||||||||||||||||||||||||||||||||||||||||
|
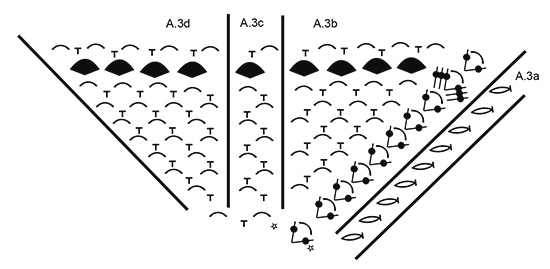
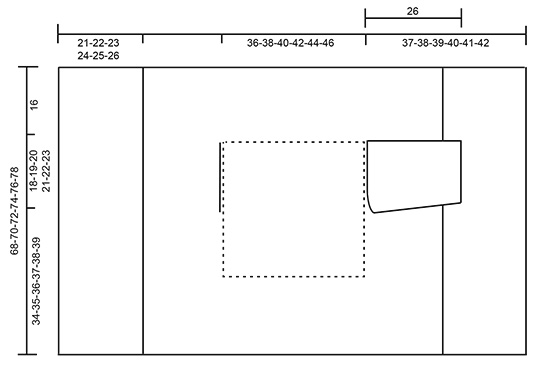
INFORMATION FOR PATTERN: PATTERN: See diagrams A.1 to A.4. CROCHET INFO (applies A.4): Replace first single crochet at beginning of row with 1 chain stitch. Replace first double treble crochet at beginning of row with 5 chain stitches. DECREASE TIP (applies to mid under sleeve): Work 5 chain stitches, skip 1 single crochet + 1 chain space, work 1 single crochet around next chain space + 1 chain space (= 1 repetition decreased), continue pattern as before until 1 chain space remains + 1 single crochet on previous row, skip these stitches and finish with 1 treble crochet in first chain stitch at beginning of previous row (= 1 repetition decreased). ---------------------------------------------------------- JACKET: Worked in the round from mid back on back and outwards as a square, then work back and forth on front pieces. Work sleeves back and forth from body, then sew them together under sleeve. Work 4 chain stitches on hook size 3.5 mm/E/4 with Flora and form a ring with 1 slip stitch in first chain stitch. Then work pattern in the round according to diagram A.1b 4 times in total on round - diagram A.1a shows how rounds begin and end and is worked in addition to A.1b. REMEMBER THE CROCHET GAUGE! When entire diagram A.1a and A.1b is cut the tread, and begin next round around chain space between last treble group worked and fasten thread with 1 slip stitch in this chain space. Now work in the round according to diagram A.2 as follows: * Work A.2b, repeat A.2c 6 times in total in width, A.2d *, repeat from *-* 4 times in total on round – diagram A.2a shows how rounds begin and end and are worked in addition to A.2b/c/d. When entire diagram A.2a and A.2b have been worked, square measures approx. 36 x 36 cm / 14¼" x 14¼". There are now 4 corner chain spaces (1 double crochet + 6 chain stitches + 1 double crochet) and 14 chain spaces along each of the sides on square. READ THE REST OF BODY BEFORE CONTINUING! Continue to work as follows: * Work A.3b around corner space, repeat A.3c until 1 chain space remains before corner, work A.3d around next chain space *, repeat from *-* 4 times in total on round – diagram A.3a shows how rounds begin and end and are worked in addition to A.3b/c/d. AT THE SAME TIME when piece measures approx. 36-38-40-42-44-46 cm / 14¼"-15"-15¾"-16½"-17¼"-18" x 36-38-40-42-44-46 cm / 14¼"-15"-15¾"-16½"-17¼"-18" work armholes as follows: Work A.3 as before until first corner, work around chain space as before. Now work chain stitches until middle of next side (i.e. in the middle between first and second corner) as follows: Work 1 chain stitch for every chain stitch/single crochet skipped. Then work pattern as before until the middle between 3rd and 4th corner. Now work chain stitches until 4th corner as follows: Work 1 chain stitch for every chain stitch/single crochet skipped, work around chain space in corner and the rest of round as before. On next round work A.3 as before over all stitches again (i.e. adjust pattern over armholes so that round is correct). Continue A.3 in the round (repeat the 9 rounds vertically) until square measures 68-70-72-74-76-78 cm / 26¾"-27½"-28⅜"-29⅛"-30"-30¾" x 68-70-72-74-76-78 cm / 26¾"-27½"-28⅜"-29⅛"-30"-30¾" (i.e. approx. 16 cm / 6¼" from armhole in all sizes) – adjust to finish after a round with treble groups. Cut the yarn and insert 1 marker in piece (between first and second corner). FRONT PIECE: Now work back and forth between first and second corner. NOTE! Work front pieces without increases. Read CROCHET INFO! Work A.4a around corner, repeat A.4b until 1 chain space remains before corner, work A.4c around this chain space and around corner. Continue pattern as shown in diagram and repeat A.4 vertically until row with treble groups has been worked 2 times in total vertically, then repeat only rows with chain spaces until piece measures approx. 19-20-21-22-23-24 cm / 7½"-8"-8¼"-8¾"-9"-9½" from marker, then work row with treble groups 1 time in all sizes. Piece now measures 21-22-23-24-25-26 cm / 8¼"-8¾"-9"-9½"-9¾"-10¼" from marker. Fasten off. Work the same way on the other side (i.e. work back and forth between third and fourth corner). SLEEVE: Work sleeve directly out from armhole on body. Work back and forth, top down and sew together when finished. Begin mid under sleeve and work as follows: Remember CROCHET INFO! Work A.4a around first chain space, repeat A.4b 15-16-17-18-19-20 times in total in width (adjust to distribute A.4b evenly along armhole, i.e. either 2 chain spaces must be worked around same chain space or skip 1 chain space), work A.4c around the last 2 chain spaces. Continue A.4 back and forth – AT THE SAME TIME when piece measures 4 cm / 1½" (adjust to work next row with chain stitches/single crochets) decrease 1 repetition in each side – read DECREASE TIP. Decrease like this approx. every 8-8-8-6-6-6 cm / 3"-3"-3"-2½"-2½"-2½" 3-3-3-4-4-4 times in total = 12-13-14-15-16-17 chain spaces of 6 stitches after last decrease. Continue until piece measures approx. 28 cm / 11" in all sizes - finish after a row with chain spaces. Fasten off. Work the other sleeve the same way in the other side of piece. ASSEMBLY: Sew the seems under the sleeves, sew in the outermost stitches and make sure that the seam does not tighten the piece. |
|||||||||||||||||||||||||||||||||||||||||||||||||||||||||||||||||||||||||||||||||||||
Diagram explanations |
|||||||||||||||||||||||||||||||||||||||||||||||||||||||||||||||||||||||||||||||||||||
|
|||||||||||||||||||||||||||||||||||||||||||||||||||||||||||||||||||||||||||||||||||||
 |
|||||||||||||||||||||||||||||||||||||||||||||||||||||||||||||||||||||||||||||||||||||
 |
|||||||||||||||||||||||||||||||||||||||||||||||||||||||||||||||||||||||||||||||||||||
 |
|||||||||||||||||||||||||||||||||||||||||||||||||||||||||||||||||||||||||||||||||||||
 |
|||||||||||||||||||||||||||||||||||||||||||||||||||||||||||||||||||||||||||||||||||||
Have you finished this pattern?Tag your pictures with #dropspattern #butterflyqueenjacket or submit them to the #dropsfan gallery. Do you need help with this pattern?You'll find 12 tutorial videos, a Comments/Questions area and more by visiting the pattern on garnstudio.com. © 1982-2026 DROPS Design A/S. We reserve all rights. This document, including all its sub-sections, has copyrights. Read more about what you can do with our patterns at the bottom of each pattern on our site. |
|||||||||||||||||||||||||||||||||||||||||||||||||||||||||||||||||||||||||||||||||||||
With over 40 years in knitting and crochet design, DROPS Design offers one of the most extensive collections of free patterns on the internet - translated to 17 languages. As of today we count 324 catalogs and 12137 patterns - 12127 of which are translated into English (US/in).
We work hard to bring you the best knitting and crochet have to offer, inspiration and advice as well as great quality yarns at incredible prices! Would you like to use our patterns for other than personal use? You can read what you are allowed to do in the Copyright text at the bottom of all our patterns. Happy crafting!
Post a comment to pattern DROPS 186-11
We would love to hear what you have to say about this pattern!
If you want to leave a question, please make sure you select the correct category in the form below, to speed up the answering process. Required fields are marked *.