
Popular categories
Looking for a yarn?


Comments / Questions (68)
![]() Celina wrote:
Celina wrote:
"Bei einer Länge von 30-31-32-33-34-35 cm am Anfang jeder Reihe, d.h. beidseitig, wie folgt abketten: 4 Maschen je 1-1-1-2-2-3 x, 2 Maschen 0-2-3-3-4-4 x und 1 Masche 2-2-2-3-4-6 x = 83-83-89-89-95-95 Maschen." Was heißt 4 Maschen 1x, 2 Maschen 2x abketten usw? Passiert das gleichzeitig in jeder Reihe oder zuerst in einer Reihe 4 Maschen beidseitig und in den nächsten 2 jeweils 2 Maschen beidseitig oder wie funktioniert das genau?
10.12.2024 - 19:42DROPS Design answered:
Liebe Celina, diese Maschen soll man am Anfang jeder Reihe (Hin- sowie Rückreihe) abketten damit beide Armlöcher (also beide Seiten) gleich sind, so wird man in die 2. Größe 4 Maschen am Anfang der 2 nächsten Reihe abketten (1 Mal 4 Maschen beidseitig), dann 2 Maschen am Anfang der 4 nächsten Reihe (2 Maschen 2 Mal beidseitig), 1 Masche am Anfang der 4 nächsten Reihen (1 Masche 2 Mal beidseitig) abketten. Viel Spaß beim Stricken!
11.12.2024 - 08:41
![]() Kirsten Berner wrote:
Kirsten Berner wrote:
Tusind tak for hjælpen. Nu tror jeg min bluse bliver flot. Venlig hilsen Kirsten
10.11.2024 - 14:32
![]() Kirsten Berner wrote:
Kirsten Berner wrote:
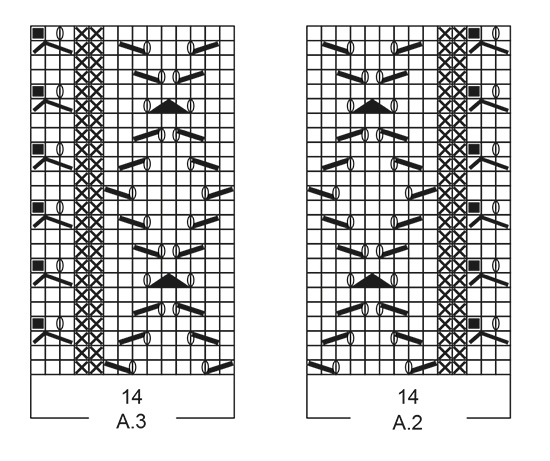
Når jeg strikke de sidste masker 3 pind i A.2 og A.3 tager jeg en maske løse af strikker 2 sammen og løfter den løse maske over. Så har jeg kun 1 maske tilbage . Iflg . opskriften skal jeg have 2 masker tilbage. Hvad gør jeg forkert.
07.11.2024 - 15:21DROPS Design answered:
Hej Kirsten. Symbolen på 3 pind i A.2 og A3 - där ska du sticka: "tag 1 maske løs af pinden som om den skulle strikkes ret, strik 2 ret, løft den løse maske over de 2 masker som blev strikket" (dvs ikke 2 ret sammen). Mvh DROPS design
08.11.2024 - 12:05
![]() Ksenya Kavva wrote:
Ksenya Kavva wrote:
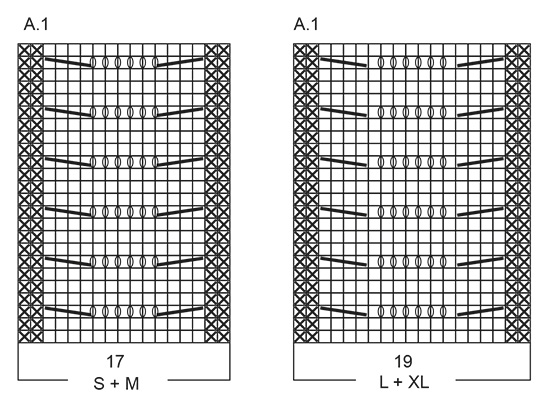
Hello! I am doing the back and it says: "Work pattern from the right side as follows: 3 stitches in garter stitch, knit 4-8-10-15-18-24 stitches, A.1, A.2, A.1, A.3, A.1, knit 4-8-10-15-18-24 stitches, 3 stitches in garter stitch". I understand how to read the diagrams for the wrong side, but does the "knit 4-8-10-15-18-24 stitches" section still get knit or purled from the wrong side? Thanks!
07.10.2024 - 04:18DROPS Design answered:
Hi Ksenya, The knitted stitches are purled from the wrong side. Happy knitting!
07.10.2024 - 06:58
![]() BRIGITTE Brigitte wrote:
BRIGITTE Brigitte wrote:
Comment faire les 4 manches groupées que ce soit à l'endroit ou à l'envers Le report ne me semble pas clair Merci d'avance
16.08.2024 - 17:21DROPS Design answered:
Bonjour Brigitte, je ne suis pas bien sûre de comprendre votre question, voulez-vous savoir comment tricoter 4 mailles ensemble à l'endroit/torse à l'endroit? Vous retrouverez cette technique sous l'onglet "vidéo" en haut de page; ces diminutions se font uniquement sur l'endroit (les diagrammes montrent tous les rangs, ceux sur l'endroit mais aussi ceux sur l'envers). Ou bien pensez-vous à autre chose? Dans ce cas, auriez-vous la gentillesse de reformuler pour que nous puissions vous aider? Merci pour votre compréhension.
19.08.2024 - 07:43
![]() Chester wrote:
Chester wrote:
Bonjour, Question sur les rangs envers : les mailles indiquées avec une croix se tricotent-elles à l'endroit sur les rangs envers et donc à l'envers sur les rangs ? Ce qui compliqueraient le tricot avec la succession de diagrammes différents . Je vous remercie
14.06.2023 - 20:42DROPS Design answered:
Bonjour Mme Chester, les cases blanches sont des mailles tricotées en jersey endroit, les croix en jersey envers; autrement dit, les croix se tricotent à l'envers sur l'endroit et à l'endroit sur l'envers (cf légende, 2ème symbole). On va tricoter par ex. A.1 ainsi sur l'endroit: 2 m env, 13-15-17 m end (cf diagramme en fonction de la taille), 2 m env et sur l'envers: 2 m end, 13-15-17 m env, 2 m end. Bon tricot!
15.06.2023 - 08:56
![]() Ángela Muñoz wrote:
Ángela Muñoz wrote:
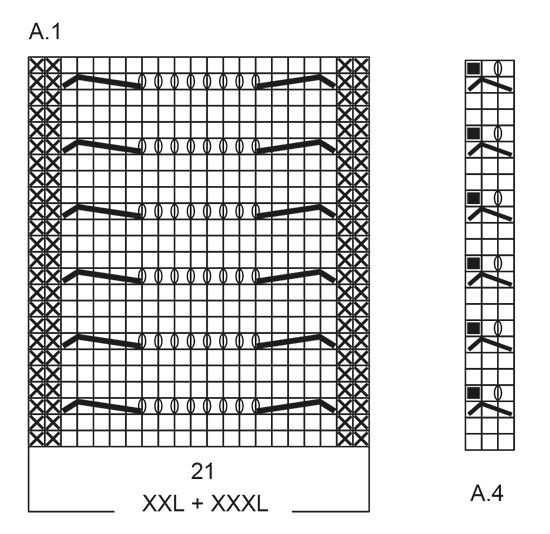
Hola, deseo saber hacia que lado se inclina el punto cuando se teje 4 puntos juntos retorcidos de derecho, ya que la línea del gráfico se ve inclinada hacia la izquierda, y al ver el vídeo de cómo se hace el punto, noto que queda inclinado hacia la derecha. De igual forma me gustaría saber la inclinación que queda al tejer 4 puntos juntos de derecho, porque veo la misma inconsistencia. Gracias
05.06.2023 - 06:08DROPS Design answered:
Hola Ángela, los puntos juntos de derecho se inclinan hacia la derecha. Los puntos de derecho retorcido se inclinan hacia la izquierda.
17.06.2023 - 18:15
![]() Chester wrote:
Chester wrote:
Bonjour, sur les diagrammes de ce modèle figure des cases avec des croix (maille envers sur l'endroit et maille endroit sur l'envers). Est-ce finalement on doit tricoter la maille à l'endroit sur le rang envers ? Merci
13.03.2023 - 19:50DROPS Design answered:
Bonjour Mme Chester, tout à fait, ces mailles avec une croix tous les rangs se tricotent en jersey envers. Bon tricot!
14.03.2023 - 09:28
![]() Céline wrote:
Céline wrote:
Bonjour, 1) J'aimerais faire ce pull plus long et plus évasé dans le bas. Comment faire ? 2) Est-ce possible de le faire à 2 couleurs ? Si oui, comment faire ? Vos suggestions? Merci
11.07.2022 - 20:01DROPS Design answered:
Bonjour Céline, nous ne sommes malheureusement pas en mesure de pouvoir adapter chacun de nos modèles à chaque demande, toutefois, vous pourrez peut-être vous inspirer d'un modèle de forme trapèze avec ce groupe de fils B (comme Merino Extra Fine) - Pour toute assistance complémentaire, n'hésitez pas à contacter votre magasin DROPS, même par mail ou téléphone. Bon tricot!
12.07.2022 - 08:45
![]() Helga Botn wrote:
Helga Botn wrote:
Hei ! Eg strikkar rendez-vous genser , og får ikkje antal masker til å stemme på A2 tredje omgang i mønsteret. Det skal vere 14 masker, men det blir berre 13. Forstår ikkje kva eg gjer gale.
03.03.2022 - 10:02DROPS Design answered:
Hei Helga. Når du strikker 3. pinne av diagrammet er det over 14 masker, men du minsker med 1 maske, slik at når du har strikket A.2 1 gang i bredden er det bare 13 masker. Om du ser på 4. pinne i samme diagram og den sorte prikken, så forteller den at dette er ingen maske = 13 masker i diagrammet. Men siden du øker i begynnelsen av denne pinnen, vil maskeantallet på 4. pinne øke igjen til 14 masker. mvh DROPS Design
07.03.2022 - 13:41
|
|||||||||||||||||||||||||||||||||||||
Rendez-vous#rendezvoussweater |
|||||||||||||||||||||||||||||||||||||
 |
 |
||||||||||||||||||||||||||||||||||||
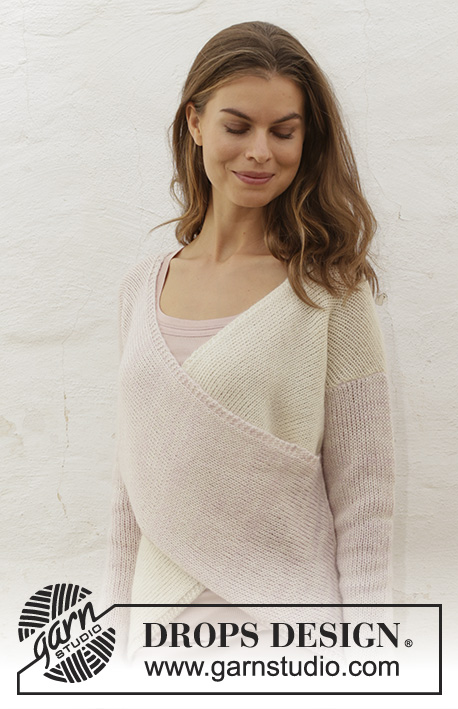
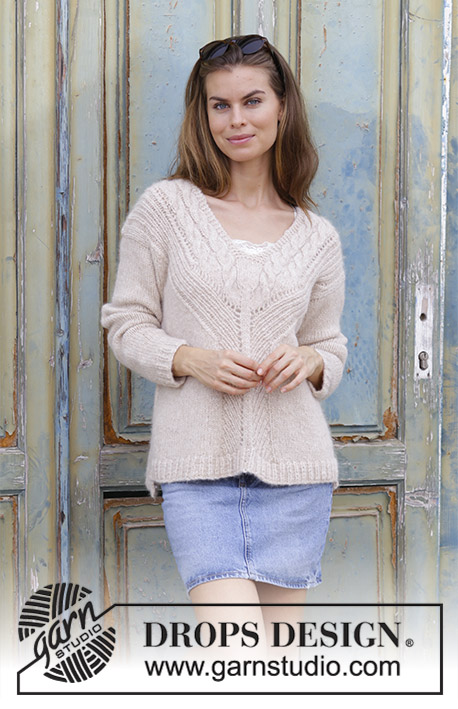
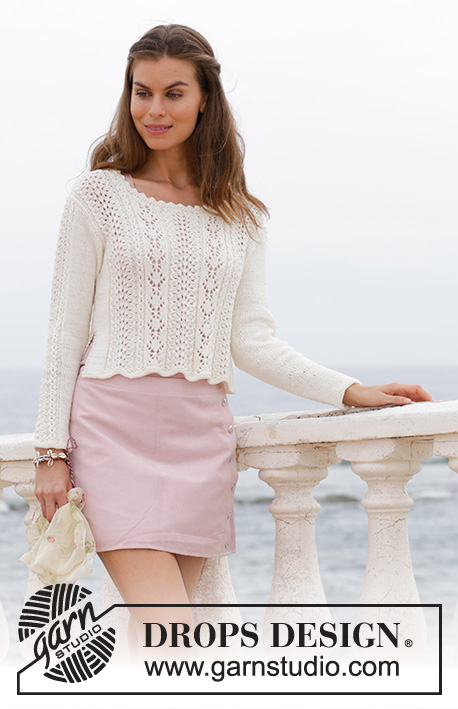
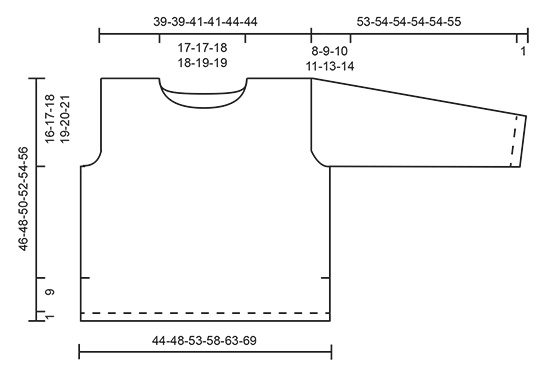
Knitted sweater with lace pattern and split in the sides. Sizes S - XXXL. The piece is worked in DROPS Merino Extra Fine.
DROPS 188-9 |
|||||||||||||||||||||||||||||||||||||
|
INFORMATION FOR THE PATTERN: RIDGE/GARTER STITCH (worked in the round): 1 ridge = 2 rounds. Knit 1 round and purl 1 round RIDGE/GARTER STITCH (worked back and forth): 1 ridge = Knit 2 rows. PATTERN: See diagrams A.1 to A.4. Choose diagram for your size (applies to diagram A.1). The diagrams show all the rows in the pattern seen from the right side. INCREASE TIP (for sleeves): All increases are made from the right side! Increase 1 stitch by making 1 yarn over between 2 stitches; on the next row, purl the yarn over twisted to avoid a hole. ---------------------------------------------------------- SWEATER: The piece is worked back and forth with circular needle and the parts are sewn together to finish. It is worked bottom up. The sleeves are worked back and forth with circular needle. BACK PIECE: Cast on (a little loosely) 93-101-111-121-133-145 stitches with circular needle size 4 mm / US 6 and Merino Extra Fine. Work 2 RIDGES – see description above. Work pattern from the right side as follows: 3 stitches in garter stitch, knit 4-8-10-15-18-24 stitches, A.1 (= 17-17-19-19-21-21 stitches), A.2 (= 14 stitches), A.1, A.3 (=14 stitches), A.1, knit 4-8-10-15-18-24 stitches, 3 stitches in garter stitch. Continue back and forth in this way until the piece measures 10 cm / 4". At the end of the next 2 rows, cast on 1 new stitch (marks the split) = 95-103-113-123-135-147 stitches. REMEMBER THE GAUGE! Now continue the pattern from the right side as follows: 1 stitch in garter stitch, knit 7-11-13-18-21-27 stitches, A.1 (= 17-17-19-19-21-21 stitches), A.2 (=14 stitches), A.1, A.3 (=14 stitches), A.1, knit 7-11-13-18-21-27 stitches, 1 stitch in garter stitch. Continue the pattern like this. When the piece measures 30-31-32-33-34-35 cm / 11¾"-12¼"-12½"-13"-13⅜"-13¾', bind off for armhole on every 2nd row in each side as follows: bind off 4 stitches 1-1-1-2-2-3 times, 2 stitches 0-2-3-3-4-4 times and 1 stitch 2-2-2-3-4-6 times = 83-83-89-89-95-95 stitches. Continue the pattern as follows: 1 stitch in garter stitch, knit 1, continue the pattern as before over the next 79-79-85-85-91-91 stitches, knit 1, 1 stitch in garter stitch. When the piece measures 43-45-47-49-51-53 cm / 17"-17¾"-18½"-19¼"-20"-21" bind off the middle 33-33-35-35-37-37 stitches for neck and each shoulder is finished separately. Continue by binding off 1 stitch on the next row from the neck = 24-24-26-26-28-28 stitches. When the piece measures 45-47-49-51-53-55 cm / ¾"-18½"-19¼"-20"-21"-21½" – adjust so that you finish after row 4, 8, 12, 16, 20 or 24 in the pattern, work 2 ridges over all stitches. Bind off, but make sure that the bind off edge is not tight. Work the other shoulder in the same way. FRONT PIECE: Cast on and work as for back piece. When the piece measures 30-31-32-33-34-35 cm / 11¾"-12¼"-12½"-13"-13⅜"-13¾" bind off for the armholes in the same way as for the back piece = 83-83-89-89-95-95 stitches. Now continue from the right side as follows: 1 stitch in garter stitch, knit 1, continue the pattern as before over the next 79-79-85-85-91-91 stitches, knit 1, 1 stitch in garter stitch. When the piece measures 36-38-40-41-43-45 cm / 14¼"-15"-15¾"-16"-17"-17¾" place the middle 17-17-19-19-21-21 stitches on 1 thread for neck and each shoulder is finished separately. Continue by binding off for the neck on each row from the neck as follows: bind off 3 stitches 2 times, 2 stitches 1 time and 1 stitch 1 time = 24-24-26-26-28-28 stitches. When the piece measures 45-47-49-51-53-55 cm / ¾"-18½"-19¼"-20"-21"-21½" – adjust so that you finish after row 4, 8, 12, 16, 20 or 24 in the pattern and that it matches the back piece, work 2 ridges over all stitches. Bind off, but make sure that the bind off edge is not tight. Work the other shoulder in the same way. SLEEVE: Cast on (a little loosely) 41-45-47-49-51-53 stitches with circular needle size 4 mm / US 6 and Merino Extra Fine. Work 2 ridges. Then work pattern from the right side as follows: 1 edge stitch in garter stitch, knit 6-8-8-9-9-10 stitches, purl 2 stitches, A.4 (= 3 stitches), A.1 – choose diagram for your size (= 17-17-19-19-21-21 stitches), A.4, purl 2 stitches, knit 6-8-8-9-9-10 stitches, 1 edge stitch in garter stitch. Continue like this back and forth. When the piece measures 8-8-8-7-5-5 cm / 3"-3"-3"-2¾"-2"-2" increase 1 stitch inside the 1 edge stitch in garter stitch in each side – read INCREASE TIP! Increase like this every 3-3-3-2-2-2 cm / 1"-1"-1"-¾"-¾"-¾" 8-8-8-11-14-15 times and every 4-4-2-3-3-1 cm / 1½"-1½"-¾"-1"-1"-½" 3-3-5-4-2-3 times = 63-67-73-79-83-89 stitches. When the piece measures 45-45-44-43-41-41 cm / 17¾"-17¾"-17¼"-17"-16"-16" bind off for sleeve cap at the beginning of each row in each side as follows: bind off 4 stitches 1 time, 2 stitches 4-4-5-5-5-5 times, 1 stitch 1-2-3-5-7-9 times and 2 stitches 5-5-5-5-5-5 times = 17-19-19-21-21-23 stitches. Bind off the remaining stitches. The sleeve measures approx. 53-54-54-54-54-55 cm / 21"-21¼"-21¼"-21¼"-21¼"-21½". Work the other sleeve in the same way. ASSEMBLY: Sew the shoulder seams with grafting stitches. Sew the sleeves into the body inside the bind off edge on the sleeves and the 1 edge stitch in garter stitch on the body. Sew the sleeve seam and then continue down the side as far as the split (sew inside the 1 edge stitch in garter stitch in each side). Repeat on the other side. NECK: The neck is worked in the round with short circular needle. Knit up from the right side approx. 95-105 stitches (including the stitches from the thread mid front) with short circular needle size 4 mm / US 6. Work 2 RIDGES in the round – see description above. Knit 1 round where the number of stitches is adjusted so that it is divisible by 3 + 2 (e.g. 95, 98, 101 or 104 stitches) - this is because you will bind off with picot as follows: Knit 1 stitch, (* insert the right needle between the first 2 stitches on the left needle (i.e. between the stitches on the needle, not through the stitches) make 1 yarn over the right needle, pull the yarn over through between the stitches and place it on the left needle *, work from *-* 2 more times (= 3 new stitches on the left needle). ** Knit the first stitch on the left needle, pass the first stitch on the right needle over the last stitch worked **), work from **-** a total of 6 times and repeat from (-) along the whole neck until there is 1 stitch left. Cut the strand and pull it through the last stitch. |
|||||||||||||||||||||||||||||||||||||
Diagram explanations |
|||||||||||||||||||||||||||||||||||||
|
|||||||||||||||||||||||||||||||||||||
 |
|||||||||||||||||||||||||||||||||||||
 |
|||||||||||||||||||||||||||||||||||||
 |
|||||||||||||||||||||||||||||||||||||
 |
|||||||||||||||||||||||||||||||||||||
Have you finished this pattern?Tag your pictures with #dropspattern #rendezvoussweater or submit them to the #dropsfan gallery. Do you need help with this pattern?You'll find 35 tutorial videos, a Comments/Questions area and more by visiting the pattern on garnstudio.com. © 1982-2026 DROPS Design A/S. We reserve all rights. This document, including all its sub-sections, has copyrights. Read more about what you can do with our patterns at the bottom of each pattern on our site. |
|||||||||||||||||||||||||||||||||||||


With over 40 years in knitting and crochet design, DROPS Design offers one of the most extensive collections of free patterns on the internet - translated to 17 languages. As of today we count 324 catalogs and 12290 patterns - 12280 of which are translated into English (US/in).
We work hard to bring you the best knitting and crochet have to offer, inspiration and advice as well as great quality yarns at incredible prices! Would you like to use our patterns for other than personal use? You can read what you are allowed to do in the Copyright text at the bottom of all our patterns. Happy crafting!
Post a comment to pattern DROPS 188-9
We would love to hear what you have to say about this pattern!
If you want to leave a question, please make sure you select the correct category in the form below, to speed up the answering process. Required fields are marked *.