
Popular categories
Looking for a yarn?


Comments / Questions (19)
![]() Sandra Imfeld wrote:
Sandra Imfeld wrote:
Guten Tag. Besten Dank für ihre Videos. Leider sind die wichtigen Hilfen nicht dabei. Mein Vorschlag wäre Grundarbeiten separat in einem Video zu schulen und für den bestimmten Artikel die genaue Anleitung zu zeigen. Es wäre wirklich viel hilfreicher. Herzliche Grüsse.
09.11.2024 - 11:17
![]() Anna wrote:
Anna wrote:
Mój pierwszy wzór od góry do dołu. Wyszło pięknie. Ładnie się układa.
02.09.2020 - 20:07
![]() Pat Miller wrote:
Pat Miller wrote:
Thank you once again for your answer - very helpful. 🙂
13.07.2020 - 12:17
![]() Pat Miller wrote:
Pat Miller wrote:
Many thanks for your last answer. I got 40 cm cable needles. I have another puzzle to do with increasing and decreasing 'evenly' at the neck. What does 'evenly' mean? I can't see how this relates to the TIP which only refers to 2 stitches either side of the marker. Is the increase/decrease meant to happen at regular intervals on the knit round, e.g. 12 stitches added at intervals , or are they to be added either side of the marker? Many thanks again, Pat
10.07.2020 - 18:47DROPS Design answered:
Dear Mrs Miller, evenly means they should have worked distributed on the whole round - read more how to here. Happy knitting!
13.07.2020 - 08:28
![]() Pat Miller wrote:
Pat Miller wrote:
Many thanks for your answer to my query about the 40 cm cable. Would a 60 cm circular needle be too long to use instead of a 40 cm one? I have 60 cm cables. Again, thanks. Pat
23.06.2020 - 12:00DROPS Design answered:
Dear Mrs Miller, a 60 cm cable needle might be too long for the cast on edge and neck edge - it might also be quite tricky to work magic loop with a 60 cm but it's not impossible neither, you might try. Happy knitting!
23.06.2020 - 16:14
![]() Pat Miller wrote:
Pat Miller wrote:
Hi, I'm a little puzzled. The pattern asks for DROPS DOUBLE POINTED NEEDLES AND CIRCULAR NEEDLE (40 and 80 cm). I can't see 40 cm needles referred to anywhere in the instructions. I don't have a 40 cm circular needle cable or needles and don't want to buy them if I don't have to. Could you please advise. Many thanks, Pat
23.06.2020 - 01:27DROPS Design answered:
Dear Mrs Miller, you will use the smaller (40 cm) needle for cast on and the first cm on yoke before you get enough stitches to use a larger one. If you already have a long one and do not want to buy another one, you can use instead the magic loop technique until there are enough stitches to fit the cable and work in the round as "normal". Happy knitting!
23.06.2020 - 09:14
![]() Karin Neumann wrote:
Karin Neumann wrote:
Hallo liebes Team, hätte da mal eine Frage zum hohen Kragen, dieser wird (angezogen) NICHT nach aussen gestülpt?? da ja sonst das Muster innen wäre? Sondern nach INNEN? oder hab ich da einen Denkfehler....
25.11.2019 - 07:46DROPS Design answered:
Liebe Frau Neumann, A.1 wird so wie gezeigt gestrickt, wenn der Kragen dann gefaltet/gestüpelt wird, sieht mann A.1 von der Rückseite. Viel Spaß beim stricken!
25.11.2019 - 10:41
![]() Silvia wrote:
Silvia wrote:
Buongiorno, il convertitore non mi indica come come sostituire i due filati con uno soltanto. Sarebbe possibile utilizzare un filo di cotton merino? Grazie per l'attenzione Silvia
03.10.2019 - 12:39DROPS Design answered:
Buongiorno Silvia, per questo modello può usare 2 capi di un filato del gruppo A o 1 capo di un filato del gruppo C. Cotton Merino appartiene al gruppo B : può comunque provare a fare un campione e vedere se corrisponde a quello indicato. Buon lavoro!
03.10.2019 - 13:45
![]() Gunilla wrote:
Gunilla wrote:
Kan jag sticka denna modell enbart i drops kid silk?
16.02.2019 - 20:27DROPS Design answered:
hei Gunilla. Ja du vil nok kunne strikke denne med 2 tråder Kid-Silk. Vi anbefaler likevel at du lager en strikkeprøve så du er sikker på at strikkefastheten din stemmer med oppskriften. God fornøyelse
21.02.2019 - 08:13
![]() Stéphanie wrote:
Stéphanie wrote:
Je suis en train de faire ce modèle et je bloque apères la mise en attente des mailles des manches. Je ne comprends pas où enlever les mailles de A2 et où faire le jeté. J’ai procédé comme suit : 1 jeté, les 2 premières mailles de A2 ensemble, ...., les 2 dernières mailles de A2 ensemble, 1 jeté. Je fais cela tous les 2 rangs sur les 4 diagrammes A2 ( dos et devants). Pouvez vous me dire si j’ai bien compris? Merci de votre aide
24.09.2018 - 15:23DROPS Design answered:
Bonjour Stéphanie, vous faites bien 1 jeté avant le 1er A.2 sur le côté, vous tricotez ensuite les mailles suivantes et vous diminuez 2 m au milieu sous la manche (au niveau du marqueur), vous tricotez le A.2 suivant et faites 1 jeté juste après = vous diminuez 2 m et vous augmentez 2 m soit 4 m au total augmentées/diminuées sur le tour. A.2 va disparaître progressivement car on diminue le nombre de mailles au milieu sous la manche et on augmente le nombre de mailles jersey du dos/devant. Bon tricot!
25.09.2018 - 09:04
|
|||||||
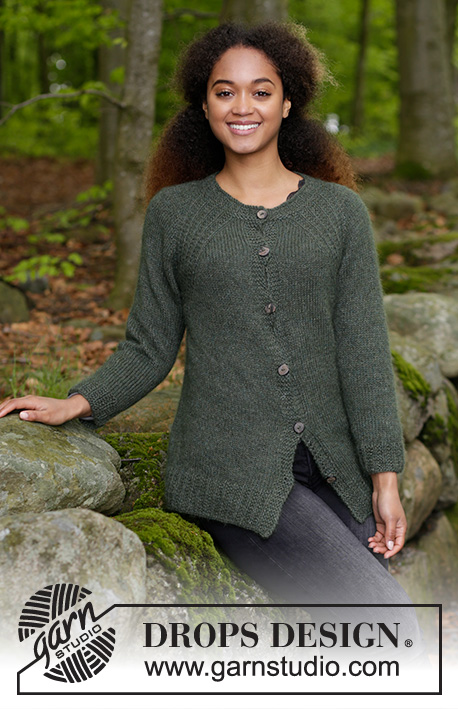
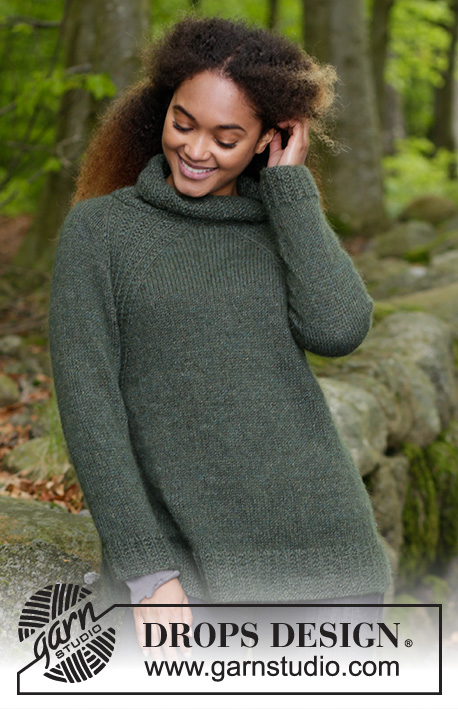
Woodland Walk#woodlandwalksweater |
|||||||
 |
 |
||||||
Knitted sweater with raglan, high collar and A-shape, knitted top down. Size: S - XXXL Piece is knitted in 1 strand DROPS Alpaca and 1 strand DROPS Kid-Silk.
DROPS 183-12 |
|||||||
|
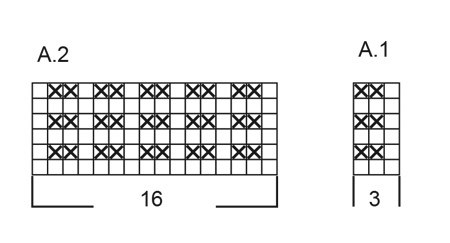
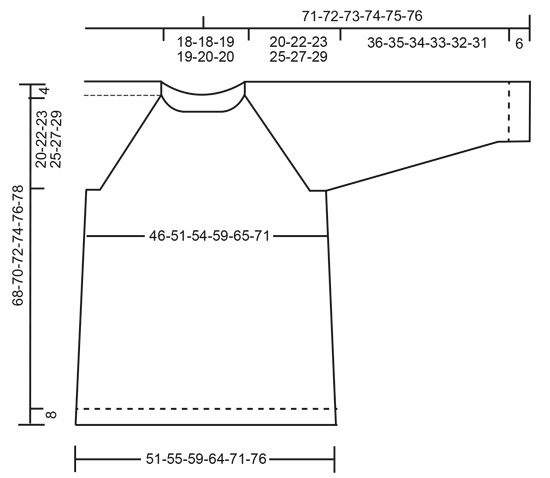
INFORMATION FOR PATTERN: DECREASE/INCREASE TIP (evenly): To calculate how to decrease/increase evenly, use the total number of stitches on row (e.g. 96 stitches) and divide stitches by number of decreased/increases to be done (e.g. 12) = 8. I.e. in this example knit approx. every 7th and 8th stitch together when decreasing. when increasing make 1 yarn over after approx. every 8th stitch, on next round knit yarn over twisted to avoid holes. PATTERN: See diagrams A.1 and A.2. Diagrams show all rows in pattern seen from the right side. RAGLAN: Increase for raglan on each side of A.2. Increase 1 stitch on each side of A.2 as follows (= 8 increased stitches per round with increase). Work until A.2, make 1 yarn over, work A.2, make 1 yarn over. On next round knit yarns over twisted to avoid holes. Then work the new stitches in stockinette stitch. INCREASE TIP (applies to sides of body): Work until 2 stitches remain before marker thread, 1 yarn over, knit 4 (marker thread is in the middle of these stitches), 1 yarn over. On next round knit yarn overs twisted to avoid holes. DECREASE TIP: Decrease 1 stitch on each side of marker thread as follows: Work until 3 stitches remain before marker thread and knit 2 together, knit 2 (marker thread is between these stitches), slip 1 stitch knitwise, knit 1, pass slipped stitch over stitch worked. ---------------------------------------------------------- SWEATER: Worked in the round on circular needle, top down from mid back. An elevation in the back of neck can be worked to get a better fit so that yoke is somewhat higher in the neck. This elevation can be skipped, to make the neck the same at the front and back - see explanation on elevation in pattern. After yoke work body in the round on circular needle. Work sleeves in the round on double pointed needles, top down. NECK: Cast on 96-96-99-102-105-111 stitches on circular needle size 4.5 mm / US 7 with 1 strand Alpaca and 1 strand Kid-Silk (= 2 strands). Knit 1 round. Work A.1 (= 3 stitches) in the round until piece measures 16 cm / 6¼". Knit 1 round while decreasing 12-8-5-3-2-3 stitches evenly - read DECREASE/INCREASE TIP = 84-88-94-99-103-108 stitches. Purl 1 round. Knit 1 round while increasing 2-2-12-11-11-10 stitches evenly = 86-90-106-110-114-118 stitches. Purl 1 round. Now work elevation in the back of neck or start to work the yoke if you don’t want an elevation. ELEVATION IN BACK OF NECK: Skip this paragraph if you do not want an elevation. Insert 1 marker at beginning of round = mid back. Begin from right side and knit 11-11-12-13-13-14 past marker, turn, tighten yarn and purl 22-22-24-26-26-28. Turn, tighten yarn and knit 33-33-36-39-39-42, turn, tighten yarn and purl 44-44-48-52-52-56. Turn, tighten yarn and knit 55-55-60-65-65-70, turn, tighten yarn and purl 66-66-72-78-78-84, turn, tighten yarn and knit until mid back. YOKE: Insert a marker here. NOW MEASURE PIECE FROM HERE! Switch to circular needle size 5 mm / US 8 and insert a marker thread at beginning of round (= mid back). Work pattern as follows: Knit 5-6-10-11-12-13 (= half back piece), A.2 (= 16 stitches), knit 1 (= sleeve), A.2, knit 10-12-20-22-24-26 (= front piece), A.2, knit 1 (= sleeve), A.2, knit 5-6-10-11-12-13. Continue pattern like this, AT THE SAME TIME increase for RAGLAN - see explanation above (= 8 stitches increased on round). Increase like this every other round 21-24-25-27-30-32 times = 254-282-306-326-354-374 stitches. After all increases for raglan continue size S with 2 rounds in stockinette stitch and pattern without increase for raglan, then continue in all sizes as follows: Piece measures 20-22-23-25-27-29 cm / 8"-8¾"-9"-9¾"-10½"-11½" from marker. If the piece is shorter than this, continue with pattern as before without increasing more stitches until piece have the correct measurements. Work next round as follows (continue pattern as before): Work 36-40-42-46-50-54 stitches (= half back piece), slip the next 55-61-69-71-77-79 stitches on a stitch holder (= sleeve), cast on 6-6-8-8-10-12 new stitches on needle (= under sleeve), work the next 72-80-84-92-100-108 stitches (= front piece), slip the next 55-61-69-71-77-79 stitches on a stitch holder (= sleeve), cast on 6-6-8-8-10-12 new stitches on needle (= under sleeve), work the remaining 36-40-42-46-50-54 stitches (= half back piece). BODY: = 156-172-184-200-220-240 stitches. NOW MEASURE THE PIECE FROM HERE! Insert a marker thread in each side (= the middle of the new stitches cast-on under each sleeve = 3-3-4-4-5-6 new stitches on each side of marker thread). Continue in the round with stockinette stitch and continue A.2 over the 10-10-7-8-8-9 stitches in the remaining pattern on front/back piece but on every other row make 1 yarn over at the edge of every A.2 (= towards mid front and mid back) and knit 2 together inside every A.2 (towards the sides). Number of stitches will stay the same but stitches in A.2 will gradually disappear and there will be more stitches in stockinette stitch. When all stitches in A.2 are gone, continue with stockinette stitch over all stitches, AT THE SAME TIME on first round increase 1 stitch on each side of marker thread in each side – read INCREASE TIP. Increase like this every 14th-14th-14th-14th-12th-12th round 4-4-4-4-5-5 times = 172-188-200-216-240-260 stitches. When piece measures 36-36-37-37-37-37 cm / 14¼"-14¼"-14½"-14½"-14½"-14½"", increase 14-10-13-15-12-16 stitches evenly = 186-198-213-231-252-276 stitches. Switch to circular needle size 4.5 mm / US 7. Work A.1 in the round for 8 cm / 3⅛". Bind off by knitting. Piece measures approx. 68-70-72-74-76-78 cm / 26¾"-27½"-28⅜"-29⅛"-30"-30¾" from shoulder and down. SLEEVE: Worked in the round on double pointed needles. Slip the 55-61-69-71-77-79 stitches from stitch holder in one side of piece on double pointed needles size 5 mm / US 8 and cast in addition on 6-6-8-8-10-12 new stitch mid under sleeve = 61-67-77-79-87-91 stitches on needles. Insert a marker thread in the middle of the new stitches under sleeve – NOW MEASURE PIECE FROM HERE. Work in stockinette stitch in the round at the same time decrease stitches in A.2 the same way as on body (number of stitches stays the same). When stitches in A.2 have been decreased, work stockinette stitch over all stitches. When piece measures 6 cm / 2⅜" in all sizes, decrease 2 stitches mid under sleeve - read DECREASE TIP. Decrease like this every 6th-5th-3rd-3rd-3rd-2nd round 12-13-18-18-20-22 times in total = 37-41-41-43-47-47 stitches. When piece measures 36-35-34-33-32-31 cm / 14¼"-13¾"-13½"-13"-12½"-12¼", increase 5-4-4-2-1-1 stitches evenly = 42-45-45-45-48-48 stitches. Switch to double pointed needles size 4.5 mm / US 7. Work A.1 over all stitches. When piece measures 42-41-40-39-38-37 cm / 16½"-16"-15¾"-15¼"-15"-14½", bind off all stitches by knitting. Work the other sleeve the same way. ASSEMBLY: Sew the openings under the sleeves |
|||||||
Diagram explanations |
|||||||
|
|||||||
 |
|||||||
 |
|||||||
Have you finished this pattern?Tag your pictures with #dropspattern #woodlandwalksweater or submit them to the #dropsfan gallery. Do you need help with this pattern?You'll find 29 tutorial videos, a Comments/Questions area and more by visiting the pattern on garnstudio.com. © 1982-2026 DROPS Design A/S. We reserve all rights. This document, including all its sub-sections, has copyrights. Read more about what you can do with our patterns at the bottom of each pattern on our site. |
|||||||


With over 40 years in knitting and crochet design, DROPS Design offers one of the most extensive collections of free patterns on the internet - translated to 17 languages. As of today we count 324 catalogs and 12290 patterns - 12280 of which are translated into English (US/in).
We work hard to bring you the best knitting and crochet have to offer, inspiration and advice as well as great quality yarns at incredible prices! Would you like to use our patterns for other than personal use? You can read what you are allowed to do in the Copyright text at the bottom of all our patterns. Happy crafting!
Post a comment to pattern DROPS 183-12
We would love to hear what you have to say about this pattern!
If you want to leave a question, please make sure you select the correct category in the form below, to speed up the answering process. Required fields are marked *.