
Popular categories
Looking for a yarn?


Comments / Questions (30)
![]() Will wrote:
Will wrote:
Het Raglan breien is dat om de naald of iedere nld. Heb het iedere nld gedaan maar trui is bij raglan veel te nauw.
11.02.2019 - 14:57DROPS Design answered:
Dag Will,
Je mindert voor de raglan iedere andere naald 25-29-31-33-33-39 keer in totaal = 120-124-144-152-176-176 steken. Zo staat dit ook beschreven onder 'PAS'
13.02.2019 - 11:16
![]() Lechevallier wrote:
Lechevallier wrote:
Finalement j'ai réussi a récupérer mon pull. Voici ma recette: Faire bouillir à gros bouillons le pull pendant dix minutes dans une casserole. Vous pouvez y aller, la laine ne feutre quasiment pas. Puis séchez le pull à plat avec un sèche-cheveux très chaud (ça prend environ 2 heures). Au final, le pull retrouve ses dimensions, de la tenue... et en plus il est propre. Cordialement
10.12.2018 - 13:30
![]() Lechevallier wrote:
Lechevallier wrote:
Alors j'ai pris mon pull, je l'ai mis dans une casserole d'eau et je l'ai fait bouillir pendant environ 10 minutes. Puis je l'ai mis à plat et je l'ai séché au sèche cheveux pour essayer de lui donner du gonflant. Résultat...un pull très propre! La laine une fois détendue est très stable, pas moyen de la faire feutrer. Je conseille de tricoter ce pull avec des aiguilles plus fines (3 ou 3,5), ou d'associer à la laine un fil qui lui donne de la tenue. Cordialement
10.12.2018 - 11:01
![]() Lechevallier wrote:
Lechevallier wrote:
C'est un très joli pull. Mais je l'ai lavé à froid à la main et séché à plat. Il s'est complètement détendu et est devenu gigantesque. Y a t'il une solution?
09.12.2018 - 13:57DROPS Design answered:
Chere Mme Lechevallier! Essayez de le laver avec de l’eau plus chaude que 40oC. Suivez les indices se referent a l’entratien de la laine de la carte de couleurs de Merino Extra Fine ICI. Bon courage!
10.12.2018 - 00:05
![]() Birthe wrote:
Birthe wrote:
Jag tycker minskningen i halskant verkar konstig (osymetrisk) . Från övergång mellan v. ärm och bakstycke stickas 40 maskor. Då är man mitt fram och minskar följande 20 maskorna så att de blir 10. Nästa minskning blir från mitt bak fram till h. ärm. Stämmer detta?
13.10.2018 - 20:04DROPS Design answered:
Hej Birthe, det ser ut som at du skall börja med att sticka de 20 m över ärmen ihop 2 och 2, sedan minskar du de andra över framstycket jämt fördelat. Lycka till!
29.10.2018 - 15:34
![]() Birthe wrote:
Birthe wrote:
Förhöjningar brukar jag (som i er video) sticka fler maskor för varje varv. Detta mönster har färre maskor för varje varv. Det blir väl ungefär det samma. Finns det någon anledning att göra på ena eller andra sättet?
13.10.2018 - 20:03DROPS Design answered:
Hei Birthe. Dette avhenger av om du strikekr overnfra og ned eller nedenfra og opp. Når du strikker ovenfra og ned strikkes forhøyningen over fler og fler masker for hver gang. Når arbeidet strikkes nedenfra og opp (slik som denne), må forhøyningen strikkes over ferre og ferre masker for hver gang - for et penest resultat. God fornøyelse.
22.10.2018 - 11:38
![]() Stahn wrote:
Stahn wrote:
Hallo, ist es wirklich richtig, dass der Bund soviel Maschen mehr hat? Normalerweise strickt man das Bündchen doch mit weniger Maschen als das Hauptteil, damit es schön anliegt... Gruß Inken
08.10.2018 - 03:04DROPS Design answered:
Liebe Inken, damit die Bündchen nicht so eng sind, schlägt man mehr Maschen an, dann wird diese Maschenanzahl abgenommen wenn man glatt rechts (und Muster) strickt. Viel Spaß beim stricken!
08.10.2018 - 09:53
![]() Veronique wrote:
Veronique wrote:
Heb een vraag met patroon telegram 185.11. Ben de mouwen aan het breien en moet nu gaan meerderen. Maar als je meerdert komt het patroon toch niet meer uit. Er staat ook in ,brei de steken in A.3 en de gemeerderde steken in A.1. Over welke steken hebben ze het in A .3? Begrijp het meerderen het wel. Maar mijn tekening komt dan niet meer uit bij patroon A.a op de 25ste rij. Ben de maat S aan het breien. Mvg
25.03.2018 - 12:22DROPS Design answered:
Hallo Veronique, Als je aan het meerderen bent voor de mouw terwijl je patroon A.1 aan het breien bent, dan brei je de meerderingen in patroon A.3 en als je aan het meerderen bent in de mouw terwijl je A.1a aan het breien bent, dan brei je de meerderingen geleidelijk in patroon A.1a mee, dus als er voldoende steken voor zijn. Het gaat erom dat patroon A.1a mooi doorloopt.
26.03.2018 - 11:06
![]() Inger wrote:
Inger wrote:
Får ikke tekst og diagram til å stemme. Fins det noen rettelse?
19.01.2018 - 21:39DROPS Design answered:
Hei Inger. Vi har ingen rettelser på denne. Men opplys gjerne hva du mener er problemmet/hvilket diagram og hvilken str du strikker, så skal vi se på det. mvh Drops design
24.01.2018 - 09:53
![]() Britt-mari Brandt wrote:
Britt-mari Brandt wrote:
Opskriften har 20 m for meget når man er færdig med at tage ind til raglan jeg strikker str xx l
21.11.2017 - 15:35
|
|||||||
Telegram#telegramsweater |
|||||||
|
|
|||||||
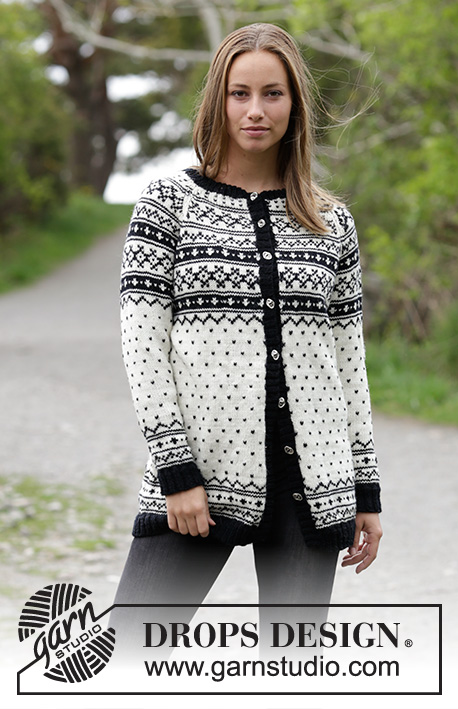
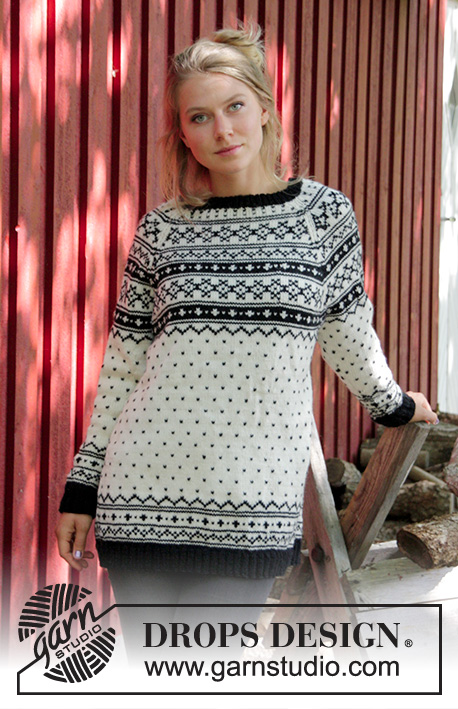
Knitted sweater with multi-colored pattern and raglan for men. Size: S - XXXL Piece is knitted in DROPS Merino Extra Fine.
DROPS 185-11 |
|||||||
|
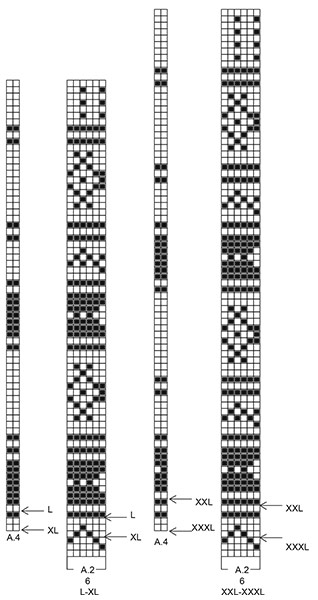
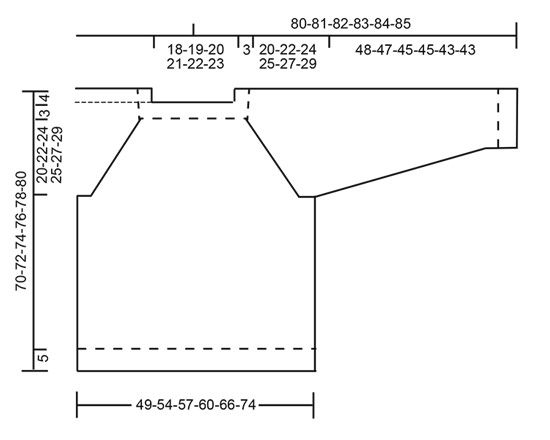
INFORMATION FOR PATTERN: PATTERN: See diagrams A.1 to A.4. Work the entire pattern in stockinette stitch. Choose diagram for your size. KNITTING TIP: To avoid the knitting gauge to tighten when working pattern, it is important not to tighten the strands on back side of piece. Switch to a higher needle number when working pattern if the pattern is somewhat tight. DECREASE TIP: To calculate how to decrease evenly, use the total number of stitches on row (e.g. 272 stitches) and divide stitches by number of decreases to be done (e.g. 44) = 6.1. In this example knit approx. every 5th and 6th stitch together. INCREASE TIP: Work until 2 stitches remain before marker thread, make 1 yarn over (= 1 stitch increased), knit 4 (marker thread is in the middle of these stitches), make 1 yarn over (= 1 stitch increased). Knit yarn over twisted on next round to avoid hole. RAGLAN: Decrease for raglan on each side of every A.4 as follows: Decrease 1 stitch after A.4 as follows: Slip last stitch in A.4, knit 1, pass slipped stitch over (= 1 stitch decreased). Decrease 1 stitch before A.4 as follows: Work until 1 stitch remains before A.4, knit the next 2 stitches together (= 1 stitch decreased). I.e. decrease 2 stitches at every A.4 and 8 stitches in total on round. ---------------------------------------------------------- SWEATER: Worked in the round on circular needles. Sleeves are worked in the round on double pointed needles, switch to a short circular needle when needed. Slip the parts together and work yoke in the round. BODY: Cast on 248-272-288-300-332-372 stitches on circular needle size 3 mm / US 2.5 with Black. Work rib (= knit 2/purl 2). When piece measures 5 cm / 2", switch to circular needle size 4 mm / US 6 and work 1 round in stockinette stitch while decreasing 44-44-48-48-56-60 stitches evenly - read DECREASE TIP = 204-228-240-252-276-312 stitches. Work 1 round as follows: Insert 1 marker in first stitch, knit 101-113-119-125-137-155 stitches, insert 1 marker in next stitch, knit the rest of round. Markers shows sides of garment. Then work A.1 (= 6 stitches) over all stitches (= 34-38-40-42-46-52 repetitions in width) - read KNITTING TIP. REMEMBER THE GAUGE! When A.1 has been worked 1 time vertically, repeat A.1a vertically. When piece measures 39-41-41-43-41-43 cm / 15¼"-16"-16"-17"-16"-17", work A.2 over A.1. When you have worked up to arrow in A.2, work next round as follows: bind off 4 stitches, work the next 95-107-113-119-131-149 stitches as before, bind off the next 7 stitches, work the next 95-107-113-119-131-149 stitches as before and bind off the last 3 stitches. Piece measures approx. 43-43-43-44-44-44 cm / 17"-17"-17"-17¼"-17¼"-17¼". Put piece aside and work the sleeves. SLEEVES: Work in the round on double pointed needles, switch to a short circular needle when needed. Cast on 48-52-56-60-64-64 stitches on double pointed needles size 3 mm / US 2.5. Work rib (= knit 2/purl 2). When piece measures 5 cm / 2", switch to double pointed needles size 4 mm / US 6 and work 1 round in stockinette stitch while decreasing 6-8-8-10-12-10 stitches evenly = 42-44-48-50-52-54 stitches. Insert 1 marker thread at beginning of round (= mid under sleeve). Work 1 round with black, then work next round as follows: Work 0-1-0-1-2-0 stitches A.3, work A.1 over the next 42-42-48-48-48-54 stitches (= 7-7-8-8-8-9 repetitions), finish with 0-1-0-1-2-0 stitches A.3. When A.1 has been worked 1 time vertically, repeat A.1a. When piece measures 8-10-10-10-8-6 cm / 3"-4"-4"-4"-3"-2 ½", increase 1 stitch on each side of marker thread (= 2 stitches increased) - READ INCREASE TIP! Increase like this every 2½-2-1½-1½-1½-1½ cm / ⅞"-¾"-½"-½"-½"-½" 15-17-21-23-22-24 times in total = 72-78-90-96-96-102 stitches. Work stitches in A.3 and the increased stitches into pattern A.1. When piece measures 44-45-43-44-40-41 cm / 17¼"-17¾"-17"-17¼"-15¾"-16", work A.2 over A.1. When all stitches under sleeve have been increased, work A.2 12-13-15-16-16-17 times in total in width. When you have worked up to arrow in A.2, work next round as follows: bind off 4 stitches, work the next 65-71-83-89-89-95 stitches as before, bind off the last 3 stitches. Sleeve measures approx. 48-47-45-45-43-43 cm / 19"-18½"-17¾"-17¾"-17"-17". Make another sleeve the same way. YOKE: Slip sleeves on to same circular needle as body where armholes were bound off = 320-356-392-416-440-488 stitches. Begin round in transition between right sleeve and back piece. Work as follows: Work A.4 (= 2 stitches, begin at arrow marking your size), continue pattern as before over the next 91-103-109-115-127-145 stitches, A.4 (= back piece), work pattern as before over the next 65-71-83-89-89-95 stitches (= sleeve), A.4, continue pattern as before over the next 91-103-109-115-127-145 stitches, A.4 (= front piece), work pattern as before over the next 65-71-83-89-89-95 stitches (= sleeve). Work 6-4-5-4-10-3 rounds with pattern, then decrease for RAGLAN – see explanation above, every other round 25-29-31-33-33-39 times in total = 120-124-144-152-176-176 stitches. When A.2 has been worked 1 time vertically, switch to black. Work 1 round in black. Yoke measures approx. 20-22-24-25-27-29 cm / 8"-8¾"-9½"-9¾"-10½"-11½". An elevation in the back of neck can be worked to get a better fit so that yoke is somewhat higher in the neck. This elevation can be skipped, to make the neck the same at the front and back. Work elevation in the back of neck or start to work the neck edge if you don’t want an elevation. ELEVATION IN BACK OF NECK: Skip this paragraph if you do not want an elevation. Insert 1 marker thread at beginning of round (this marks the beginning of rounds after elevation has been worked). Work until mid back, insert 1 marker. Begin from right side with black and knit as before until 30-30-34-34-40-40 stitches have been worked past marker, turn, tighten yarn and purl 60-60-68-68-80-80. Turn, tighten yarn and knit 54-54-61-61-72-72, turn, tighten yarn and purl 48-48-54-54-64-64. Turn, tighten yarn and knit 42-42-48-48-56-56, turn, tighten yarn and purl 36-36-42-42-48-48. Turn, tighten yarn and knit 30-30-35-35-40-40, turn, tighten yarn and purl 24-24-28-28-32-32, turn, tighten yarn and work mid back. Cut the yarn. Round now begins at the marker thread, i.e. in the transition between right sleeve and back piece. NECK EDGE: On next round decrease as follows: * Knit 40-42-52-56-68-68 and decrease 0-0-8-8-18-16 stitches evenly, work the next 20 stitches together 2 by 2 (= 10 stitches decreased) *, work from *-* 2 times in total = 100-104-108-116-120-124 stitches. Switch to double pointed needles size 3 mm / US 2.5. Work next round as follows: * Knit 2, purl 2, knit 1, make 1 yarn over (= 1 stitch increased), purl 2, knit 2, make 1 yarn over (= 1 stitch increased), purl 1 *, work from *-* until 0-4-8-16-0-4 stitches remain, work rib (= knit 2/purl 2) over the remaining stitches = 120-124-128-136-144-148 stitches. Work yarn overs twisted in rib (i.e. knit 2/purl 2) on next round to avoid holes. When rib measures 3 cm / 1", bind off knit over knit and purl over purl. ASSEMBLY: Sew opening under each sleeve in outer loops of edge stsiches. |
|||||||
Diagram explanations |
|||||||
|
|||||||
 |
|||||||
 |
|||||||
 |
|||||||
Have you finished this pattern?Tag your pictures with #dropspattern #telegramsweater or submit them to the #dropsfan gallery. Do you need help with this pattern?You'll find 30 tutorial videos, a Comments/Questions area and more by visiting the pattern on garnstudio.com. © 1982-2026 DROPS Design A/S. We reserve all rights. This document, including all its sub-sections, has copyrights. Read more about what you can do with our patterns at the bottom of each pattern on our site. |
|||||||


With over 40 years in knitting and crochet design, DROPS Design offers one of the most extensive collections of free patterns on the internet - translated to 17 languages. As of today we count 324 catalogs and 12290 patterns - 12280 of which are translated into English (US/in).
We work hard to bring you the best knitting and crochet have to offer, inspiration and advice as well as great quality yarns at incredible prices! Would you like to use our patterns for other than personal use? You can read what you are allowed to do in the Copyright text at the bottom of all our patterns. Happy crafting!
Post a comment to pattern DROPS 185-11
We would love to hear what you have to say about this pattern!
If you want to leave a question, please make sure you select the correct category in the form below, to speed up the answering process. Required fields are marked *.