
Popular categories
Looking for a yarn?


Comments / Questions (29)
![]() Paola wrote:
Paola wrote:
Praticamente sto per lavorare la spalla a sinistra del motivo e facendo la riga a rovescio e poi intrecciando le due maglie, mi trovo il filo a sx e quindi, girando il lavoro per la riga dopo da fare a diritto, ho due maglie intrecciate e poi iniziano le maglie da lavorare. Come faccio?
20.11.2017 - 23:02DROPS Design answered:
Buonasera Paola. Per lo scollo, deve intrecciare le maglie quando il ferro inizia dallo scollo, in modo da non dover tagliare il filo. Nel suo caso, intreccia le prime 2 maglie del ferro lavorato sul diritto del lavoro (e non le ultime due del ferro sul rovescio) e prosegue con le restanti maglie sul ferro. Buon lavoro!
20.11.2017 - 23:29
![]() Paola wrote:
Paola wrote:
Sono alla riga in cui ho messo le maglie centrali in sospeso: partendo da destra ho lavorato a m rasata fino al motivo, messo le 14 maglie centrali in attesa, rilavorato le maglie dopo il motivo. Ora devo girare il lavoro e lavorare a rovescio e intrecciare le ultime due maglie.
20.11.2017 - 23:01
![]() Paola wrote:
Paola wrote:
Scusate l'ennesima domanda: ho finito la parte degli aumenti e devo fare gli intrecci per gli scalfi, per poi iniziare a lavorare separatamente. Però non capisco perchè il dietro per la taglia xl ha solo 106 maglie e il davanti ne ha 118, visto e considerato che il secondo marcapunti all'inizio del lavoro era stato messo a metà dei punti totali....quindi dovrei avere le maglie distribuite equamente tra davanti e dietro.
16.11.2017 - 11:06DROPS Design answered:
Buongiorno Paola. Solo sul davanti sono state aumentate le 12 maglie del diagramma A1. Questo giustifica la differenza nel numero di maglie tra il davanti e il dietro. Buon lavoro!
16.11.2017 - 11:40
![]() Paola wrote:
Paola wrote:
Per il collo: le istruzioni dicono riprendere tra le 78/100 maglie...come mi regolo con una taglia xl? Anche perchè poi bisogna portare le maglie a 84....grazie
15.11.2017 - 10:49DROPS Design answered:
Buongiorno Paola, non c'è un numero definito di maglie da riprendere per ogni taglia, anche perché poi appunto vengono portate a 84. Può riprendere un numero intermedio di maglie. Buon lavoro!
15.11.2017 - 15:50
![]() Paola wrote:
Paola wrote:
Mi è venuto un dubbio: io sto lavorando la taglia XL. Il primo aumento, va fatto da 4 cm totali dall'inizio del lavoro o da 4 cm totali dall'inizio del diagramma A2?
12.11.2017 - 00:50DROPS Design answered:
Buongiorno Paola. I 4 cm vanno misurati dall'inizio del lavoro. Buon lavoro!
12.11.2017 - 08:29
![]() Paola wrote:
Paola wrote:
Domanda prima di procedere oltre e sbagliare: ho iniziato gli aumenti, ma facendo i calcoli, 3 aumenti sono da fare lavorando in tondo, mentre altri due sono da fare quando si separe il dritto dal retro. Come faccio gli aumenti per il dritto e il retro separati?
12.11.2017 - 00:39DROPS Design answered:
Buongiorno Paola. Gli aumenti sono tutti prima degli scalfi. Per la taglia XL, aumenta quando il lavoro misura, 4, 13, 22, 31 e 40 cm. Divide il davanti dal dietro a 44 cm. Buon lavoro!
12.11.2017 - 08:34
![]() Paola wrote:
Paola wrote:
Sto iniziando il diagramma A2. Non riesco a capire questa parte: ALLO STESSO TEMPO, quando il lavoro misura 5-6-7-4-5-6 cm, aumentare 1 maglia da ciascun lato dei segni ai lati - VEDERE IL SUGGERIMENTO PER GLI AUMENTI! Aumentare in questo modo ogni 8-8-8-9-9-9 cm 5 volte in tutto.
11.11.2017 - 10:17DROPS Design answered:
Buongiorno Paola. P.es per la taglia S, quando il lavoro misura 5 cm, aumenta 1 m ai due lati (dove ci sono i segni), come spiegato nel paragrafo: suggerimento per gli aumenti. Quindi lavora fino alla maglia prima del segno, 1 maglia gettata, 2 maglie diritto (il segno si trova tra queste due maglie), 1 maglia gettata. Aumenta in questo modo ogni 8 cm per 5 volte. Verifichi che il numero delle maglie sia corretto. Buon lavoro!
11.11.2017 - 12:30
![]() Paola wrote:
Paola wrote:
Devo lavorare la seconda riga del diagramma A1, ma non capisco da dove partire. Nella prima riga ho fatto i gettati, per cui ho 200 maglie totali + 6 gettati...nella seconda riga del diagramma a1 ho 46 maglie...aiuto!
11.11.2017 - 01:06DROPS Design answered:
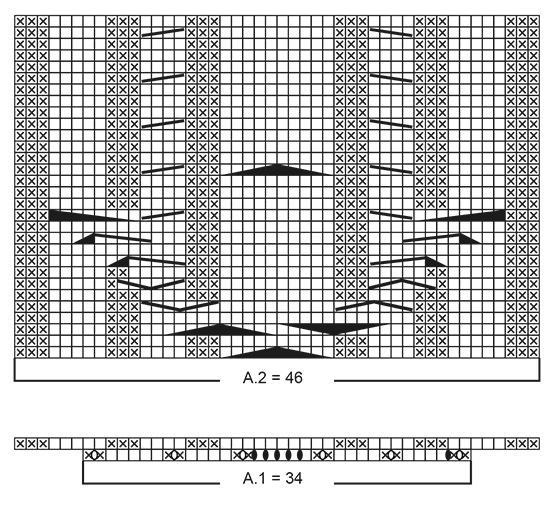
Buongiorno Paola. Nella prima riga del diagramma A1 i gettati sono in tutto 12. Trova una maglia gettata tra ognuna delle due maglie lavorate a rovescio. È un pallino tondo vuoto tra le due X. Se riesce ad ingrandire il diagramma, risulta un po' più visibile. Buon lavoro!
11.11.2017 - 06:57
![]() Paola wrote:
Paola wrote:
Devo fare il 1 giro a diritto con le diminuzioni. Quello che voglio capire è: partendo dal mio marcapunti che mi da l'inizio del giro e che dovrebbe corrispondere al lato sinistro del maglione dove andrebbe una cucitura se fosse fatto ai ferri normali, le diminuzioni per arrivare al centro sulla parte davanti, le faccio che tendono verso destra e quindi 2 maglie lavorate assieme normalmente, o che tendono verso sinistra e quindi 2 maglie lavorate assieme a ritorto? Grazie
10.11.2017 - 20:48DROPS Design answered:
Buonasera Paola, solitamente per le diminuzioni si lavorano 2 maglie insieme a diritto, ma può diminuire nel modo che esteticamente preferisce. Buon lavoro!
10.11.2017 - 22:28
|
|||||||||||||||||||||||||||||||||||||||||||||||||
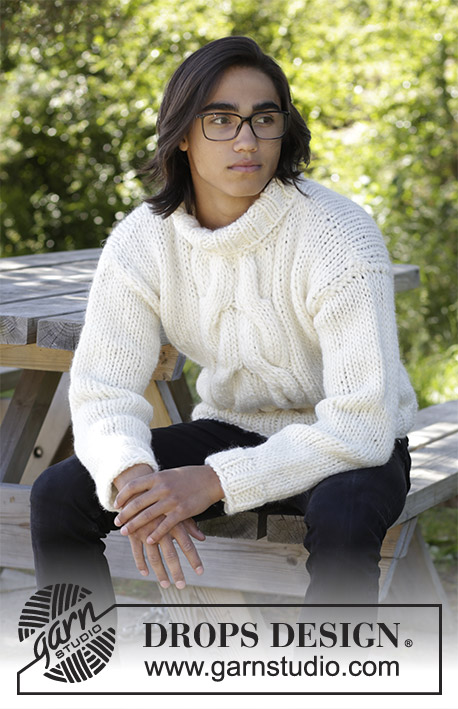
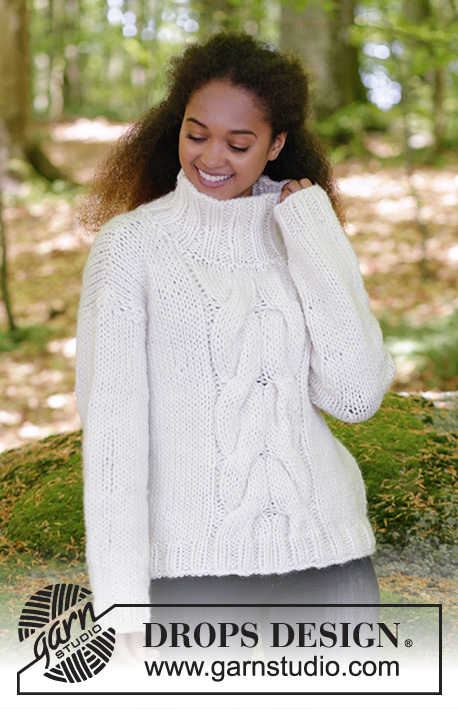
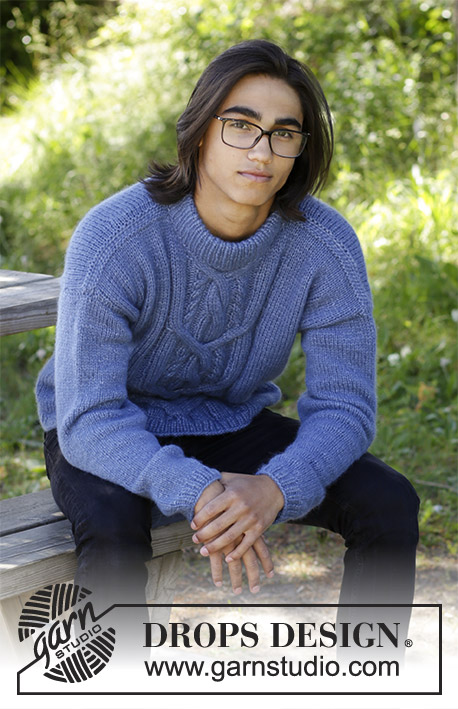
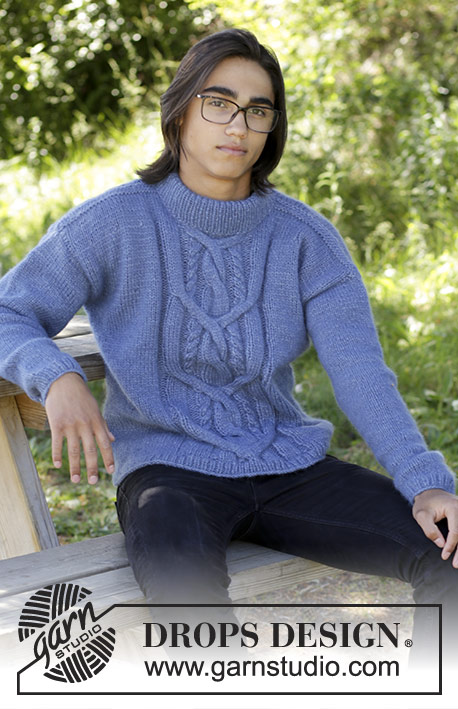
Winter Love#winterlovesweater |
|||||||||||||||||||||||||||||||||||||||||||||||||
 |
 |
||||||||||||||||||||||||||||||||||||||||||||||||
Knitted sweater with cable at the front for men. Size: S - XXXL Piece is knitted in DROPS Air.
DROPS 185-5 |
|||||||||||||||||||||||||||||||||||||||||||||||||
|
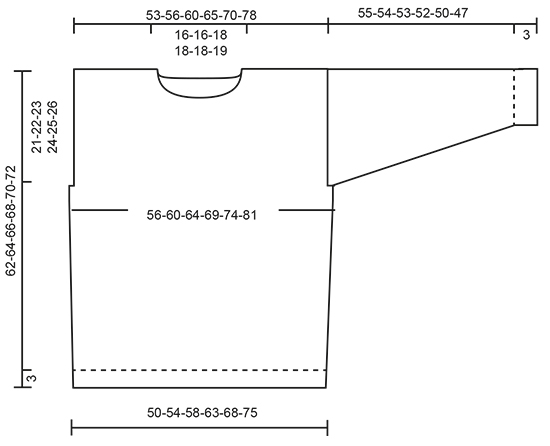
INFORMATION FOR PATTERN: GARTER STITCH (back and forth): 1 ridge = knit 2 rows. PATTERN: See diagrams A.1 and A.2. Diagrams show all rows in pattern seen from the right side. DECREASE/INCREASE TIP: To calculate how to decrease/increase evenly, use the total number of stitches on row (e.g. 196 stitches) and divide stitches by number of decreases/increases to be done (e.g. 36) = 5.4. In this example knit approx. every 4th and 5th stitch together. If an even increase should be done, do so by making a yarn over after alternately every 5th and 6th stitch. On next round knit yarn over twisted to avoid holes. INCREASE TIP (applies to sides on body and mid under sleeve): Work until 1 stitch remains before marker, make 1 yarn over, knit 2 (marker is between these stitches), make 1 yarn over. On next round knit yarn overs twisted to avoid holes. BIND-OFF TIP: To avoid a tight bind-off edge you may use a needle ½ size larger. ---------------------------------------------------------- SWEATER: Worked in the round on circular needle up to armhole, then work front and back piece back and forth separately. Work sleeves in the round on double pointed needles/a short circular needle. BODY: Cast on 196-214-226-242-258-288 stitches on circular needle size 4.5 mm / US 7 with Air. Knit 1 round. Then work rib (= knit 1/purl 1) for 3 cm / 1". Switch to circular needle SIZE 5.5 mm/US 9, knit 1 round while decreasing 36-42-42-42-42-48 stitches evenly - read DECREASE/INCREASE TIP above = 160-172-184-200-216-240 stitches. Insert 1 marker at beginning of round and 1 marker after 80-86-92-100-108-120 stitches (= the sides) and move the markers upwards when working. Work pattern as follows: Work 23-26-29-33-37-43 stitches in stockinette stitch, A.1 (= 34 stitches), work in stockinette stitch over the remaining 103-112-121-133-145-163 stitches. When entire A.1 has been worked vertically, there are 172-184-196-212-228-252 stitches on round. REMEMBER THE GAUGE! Now work pattern as follows: Work 23-26-29-33-37-43 stitches in stockinette stitch, A.2 (= 46 stitches), work in stockinette stitch over the remaining 103-112-121-133-145-163 stitches. Continue pattern like this and repeat A.2 vertically until finished measurements. AT THE SAME TIME when piece measures 5-6-7-4-5-6 cm / X", increase 1 stitch on each side of marker thread in each side - READ INCREASE TIP! Increase like this every 8-8-8-9-9-9 cm / 3"-3"-3"-3½"-3½"-3½" 5 times in total = 192-204-216-232-248-272 stitches. When piece measures 41-42-43-44-45-46 cm / 16⅛"-16½"-17"-17¼"-17¾"-18", bind off 4 stitches for armhole in each side (= 2 stitches on each side of marker thread). Work front and back piece back and forth separately. BACK PIECE: = 86-92-98-106-114-126 stitches (including 1 edge stitch in each side). Continue in stockinette stitch as before with 1 edge stitch in GARTER STITCH - see explanation above, in each side. When piece measures 59-61-63-65-67-69 cm / 23¼"-24"-24¾"-25½"-26⅜"-27⅛", bind off the middle 24-24-26-26-26-28 stitches for neck and finish each shoulder separately. Bind off 1 stitch on next row from neck = 30-33-35-39-43-48 stitches remain on the shoulder. Continue to work until piece measures 61-63-65-67-69-71 cm / 24"-24¾"-25½"-26⅜"-27⅛"-28". Work 1 ridge and bind off - read BIND-OFF TIP. Piece measures approx. 62-64-66-68-70-72 cm / 24⅜"-25¼"-26"-26¾"-27½"-28⅜". Work the other shoulder the same way. FRONT PIECE: = 98-104-110-118-126-138 stitches (including 1 edge stitch in each side). Continue the pattern as before with 1 edge stitch in garter stitch in each side. When piece measures 56-58-60-61-63-65 cm / 22"-22¾"-23½"-24"-24¾"-25½", decrease 12 stitches evenly over A.2 - remember DECREASE/INCREASE TIP = 86-92-98-106-114-126 stitches. On next row slip the middle 12-12-14-14-14-16 stitches on 1 stitch holder for neck and finish each shoulder separately in stockinette stitch, work edge stitch as before. Bind off for neck at the beginning of every row from neck as follows: 2 stitches 2 times and 1 stitch 3 times = 30-33-35-39-43-48 stitches remain on shoulder. Continue to work until piece measures 61-63-65-67-69-71 cm / 24"-24¾"-25½"-26⅜"-27⅛"-28". Work 1 ridge in garter stitch and bind off. Piece measures approx. 62-64-66-68-70-72 cm / 24⅜"-25¼"-26"-26¾"-27½"-28⅜". Work the other shoulder the same way. SLEEVE: Work sleeve in the round on double pointed needles/a short circular needle. Cast on 48-50-54-56-58-58 stitches on double pointed needles size 4.5 mm / US 7 with Air. Knit 1 round. Then work rib (= knit 1/purl 1) for 3 cm / 1". Switch to double pointed needles SIZE 5.5 mm/US 9 / US 9, knit 1 round while decreasing 10-10-12-12-14-14 stitches evenly = 38-40-42-44-44-44 stitches. Insert 1 marker at beginning of round (= mid under sleeve) and move the marker upwards. Then work in stockinette stitch. When piece measures 9-8-11-10-12-8 cm / 3½"-3"-4½"-4"-4¾"-3", increase 2 stitches mid under sleeve - remember INCREASE TIP! Increase like this every 6th-6th-5th-5th-4th-4th round 15-15-16-16-18-19 times in total = 68-70-74-76-80-82 stitches. When piece measures 55-54-53-52-50-47 cm / 21½"-21¼"-21"-20½"-19¾"-18½", bind off all stitches. ASSEMBLY: Sew shoulder seams inside bind-off edges so that there are 2 ridges on top of shoulder. Sew in sleeves inside 1 edge stitch in garter stitch. NECK: Pick up from right side approx. 78-100 stitches around the neck (including stitches on stitch holder at the front) on a short circular needle size 4.5 mm / US 7. Purl 1 round. Knit 1 round while adjusting number of stitches to 78-78-84-84-90-90. Then work rib (= knit 1/purl 1) for 12 cm / 4¾". Then purl 1 round from wrong side, bind off. Fold the neck inwards so that it is 6 cm / 2⅜" high. Fasten it with neat little stitches inside the sweater. |
|||||||||||||||||||||||||||||||||||||||||||||||||
Diagram explanations |
|||||||||||||||||||||||||||||||||||||||||||||||||
|
|||||||||||||||||||||||||||||||||||||||||||||||||
 |
|||||||||||||||||||||||||||||||||||||||||||||||||
 |
|||||||||||||||||||||||||||||||||||||||||||||||||
Have you finished this pattern?Tag your pictures with #dropspattern #winterlovesweater or submit them to the #dropsfan gallery. Do you need help with this pattern?You'll find 28 tutorial videos, a Comments/Questions area and more by visiting the pattern on garnstudio.com. © 1982-2026 DROPS Design A/S. We reserve all rights. This document, including all its sub-sections, has copyrights. Read more about what you can do with our patterns at the bottom of each pattern on our site. |
|||||||||||||||||||||||||||||||||||||||||||||||||


With over 40 years in knitting and crochet design, DROPS Design offers one of the most extensive collections of free patterns on the internet - translated to 17 languages. As of today we count 324 catalogs and 12290 patterns - 12280 of which are translated into English (US/in).
We work hard to bring you the best knitting and crochet have to offer, inspiration and advice as well as great quality yarns at incredible prices! Would you like to use our patterns for other than personal use? You can read what you are allowed to do in the Copyright text at the bottom of all our patterns. Happy crafting!
Post a comment to pattern DROPS 185-5
We would love to hear what you have to say about this pattern!
If you want to leave a question, please make sure you select the correct category in the form below, to speed up the answering process. Required fields are marked *.