DROPS Air
DROPS Air
65% Alpaca, 28% Polyamide, 7% Wool
from 4.80 £ /50g
Get the yarn to make this pattern from 33.60£.

The yarn cost is calculated from the pattern’s smallest size and the yarn’s cheapest product type. Looking for an even better price? You might find it on the DROPS Deals!

DROPS SS24

Winter Love

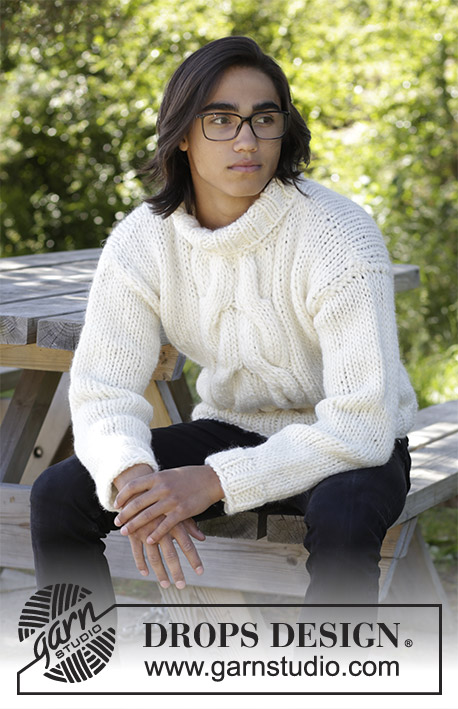
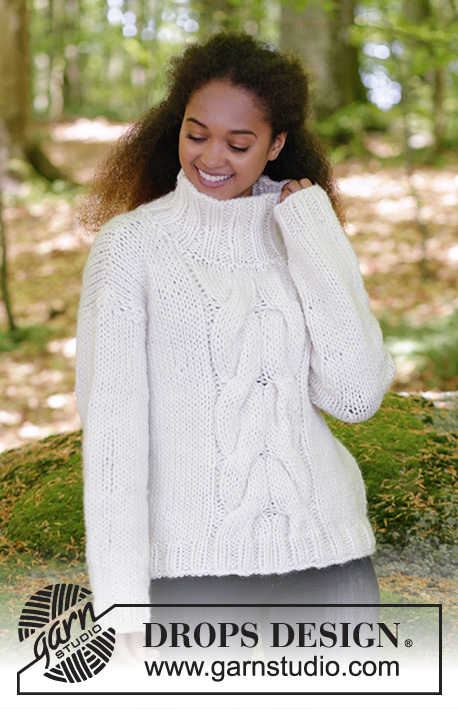
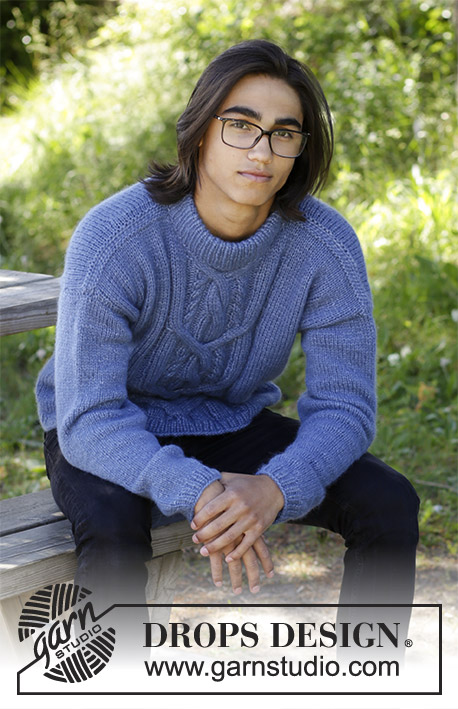
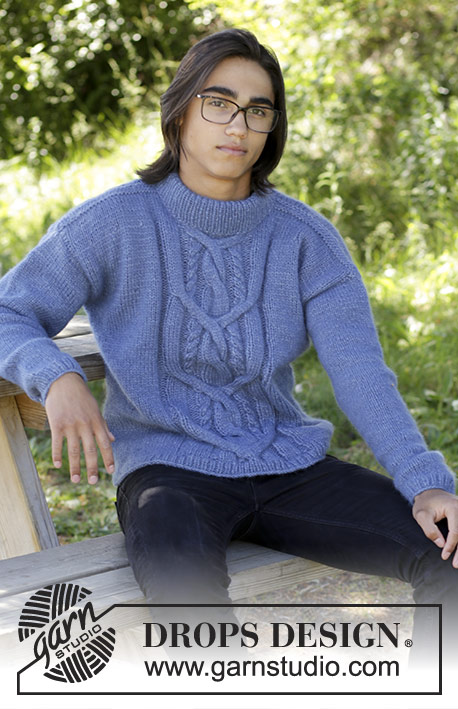
Knitted jumper with cable at the front for men. Size: S - XXXL Piece is knitted in DROPS Air.

DROPS 185-5
DROPS design: Pattern ai-091
Yarn group C or A + A
----------------------------------------------------------
Size: S - M - L - XL - XXL - XXXL
Materials:
DROPS AIR from Garnstudio (belongs to yarn group C)
350-400-450-450-500-550 g colour no 17, denim blue

Piece can also be knitted with yarn from:
“Alternative yarn (yarn group C)” - see link below.

DROPS DOUBLE POINTED NEEDLES AND CIRCULAR NEEDLE (40 and 80 cm) SIZE 5.5 mm – or size needed to get 16 stitches and 20 rows in stocking stitch = width 10 cm and 10 cm vertically.

DROPS DOUBLE POINTED NEEDLES AND CIRCULAR NEEDLE (40 and 80 cm) SIZE 4.5 mm for rib – or size needed to get 18 stitches and 23 rows in stocking stitch = width 10 cm and 10 cm vertically.

DROPS CABLE NEEDLE - for cables.
----------------------------------------------------------

-------------------------------------------------------

Alternative Yarn – See how to change yarns here
Yarn Groups A to F – Use the same pattern and change the yarn here
Yarn usage using an alternative yarn – Use our yarn converter here

-------------------------------------------------------

DROPS Air
DROPS Air
65% Alpaca, 28% Polyamide, 7% Wool
from 4.80 £ /50g
Get the yarn to make this pattern from 33.60£.

The yarn cost is calculated from the pattern’s smallest size and the yarn’s cheapest product type. Looking for an even better price? You might find it on the DROPS Deals!

Pattern instructions

NOTE: This pattern is written in British English. All measurements in charts are in cm. For conversion from cm to inches - click here. There are different terms for crocheting in British and American English. If this pattern includes crochet, click for "crochet terms" here. For this pattern in American English, please click here.
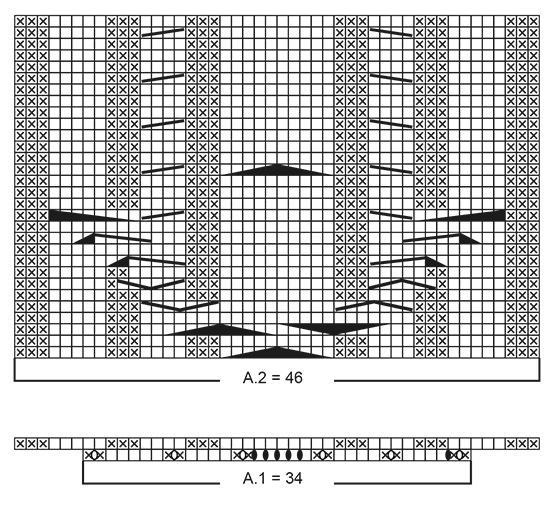
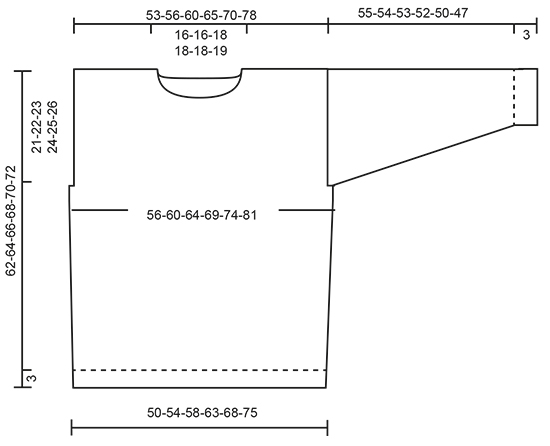
INFORMATION FOR PATTERN:

GARTER STITCH (back and forth):
1 ridge = knit 2 rows.

PATTERN:
See diagrams A.1 and A.2. Diagrams show all rows in pattern seen from the right side.

DECREASE/INCREASE TIP:
To calculate how to decrease/increase evenly, use the total number of stitches on row (e.g. 196 stitches) and divide stitches by number of decreases/increases to be done (e.g. 36) = 5.4. In this example knit approx. every 4th and 5th stitch together.
If an even increase should be done, do so by making a yarn over after alternately every 5th and 6th stitch. On next round knit yarn over twisted to avoid holes.

INCREASE TIP (applies to sides on body and mid under sleeve):
Work until 1 stitch remains before marker, make 1 yarn over, knit 2 (marker is between these stitches), make 1 yarn over. On next round knit yarn overs twisted to avoid holes.

CAST-OFF TIP:
To avoid a tight cast-off edge you may use a needle ½ size larger.
----------------------------------------------------------

JUMPER:
Worked in the round on circular needle up to armhole, then work front and back piece back and forth separately. Work sleeves in the round on double pointed needles/a short circular needle.

BODY:
Cast on 196-214-226-242-258-288 stitches on circular needle size 4.5 mm with Air. Knit 1 round. Then work rib (= knit 1/purl 1) for 3 cm. Switch to circular needle size 5.5 mm, knit 1 round while decreasing 36-42-42-42-42-48 stitches evenly - read DECREASE/INCREASE TIP above = 160-172-184-200-216-240 stitches. Insert 1 marker at beginning of round and 1 marker after 80-86-92-100-108-120 stitches (= the sides) and move the markers upwards when working.
Work pattern as follows: Work 23-26-29-33-37-43 stitches in stocking stitch, A.1 (= 34 stitches), work in stocking stitch over the remaining 103-112-121-133-145-163 stitches. When entire A.1 has been worked vertically, there are 172-184-196-212-228-252 stitches on round. REMEMBER THE KNITTING TENSION!
Now work pattern as follows: Work 23-26-29-33-37-43 stitches in stocking stitch, A.2 (= 46 stitches), work in stocking stitch over the remaining 103-112-121-133-145-163 stitches. Continue pattern like this and repeat A.2 vertically until finished measurements. AT THE SAME TIME when piece measures 5-6-7-4-5-6 cm, increase 1 stitch on each side of marker thread in each side - READ INCREASE TIP! Increase like this every 8-8-8-9-9-9 cm 5 times in total = 192-204-216-232-248-272 stitches. When piece measures 41-42-43-44-45-46 cm, cast off 4 stitches for armhole in each side (= 2 stitches on each side of marker thread).
Work front and back piece back and forth separately.

BACK PIECE:
= 86-92-98-106-114-126 stitches (including 1 edge stitch in each side). Continue in stocking stitch as before with 1 edge stitch in GARTER STITCH - see explanation above, in each side. When piece measures 59-61-63-65-67-69 cm, cast off the middle 24-24-26-26-26-28 stitches for neck and finish each shoulder separately. Cast off 1 stitch on next row from neck = 30-33-35-39-43-48 stitches remain on the shoulder. Continue to work until piece measures 61-63-65-67-69-71 cm. Work 1 ridge and cast off - read CAST-OFF TIP. Piece measures approx. 62-64-66-68-70-72 cm. Work the other shoulder the same way.

FRONT PIECE:
= 98-104-110-118-126-138 stitches (including 1 edge stitch in each side). Continue the pattern as before with 1 edge stitch in garter stitch in each side. When piece measures 56-58-60-61-63-65 cm, decrease 12 stitches evenly over A.2 - remember DECREASE/INCREASE TIP = 86-92-98-106-114-126 stitches. On next row slip the middle 12-12-14-14-14-16 stitches on 1 stitch holder for neck and finish each shoulder separately in stocking stitch, work edge stitch as before. Cast off for neck at the beginning of every row from neck as follows: 2 stitches 2 times and 1 stitch 3 times = 30-33-35-39-43-48 stitches remain on shoulder. Continue to work until piece measures 61-63-65-67-69-71 cm. Work 1 ridge in garter stitch and cast off. Piece measures approx. 62-64-66-68-70-72 cm. Work the other shoulder the same way.


SLEEVE:
Work sleeve in the round on double pointed needles/a short circular needle.
Cast on 48-50-54-56-58-58 stitches on double pointed needles size 4.5 mm with Air. Knit 1 round. Then work rib (= knit 1/purl 1) for 3 cm. Switch to double pointed needles size 5.5 mm, knit 1 round while decreasing 10-10-12-12-14-14 stitches evenly = 38-40-42-44-44-44 stitches. Insert 1 marker at beginning of round (= mid under sleeve) and move the marker upwards. Then work in stocking stitch.
When piece measures 9-8-11-10-12-8 cm, increase 2 stitches mid under sleeve - remember INCREASE TIP! Increase like this every 6th-6th-5th-5th-4th-4th round 15-15-16-16-18-19 times in total = 68-70-74-76-80-82 stitches. When piece measures 55-54-53-52-50-47 cm, cast off all stitches.

ASSEMBLY:
Sew shoulder seams inside cast-off edges so that there are 2 ridges on top of shoulder. Sew in sleeves inside 1 edge stitch in garter stitch.

NECK:
Pick up from right side approx. 78-100 stitches around the neck (including stitches on stitch holder at the front) on a short circular needle size 4.5 mm. Purl 1 round. Knit 1 round while adjusting number of stitches to 78-78-84-84-90-90. Then work rib (= knit 1/purl 1) for 12 cm. Then purl 1 round from wrong side, cast off. Fold the neck inwards so that it is 6 cm high. Fasten it with neat little stitches inside the jumper.

Diagram

symbols = knit from the right side, purl from the wrong side
symbols = purl from the right side, knit from the wrong side
symbols = slip 2 stitches on cable needle in front of piece, knit 2, knit 2 from cable needle
symbols = slip 2 stitches on cable needle behind piece, knit 2, knit 2 from cable needle
symbols = slip 5 stitches on cable needle in front of piece, knit 5, knit 5 from cable needle
symbols = slip 5 stitches on cable needle behind piece, knit 5, knit 5 from cable needle
symbols = slip 2 stitches on cable needle behind piece, knit 5, knit 2 from cable needle
symbols = slip 5 stitches on cable needle in front of piece, knit 2, knit 5 from cable needle
symbols = slip 2 stitches on cable needle behind piece, knit 5, purl 2 from cable needle
symbols = slip 5 stitches on cable needle in front of piece, purl 2, knit 5 from cable needle
symbols = slip 1 stitch on cable needle behind piece, knit 5, purl 1 from cable needle
symbols = slip 5 stitches on cable needle in front of piece, purl 1, knit 5 from cable needle
symbols = slip 3 stitches on cable needle behind piece, knit 5, purl 3 from cable needle
symbols = slip 5 stitches on cable needle in front of piece, purl 3, knit 5 from cable needle
symbols = between 2 stitches make a yarn over on needle, on next round/row purl yarn over twisted
symbols = between 2 stitches make a yarn over on needle, on next round/row knit yarn over twisted
diagram
diagram

Each of our patterns has specific tutorial videos to help you.

Do you have a question? See a list of frequently asked questions (FAQ)

Knitting tension is what determines the final measurements of your work, and is usually measured per 10 x 10 cm. It is provided like so: number of stitches in width x number of rows in height - eg: 19 stitches x 26 rows = 10 x 10 cm.

The knitting tension is very individual; some people knit/crochet loosely while others work tightly. You adjust the knitting tension with the needle size, which is why the suggested needle size is only meant as a guide! You need to adjust this (up or down) to ensure that YOUR knitting tension matches the knitting tension provided in the pattern. If you work with a different knitting tension than provided you will have a different yarn consumption, and your work will have different measurements than what the pattern suggests.

The knitting tension also determines which yarns can replace each other. As long as you achieve the same knitting tension you can replace one yarn with another.

See DROPS lesson: How to measure your tension/gauge

See DROPS video: How to make a gauge tension swatch

The required amount of yarn is provided in grams, eg: 450 g. To calculate how many balls you’ll need you first need to know how many grams are in 1 ball (25g, 50g or 100g). This information is available if you click on the individual yarn quality on our pages. Divide the amount required with the amount of each ball. For example, if each ball is 50g (the most common amount), the calculation will be as follows: 450 / 50 = 9 balls.

The important thing when changing from one yarn to another is that the knitting/crochet tension remains the same. This is so that the measurements of the finished piece will be the same as on the sketch provided. It is easier to achieve the same knitting tension using yarns from the same yarn group. It is also possible to work with multiple strands of a thinner yarn to achieve the knitting tension of a thicker one. Please try our yarn converter. We recommend you to always work a test swatch.

Please NOTE: when changing yarn the garment might have a different look and feel to the garment in the photo, due to individual properties and qualities of each yarn.

See DROPS lesson: Can I use a different yarn than the one mentioned in the pattern?

All our yarns are categorised into yarn groups (from A to F) according to thickness and knitting tension – group A contains the thinnest yarns and group F the thickest. This makes it easier for you to find alternative yarns to our patterns, should you wish to switch yarn. All yarns within the same group have a similar knitting tension and can easily replace each other. However, different yarn qualities have different structures and properties which will give the finished work a unique look and feel.

Click here for an overview of the yarns in each yarn group

At the top of all our patterns you’ll find a link to our yarn calculator, which is a helpful tool should you wish to use a different yarn than suggested. By filling in the yarn quality you wish to replace, the amount (in your size) and number of strands, the calculator will present good alternative yarns with the same knitting tension. Additionally it will tell you how much you’ll require in the new qualities and whether you’ll need to work with multiple strands. Most skeins are 50g (some are 25g or 100g).

If the pattern is worked with multiple colours, every colour will have to be calculated separately. Similarly, if the pattern is worked with several strands of different yarns (for example 1 strand Alpaca and 1 strand Kid-Silk) you will have to find alternatives for each, individually.

Click here to see our yarn calculator

Since different yarns have different qualities and textures we have chosen to keep the original yarn in our patterns. However, you can easily find options among our available qualities by using our yarn calculator, or simply pick a yarn from the same yarn group.

It is possible that some retailers still have discontinued yarns in stock, or that someone has a few skeins at home that they would like to find patterns for.

The yarn calculator will provide both alternative yarn as well as required amount in the new quality.

If you think it's hard to decide what size to make, it can be a good idea to measure a garment you own already and like the size of. Then you can pick the size by comparing those measures with the ones available in the pattern's size chart.

You'll find the size chart at the bottom of the pattern.

See DROPS lesson: How to read size chart

The needle size provided in the pattern serves only as a guide, the important thing is to follow the knitting tension. And since knitting tension is very individual, you will have to adjust the needle size to ensure that YOUR tension is the same as in the pattern – maybe you’ll have to adjust 1, or even 2 needle sizes, up or down to achieve the correct tension. For this, we recommend that you work test swatches.

Should you work with a different knitting tension than the one provided, the measurements of the finished garment might deviate from the measurement sketch.

See DROPS lesson: How to measure your tension/gauge

See DROPS video: How to make a tension/gauge swatch

Working a garment top-down provides more flexibility and room for personal adjustment. For example it is easier to try the garment on while working, as well as making adjustments to length of yoke and shoulder caps.

The instructions are carefully explaining every step, in the correct order. Diagrams are adjusted to the knitting direction and are worked as usual.

The diagram depicts all rows/rounds, and every stitch seen from the right side. It is read from bottom to top, from right to left. 1 square = 1 stitch.

When working back and forth, every other row is worked from the right side and every other row is worked from the wrong side. When working from the wrong side, the diagram will have to be worked reversed: from left to right, knit stitches are purled, purl stitches are knit etc.

When working in the round every round is worked from the right side and the diagram are worked from right to left on all rounds.

See DROPS lesson: How to read knitting diagrams

The diagram depicts all rows/rounds, and every stitch seen from the right side. It is worked from bottom to top, from right to left.

When working back and forth every other row is worked from the right side: from right to left and every other row is worked from the wrong side: from left to right.

When working in the round, every row in the diagram are worked from the right side, from right to left.

When working a circular diagram you start in the middle and work your way outwards, counter clockwise, row by row.

The rows usually start with a given number of chain stitches (equivalent to the height of the following stitch), this will either be depicted in the diagram or explained in the pattern.

See DROPS lesson: How to read crochet diagrams

Instructions for working several diagrams after each other on the same row/round, will often be written like so: “work A.1, A.2, A.3 a total of 0-0-2-3-4 times". This means you work A.1 once, then A.2 is worked once, and A.3 is repeated (in width) the number of times provided for your size – in this case like so: S = 0 times, M = 0 times, L=2 times, XL= 3 times and XXL = 4 times.

The diagrams are worked as usual: begin with the first row in A.1, then work the first row in A.2 etc.

See DROPS lesson: How to read knitting diagrams

See DROPS lesson: How to read crochet diagrams

The total width of the garment (from wrist-to-wrist) will be larger in the larger sizes, despite the actual sleeves being shorter. The larger sizes have longer sleeve caps and wider shoulders, so there will be a good fit in all sizes.

The measurement sketch/schematic drawing provides information regarding the full length of the garment. If it’s a jumper or a jacket the length is measured from the highest point on the shoulder closest to the neckline, and straight down to the bottom of the garment. It is NOT measured from the tip of shoulder. Similarly, the length of yoke is measured from the highest point on the shoulder and down to where yoke is split into body and sleeves.

On a jacket measures are never taken along bands, unless specifically stated. Always measure inside band stitches when measuring the length.

See DROPS lesson: How to read a schematic drawing

Diagrams are often repeated on the round or in height. 1 repeat is the diagram the way it appears in the pattern. If it says to work 5 repeats of A.1 in the round, then you work A.1 a total of 5 times after/next to each other in the round. If it says to work 2 repeats of A.1 vertically/in height you work the entire diagram once, then begin again at the start and work the entire diagram one more time.

Chain stitches are slightly narrower than other stitches and to avoid working the cast-on edge too tight, we simply chain more stitches to begin with. The stitch count will be adjusted on the following row to fit the pattern and measurement sketch.

The rib edge is more elastic and will contract slightly compared to, for example, stocking stitch. By increasing before the rib edge, you avoid a visible difference in width between the rib edge and the rest of the body.

It’s very easy to cast off too tightly, and by making yarn overs while casting off (and simultaneously casting these off) you avoid a too tight cast off edge.

See DROPS video: How to bind off with yarn overs (yo)

To achieve an even increase (or decrease) you can increase on, for example: every 3rd and 4th row alternately, like so: work 2 rows and increase on the 3rd row, work 3 rows and increase on the 4th. Repeat this until the increase is complete.

See DROPS lesson: Increase or decrease 1 st on every 3rd and 4th row alternately

Should you prefer to work in the round instead of back and forth, you may of course adjust the pattern. You’ll need to add steeks mid-front (usually 5 stitches), and follow the instructions. When you would normally turn and work from the wrong side, simply work across the steek and continue in the round. At the end you’ll cut the piece open, pick up stitches to work bands, and cover the cut edges.

See DROPS video: How to knit steeks and cut open

Should you prefer to work back and forth instead of in the round, you may of course adjust the pattern so you work the pieces separately and then assemble them at the end. Divide the stitches for the body in 2, add 1 edge stitch in each side (for sewing) and work the front and back pieces separately.

See DROPS lesson: Can I adapt a pattern for circular needles into straight needles?

Pattern repeats can vary slightly in the different sizes, in order to get the correct proportions. If you’re not working the exact same size as the garment in the photo, yours might deviate slightly. This has been carefully developed and adjusted so that the complete impression of the garment is the same in all sizes.

Make sure to follow instructions and diagrams for your size!

If you have found a pattern you like which is available in women’s size it’s not very difficult to convert it to men’s size. The biggest difference will be the length of sleeves and body. Start working on the women size that you think would fit across the chest. The additional length will be worked right before you cast off for the armhole/sleeve cap. If the pattern is worked top-down you can add the length right after the armhole or before the first decrease on sleeve.

Regarding additional yarn amount, this will depend on how much length you add, but it is better with a skein too many than too few.

All yarns will have excess fibres (from production) that might come off as lint or shedding. Brushed yarns (ie hairier yarns) have more of these loose, excess fibres, causing more shedding.

Shedding also depends on what is worn under or over the garment, and whether this pulls at the yarn fibres. It’s therefore not possible to guarantee that there will be no shedding

Below are some tips on how to get the best result when working with hairier yarns:

1. When the garment is finished (before you wash it) shake it vigorously so the looser hairs come off. NOTE: do NOT use a lint roller, brush or any method that pulls at the yarn.

2. Place the garment in a plastic bag and put it in your freezer - the temperature will cause the fibres to become less attached to each other, and excess fibres will come off easier.

3. Leave in the freezer for a few hours before taking it out and shaking it again.

4. Wash the garment according to the instructions on the yarn label.

Pilling is a natural process that happens to even the most exclusive of fibers. It's a natural sign of wear and tear that is hard to avoid, and that is most visible in high friction areas of your garment like a sweater's arms and cuffs.

You can make your garment look as new by removing the pilling, using a fabric comb or a pill/lint remover.

Still can't find the answer you need? Then scroll down and leave your question so one of our experts can try to help you. This will be done normally within 5 to 10 working days.
In the meantime, you can read the questions and answers that others have left to this pattern or join the DROPS Workshop on Facebook to get help from fellow knitters/crocheters!

You might also like...

Post a comment to pattern DROPS 185-5

We would love to hear what you have to say about this pattern!

If you want to leave a question, please make sure you select the correct category in the form below, to speed up the answering process. Required fields are marked *.

Comments / Questions (30)

country flag Bernadine Harrar wrote:

I would like to make this pattern (Winter Love) with an alternative yarn: Wool Ease , made by Lion Brand. Please advise me how many yards or meters are necessary in your suggested yarn. I don't see it written anywhere. I will make an XL size. Thank you.

12.02.2024 - 18:50

DROPS Design answered:

Hi Bernadine, The Drops Air yarn comes in 50 g balls each with a yardage of approx. 150 m. In size XL you need 450 g (9 balls). Happy crafting!

13.02.2024 - 06:49

country flag Lise Firth wrote:

Drops Nepal is 17st x 22rows, needles 4.5mm and 5mm. If I use Drops Air, which is 16st x 20 rows instead with needles 5mm and 5.5mm, do I have to use the same needle sizes as I would with Drops Nepal? Thank you.

22.01.2024 - 18:26

DROPS Design answered:

Dear Lise, you need to work a swatch and check which needles will help you obtain the gauge stated in the pattern, regardless of the yarn used. So you can try the needles recommended for Nepal and change to a larger number if necessary. Happy knitting!

22.01.2024 - 23:11

country flag Lise Firth wrote:

Why are there no bottom up Nordic patterns for men’s sweaters knitted with Drops Air?

20.01.2024 - 19:17

DROPS Design answered:

Dear Mrs Firth, please find all our jumpers worked bottom up with nordic pattern and a yarn group C, just as Air here - use the yarn converter to get the new amount of yarn for the desired size. Happy knitting!

22.01.2024 - 08:38

country flag Yvonne Buist wrote:

Dit is een mooie trui, Wordt de achterkant ook met kabel gebreid??

24.11.2021 - 13:27

DROPS Design answered:

Dag Yvonne,

Nee, de kabel wordt alleen op het voorpand gebreid.

26.11.2021 - 17:10

country flag Annalisa Doedens wrote:

Why is the band so much wider than the body? I started this in size L for someone who normally wears an L and the band has seemed too wide. Going to restart with just the body amount of stitches- will this be OK?

14.08.2021 - 23:34

DROPS Design answered:

Dear Mrs Doedens, if your tension is right (= 18 sts x 23 rows = 10 x 10 cm), then you will get the correct measurements for each size as shown in chart with the number of sts to cast on; you need more stitches when working in rib with smaller needles than working stocking stitch with larger needles, reason why more sts are cast on and then sts are decreased after ribbing edge to get the correct width on body. Hope this will help, happy knitting!

16.08.2021 - 08:44

country flag Ester wrote:

Hej hvad menes der med "SAMTIDIG når arbejdet måler 5-6-7-4-5-6 cm tages der 1 maske ud på hver side af mærketråden i hver side ". det er mærketråden jeg ikke er helt med på. er det de mærkemasker man har sat ved siden af mønstret?

02.10.2020 - 15:57

DROPS Design answered:

Hei Ester. Ja, det er det. De markerer sidene av genseren og hvor det skal økes, les ØKETIPS om hvordan det økes. God Fornøyelse!

05.10.2020 - 10:46

country flag Debbie wrote:

Hi I am knitting size large and ready to knit back and front separately-how does a total of 216 stitches reduce to 98 sets for the back and 110 for the front with only 4 st reduction for armhole - help pls thnx

16.07.2020 - 05:43

DROPS Design answered:

Dear Debbie, at the beg you got 92 sts for each front and back, then increase in A.1 = 104 sts front/92 sts back (= 196 sts). Then increase on the sides (4 sts 5 times) = 114 sts front/102 sts back = 216 sts and then cast off 4 sts for armholes = 110 sts for front piece/98 sts for back piece. Happy knitting!

16.07.2020 - 10:43

country flag Jo wrote:

Hi! This is a lovely pattern, but I am unsure as to what measurements the size small garment would make? Yes this is a wonderful pattern Thank you

02.07.2020 - 15:10

DROPS Design answered:

Dear Jo, compare a similar garment you have (or the person who will get the jumper has) and like the shape and compare them to the measurements in the chart, this will help you to choose size and ajdust if necessary - read more about sizing here. Happy knitting!

02.07.2020 - 17:20

country flag Hanne wrote:

Jeg strikker denne til mannen min nå, og har et (mulig litt dumt) spørsmål. Når jeg skal strikke forstykket står det at jeg skal fortsette mønsteret som før. Men nå strikker jeg jo frem og tilbake! Hvordan strikker jeg da mønsteret på vrangen? Savner et par setninger om det ...

23.01.2020 - 02:01

DROPS Design answered:

Hei Hanne, Når man strikke fra vrangen leser man diagrammet fra venstre til høyre. Alle rad på vrangen er kun med rett eller vrang masker (følge symbolinstruks) God fornøyelse!

23.01.2020 - 07:11

country flag Karine wrote:

Tõsta 2 silmust palmikuvardale töö taha, 5 pahempidi, koo 2 pahempidi palmikuvardalt 5 silma pahempidi ?

10.12.2019 - 20:59

DROPS Design answered:

Aitah Kaire, viga parandatud !

13.12.2019 - 11:58