
Popular categories
Looking for a yarn?


Comments / Questions (9)
![]() Anne Castonguay wrote:
Anne Castonguay wrote:
Je débute le puncho 184-6 et je ne comprends pas les explications après les 4 rang de points mousse. Il y a une bordure de point mousse de 4 mailles au début mais a la fin du rang il n' en parle plus pas mais plutôt d' une maille lisière au point mousse . Ça ne fait pas une bordure ça non?
16.08.2023 - 16:47DROPS Design answered:
Bonjour Mme Castonguay, vu sur l'endroit, vous aurez 4 mailles de bordure point mousse à droite (= début de rang sur l'endroit/ fin de rang sur l'envers) et 1 maille lisière point mousse à gauche (= en fin de rang sur l'endroit/début de rang sur l'envers). Les 4 mailles de bordure vont se trouver en bas du poncho et la m lisière côté couture (vous coudrez ensuite à 1 m des bords pour les épaules et vous relèverez les mailles de l'encolure à 1 m des bords pour le col). Bon tricot!
17.08.2023 - 09:33
![]() Sofia A wrote:
Sofia A wrote:
Hej Jag förstår inte vilka stickor som skall användas. Tittar i er webbshopp också om stickorna finns där. 40 och 80 cm tror jag då är längden. Men vad står då nr 8 och 9 för? /Sofia
14.10.2022 - 22:49DROPS Design answered:
Hei Sofia. Ja, 40 og 80 cm er lengden og 8 og 9 er tykkelsen på pinnen. Når du strikker kantene, strikkes de med den tynneste pinnen, altså str.8 og når du strikker hoveddelen, strikkes den med den tykkeste, altså str. 9. Når du strikker med pinne 9, trenger du en lang rundpinne (80 cm) for å få plass til alle maskene som det står i oppskriften. Det samme trenger du når du strikker kantene med pinne tykkelse 8 (80 cm). Men når du skal strikke halsen, har du bare 42 - 48 masker du skal strikker over, og da trenger du en kort rundpinne (40 cm). mvh DROPS Design
24.10.2022 - 11:23
![]() Diane St-Germain wrote:
Diane St-Germain wrote:
Je veux faire le poncho #184-6, .Je ne comprends pas ,quand vous écrivez . Tricoter le rang de retour sur l'envers de la même façon = 75 mailles. Est ce que je dois suivent la diagramme A.2 et A.1,ou bien je tricote les mailles comme elles se présentes.J'aimerais être prévenu dès que j'aurai une réponse a ma question. Merci a l'avance. Diane
07.02.2022 - 22:11DROPS Design answered:
Bonjour Mme St Germain, pour tricoter le rang suivant sur l'envers, tricotez les m lisières à l'endroit, les mailles jersey à l'envers et lisez les diagrammes de gauche à droite (en commençant par A.2 puis A.1). Retrouvez ici plus d'infos sur les diagrammes. Bon tricot!
08.02.2022 - 08:56
![]() Doris wrote:
Doris wrote:
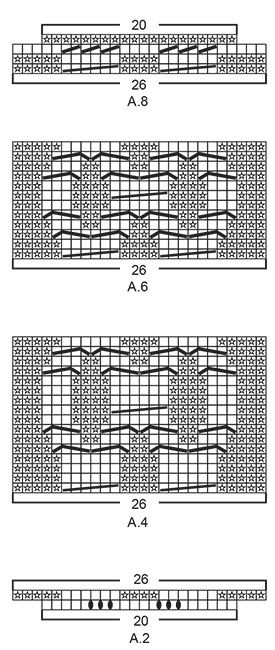
Es ist leider ein Fehler in der Anleitung. In A4/Reihe 9 und A6/Reihe 7 sollten die Maschen bei der Verzopfung VOR die Arbeit gelegt werden. Dadurch erhält man erst ein echtes und gleichmäßiges Zopfmuster.
08.11.2019 - 20:42
![]() Michele wrote:
Michele wrote:
There are several people I have found making your patterns for profit.
04.09.2018 - 02:43
![]() Pascale wrote:
Pascale wrote:
Bonjour, pouvez-vous me dire en millimètre les aiguilles utilisées svp. Au Canada, une aiguille #8 est de 5mm. Merci!
27.05.2018 - 17:01DROPS Design answered:
Bonjour Pascale, la taille des aiguilles des modèles français est toujours indiquée en système métrique, pour connaître l'équivalence en système US, vous pouvez modifier la langue du modèle en English (US) ou retrouver ici le récapitulatif des tailles d'aiguilles US/métrique. Bon tricot!
28.05.2018 - 09:36
![]() Berit wrote:
Berit wrote:
Skal den strikkes med en tråd i hver anden maske eller med to tråde i hver maske?
22.05.2018 - 19:54DROPS Design answered:
Hei Berit. Det skal strikkes med 2 tråder i alle maskene, på samme måte som når du strikker med 1 tråd. God fornøyelse
23.05.2018 - 11:57
![]() Susan Weston wrote:
Susan Weston wrote:
Hi, I would like to make this for my daughter, I have some wool from something my mother in law started, but no pattern. Please could you tell me how to find how many balls I need for the small to medium. My son has also chosen a pattern for himself so I'll be very busy! Many thanks, I love the look of your website, do you have an app?
24.10.2017 - 13:21DROPS Design answered:
Dear Mrs Weston, you will find total amount of yarn required for each size under tab "Materials", ie in size S/M you need 750 g DROPS Air / 50 g a ball Air = 15 balls Air. Read more about alternatives here>/a>. Happy knitting!
24.10.2017 - 13:35
![]() Anpatito wrote:
Anpatito wrote:
Très joli J'adore!!
02.09.2017 - 18:24
|
|||||||||||||||||||||||||
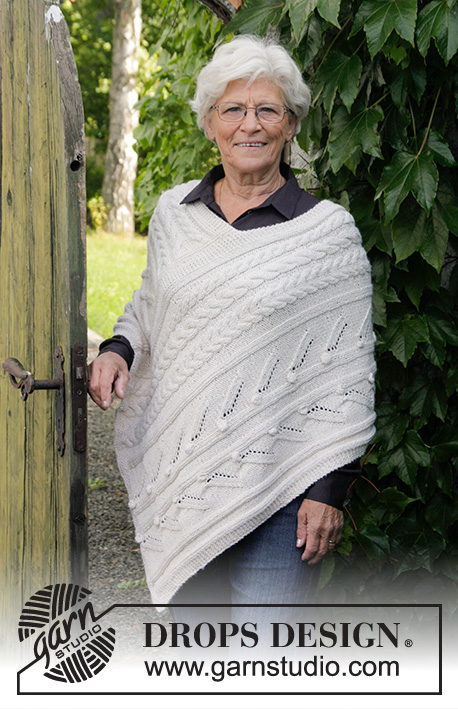
Snow Queen#snowqueenponcho |
|||||||||||||||||||||||||
 |
 |
||||||||||||||||||||||||
Sideways knitted poncho with cables and high collar. Sizes S - XXXL. The piece is worked in 2 strands DROPS Air.
DROPS 184-6 |
|||||||||||||||||||||||||
|
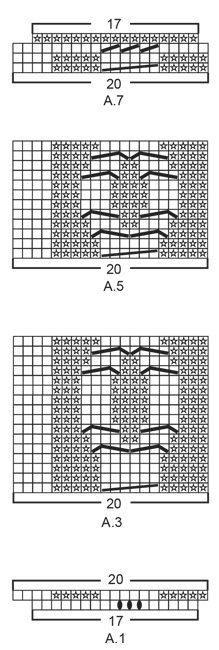
INFORMATION FOR THE PATTERN: RIDGE/GARTER STITCH (worked back and forth): 1 ridge = Knit 2 rows. PATTERN: See diagrams A.1 to A.8. The diagrams show all the rows in the pattern seen from the right side. INCREASE TIP: Increase 1 stitch at the end of each knitted section by making 1 yarn over. On the next round knit the yarn over twisted to prevent a hole. The next time you increase, make 1 yarn over at the beginning of each knitted section. ---------------------------------------------------------- PONCHO: The piece is worked sideways. Front and back pieces are worked separately back and forth with circular needle. Then the shoulder seams are sewn before working a high collar. FRONT PIECE: Cast on 66-70-74-78 stitches with circular needle size 8 mm / US 11 and 2 strands Air. Work 4 RIDGES – see description above. Change to circular needle size 9 mm / US 13 and work the next row as follows from the right side: 4 edge stitches in garter stitch, 18-22-24-28 stitches stockinette stitch, A.1 (= 17 stitches), A.2 (= 20 stitches), 6-6-8-8 stitches stockinette stitch and 1 edge stitch in garter stitch. Work back from the wrong side in the same way = 75-79-83-87 stitches on the needle. The next row is worked as follows from the right side: 4 edge stitches in garter stitch, 18-22-24-28 stitches stockinette stitch, A.3 (= 20 stitches), A.4 (= 26 stitches), 6-6-8-8 stitches stockinette stitch and 1 edge stitch in garter stitch. Continue the pattern in this way. REMEMBER THE GAUGE! When A.3 and A.4 have been worked 4-4-5-5 times in height, the piece measures approx. 51-51-63-63 cm / 20"-20"-24¾"-24¾" from the cast-on edge. The next row is worked as follows from the right side: 4 edge stitches in garter stitch, 18-22-24-28 stitches stockinette stitch, A.5 (= 20 stitches), A.6 (= 26 stitches), 6-6-8-8 stitches stockinette stitch and 1 edge stitch in garter stitch. Continue the pattern in this way and bind off AT THE SAME TIME for neck at the beginning of each row from the wrong side as follows: S/M and L/XL: bind off 2 stitches 1 time and 1 stitch 2 times = 71-75 stitches. XXL and XXXL: bind off 3 stitches 1 time, 2 stitches 1 time and 1 stitch 1 time = 77-81 stitches. After the last bind-off, insert 1 marker at the end of the row from the right side. Continue the pattern as before with 1 edge stitch in garter stitch towards the neck until A.5 and A.6 have been worked 1 time in height. Insert 1 new marker = mid front (if your knitting gauge is right in height, the piece will measure approx. 4½ cm / 1¾" from the first marker). Continue the pattern with A.5 and A.6 until the piece measures 4½ cm / 1¾" from the marker mid front. Now cast on stitches for the neck at the end of each row from the right side as follows: S/M and M/L: Cast on 1 stitch 2 times and 2 stitches 1 time = 75-79 stitches. XXL and XXXL: Cast on 1 stitch 1 time, 2 stitches 1 time and 3 stitches 1 time = 83-87 stitches. A.5 and A.6 have now been worked 1 time in height after the marker mid front (there is a total of 2 repeats in height of A.5 and A.6) and the neckline measures approx. 17 cm / 6¾" in all sizes. The next row is worked as follows from the right side: 4 edge stitches in garter stitch, 18-22-24-28 stitches stockinette stitch, A.3 (= 20 stitches), A.4 (= 26 stitches), 6-6-8-8 stitches stockinette stitch and 1 edge stitch in garter stitch. Continue the pattern in this way until A.3 and A.4 have been worked 4-4-5-5 times in height after the neckline. The next row is worked as follows from the right side: 4 edge stitches in garter stitch, 18-22-24-28 stitches stockinette stitch, A.7 (= 20 stitches), A.8 (= 26 stitches), 6-6-8-8 stitches stockinette stitch and 1 edge stitch in garter stitch. When A.7 and A.8 have been completed, there are 66-70-74-78 stitches on the needle. Change to circular needle size 8 mm / US 11 and work 3 ridges. Bind off with knit from the right side, but to avoid the bind-off edge being tight bind off with circular needle size 9 mm / US 13. BACK PIECE: Cast on and work in the same way as the front piece as far as the neckline. Now bind off for the neck at the beginning of each row from the wrong side as follows: bind off 1 stitch 2 times = 73-77-81-85 stitches. Insert 1 marker at the end of the row from the right side. Continue working until A.5 and A.6 have been worked 1 time in height. Insert 1 new marker = mid back (the piece measures approx. 5½ cm / 2¼" from the first marker). Continue the pattern with A.5 and A.6 until the piece measures 5½ cm / 2¼" from the marker mid back. Now cast on stitches for the neck at the end of each row from the right side as follows: Cast on 1 stitch 2 times = 75-79-83-87 stitches. A.5 and A.6 have now been worked 1 time in height after the marker mid back (there is a total of 2 repeats in height of A.5 and A.6) and the neckline measures approx. 17 cm / 6¾" in all sizes. Continue working to finished length in the same way as the front piece. ASSEMBLY: Sew the 2 parts together at the shoulder – sew edge to edge in the outermost loop of the outermost garter stitch so that the seam is flat. If you would like to define the armhole you can sew a couple of stitches through the front and back pieces in each side approx. 30-35 cm / 11¾"-13¾" from the shoulder down. HIGH COLLAR: Knit up from the right side approx. 42 to 48 stitches around the neck with short circular needle size 8 mm / US 11 and 2 strands Air. Knit 1 round where you increase evenly on row to 56-56-64-64 stitches (the number of stitches should be divisible by 4). Work rib in the round (= knit 2 / purl 2). When the rib measures 10 cm / 4" increase every other knit 2 to knit 3 – read INCREASE TIP = 63-63-72-72 stitches. When the rib measures 18 cm / 7" increase the remaining knit 2 to knit 3 = 70-70-80-80 stitches. Continue in the round with knit 3 / purl 2 until the collar measures approx. 22-24 cm / 8¾"-9½" (you can try the poncho on and work the collar to the desired length). Bind off with knit over knit and purl over purl, but to avoid the bind-off edge being tight you can make 1 yarn over after every 5th stitch at the same time as you bind off (the yarn overs are bind off as normal stitches). Fold the collar down. |
|||||||||||||||||||||||||
Diagram explanations |
|||||||||||||||||||||||||
|
|||||||||||||||||||||||||
 |
|||||||||||||||||||||||||
 |
|||||||||||||||||||||||||
 |
|||||||||||||||||||||||||
Have you finished this pattern?Tag your pictures with #dropspattern #snowqueenponcho or submit them to the #dropsfan gallery. Do you need help with this pattern?You'll find 26 tutorial videos, a Comments/Questions area and more by visiting the pattern on garnstudio.com. © 1982-2026 DROPS Design A/S. We reserve all rights. This document, including all its sub-sections, has copyrights. Read more about what you can do with our patterns at the bottom of each pattern on our site. |
|||||||||||||||||||||||||


With over 40 years in knitting and crochet design, DROPS Design offers one of the most extensive collections of free patterns on the internet - translated to 17 languages. As of today we count 324 catalogs and 12290 patterns - 12280 of which are translated into English (US/in).
We work hard to bring you the best knitting and crochet have to offer, inspiration and advice as well as great quality yarns at incredible prices! Would you like to use our patterns for other than personal use? You can read what you are allowed to do in the Copyright text at the bottom of all our patterns. Happy crafting!
Post a comment to pattern DROPS 184-6
We would love to hear what you have to say about this pattern!
If you want to leave a question, please make sure you select the correct category in the form below, to speed up the answering process. Required fields are marked *.