
Popular categories
Looking for a yarn?


Comments / Questions (27)
![]() Veronica Gustavsson wrote:
Veronica Gustavsson wrote:
Hej, jag stickar denna tröja i Drops air färg 17 och blev besviken då jag märkte hur stor skillnad i färgen det var mellan två olika partier. Ena tillverkad i EU, andra i Peru! Båda köpta i samma nätbutik, Kärkkäinen i Finland. Tröjan blir randig. Är detta i enlighet med Drops kvalitetsstandarder? Hälsningar Veronica Gustavsson
10.02.2022 - 17:34DROPS Design answered:
Hej Veronica, vi anbefaler altid at købe alt garn til en trøje fra samme parti. Der vil altid være en større eller mindre forskel på to partier. Håber du får fat i mere i et af partierne. God fornøjelse!
16.02.2022 - 15:26
![]() Annarita Michetti wrote:
Annarita Michetti wrote:
Buongiorno, sono arrivata alle diminuzioni per il collo: ho messo in sospeso le prime 15 maglie, ora devo subito intrecciare le prime due maglie successive o lo devo fare nel ferro seguente? Grazie.
18.02.2021 - 11:45DROPS Design answered:
Buonasera Annarita, può intrecciare le maglie. Buon lavoro!
18.02.2021 - 21:43
![]() Cahingt wrote:
Cahingt wrote:
Bonjour Je suis bloquée pour l'emmanchure. Si je tricote les 40 m, je tombe 1m après le fil marqueur, impossible donc de rabattre les 8m (4 de chaque côté des fils marqueurs). Je fais le modèle en taille M Je vous remercie beaucoup pour votre aide. Chloé
20.01.2020 - 17:44DROPS Design answered:
Bonjour Mme Cahingt, aviez-vous bien placé votre marqueur pour les diminutions? Le marqueur du côté doit être à 48 m du bord et on diminue 4 fois = il doit rester 44 m avant le marqueur, soit 40 m pour le devant + 4 m à rabattre avant le marqueur. Bon tricot!
21.01.2020 - 09:19
![]() Phyllis wrote:
Phyllis wrote:
In het patroon wordt vermeld dat je een omslag moet maken,. Wordt deze omslag dan in de volgende naald als een steek gebreid? In de eerste twee naalden worden namelijk per patroon 2x2 steken samengebreid, dus dan is in de derde naald de omslag weer ter compensatie om het aantal steken gelijk te houden wellicht?
08.12.2019 - 19:16DROPS Design answered:
Dag Phyllis,
De omslagen in het telpatroon worden op de volgende naald niet gedraaid gebreid, zodat er een gaatje ontstaat. Elke omslag wordt gecompenseerd met het minderen van steken (door samen te breien of 1 st afhalen, 1 st breien en de afgehaalde steek over te halen), waardoor het totaal aantal steken steeds gelijk blijft op de naald. (In de eerste naald staan de omslagen vlak naast de averechte steken aan de goede kant, dus naast de kruisjes.)
12.12.2019 - 13:01
![]() Cristina wrote:
Cristina wrote:
Buenas tardes, he llegado hasta el momento de disminuir el cuello y no entiendo cuántos puntos hay que disminuir, he disminuido 2 + 1 + 1 punto y no queda igualado con la espalda, creo que no está bien explicado y que hay que seguir disminuyendo hasta tener 18 puntos en cada lado delantero igual que en los hombros de la espalda, porque si no no queda bien, podrían especificarlo por favor? Gracias.
24.03.2019 - 15:19DROPS Design answered:
Hola Cristina. El escote de delantero derecho se trabaja como sigue ( por ejemplo, para la talla S): pasar los 15 puntos más externos hacia el centro del delantero a un gancho auxiliar, en la siguiente fila por el lado derecho disminuir 2 puntos, en la siguientes 2 filas por el lado derecho disminuir cada vez 1 punto = 37 - 15 - 2- 1 -1 =quedan 18 puntos para el hombro ( igual que en la espalda).
24.03.2019 - 19:50
![]() Barbara wrote:
Barbara wrote:
Dziękuję za odpowiedzi. Pozdrawiam
08.02.2019 - 14:56
![]() Barbara wrote:
Barbara wrote:
Dzien dobry, nie rozumiem po co mam przekladac 15 oczek na nitke i kiedy do nich wracam. Po przelozeniu oczek moja nitka jest na poczatku rzedu. Mam przerobic te 15 oczektak jak w schemacie i dopiero je zdjac na nitke, a potem ( na poczatku pozostalych 25 oczkek tego samego rzedu) zamknac 2 oczka, nastepnie w kolejnym rzedzie 1 oczko, tylko co z tymi 15 oczkami? Sa na nitce, opis nie wyjasnia co mam z nimi zrobic. Dziekuje zaodpowiedz.
07.02.2019 - 17:20DROPS Design answered:
Witaj Basiu, tak najpierw przerób te 15 oczek, a dopiero później przełóż na nitkę. Dalej zamykasz na dekolt na początku każdego rzędu od strony dekoltu (czyli od tej nitki): 1 raz 2 oczka i 2 razy 1 oczko. Co później z tymi 15 oczkami wyjaśniłam już w poprzedniej odpowiedzi na twoje pytanie Pozdrawiamy!
08.02.2019 - 08:38
![]() Barbara wrote:
Barbara wrote:
Dzien dobry , prosze wyjasnijcie co mam robic :"Umieścić teraz na drucie nitce 15-15-16-16-17-17 pierwszych oczek na dekolt." Czy to oznacza, ze przerabiam te oczka dzersejem a nastepne 25 oczek przerabiam wedlug opisu? Czy po prostu pozostawiam 15o. i zaczynam rzad po tych 15 o., wowczas oznaczaloby ze te 15o. przerabiam odzielnie az beda siegac do ramienia i doszywam je do dekoltu ( tylko ze 15 o =8cm? czy dobrze rozumiem? pozdrawiam.
07.02.2019 - 16:12DROPS Design answered:
Witaj Barbaro, przekładasz 15 pierwszych oczek na drut pomocniczy/nitkę, a następnie przerabiasz do końca już tylko pozostałe oczka (ramię) wg schematu, zamykając oczka od strony dekoltu (od środka przodu swetra), i dalej przerabiasz wg schematu, aż dł. robótki wynosi 68-70-72-74-76-78 cm (pozostałe oczka schematu A.1 są przerabiane dżersejem) i zakończyć. Zobacz schematyczny rysunek na końcu opisu. A te pozostawione 15 oczek na każdym przodzie będą potrzebne dopiero na końcu, przy wykonywaniu wykończenia dekoltu. Powodzenia!
08.02.2019 - 08:33
![]() Cheryl Lyon wrote:
Cheryl Lyon wrote:
I have the same query as the lady HHK on12.03.2018 but I do not understand the answer you gave her. Are the stitches between the A1 patterns knitted in stocking stitch or garter stitch. I cannot tell by looking at the picture. Please give instructions for the second row of the body
10.12.2018 - 00:05DROPS Design answered:
Dear Mrs Lyon, the stitches between A.1 will be either K or P - you are working from RS: 5 stitches garter stitch, purl 2 (= K these 2 sts from WS), A.1 (= 24-24-24-28-28-28 stitches = work these sts as shown in diagram), purl 2 (= K these 2 sts from WS), knit 25-31-37-37-45-55 (= P these sts from WS), purl 2 (K these 2 sts from WS), A.1, purl 2 (= K these 2 sts from WS), A.1, purl 2 (= K these 2 sts from WS), knit 25-31-37-37-45-55 (= P these sts from WS), purl 2 (= K these 2 sts from WS), A.1, purl 2 (= K these 2 sts from WS) and 5 stitches garter stitch. Happy knitting!
10.12.2018 - 10:33
![]() MIchele wrote:
MIchele wrote:
Question for shoulder/neck: I have placed the first 15 stitches on the thread. I am actually binding off 2 stitches from the needle, correct? The pattern says continue working the piece until it measures 68cm. AND it also says the remaining stitches in A1 are worked in stockinette stitch and bind off. Does this mean I no longer work the pattern from the time I bind off those first 2 stitches? Or exactly at what point do I stop working the A1 pattern on the shoulder and switch over to ss?
20.09.2018 - 15:51DROPS Design answered:
Dear Michele, correct, after you have binding off stitches for neck, you continue working all stitches in stocking stitch. Happy knitting!
20.09.2018 - 16:00
|
||||||||||||||||
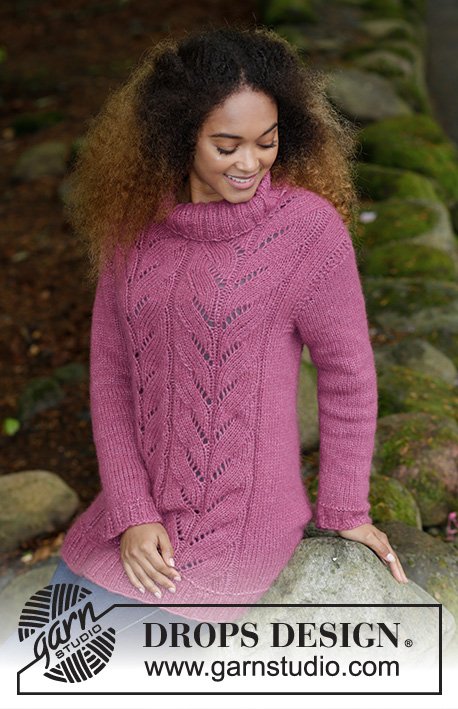
Lotus Jacket#lotusjacket |
||||||||||||||||
 |
 |
|||||||||||||||
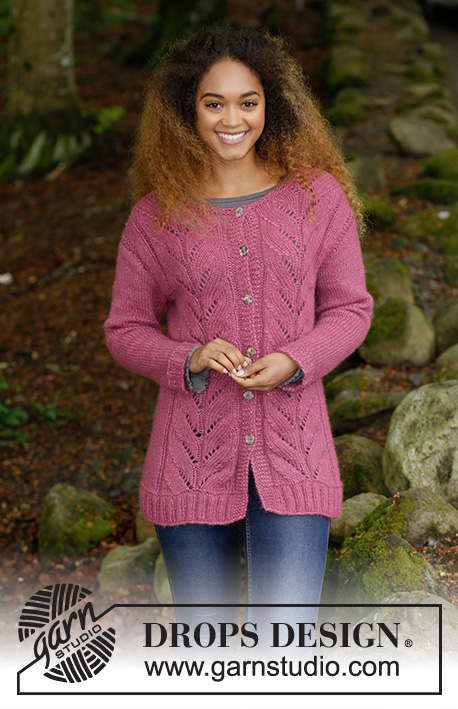
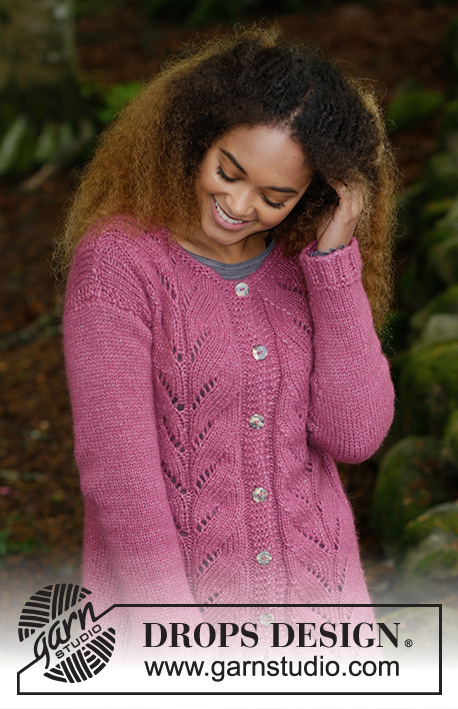
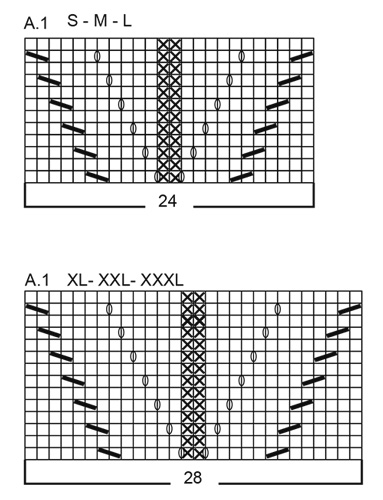
Knitted jacket with lace pattern and rib. Sizes S - XXXL. The jacket is worked in DROPS Air.
DROPS 179-18 |
||||||||||||||||
|
INFORMATION FOR THE PATTERN: RIDGE/GARTER STITCH (worked in the round): 1 ridge = 2 rounds. Knit 1 round and purl 1 round. RIDGE/GARTER STITCH (worked back and forth): 1 ridge = Knit 2 rows. PATTERN: See diagram A.1. The diagram shows all the rows in the pattern seen from the right side. See diagram for your size. DECREASE TIP (for the side): Start 3 stitches before the marker thread in the side: Knit 2 stitches together, knit 2 stitches (the marker thread sits between these stitches), slip 1 stitch, knit 1 stitch, pass the slipped stitch over the knitted stitch. INCREASE TIP (for mid under the sleeve): Start 1 stitch before the marker thread, make 1 yarn over, knit 2 (marker thread sits in the middle of these 2 stitches), make 1 yarn over (= 2 stitches increased). On the next round, knit the yarn overs twisted to prevent holes. BUTTONHOLE: Decrease for buttonholes on the right band. 1 BUTTONHOLE = knit third and fourth stitch from the edge together and make 1 yarn over. On the next row knit the yarn over = hole. Decrease for buttonholes when the piece measures: S: 16, 25, 34, 43, 52 and 61 cm M: 16, 25, 34, 43, 53 and 63 cm L: 16, 25, 35, 45, 55 and 65 cm XL: 16, 24, 32, 40, 49, 58 and 67 cm XXL: 16, 24, 33, 42, 51, 60 and 69 cm XXXL: 16, 26, 35, 44, 53, 62 and 71 cm ---------------------------------------------------------- JACKET: The piece is worked back and forth from mid front, bottom up to the armholes. Then work the front and back pieces back and forth on circular needle, separately. The sleeves are worked in the round with double pointed needles/short circular needle. BODY: Cast on 204-220-232-252-272-296 stitches with circular needle size 5 mm / US 8 and Air. Purl 1 row from the wrong side, then work rib as follows – from the right side: 5 stitches GARTER STITCH – see description above, * knit 2 / purl 2 *, repeat from *-* until there are 7 stitches left, knit 2 stitches and 5 stitches garter stitch. Continue with rib until the piece measures 6 cm / 2⅜". Change to circular needle size 6 mm / US 10 and work 1 ridge over all stitches, AT THE SAME TIME on the first row of the ridge, decrease 34-38-38-42-46-50 stitches evenly on the row = 170-182-194-210-226-246 stitches. Continue as follows – from the right side: 5 stitches garter stitch, purl 2, A.1 (= 24-24-24-28-28-28 stitches), purl 2, knit 25-31-37-37-45-55, purl 2, A.1, purl 2, A.1, purl 2, knit 25-31-37-37-45-55, purl 2, A.1, purl 2 and 5 stitches garter stitch. Continue this pattern upwards. REMEMBER THE GAUGE! Insert 1 marker thread in each side, 45-48-51-55-59-64 stitches in from mid front (back piece = 80-86-92-100-108-118 stitches). When the piece measures 8 cm / 3⅛" decrease 1 stitch on each side of the marker threads in the sides = 4 stitches decreased, READ DECREASE TIP! Decrease every 12-12-13-13-14-14 cm / 4¾"-4¾"-5"-5"-5½"-5½" a total of 4 times = 154-166-178-194-210-230 stitches. AT THE SAME TIME when the piece measures 16 cm / 6¼" start decreasing for BUTTONHOLE – see description above. When the piece measures 48-49-50-51-52-53 cm / 19"-19¼"-19¾"-20"-20½"-21" work ridges over 14 stitches in each side (= 7 stitches on each side of the marker threads in the sides). When you have worked 2 ridges over the stitches in the sides, work the next row as follows – from the right side: Work 37-40-43-47-51-56 stitches, bind off the next 8 stitches for the armhole (= 4 stitches on each side of the marker threads in the sides), work 64-70-76-84-92-102 stitches, bind off the next 8 stitches for the armhole, work 37-40-43-47-51-56 stitches. Now work each part separately. BACK PIECE: = 64-70-76-84-92-102 stitches. Continue with pattern as before, the 3 outermost stitches in each side are now worked in garter stitch. When the piece measures 66-68-70-72-74-76 cm / 26"-26¾"-27½"-28⅜"-29⅛"-30" bind off the middle 26-26-28-28-30-30 stitches for the neck and each shoulder is finished separately. Bind off 1 stitch on the next row from the neck = 18-21-23-27-30-35 stitches left on the shoulder. Continue working until the piece measures 68-70-72-74-76-78 cm / 26¾"-27½"-28⅜"-29⅛"-30"-30¾" (the remaining stitches in A.1 are worked in stockinette stitch) and bind off. Work the other shoulder in the same way. RIGHT FRONT PIECE: = 37-40-43-47-51-56 stitches. Continue with pattern as before, the 3 outermost stitches in the side towards the armhole are worked in garter stitch. REMEMBER BUTTONHOLES. Continue working until the piece measures 62-64-66-68-70-72 cm / 24⅜"-25¼"-26"-26¾"-27½"-28⅜". Now place the first 15-15-16-16-17-17 stitches on a thread for the neck. Continue the pattern as before and bind off for the neck at the beginning of each row from the neck as follows: 2 stitches 1 time and 1 stitch 2 times = 18-21-23-27-30-35 stitches left on the shoulder. Continue working until the piece measures 68-70-72-74-76-78 cm / 26¾"-27½"-28⅜"-29⅛"-30"-30¾" (the remaining stitches in A.1 are worked in stockinette stitch) and bind off. Work the other shoulder in the same way. LEFT FRONT PIECE: Work as for the right, but reversed. SLEEVE: The sleeve is worked in the round with double pointed needles/circular needle. Cast on 40-40-44-48-52-52 stitches with double pointed needles size 5 mm / US 8 and Air. Knit 1 round, then work rib, knit 2/ purl 2. Work rib for 5 cm / 2", then change to double pointed needles size 6 mm / US 10, work 1 RIDGE, see description above, on the first round of the ridge decrease 6-6-8-10-12-12 stitches evenly on round = 34-34-36-38-40-40 stitches. Continue with stockinette stitch. Insert 1 marker thread at the beginning of the round = mid under the sleeve. Work stockinette stitch in the round. When the piece measures 8-8-8-8-10-9 cm / 3"-3"-3"-3"-4"-3½" increase 2 stitches mid under the sleeve – READ INCREASE TIP. Increase in this way every 3½-3-2½-2½-2-2 cm / 1¼"-1⅛"-⅞"-⅞"-¾"-¾" a total of 12-13-14-14-15-16 times = 58-60-64-66-70-72 stitches. When the piece measures 49-48-47-46-44-41 cm / 19¼"-19"-18½"-18"-17¼"-16" (shorter measurements in larger sizes because of the shoulder width), bind off the middle 6 stitches under the sleeve and the sleeve cap is finished back and forth on circular needle. Work stockinette stitch and bind off at the beginning of each row in each side as follows: 3 stitches 3 times = 34-36-40-42-46-48 stitches. The sleeve measures approx. 52-51-50-48-47-44 cm / 20½"-20"-19¾"-19"-18½"-17¼". Bind off the remaining stitches. Work one more sleeve in the same way. ASSEMBLY: Sew shoulder seams. Sew in the sleeves. Sew the buttons onto the left front piece. NECKLINE: Knit up approx. 80 - 100 stitches (including the stitches on the threads) with circular needle size 5 mm / US 8 and Air. Work 2 ridges back and forth, then bind off with knit from the right side. |
||||||||||||||||
Diagram explanations |
||||||||||||||||
|
||||||||||||||||
 |
||||||||||||||||
 |
||||||||||||||||
Have you finished this pattern?Tag your pictures with #dropspattern #lotusjacket or submit them to the #dropsfan gallery. Do you need help with this pattern?You'll find 26 tutorial videos, a Comments/Questions area and more by visiting the pattern on garnstudio.com. © 1982-2026 DROPS Design A/S. We reserve all rights. This document, including all its sub-sections, has copyrights. Read more about what you can do with our patterns at the bottom of each pattern on our site. |
||||||||||||||||


With over 40 years in knitting and crochet design, DROPS Design offers one of the most extensive collections of free patterns on the internet - translated to 17 languages. As of today we count 324 catalogs and 12290 patterns - 12280 of which are translated into English (US/in).
We work hard to bring you the best knitting and crochet have to offer, inspiration and advice as well as great quality yarns at incredible prices! Would you like to use our patterns for other than personal use? You can read what you are allowed to do in the Copyright text at the bottom of all our patterns. Happy crafting!
Post a comment to pattern DROPS 179-18
We would love to hear what you have to say about this pattern!
If you want to leave a question, please make sure you select the correct category in the form below, to speed up the answering process. Required fields are marked *.