
Popular categories
Looking for a yarn?


Comments / Questions (116)
![]() Anne Gjestvang wrote:
Anne Gjestvang wrote:
Jeg har fått beskjed om at det har kommet et svar på mitt spørsmål fra 19/5. Det stemmer ikke....
09.06.2018 - 18:49DROPS Design answered:
Hei Anne. Takk for beskjed, det hadde skjedd en feil i posting av svaret ditt. Nå skal det være i orden og svaret er synlig. Beklager dette og god fornøyelse
25.06.2018 - 10:56
![]() Gaëlle F. wrote:
Gaëlle F. wrote:
Bonjour , encore moi . Ok pour les augmentations (2x2 + 9x1 = dos ) et ( 6x2 + 5x1= devant) mais ca fait 11 rangs d'augmentation. Je me fis sur le diagramme pour compter mes rangs . Si le 11e rang du diagramme correspond au dernier rang raccourci , le 12ème rang jusqu'au 31e ( 1ère flèche) , je ne compte que 10rg ou l'on peut augmenter ...y'a sûrement quelques chose que je n'ai pas saisie je suis désolée 😐.
05.06.2018 - 05:26DROPS Design answered:
Bonjour Gaëlle, on augmente pour l'arrondi des manches avant la fin des augmentations du dos et du devant = vous continuez à augmenter pour le devant et le dos et au rang avec la flèche dans A.2, vous commencez à augmenter pour l'arrondi des manches. Bon tricot!
05.06.2018 - 09:00
![]() Gaëlle F. wrote:
Gaëlle F. wrote:
Bonjour merci pour votre aide . J'ai fini les rangs raccourcis. Coupé le fil et recommencé au milieu du dos . Maintenant et jusqu'au rang du diagramme où il y a la flèche de la taille choisie (S), j'augmente seulement d' 1 maille côté dos et devants (de chaque côté des manches = 4 m par rangs , tous les 2 rangs ( 9x4 )? Ensuite j'y ajoute les augmentations de l'arrondi des manches ? Est ce exact ? Je préfère demander avant de tout devoir défaire ... :)
03.06.2018 - 05:52DROPS Design answered:
Bonjour Gaëlle, en taile S vous augmentez sur le dos: 2 x 2 m et 9x 1 m tous les 2 tours (soit 26m augmentées pour le dos) et sur le devant: 6x 2 m et 5x 1 m tous les 2 tours (soit 34 m augmentées pour le devant) . Et, quand vous arrivez au tour avec la flèche, vous augmentez pour l'arrondi des manches: 1x tous les tours et 25x tous les 2 tours (soit 52 m augmentées pour chaque manche) = soit 306 m quand toutes les augmentations sont faites. Bon tricot!
04.06.2018 - 09:13
![]() Gaëlle F. wrote:
Gaëlle F. wrote:
Bonjour, Merci pour votre réponse. Néanmoins si je continue sur le rang 5 , je me rends au marqueur 1, continuer A2 = rang 3 du diagramme encore ou passer au rang 5 directement ? Puis au rang 6 du tricot , A2 = rang 4 sachant qu\'on est sur l\'env ? Rang 4 du diagramme que je refais sur l\'autre épaule, du côté du marqueur 4 ?? Ai-je bien compris le principe ? Ou je suis dans le champs ?! Merci beaucoup pour votre aide
01.06.2018 - 05:09DROPS Design answered:
Bonjour Gaëlle, les rangs impairs se font sur l'endroit = rangs ajourés de A.2 et les rangs pairs se font sur l'envers (= on tricote les mailles de A.2 à l'envers). Au rang 4, on tricote d'abord le rang 2 de A.2 puis après le marqueur 4, on tricote le rang 2 du diagramme. Bon tricot!
01.06.2018 - 09:00
![]() Gaëlle F. wrote:
Gaëlle F. wrote:
Bonjour , Je suis encore aux rangs raccourcis et oui j'ai déjà des questions :) Rang 5: tricoter A.2 = sachant qu'au rang précédent il fallait commencer au rang 2 du diagramme pour l'envers , pour ce rang dois-je tricoter le rang 1 ou le rend 3 du diagramme ? Merci beaucoup
30.05.2018 - 04:01DROPS Design answered:
Bonjour Gaëlle, au rang 5, vous tricotez le rang 3 de A.2. Bon tricot!
30.05.2018 - 08:56
![]() Anne Gjestvang wrote:
Anne Gjestvang wrote:
Hei. Har strikket mye,men dette mønsteret forstår jeg ikke. Ser at jeg ikke er alene om det. Står at en skal begynne å øke til ermetopp ved pilen. Og at disse maskene skal strikkes vrangt og inn i mønsteret. men på bildet er det da ikke mer økning enn det som blir av mønster A2. (og øking til skulder) . Forstår det slik at disse økte,vrange maskene er de som blir under ermet. ... Uforståelig.... Anne
19.05.2018 - 08:08DROPS Design answered:
Hei Anne. Du skal, som du sier, begynne å øke til ermtopp ved pilen for din størrelse, som anvist i oppskriften. De økte maskene strikkes vrangt. Disse vil inngå i diagrammet etterhvert som A.2 øker utover. Som du kan se er det lagt til en rettelse om at oppskirften er skrevet om i sin helhet: bildet av genseren er derfor ikke nødvendigvis helt identisk med oppskriften i den størrelsen du strikker. Følg anvisningen i oppskriften så skal du se at det blir fint. God fornøyelse
29.05.2018 - 13:48
![]() Romy wrote:
Romy wrote:
Hi, Can I use "Drops Sky" to replace the "Puna" in this pattern? If I can, how many balls of Sky I have to get for a size M ? Thank you, Romy
28.04.2018 - 00:03DROPS Design answered:
Dear Romy, Sky and Puna both belong to yarn group B so that you can use Sky as an alternative - read more about alternatives here, do not hesitate to try our yarn converter to calculate new amount of yarn. Happy knitting!
30.04.2018 - 09:51
![]() Franca Ghidoni wrote:
Franca Ghidoni wrote:
Rimando il messaggio...Buongiorno sto eseguendo il modello in taglia L .sono al ferro 13 e ho effettivamente 146 maglie suddivise come descritto, ma non mi tornano le maglie sul centro davanti sulle quali non ho fatto i ferri accorciati. Io ne ho 20 mentre nel modello ne sono indicate 4. Non riesco a capire se e dove sbaglio...mi potete aiutare? Grazie mille!
05.03.2018 - 10:20DROPS Design answered:
Buonasera Franca. E' corretto il suo conteggio. Chiederemo di verificare l'indicazione sul numero delle maglie non lavorate con i ferri accorciati. Buon lavoro!
05.03.2018 - 22:00
![]() Hajni wrote:
Hajni wrote:
Érdeklődni szeretnék, hogy magyar fordítás is készül-e a javított mintaleírásról.
02.03.2018 - 00:18DROPS Design answered:
Kedves Hajni! Amint elkészültek az aktuális katalógusok mintáinak fordításai igyekszünk pótolni a javított változatot is. Még egy kis türelmet kérünk. Sikeres kézimunkázást!
04.03.2018 - 18:41
![]() Franca wrote:
Franca wrote:
Buongiorno sto eseguendo il modello in taglia L .sono al ferro 13 e ho effettivamente 146 magli suddivise come descritto, ma non mi tornano le maglie sul centro davanti sulle quali non ho fatto i ferri accorciati.io ne ho 20 mentre nel modello ne sono indicate 4. Non riesco a capire se e dove sbaglio...mi potete aiutare? Grazie mille!
01.03.2018 - 23:02
|
||||||||||||||||||||||
Vanilla Kiss#vanillakisssweater |
||||||||||||||||||||||
 |
 |
|||||||||||||||||||||
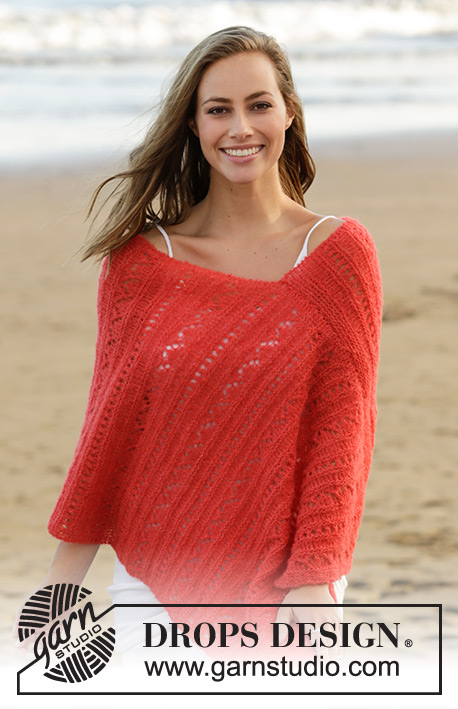
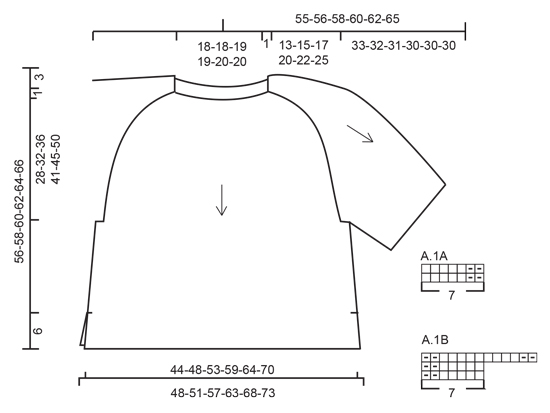
Knitted sweater with lace pattern on shoulders and sleeves, worked top down. Sizes S - XXXL. The piece is worked in DROPS Puna.
DROPS 178-16 |
||||||||||||||||||||||
|
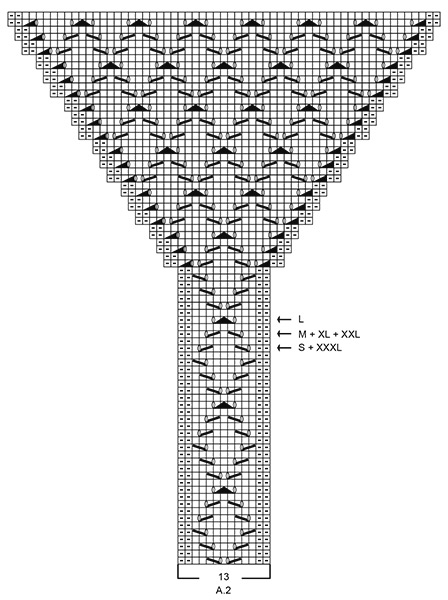
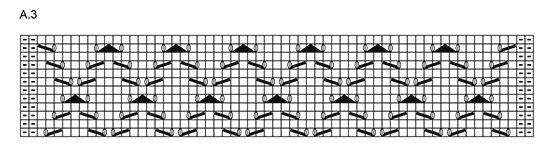
RIDGE/GARTER STITCH (worked in the round): 1 ridge = 2 rounds. Knit 1 round and purl 1 round. RIDGE/GARTER STITCH (worked back and forth): 1 ridge = Knit 2 rows. PATTERN: See diagrams A.1 to A.3. The diagrams show all rows in pattern seen from the right side. SHOULDER: NOTE: All increases worked from right side! On next row work yarn overs twisted to avoid holes. Increase 2 stitches as follows: INCREASE 2 STITCHES BEFORE MARKERS 1 AND 3: Start 3 stitches before marker, 1 yarn over, knit 2, 1 yarn over, knit 1, (= 2 stitches increased). INCREASE 2 STITCHES AFTER MARKERS 2 AND 4: Knit 1, 1 yarn over, knit 2, 1 yarn over (= 2 stitches increased). Increase 1 stitch as follows: INCREASE 1 STITCH BEFORE MARKERS 1 AND 3: Start 1 stitch before marker, 1 yarn over, knit 1 (= 1 stitch increased). INCREASE 1 STITCH AFTER MARKERS 2 AND 4: Knit 1, 1 yarn over (= 1 stitch increased). SLEEVE CAP: Increase 1 stitch by making 1 yarn over (make sure the yarn over is not too loose). On next round: purl yarn over twisted to avoid holes – knit the first 21 stitches increased, purl the remaining stitches. INCREASE TIP (for sides of front and back pieces): Increase on inside of the 4 outermost stitches in each side (i.e. 3 edge stitches in garter stitch + 1 stitch in stockinette stitch). Increase 1 stitch by making 1 yarn over, on next row work yarn over twisted to avoid a hole (the increased stitch is worked in stockinette stitch). DECREASE TIP (for mid under sleeve): Start 3 stitches before marker mid under sleeve, purl 2 together, knit 2 (the marker sits in the middle of these 2 stitches), purl 2 together (= 2 stitches decreased). ---------------------------------------------------------- SWEATER The piece is worked in the round with circular needle, top down, as far as below the sleeves. Then the front and back pieces are worked separately back and forth. The sleeves are worked in the round. The photo deviates somewhat from pattern regarding increases in sleeve caps (A.2) – the fit has been improved. YOKE: Cast on 102-102-106-106-110-110 stitches with short circular needle size 3 mm / US 2.5 and Puna. The round starts mid back. Insert a marker here which will follow your work onwards. Work 2 RIDGES in the round – see description above. Insert 4 new markers in the piece as follows (without working the stitches): Insert marker 1 after the first 19-19-20-20-21-21 stitches (= ½ back piece), marker 2 after the next 13 stitches (= shoulder/sleeve), marker 3 after the next 38-38-40-40-42-42 stitches (= front piece), marker 4 after the next 13 stitches (= shoulder/sleeve), there are now 19-19-20-20-21-21 stitches left after the last marker (= ½ back piece). Change to circular needle size 4 mm / US 6. Now work short rows over the stitches in the neck for a better fit, AT THE SAME TIME as you increase stitches to shoulder and work pattern on shoulders/sleeves (= 13 stitches) as follows: ROW 1 (from right side): Knit until 3 stitches before the marker 1, increase 2 stitches to SHOULDER – see description above, work A.1A (= 7 stitches), turn piece and tighten strand. ROW 2 (from wrong side): Work A.1A, purl as far as marker 4, A.1B (= 7 stitches –you read the diagram from left to right when working from the wrong side), turn the piece and tighten strand. ROW 3: Work A.1B, increase 2 stitches to shoulder, knit to 3 stitches before marker 1 and increase 2 stitches to shoulder, work A.2 (= 13 stitches), marker 2 is here, turn the piece and tighten strand. ROW 4: Work A.2, purl to marker 4, work A.2 – start on row 2 in the diagram, marker 3 is here, turn the piece and tighten strand. ROW 5: Work A.2, increase 2 stitches to shoulder, knit to 3 stitches before marker 1, increase 2 stitches to shoulder, continue A.2 and increase 2 stitches to shoulder on front piece, (i.e. you work as follows after marker 2: Knit 1, 1 yarn over, knit 2, 1 yarn over), knit 1, (= 4 stitches + 2 yarn overs on front piece), turn the piece and tighten strand. ROW 6: Purl to marker 2 (= purl 6 stitches on front piece), continue A.2, purl to marker 4, continue A.2, purl 4 stitches on front piece (= 4 stitches past marker 3) turn the piece and tighten strand. REMEMBER THE GAUGE! ROW 7: Knit 1, increase 2 stitches to shoulder (= 4 stitches + 2 yarn overs on front piece), continue A.2, increase 2 stitches to shoulder, knit to 3 stitches before marker 1, increase 2 stitches to shoulder, continue A.2, increase 2 stitches to shoulder on front piece and knit over 2 more stitches than on previous row on front piece (= 8 stitches + 2 yarn overs on front piece), turn the piece and tighten the strand. ROW 8: Purl to marker 2 (= 10 purled stitches on front piece), continue A.2, purl to marker 4, continue A.2 and purl over 2 stitches more than on the previous row on front piece (= 8 stitches on front piece), turn the piece and tighten strand. ROW 9: Knit to 3 stitches before the marker, increase 2 stitches to shoulder (= 8 knitted stitches + 2 yarn overs on front piece), continue A.2, increase 2 stitches to shoulder, knit to 3 stitches before marker 1, increase 2 stitches to shoulder, continue A.2, increase 2 stitches to shoulder on front piece, Knit over 2 stitches more than on the previous row on front piece (= 12 stitches + 2 yarn overs on front piece), turn piece and tighten strand. ROW 10: Purl to marker 2 (= 14 purled stitches on front piece), continue A.2, purl to marker 4, continue A.2 and purl over 2 stitches more than on previous row on front piece (= 12 stitches on front piece), turn the piece and tighten strand. ROW 11: Knit to 3 stitches before the marker, increase 2 stitches to shoulder (= 12 knitted stitches + 2 yarn overs on front piece), continue A.2, increase 2 stitches to shoulder, knit to 3 stitches before marker 1, increase 2 stitches to shoulder, continue A.2, increase 2 stitches to shoulder on front piece, knit over 2 more stitches than on the previous row on front piece (= 16 stitches + 2 yarn overs on front piece), turn the piece and tighten strand. ROW 12: Purl to marker 2 (= 18 purled stitches on front piece), continue A.2, purl to marker 4, continue A.2 and purl over 2 stitches more than on previous row on front piece (= 16 stitches on front piece), turn piece and tighten strand. ROW 13: Knit to 3 stitches before marker, increase 2 stitches to shoulder (= 18 stitches before next marker), continue A.2, increase 2 stitches to shoulder, knit to mid back (= start of the round). Continue with pattern but without increasing as far as marker 2. Now you have worked 11 rows of A.2. Cut the strand. You have now increased 2 stitches to shoulder in each side of the front piece 4 times and 2 stitches to shoulder in each side of the back piece 6 times = 142-142-146-146-150-150 stitches (= 54-54-56-56-58-58 stitches on front piece and 62-62-64-64-66-66 stitches on back piece). The short rows are now finished and you continue in the round with circular needle. Start at marker mid back. On the next round continue the increases to shoulder (= work the increased stitches on front and back piece in stockinette stitch) and work A.2 as before, AT THE SAME TIME on round with arrow in A.2 (i.e. before the increases to shoulder are finished) start the increases to sleeve cap (= work the first 21 increased stitches knit. AT THE SAME TIME work the new stitches into A.2 as A.2 expands outwards). When A.2 has been completed in height, repeat A.3 over A.2 to finished length. Increase to shoulder and to sleeve cap as described below: INCREASE TO SHOULDER AS FOLLOWS: NOTE: You increase differently on front and back pieces and, on the rounds after increases, the yarn overs are knitted twisted to avoid holes - Remember SHOULDER! INCREASE ON BACK PIECE (= between markers 4 and 1): Increase 2 stitches every 2nd round a total of 2-3-5-7-8-10 times, then increase 1 stitch every 2nd round a total of 9-11-12-14-16-18 times. INCREASE ON FRONT PIECE (= between markers 2 and 3): Increase 2 stitches every 2nd round a total of 6-7-9-11-12-14 times, then increase 1 stitch every 2nd round a total of 5-7-8-10-12-14 times. After all increases to shoulder there are 88-96-108-120-130-142 stitches on both front and back pieces. INCREASE TO SLEEVE CAP AS FOLLOWS: On the round with an arrow in diagram A.2 start increasing to SLEEVE CAP – see description above. Increase 1 stitch on each side of A.2 on every shoulder/sleeve (= 4 stitches increased on round). Increase in this way every round a total of 1-4-6-4-4-2 times and then every 2nd round a total of 25-26-28-32-34-38 times. There should always be 2 purled stitches on each side of the lace pattern A.2 on sleeves. (These purl stitches are included in the diagram). A.2 expands outwards as diagram is worked, so that more and more stitches are included in the lace pattern. When all increases to sleeve cap are finished, there are 65-73-81-85-89-93 stitches on each sleeve. After all increases to shoulder and sleeve cap there are 306-338-378-410-438-470 stitches on the needle and piece measures 31-33-35-37-38-41 cm / 12¼"-13"-13¾"-14½"-15"-16" (measured from shoulder down). There are now 4-8-12-14-16-18 purled stitches on each side of the lace pattern (including the 2 stitches in each side of A.2/A.3). The next round is worked as follows: Work 44-48-54-60-65-71 stitches stockinette stitch (= ½ back piece), place the next 65-73-81-85-89-93 stitches on 1 thread (= sleeve), cast on 4 new stitches on needle (= in side under sleeve), work 88-96-108-120-130-142 stitches stockinette stitch (= front piece), place the next 65-73-81-85-89-93 stitches on 1 thread (= sleeve), cast on 4 new stitches on needle (= in side under sleeve) and work the remaining 44-48-54-60-65-71 stitches in stockinette stitch (= ½ back piece). BODY: = 184-200-224-248-268-292 stitches. THE PIECE IS NOW MEASURED FROM HERE! Now divide the piece in the middle of the 4 new stitches under each sleeve and the front and back pieces are worked separately, back and forth on circular needle to finished length. BACK PIECE: = 92-100-112-124-134-146 stitches. Work stockinette stitch with 3 edge stitches in GARTER STITCH – see description above, in each side. When piece measures 3 cm / 1" from the division, increase 1 stitch in each side – read INCREASE TIP (= 2 stitches increased). Increase in this way every 14th-14th-14th-14th-14th-14th row a total of 4 times in each side = 100-108-120-132-142-154 stitches. When piece measures 24-24-24-24-25-24 cm / 9½"-9½"-9½"-9½"-9¾"-9½" from the division, change to circular needle size 3 mm / US 2.5. Work 3 ridges, change back to circular needle size 4 mm / US 6 and loosely bind off. The sweater measures approx. 56-58-60-62-64-66 cm / 22"-22¾"-23⅝"-24⅜"-25¼"-26" from top of shoulder down. FRONT PIECE: = 92-100-112-124-134-146 stitches. Work in the same way as the back piece. SLEEVE: Place the 65-73-81-85-89-93 stitches from the thread in one side of the piece onto short circular needle/double pointed needles size 4 mm / US 6 and, in addition, knit up 1 stitch in each of the 4 stitches cast on under the sleeve = 69-77-85-89-93-97 stitches on needle. Insert 1 marker in the middle of the 4 new stitches mid under sleeve and allow the marker to follow your work onwards. Continue A.3 as before, knit 1 stitch on each side of the marker mid under sleeve and purl the remaining stitches on the round. When piece measures 3 cm / 1" from the division, decrease 2 stitches mid under sleeve – read DECREASE TIP. Repeat the decrease when piece measures 8-8-7-7-6-6 cm / 3"-3"-2¾"-2¾"-2¼"-2¼" = 65-73-81-85-89-93 stitches. Continue working until piece measures 14-12-11-11-11-12 cm / 5½"-4¾"-4½"-4½"-4½"-4¾" from the division. Change to double pointed needles size 3 mm / US 2.5. Work 3 ridges over all stitches, change back to double pointed needles size 4 mm / US 6 and bind off. Work the other sleeve in the same way. ASSEMBLY: Sew side seams in outermost loop of outermost stitch so that the seam is flat, but stop when there is 6 cm / 2⅜" left in each side (= split). |
||||||||||||||||||||||
Diagram explanations |
||||||||||||||||||||||
|
||||||||||||||||||||||
 |
||||||||||||||||||||||
 |
||||||||||||||||||||||
 |
||||||||||||||||||||||
Have you finished this pattern?Tag your pictures with #dropspattern #vanillakisssweater or submit them to the #dropsfan gallery. Do you need help with this pattern?You'll find 33 tutorial videos, a Comments/Questions area and more by visiting the pattern on garnstudio.com. © 1982-2026 DROPS Design A/S. We reserve all rights. This document, including all its sub-sections, has copyrights. Read more about what you can do with our patterns at the bottom of each pattern on our site. |
||||||||||||||||||||||


With over 40 years in knitting and crochet design, DROPS Design offers one of the most extensive collections of free patterns on the internet - translated to 17 languages. As of today we count 325 catalogs and 12298 patterns - 12288 of which are translated into English (US/in).
We work hard to bring you the best knitting and crochet have to offer, inspiration and advice as well as great quality yarns at incredible prices! Would you like to use our patterns for other than personal use? You can read what you are allowed to do in the Copyright text at the bottom of all our patterns. Happy crafting!
Post a comment to pattern DROPS 178-16
We would love to hear what you have to say about this pattern!
If you want to leave a question, please make sure you select the correct category in the form below, to speed up the answering process. Required fields are marked *.