
Popular categories
Looking for a yarn?


|
||||||||||||||||||||||
Vanilla Kiss |
||||||||||||||||||||||
 |
 |
|||||||||||||||||||||
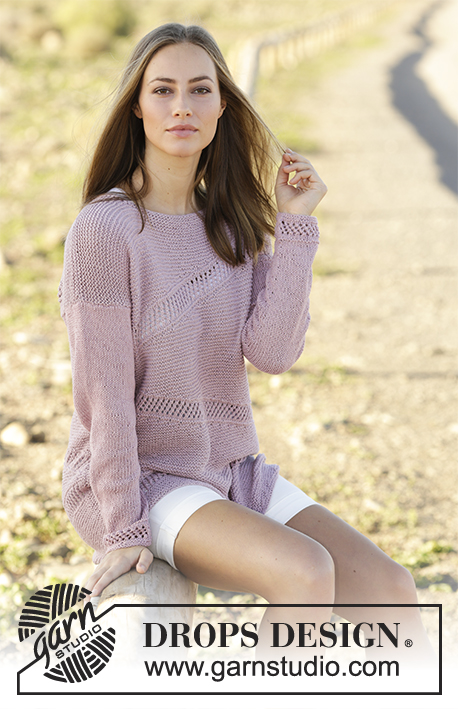
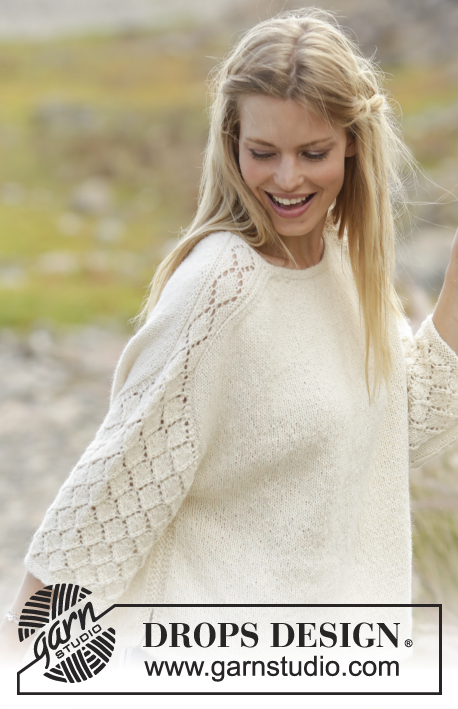
Jumper with lace pattern on shoulders and sleeves, knitted top down in DROPS Puna or Sky. Size: S - XXXL
DROPS 178-16 |
||||||||||||||||||||||
|
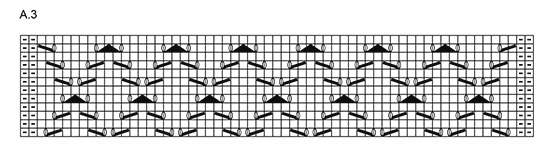
RIDGE/GARTER STITCH (worked in the round): 1 ridge = 2 rounds. Knit 1 round and purl 1 round. RIDGE/GARTER STITCH (worked back and forth): 1 ridge = Knit 2 rows. PATTERN: See diagrams A.1 to A.3. The diagrams show all rows in pattern seen from the right side. SHOULDER: NOTE: All increases worked from right side! On next row work yarn overs twisted to avoid holes. Increase 2 stitches as follows: INCREASE 2 STITCHES BEFORE MARKERS 1 AND 3: Start 3 stitches before marker, 1 yarn over, knit 2, 1 yarn over, knit 1, (= 2 stitches increased). INCREASE 2 STITCHES AFTER MARKERS 2 AND 4: Knit 1, 1 yarn over, knit 2, 1 yarn over (= 2 stitches increased). Increase 1 stitch as follows: INCREASE 1 STITCH BEFORE MARKERS 1 AND 3: Start 1 stitch before marker, 1 yarn over, knit 1 (= 1 stitch increased). INCREASE 1 STITCH AFTER MARKERS 2 AND 4: Knit 1, 1 yarn over (= 1 stitch increased). SLEEVE CAP: Increase 1 stitch by making 1 yarn over (make sure the yarn over is not too loose). On next round: work yarn over twisted to avoid holes – knit the first 21 stitches increased, purl the remaining stitches. next round purl yarn over twisted to avoid a hole – all increased stitches on sleeve cap are purled. INCREASE TIP (for sides of front and back pieces): Increase on inside of the 4 outermost stitches in each side (i.e. 3 edge stitches in garter stitch + 1 stitch in stocking stitch). Increase 1 stitch by making 1 yarn over, on next row work yarn over twisted to avoid a hole (the increased stitch is worked in stocking stitch). DECREASE TIP (for mid under sleeve): Start 3 stitches before marker mid under sleeve, purl 2 together, knit 2 (the marker sits in the middle of these 2 stitches), purl 2 together (= 2 stitches decreased). ---------------------------------------------------------- JUMPER The piece is worked in the round with circular needle, top down, as far as below the sleeves. Then the front and back pieces are worked separately back and forth. The sleeves are worked in the round. The photo deviates somewhat from pattern regarding increases in sleeve caps (A.2) – the fit has been improved. YOKE: Cast on 102-102-106-106-110-110 stitches with short circular needle size 3 mm and Puna. The round starts mid back. Insert a marker here which will follow your work onwards. Work 2 RIDGES in the round – see description above. Insert 4 new markers in the piece as follows (without working the stitches): Insert marker 1 after the first 19-19-20-20-21-21 stitches (= ½ back piece), marker 2 after the next 13 stitches (= shoulder/sleeve), marker 3 after the next 38-38-40-40-42-42 stitches (= front piece), marker 4 after the next 13 stitches (= shoulder/sleeve), there are now 19-19-20-20-21-21 stitches left after the last marker (= ½ back piece). Change to circular needle size 4 mm. Now work short rows over the stitches in the neck for a better fit, AT THE SAME TIME as you increase stitches to shoulder and work pattern on shoulders/sleeves (= 13 stitches) as follows: ROW 1 (from right side): Knit until 3 stitches before the marker 1, increase 2 stitches to SHOULDER – see description above, work A.1A (= 7 stitches), turn piece and tighten strand. ROW 2 (from wrong side): Work A.1A, purl as far as marker 4, A.1B (= 7 stitches –you read the diagram from left to right when working from the wrong side), turn the piece and tighten strand. ROW 3: Work A.1B, increase 2 stitches to shoulder, knit to 3 stitches before marker 1 and increase 2 stitches to shoulder, work A.2 (= 13 stitches), marker 2 is here, turn the piece and tighten strand. ROW 4: Work A.2, purl to marker 4, work A.2 – start on row 2 in the diagram, marker 3 is here, turn the piece and tighten strand. ROW 5: Work A.2, increase 2 stitches to shoulder, knit to 3 stitches before marker 1, increase 2 stitches to shoulder, continue A.2 and increase 2 stitches to shoulder on front piece, (i.e. you work as follows after marker 2: Knit 1, 1 yarn over, knit 2, 1 yarn over), knit 1, (= 4 stitches + 2 yarn overs on front piece), turn the piece and tighten strand. ROW 6: Purl to marker 2 (= purl 6 stitches on front piece), continue A.2, purl to marker 4, continue A.2, purl 4 stitches on front piece (= 4 stitches past marker 3) turn the piece and tighten strand. REMEMBER THE KNITTING TENSION! ROW 7: Knit 1, increase 2 stitches to shoulder (= 4 stitches + 2 yarn overs on front piece), continue A.2, increase 2 stitches to shoulder, knit to 3 stitches before marker 1, increase 2 stitches to shoulder, continue A.2, increase 2 stitches to shoulder on front piece and knit over 2 more stitches than on previous row on front piece (= 8 stitches + 2 yarn overs on front piece), turn the piece and tighten the strand. ROW 8: Purl to marker 2 (= 10 purled stitches on front piece), continue A.2, purl to marker 4, continue A.2 and purl over 2 stitches more than on the previous row on front piece (= 8 stitches on front piece), turn the piece and tighten strand. ROW 9: Knit to 3 stitches before the marker, increase 2 stitches to shoulder (= 8 knitted stitches + 2 yarn overs on front piece), continue A.2, increase 2 stitches to shoulder, knit to 3 stitches before marker 1, increase 2 stitches to shoulder, continue A.2, increase 2 stitches to shoulder on front piece, Knit over 2 stitches more than on the previous row on front piece (= 12 stitches + 2 yarn overs on front piece), turn piece and tighten strand. ROW 10: Purl to marker 2 (= 14 purled stitches on front piece), continue A.2, purl to marker 4, continue A.2 and purl over 2 stitches more than on previous row on front piece (= 12 stitches on front piece), turn the piece and tighten strand. ROW 11: Knit to 3 stitches before the marker, increase 2 stitches to shoulder (= 12 knitted stitches + 2 yarn overs on front piece), continue A.2, increase 2 stitches to shoulder, knit to 3 stitches before marker 1, increase 2 stitches to shoulder, continue A.2, increase 2 stitches to shoulder on front piece, knit over 2 more stitches than on the previous row on front piece (= 16 stitches + 2 yarn overs on front piece), turn the piece and tighten strand. ROW 12: Purl to marker 2 (= 18 purled stitches on front piece), continue A.2, purl to marker 4, continue A.2 and purl over 2 stitches more than on previous row on front piece (= 16 stitches on front piece), turn piece and tighten strand. ROW 13: Knit to 3 stitches before marker, increase 2 stitches to shoulder (= 18 stitches before next marker), continue A.2, increase 2 stitches to shoulder, knit to mid back (= start of the round). Continue with pattern but without increasing as far as marker 2. Now you have worked 11 rows of A.2. Cut the strand. You have now increased 2 stitches to shoulder in each side of the front piece 4 times and 2 stitches to shoulder in each side of the back piece 6 times = 142-142-146-146-150-150 stitches (= 54-54-56-56-58-58 stitches on front piece and 62-62-64-64-66-66 stitches on back piece). The short rows are now finished and you continue in the round with circular needle. Start at marker mid back. On the next round continue the increases to shoulder (= work the increased stitches on front and back piece in stocking stitch) and work A.2 as before, AT THE SAME TIME on round with arrow in A.2 (i.e. before the increases to shoulder are finished) start the increases to sleeve cap (= work the first 21 increased stitches knit. AT THE SAME TIME work the new stitches into A.2 as A.2 expands outwards). When A.2 has been completed in height, repeat A.3 over A.2 to finished length. Increase to shoulder and to sleeve cap as described below: INCREASE TO SHOULDER AS FOLLOWS: NOTE: You increase differently on front and back pieces and, on the rounds after increases, the yarn overs are knitted twisted to avoid holes - Remember SHOULDER! INCREASE ON BACK PIECE (= between markers 4 and 1): Increase 2 stitches every 2nd round a total of 2-3-5-7-8-10 times, then increase 1 stitch every 2nd round a total of 9-11-12-14-16-18 times. INCREASE ON FRONT PIECE (= between markers 2 and 3): Increase 2 stitches every 2nd round a total of 6-7-9-11-12-14 times, then increase 1 stitch every 2nd round a total of 5-7-8-10-12-14 times. After all increases to shoulder there are 88-96-108-120-130-142 stitches on both front and back pieces. INCREASE TO SLEEVE CAP AS FOLLOWS: On the round with an arrow in diagram A.2 start increasing to SLEEVE CAP – see description above. Increase 1 stitch on each side of A.2 on every shoulder/sleeve (= 4 stitches increased on round). Increase in this way every round a total of 1-4-6-4-4-2 times and then every 2nd round a total of 25-26-28-32-34-38 times. There should always be at least 2 purled stitches on each side of the lace pattern A.2 on sleeves. (These purl stitches are included in the diagram). A.2 expands outwards as diagram is worked, so that more and more stitches are included in the lace pattern. When all increases to sleeve cap are finished, there are 65-73-81-85-89-93 stitches on each sleeve. After all increases to shoulder and sleeve cap there are 306-338-378-410-438-470 stitches on the needle and piece measures 31-33-35-37-38-41 cm (measured from shoulder down). There are now 4-8-12-14-16-18 purled stitches on each side of the lace pattern (including the 2 stitches in each side of A.2/A.3). The next round is worked as follows: Work 44-48-54-60-65-71 stitches stocking stitch (= ½ back piece), place the next 65-73-81-85-89-93 stitches on 1 thread (= sleeve), cast on 4 new stitches on needle (= in side under sleeve), work 88-96-108-120-130-142 stitches stocking stitch (= front piece), place the next 65-73-81-85-89-93 stitches on 1 thread (= sleeve), cast on 4 new stitches on needle (= in side under sleeve) and work the remaining 44-48-54-60-65-71 stitches in stocking stitch (= ½ back piece). BODY: = 184-200-224-248-268-292 stitches. THE PIECE IS NOW MEASURED FROM HERE! Now divide the piece in the middle of the 4 new stitches under each sleeve and the front and back pieces are worked separately, back and forth on circular needle to finished length. BACK PIECE: = 92-100-112-124-134-146 stitches. Work stocking stitch with 3 edge stitches in GARTER STITCH – see description above, in each side. When piece measures 3 cm from the division, increase 1 stitch in each side – read INCREASE TIP (= 2 stitches increased). Increase in this way every 14th-14th-14th-14th-14th-14th row a total of 4 times in each side = 100-108-120-132-142-154 stitches. When piece measures 24-24-24-24-25-24 cm from the division, change to circular needle size 3 mm. Work 3 ridges, change back to circular needle size 4 mm and loosely cast off. The jumper measures approx. 56-58-60-62-64-66 cm from top of shoulder down. FRONT PIECE: = 92-100-112-124-134-146 stitches. Work in the same way as the back piece. SLEEVE: Place the 65-73-81-85-89-93 stitches from the thread in one side of the piece onto short circular needle/double pointed needles size 4 mm and, in addition, knit up 1 stitch in each of the 4 stitches cast on under the sleeve = 69-77-85-89-93-97 stitches on needle. Insert 1 marker in the middle of the 4 new stitches mid under sleeve and allow the marker to follow your work onwards. Continue A.3 as before, knit 1 stitch on each side of the marker mid under sleeve and purl the remaining stitches on the round. When piece measures 3 cm from the division, decrease 2 stitches mid under sleeve – read DECREASE TIP. Repeat the decrease when piece measures 8-8-7-7-6-6 cm = 65-73-81-85-89-93 stitches. Continue working until piece measures 14-12-11-11-11-12 cm from the division. Change to double pointed needles size 3 mm. Work 3 ridges over all stitches, change back to double pointed needles size 4 mm and cast off. Work the other sleeve in the same way. ASSEMBLY: Sew side seams in outermost loop of outermost stitch so that the seam is flat, but stop when there is 6 cm left in each side (= split). |
||||||||||||||||||||||
Diagram explanations |
||||||||||||||||||||||
|
||||||||||||||||||||||

|
||||||||||||||||||||||

|
||||||||||||||||||||||
|
||||||||||||||||||||||
|
Have you made this or any other of our designs? Tag your pictures in social media with #dropsdesign so we can see them! Do you need help with this pattern?You'll find tutorial videos, a Comments/Questions area and more by visiting the pattern on garnstudio.com. © 1982-2024 DROPS Design A/S. We reserve all rights. This document, including all its sub-sections, has copyrights. Read more about what you can do with our patterns at the bottom of each pattern on our site. |
||||||||||||||||||||||


With over 40 years in knitting and crochet design, DROPS Design offers one of the most extensive collections of free patterns on the internet - translated to 17 languages. As of today we count 304 catalogues and 11422 patterns - 11422 of which are translated into English (UK/cm).
We work hard to bring you the best knitting and crochet have to offer, inspiration and advice as well as great quality yarns at incredible prices! Would you like to use our patterns for other than personal use? You can read what you are allowed to do in the Copyright text at the bottom of all our patterns. Happy crafting!
Comments / Questions (95)
Oubliez ma question précédente. Je crois avoir compris. Pour le Rang 1, je tourne l'ouvrage après avoir fait le point faintaisie de la 2e épaule. C'est bien cela ? Merci de me confirmer.
16.03.2024 - 12:48DROPS Design answered:
Bonjour Mme Gendron, les rangs raccourcis commencent au milieu dos, au 1er rang vous tricotez uniquement la 1ère épaule, puis vous tricoterez la 2ème épaule à partir du rang 2, et vous terminerez les rangs raccourcis en tricotant la 2ème épaule jusqu'au milieu dos seulement (ainsi on a bien 6 rangs sur chaque épaule); Bon tricot!
18.03.2024 - 08:19Bonjour, puisque c'est la première fois que j'utilise la technique des rangs raccourcis, je ne comprends pas tout à fait les explicattions après avoir terminé le col (2 rangs point mousse). Rang 1: pour le rang raccourci au-dessus des mailles du dos, est-ce que je tourne l'ouvrage avant le marqueur 1 ou après avoir fait le diagramme A.1A ? Après avoir tourné l'ouvrage, est-ce que je repars envers sur envers pour faire le tour complet jusqu'au marqueur du milieu du dos?Merci !!
15.03.2024 - 12:40Est-ce que les rangs raccourcis pour ce modèle se font en point jersey ou en point mousse ? Autrement dit est-ce que la méthode des rangs raccourcis se fait toujours en point jersey? Merci, ce sera la première fois que j'utilise la méthode des rangs raccourcis.
11.03.2024 - 11:29DROPS Design answered:
Bonjour Mme Gendron, les rangs raccourcis se tricotent ici en jersey (à l'endroit sur l'endroit, à l'envers sur l'envers) et en point fantaisie en suivant les diagrammes (on les lit de droite à gauche sur l'endroit et de gauche à droite sur l'envers). Suivez attentivement la description des rangs raccourcis, il est bien indiqué quel diagramme tricoter à quel moment et si on doit tricoter à l'endroit ou à l'envers. Bon tricot!
11.03.2024 - 14:32For the sleeve cap, I don’t understand which 21 increased stitches I am to knit? I made the yarn over and have purled it twisted in next row. In the future do I knit those increased and do I count until I have increased 21 and then purl the rest of the increases? I am confused! Thank you!
09.04.2023 - 18:11DROPS Design answered:
Dear Glenda, the first 21 yarn overs that you increase will be knitted twisted; the following yarn overs will be purled twisted. Count until you have 21 yarn overs and starting from the 22nd, purl them twisted. Happy knitting!
10.04.2023 - 17:02Witam. Mam problem z dodawaniem oczek na zaokrąglanie rękawów. Przerabiając od środka tylu dodaje oczka zawsze za markerem czy zawsze przed 2o lewymi schematu? Czyli rzad1:tył, marker, narzut, 2o.l., rzad2:tył, marker,narzut, poprzedni narzut na prawo, 2o.l., rzad3:tył, marker, narzut, narzut na prawo 1o.p.,2o.l? Czy narzut zawsze przed 2o.l.schematu A.2? Pozdrawiam
01.01.2023 - 10:51DROPS Design answered:
Witaj Moniko, dodajesz oczka na zaokrąglenie rękawów (4 oczka w rzędzie) z każdej strony schematu A.2, tzn. wykonujesz 1 narzut przed 2 pierwszymi oczkami lewymi schematu A.2 i za 2 ostatnimi oczkami lewymi schematu A.2. Pozdrawiamy!
03.01.2023 - 17:20Bel modello ma spiegazione incomprensibile.\r\nCome si integrano gli aumenti per la spalla con quelli dell’ arrotondamento manica? \r\nSi sommano? Con i 21 aumenti a dritto arrivo fino all’allargamento dello schema? Tutto molto confuso!
08.04.2022 - 19:02DROPS Design answered:
Buongiorno Antonella, a quale punto del modello sta facendo riferimento? E' un modello con una costruzione particolare, e quindo può risultare un po' complicato. Buon lavoro!
10.05.2022 - 07:52Hallo Dropsteam, Ich stricke den Pullover in Größe M und möchte jetzt mit der Zunahme für die Armkugel beginnen. Ich verstehe nicht was mit " die ersten 21 zugenommen Maschen rechts stricken, die restlichen Maschen links stricken" gemeint ist. Von welchen Maschen ist da die Rede? Viele Dank und viele Grüße
24.02.2022 - 19:55DROPS Design answered:
Liebe Ute, die ersten 21 Mal Sie zunehmen werden, stricken Sie diese Zunahmen rechts, die restlichen Zunahmen werden Sie links stricken. Hat es mehr Sinn?
25.02.2022 - 09:04Nie mogę się uporać z tym fragmentem, gdzie w schemacie A2 zaczynamy dodawać oczka w rzędzie oznaczonym strzałką. Czy sweter na zdjęciu jest robiony trochę inaczej (właśnie w tym miejscu, o którym piszę?). Może mogliby Państwo dodać opis kilku rzędów schematu A2 od rzędu oznaczonego strzałką? Nie rozumiem między innymi tych 21 oczek przerabianych na prawo..
14.10.2021 - 22:25DROPS Design answered:
Witaj Ewo, zdjęcie lekko odbiega od wzoru, ze względu na dodawane oczka na główkę rękawa (A.2) – zostało to lepiej dopasowane. W zależności od rozmiaru dodajesz na zaokrąglenie rękawów 1-4-6-4-4-2 razy w każdym okrążeniu i 25-26-28-32-34-38 razy co 2 okrążenia, czyli w sumie 26-30-34-36-38-40 razy, te 21 pierwszych dodanych oczek (21 powtórzeń dodawania oczek) przerabiasz na prawo, a resztę na lewo (czyli jeszcze 5-9-13-15-17-10 razy). Pozdrawiamy!
17.10.2021 - 22:27Bonjour, après avoir fini les rangs raccourcis et recommence au milieu du dos, il faut faire un tour avant de recommencer les augmentations, qui correspond au rang 12 (envers) de A2, n’est-ce pas? Merci!
02.10.2021 - 10:08DROPS Design answered:
Bonjour Beatriz, après avoir tricoté le rang 13 des rangs raccourcis, vous avez tricoté 11 rangs de A.2 et vous coupez le fil. Vous reprenez ensuite les tours à partir du milieu dos et continuez comme avant mais en rond cette fois, en reprenant A.2 à partir du rang 12 (= sur l'endroit car vous tricotez maintenant en rond). Bon tricot!
04.10.2021 - 07:54"przerobić oczko przekręcone w miejscu narzutu na lewo, aby uniknąć dziur – przerobić na prawo 21 pierwszych dodanych oczek, a na lewo pozostałe oczka" - czyli te dodane oczka, a dokładnie 21 tych oczek, przerobić na prawo i będą niejako zaliczały się do przodu lub do tyłu, a kolejne już będą wchodziły do ściegu ażurowego na rękawach? Bardzo dziękuję za odpowiedzi!
16.09.2021 - 13:41DROPS Design answered:
Dokładnie tak będzie. Pozdrawiamy!
16.09.2021 - 16:15