
Popular categories
Looking for a yarn?


Comments / Questions (28)
![]() Chieri wrote:
Chieri wrote:
Hi! Is the gauge measured flat or in the round?
12.03.2026 - 16:37DROPS Design answered:
Hi Chieri, We recommend that you work a swatch flat (a small knitted square of at least 10 x 10 cm), to measure your knitting tension and get the right gauge. Regards, Drops Team.
13.03.2026 - 06:10
![]() Barbara wrote:
Barbara wrote:
Sono bloccata e non riesco a capire questo passaggio: ho inserito i 6 marcapunto come da voi indicato. Quando arrivo al 2 rigo di A3 faccio 1 gettato, 1 passata e 1 accavallata, 4 maglie a diritto, 2 insieme a diritto, 1 gettato, 1 diritto, 1 gettato e devo fare 1 passata e 1 accavallamento ma trovo il marcapunto nel mezzo alle 2 maglie. E’ corretto e devo spostare il marcapunto? Grazie siete sempre preziosi….
01.03.2026 - 10:07DROPS Design answered:
Buonasera Barbara, al momento non ci sono correzioni previste per il modello, sposti il segnapunti verso l'alto durante il lavoro. Buon lavoro!
01.03.2026 - 21:06
![]() Barbara wrote:
Barbara wrote:
Ho bisogno di aiuto..ho inserito i 6 marcapunto come da voi indicato. Quando arrivo al 2 rigo di A3 faccio 1 gettato, 1 passata e 1 accavallata, 4 maglie a diritto, 2 insieme a diritto, 1 gettato, 1 diritto, 1 gettato e devo fare 1 passata e 1 accavallamento ma trovo il marcapunto nel mezzo alle 2 maglie. E’ corretto e devo spostare il marcapunto? Grazie siete sempre preziosi….
17.02.2026 - 14:33DROPS Design answered:
Buonasera Barbara, al momento non ci sono correzioni previste per il modello, sposti il segnapunti verso l'alto durante il lavoro. Buon lavoro!
01.03.2026 - 21:06
![]() Angèle wrote:
Angèle wrote:
Bonjour. Je ne comprends pas les diminutions pour les emmanchures. vous dites : au 1er tour après les côtes mousse rabattre 6 m au milieu des côtes et en même temps au 1er rang sur l'endroit diminuer pour les emmanchures. Merci de me préciser comment procéder à cette étape. En l'attente et avec mes remerciements Bien cordialement
03.06.2025 - 15:58DROPS Design answered:
Bonjour Angèle, ceci se fait en 2 étapes: vous rabattez d'abord les mailles des emmanchures et vous terminez chaque partie séparément; tricotez maintenant les mailles du dos sur l'envers (en jersey avec 3 m point mousse de chaque côté), puis, au rang suivant sur l'endroit, vous commencez à diminuer pour l'emmanchure de chaque côté. Bon tricot!
04.06.2025 - 07:43
![]() Satu wrote:
Satu wrote:
Kudon pyöröpuikoilla eli suljettuna neuleena. Olen kutonut kuvion A.2 mukaisesti siten, että rivit, joissa on kavennuksia/lisäyksiä on kudottu oikein ja välirivit nurin. Näin ollen kuvion viimeisin rivi on nurjaa. Kun jatkan kuvioon A.3, ensimmäisen (alimman) rivin pitäisi olla siis oikeaa ja kavennukset/langankierrot pitäisi tehdä nurjalla? Vai kuinka?
24.03.2024 - 20:29DROPS Design answered:
Hei, piirrokset näyttävät mallineuletta oikealta puolelta katsottuna. Eli kaikki tyhjät ruudut neulotaan oikein (kun neulot suljettua neuletta). Tällöin piirroksen A.2 viimeinen rivi neulotaan oikein.
27.03.2024 - 18:51
![]() Elly wrote:
Elly wrote:
After completing A.5 it says "insert 1 marker on round." and measure from there. I don't understand. where do I place the marker?
03.03.2023 - 23:10DROPS Design answered:
Hi Elly, you can place the marker anywhere in the round - on the edge or in the middle - so that you can easily measure the distance from the round when you work ahead. Happy knitting!
05.03.2023 - 09:53
![]() Elly wrote:
Elly wrote:
I have a question about the diagrams. the first instruction says to "choose diagram for your size." what does that mean? I'm making a size small. Also when the pattern says to work A.1 in the round = 10 repetions of 23 stitches, does that mean I repeat the entire 12 row A.1 pattern 10 times with decreases at row 10?
17.02.2023 - 00:02DROPS Design answered:
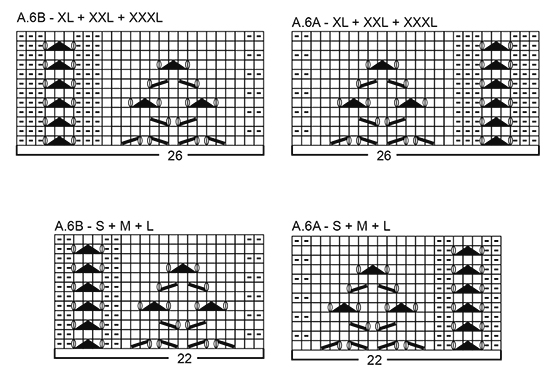
Dear Elly, this applies only to diagram A.6 - all remaining diagrams are the same for all sizes, when working A.6A and A.6B chosse the one for size S (below all diagrams, just above measurement charts). Happy knitting!
17.02.2023 - 11:55
![]() Brigitte wrote:
Brigitte wrote:
Mes surjets ( glisser un maille, tricoter la suivante, rabattre la maille glissée sur la maille tricotée ) ne sont pas réguliers. Puis-je les remplacer par 2 mailles ensemble torses à l'endroit ?
18.07.2022 - 17:41DROPS Design answered:
Bonjour Brigitte, vous pouvez, l'effet est le meme, la maille obtenue sera inclinee a gauche dans les 2 cas. Bon tricot!
24.07.2022 - 15:03
![]() Anna wrote:
Anna wrote:
Jag är på bakstycket, har minskat till 58 maskor, men vet inte hur jag nu ska fortsätta. Instruktionen säger fortsätt mönstret med 3 kantmaskor i rätstickning i varje sida. Hur ska jag fortsätta med kombinationen som innan var 10rm, A6A, A6B, 20rm, A6A, A6B, 10rm, då det är mer än 58m? Sedan undrar jag hur jag stickar varje axel för sig? Helt ny på detta, och beskrivninen säger bara sticka som förut och maska av 1m på nästa varv från halsen?
19.03.2020 - 12:50DROPS Design answered:
Hej Du fortsätter att sticka A6A och A6B som tidigare så att mönstret stämmer och de minskade maskorna minskar du av de slätstickade i sidorna. När du gör varje axel färdig sen och ska maska av mot halsen ser du bara till att mönstret från diagrammen stämmer så att det passar mot det du stickat innan. Lycka till!
20.03.2020 - 10:23
![]() Rikke wrote:
Rikke wrote:
Har fundet løsningen på mit spørgsmål. Var en læse fejl
24.07.2019 - 20:52
|
||||||||||||||||||||||
Ribeira#ribeiradress |
||||||||||||||||||||||
|
|
||||||||||||||||||||||
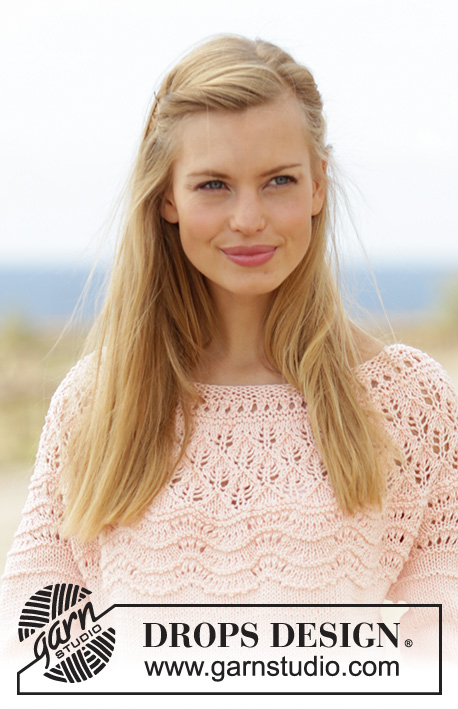
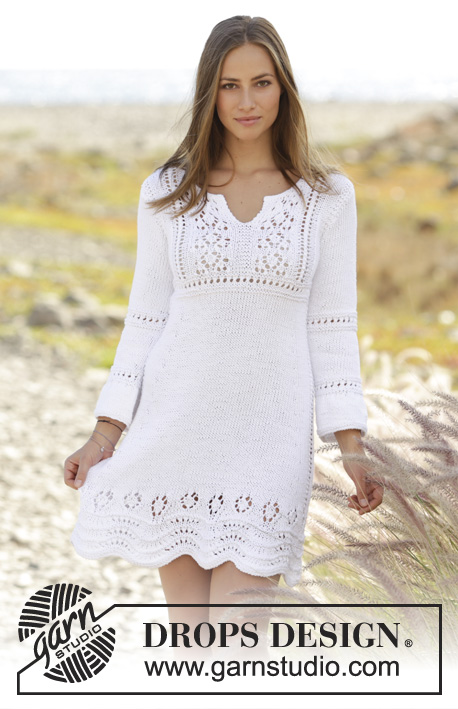
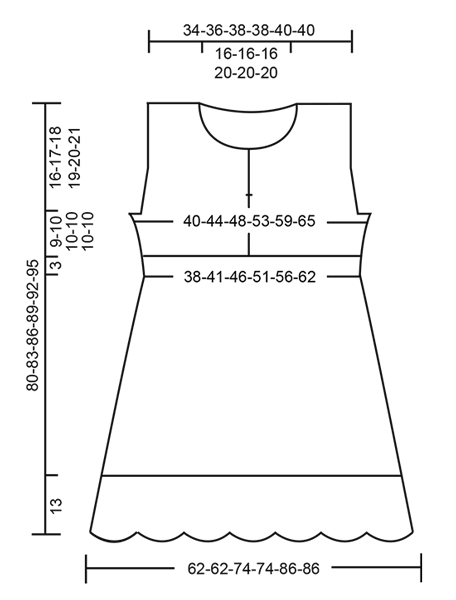
Knitted dress with lace pattern in DROPS Paris. Size: S - XXXL
DROPS 176-10 |
||||||||||||||||||||||
|
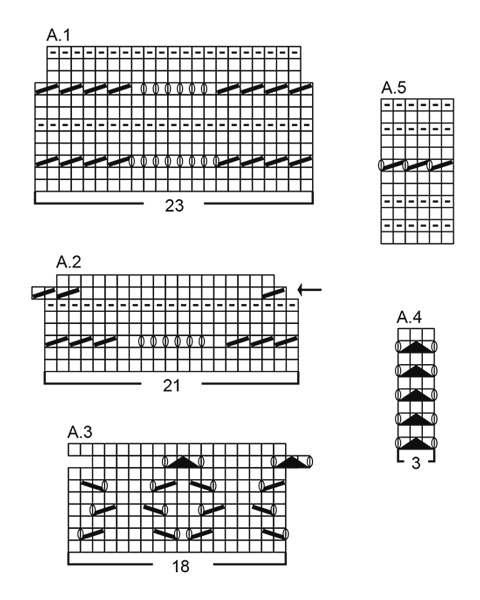
GARTER STITCH (worked in the round): 1 ridge = 2 rounds. Knit 1 round and purl 1 round. GARTER STITCH (back and forth): 1 ridge = knit 2 rows. PATTERN: See diagrams A.1 to A.6. Diagrams show all rows in pattern seen from the right side. Choose diagram for your size. DECREASE TIP-1 (applies to sides of dress): Decrease as follows after marker thread: Slip 1 stitch knitwise, knit 1, pass slipped stitch over stitch worked (= 1 stitch decreased). Decrease as follows before marker thread: Begin 2 stitches before marker thread, knit 2 together (= 1 stitch decreased). DECREASE TIP-2 (applies to armholes): Decrease inside 3 edge stitches in garter stitch. All decreases are done from the right side. Decrease after 3 edge stitches as follows: Slip 1 stitch knitwise, knit 1, pass slipped stitch over (= 1 stitch decreased). Decrease before 3 edge stitches as follows: Begin 2 stitches before the 3 edge stitches and knit 2 together (= 1 stitch decreased). INCREASE TIP (applies to sides of dress): Increase on each side of 1st and 4th marker thread as follows: Work until 2 stitches remain before marker thread, make 1 yarn over, knit 4 (marker thread is in the middle of these 4 stitches), make 1 yarn over (= 2 stitches increased). On next round knit yarn-over twisted to avoid holes. ---------------------------------------------------------- DRESS: Worked in the round on circular needle bottom up to armholes, then work the front and back piece separately back and forth. Cast on somewhat loosely 230-230-276-276-322-322 stitches on circular needle size 5 mm / US 8 with Paris. Work 2 ridges in GARTER STITCH - see explanation above. Then work A.1 in the round (= 10-10-12-12-14-14 repetitions of 23 stitches). When A.1 has been worked, there are 210-210-252-252-294-294 stitches on needle. Work A.2 in the round (= 10-10-12-12-14-14 repetitions of 21 stitches). NOTE: On 7th round in A.2 displace round 1 stitch forward. When A.2 has been worked, there are 180-180-216-216-252-252 stitches on needle. Insert 6 marker threads in the piece as follows: Insert 1st marker thread at beginning of round (= side), 2nd marker thread after the next 10 stitches, 3rd marker thread after the next 70-70-88-88-106-106 stitches, 4th marker thread after the next 10 stitches (= in the side), 5th marker thread after the next 10 stitches, 6th marker thread after the next 70-70-88-88-106-106 stitches = 10 stitches remain on round after last marker thread. Move marker threads upwards when working. READ ALL OF THE FOLLOWING SECTION BEFORE CONTINUING: Work A.3 in the round (= 10-10-12-12-14-14 repetitions of 18 stitches). When A.3 has been worked vertically, work next round as follows: Begin 2 stitches before 1st marker thread, work A.4 over the next 3 stitches (1st marker thread is now in the middle of A.4 and A.4 matches over holes in A.3), work in stockinette stitch until 2 stitches remain before 4th marker thread, work A.4 over the next 3 stitches and work stockinette stitch the rest of round. Continue pattern like this with stockinette stitch and A.4 in each side. AT THE SAME TIME when piece measures 14-14-16-14-14-16 cm / 5½"-5½"-6¼"-5½"-5½"-6¼", decrease after 2nd and 5th marker thread and before 3rd and 6th marker thread – READ DECREASE TIP-1 (= 4 stitches decreased). Decrease like this every 3-4-2½-4-3-4½ cm / 1⅛"-1½"-⅞"-1½"-1⅛"-1¾" 13-10-15-11-15-10 times in total = 128-140-156-172-192-212 stitches on needle. REMEMBER THE KNITTING GAUGE When piece measures 51-52-54-56-58-60 cm / 20"-20½"-21¼"-22"-22¾"-23½" (decreases are now done), switch to circular needle size 4 mm / US 6. Work A.5 in the round. When A.5 has been worked, switch back to circular needle size 5 mm / US 8. Insert 1 marker on round – NOW MEASURE PIECE FROM HERE. Work next round as follows: 10-13-17-17-22-27 stitches in stockinette stitch, A.6A (= 22-22-22-26-26-26 stitches), A.6B (= 22-22-22-26-26-26 stitches), 20-26-34-34-44-54 stitches stockinette stitch (marker thread in the side is in the middle of these stitches), A.6A (= 22-22-22-26-26-26 stitches), A.6B (= 22-22-22-26-26-26 stitches) and 10-13-17-17-22-27 stitches stockinette stitch. Continue pattern like this. When piece measures 3 cm / 1" from marker, increase 1 stitch on each side of 1st and 4th marker thread - READ INCREASE TIP-1 (= 4 stitches increased). Repeat increase when piece measures 6 cm / 2⅜" from marker = 136-148-164-180-200-220 stitches. When piece measures 63-65-67-69-71-73 cm / 24¾"-25½"-26⅜"-27⅛"-28"-28¾", work 2 ridges over the middle 12-12-14-18-22-26 stitches in each side (6-6-7-9-11-13 stitches on each side of 1st and 4th marker thread – work the other stitches as before). On first round after ridges, bind off the middle 6-6-8-12-16-20 stitches in each side for armholes (3-3-4-6-8-10 stitches on each side of 1st and 4th marker thread). Finish front and back piece separately. BACK PIECE: = 62-68-74-78-84-90 stitches. Continue with stockinette stitch and A.6 as before and work the outermost 3 stitches in each side in garter stitch. AT THE SAME TIME on first row from right side decrease for armhole in each side - READ DECREASE TIP-2 (= 2 stitches decreased). Decrease like this on every other row (i.e. every row from right side) 2-3-5-7-8-11 times in total in each side = 58-62-64-64-68-68 stitches. Continue pattern with 3 edge stitches in garter stitch in each side until piece measures 77-80-83-86-89-92 cm / 30⅜"-31½"-32¾"-33⅞"-35"-36¼". Now bind off the middle 26-26-26-32-32-32 stitches for neck and finish each shoulder separately. Continue as before and bind off 1 stitch on next row from the neck = 15-17-18-15-17-17 stitches remain on shoulder. Work until 1 row remains until piece measures 80-83-86-89-92-95 cm / 31½"-32¾"-33⅞"-35"-36¼"-37⅜", knit 1 row from wrong side and bind off by knitting from right side. Work the other shoulder the same way. FRONT PIECE: = 62-68-74-78-84-90 stitches. Work the same way as on back piece and decrease for armholes in each side as on back piece. AT THE SAME TIME when piece measures 66-69-71-74-76-79 cm / 26"-27"-28"-29"-30"-31", adjust so that next row is worked from right side, divide the piece in the middle for neck vent and finish each front piece separately. LEFT FRONT PIECE (when garment is worn): Continue back and forth over half the stitches with 3 edge stitches in garter stitch towards armhole, stockinette stitch and A.6A towards mid front. When piece measures 72-75-78-81-84-87 cm / 28½"-29½"-30¾"-32"-33"-34¼" (adjust so that next row is worked from wrong side), slip the first 9-9-9-12-12-12 stitches from mid front on 1 stitch holder for neck (to avoid cutting the working yarn, work the stitches before slipping them on stitch holder). Continue to bind off for neck at beginning of every row from mid front as follows: 2 stitches 1 time and 1 stitch 3 times = 15-17-18-15-17-17 stitches remain for shoulder. Work until 1 row remains until piece measures 80-83-86-89-92-95 cm / 31½"-32¾"-33⅞"-35"-36¼"-37⅜", knit 1 row from wrong side and bind off by knitting from right side. RIGHT FRONT PIECE: Work the same way as on left front piece but with decreases in opposite side (when slipping stitches on stitch holder for neck this is done from right side, not wrong side). ASSEMBLY: Sew the shoulder seams. NECK EDGE: Begin mid front and pick up from right side approx. 74 to 94 stitches around the neck (including stitches on stitch holders at the front) on circular needle size 4 mm / US 6. Knit 1 row from wrong side, knit 1 row from right side and knit 1 row from wrong side. Bind off knitting from right side. |
||||||||||||||||||||||
Diagram explanations |
||||||||||||||||||||||
|
||||||||||||||||||||||
 |
||||||||||||||||||||||
 |
||||||||||||||||||||||
 |
||||||||||||||||||||||
Have you finished this pattern?Tag your pictures with #dropspattern #ribeiradress or submit them to the #dropsfan gallery. Do you need help with this pattern?You'll find 28 tutorial videos, a Comments/Questions area and more by visiting the pattern on garnstudio.com. © 1982-2026 DROPS Design A/S. We reserve all rights. This document, including all its sub-sections, has copyrights. Read more about what you can do with our patterns at the bottom of each pattern on our site. |
||||||||||||||||||||||


With over 40 years in knitting and crochet design, DROPS Design offers one of the most extensive collections of free patterns on the internet - translated to 17 languages. As of today we count 324 catalogs and 12290 patterns - 12280 of which are translated into English (US/in).
We work hard to bring you the best knitting and crochet have to offer, inspiration and advice as well as great quality yarns at incredible prices! Would you like to use our patterns for other than personal use? You can read what you are allowed to do in the Copyright text at the bottom of all our patterns. Happy crafting!
Post a comment to pattern DROPS 176-10
We would love to hear what you have to say about this pattern!
If you want to leave a question, please make sure you select the correct category in the form below, to speed up the answering process. Required fields are marked *.