
Popular categories
Looking for a yarn?












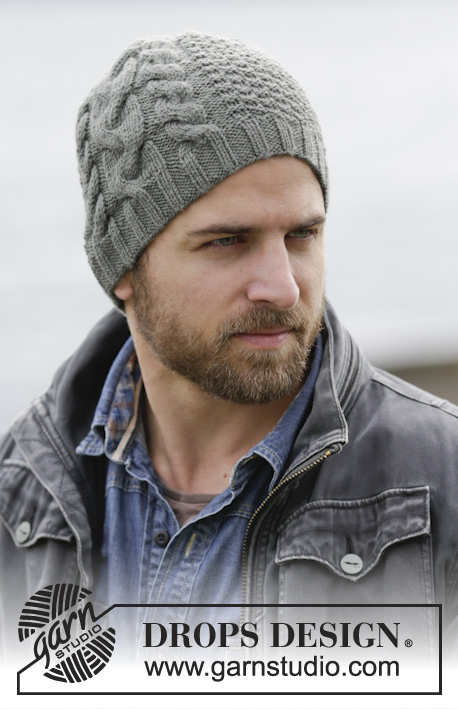
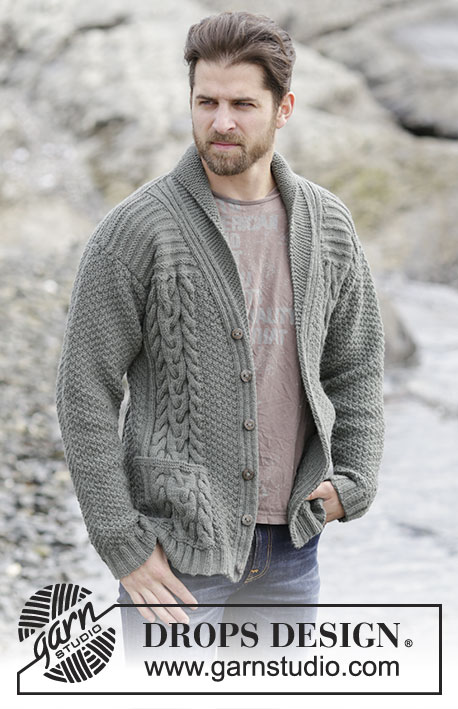























Comments / Questions (258)
 Rosemarie wrote:
Was heisst kraus rechts hinreihe, Rückreise rechts
07.07.2026 - 11:38DROPS Design answered:
Liebe Rosemarie, wenn man krausrechts strickt werden die Maschen rechts bei den Hin- sowie bei den Rückreihen gestrickt. Viel Spaß beim Stricken!
07.07.2026 - 14:24
Rosemarie wrote:
Ich kann machen und zählen was ich will es endet bei der hinreihe immer mit 4 linken vor der blende. Warum???
06.07.2026 - 17:34
Rosemarie wrote:
Ich kann machen und zählen was ich will es endet bei der hinreihe immer mit 4 linken vor der blende. Warum???
06.07.2026 - 17:33DROPS Design answered:
Liebe Rosemarie, hatten Sie die vorige Antwort gelesen? In XXL stricken Sie am Anfang so: 10 Blenden Maschen, dann 28 M A.1A, dann 19 x 7 M (= 133 M mit 3 re, 4 li), 3 M re, 7 M li, dann wieder 19 x 7 m (= 133 M mit 3 re, 4 li), 3 M re, 28 M A.2A + 10 Blenden-Maschen = 10+28+133+3+7+133+3+28+10=355 Maschen - könnte das nicht helfen?
07.07.2026 - 14:05
Rosemarie wrote:
Ich versteh am Bund die Aufteilung nicht bei xxl 19x 7 plus 13 maschen in der Mitte und dann wieder 19x7 plus je Seite 10 blenden maschen, da bleiben noch einige maschen übrig
02.07.2026 - 13:11DROPS Design answered:
Liebe Rosemarie, so stricken Sie: 10 Blenden Maschen, dann 28 M A.1A, dann 19 x 7 M (= 133 M mit 3 re, 4 li), 3 M re, 7 M li, dann wieder 19 x 7 m (= 133 M mit 3 re, 4 li), 3 M re, 28 M A.2A + 10 Blenden-Maschen = 10+28+133+3+7+133+3+28+10=355 Maschen. Viel Spaß beim Stricken!
02.07.2026 - 15:36
Rosemarie wrote:
Ich muss ja am schalkragen vor der blende doch auch abnehmen wie??
22.06.2026 - 06:41DROPS Design answered:
Liebe Rosemarie, ja man soll für den Schalkragen zunehmen (die Maschenanzahl der Maschen in Krausrippe zunimmt), und gleichzeitig soll man für den Halsausschnitt (nach der Blende beim rechten Vorderteil / vor der Blende beim linken Vorderteil) abnehmen, wie unter ABNAHMETIPP (gilt für den Halsausschnitt): erklärt. Viel Spaß beim Stricken!
22.06.2026 - 15:17
 Elizabeth wrote:
Is the 1st button hole made when the band is 8 cm . It says continue till band is 8cm then remember button hole. When do I make that 1st button hole. Thankyou.
06.06.2026 - 19:12DROPS Design answered:
Dear Elizabeth, the first buttonhole is worked when piece measures either 2 or 3 cm - see BUTTONHOLES, the measurements for each size are written from cast on edge. Happy knitting!
08.06.2026 - 09:08
 Lora wrote:
Greetings, I am at the collar & neckband part where the pattern says to increase & decrease. How many stitches are there for the band & collar altogether? If decreasing on one end & increasing on the other side wouldn't that be the same amount of stitches (10)? Do I need to add more in order to get the band & the collar? Thank you for your help :)
15.05.2026 - 02:17DROPS Design answered:
Dear Lora, you increase more stitches for the collar than you will decrease stitches for neck raison why the number of sts is tnot the same. Happy knitting!
15.05.2026 - 14:21
 Cecilie wrote:
Når jeg skal begynde rygstykket står der, at jeg skal lukke 2 m af i begyndelsen af hver pind i begge sider. Skal jeg så også lukke af i til slut på pinden? Ellers kan jeg ikke få masketallet til at passe.
12.04.2026 - 18:06DROPS Design answered:
Hei Cecilie. Det skal felles av til ermhull på begynnelsen av hver pinne i hver side slik, ikke på slutten også. Men hvilken str. strikker du og hva er maskeantallet ditt? mvh DROPS Design
13.04.2026 - 14:36
 José wrote:
Te snel op verzenden gedrukt. Als je aan het eind van een verkorte toer 1 steek afhaalt, dan wordt je bies toch steeds smaller? Of moet je dan in de eerstvolgende “gewone” toer weer een streek opzetten?
21.03.2026 - 10:36DROPS Design answered:
Dag José,
Je haalt de steek af, maar je kant hem niet a, dus je hebt nog steeds evenveel steken op de naald staan.
11.04.2026 - 11:22
 Hannele Hirvonen wrote:
Mallitilkun mukaan koossa XL villatakin ympärys olisi 155 cm. Eli 21 silmukkaa on 10 cm. 327 silmukkaa / 21 silmukalla 15,5 x 10 cm = 155 cm. Olenko ymmärtänyt oikein ? Eli jos teen XL kokoiselle miehelle niin pitääkin tehdä L tai M koko.
18.03.2026 - 15:07DROPS Design answered:
Hei, koossa XL takin ympärys on 126 cm. Takissa on palmikoita ja raitoja, joten siitä tulee kapeampi kuin jos neulottaisiin pelkkää sileää neuletta kuten mallitilkussa.
18.03.2026 - 18:08
|
|||||||||||||||||||
Jackson#jacksoncardigan |
|||||||||||||||||||
 |
 |
||||||||||||||||||
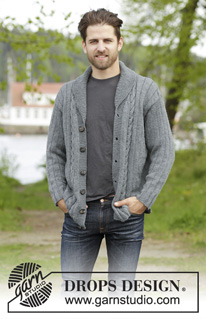
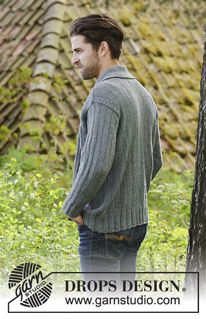
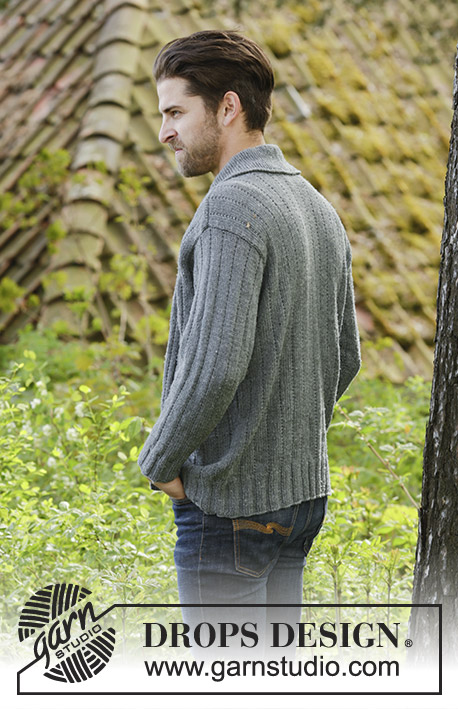
Knitted DROPS men’s jacket with simple cable, textured pattern and shawl collar in Karisma. Size: XS - XXXL.
DROPS 174-1 |
|||||||||||||||||||
|
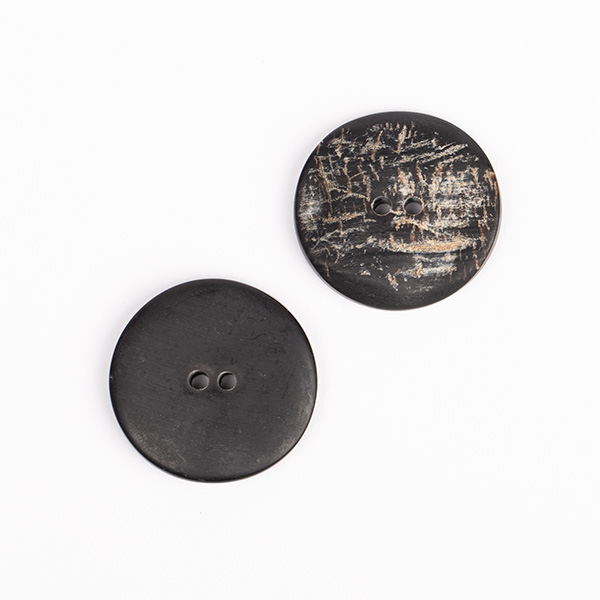
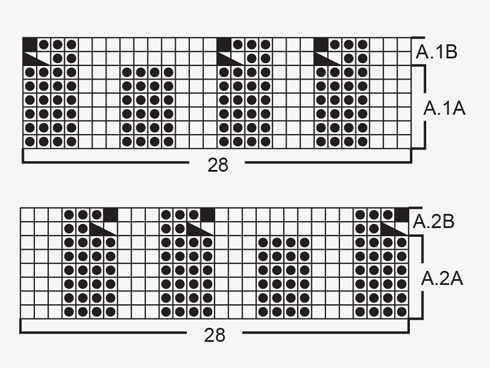
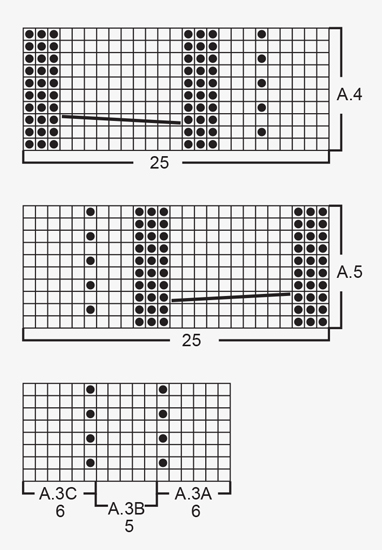
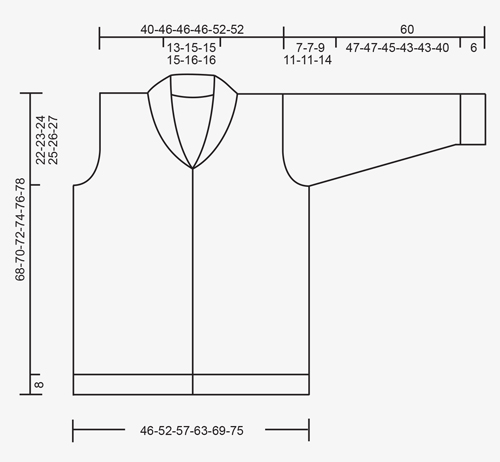
GARTER ST (back and forth): K all rows. 1 ridge = K2 rows. PATTERN: See diagrams A.1 to A.5. The diagrams show all rows in pattern seen from RS. KNITTING TIP (applies to bands): To keep the bands from contracting vertically work short rows over bands as follows: * Beg mid front and K the outermost 10 sts (= band), turn piece, slip 1st st as if to K, tighten yarn and K the rest of row *, repeat from *-* after approx. every 10 rows in piece. INCREASE TIP-1 (applies to shawl collar): Inc 1 st in next to last st towards mid front by K in front and back loop of same st. INCREASE TIP-2 (applies to mid under sleeve): Inc 1 st on each side of st with marker mid under sleeve. Inc 1 st by making 1 YO, on next round work YO twisted to avoid holes. Work the inc sts in the pattern A.3. DECREASE TIP (applies to neckline): Dec inside 10 band sts in garter st + inc sts for shawl collar. All dec are done from RS! Dec as follows before band + collar: K 2 tog. Dec as follows after collar + band: Slip 1 st as if to K, K 1, psso. BUTTONHOLES: Dec for buttonholes from RS on left band (when garment is worn). 1 buttonhole = work 6 band sts as before, slip next to last st on right needle over outermost st on right needle, K 1, slip next to last st on right needle over outermost st on right needle (2 sts bind off), K the last 3 sts. On next row cast on 2 new sts over the bind off sts. Dec for buttonholes when piece measures: SIZE XS/S: 2, 12, 21, 31, 40 and 50 cm SIZE M: 2, 12, 21, 31, 41 and 51 cm Size L: 2, 12, 22, 32, 42 and 52 cm SIZE XL: 3, 13, 23, 33, 43 and 53 cm Size XXL: 3, 13, 23, 33, 43 and 54 cm SIZE XXXL: 3, 13, 24, 34, 45 and 55 cm ---------------------------------------------------------- JACKET: Worked back and forth on circular needle from mid front. BODY: Cast on 243-271-299-327-355-383 sts (includes 10 band sts in each side towards mid front) on circular needle size 3 mm / US 2.5 with Karisma. P 1 row from WS. Work next row as follows from RS: 10 band sts in GARTER ST – see explanation above, A.1A (= 28 sts), * K 3, P 4 *, repeat from *-* 11-13-15-17-19-21 times in total, K 3, P 7 (= mid back), * K 3, P 4 *, repeat from *-* 11-13-15-17-19-21 times in total, K 3, A.2A (= 28 sts) and 10 band sts in garter st. Work back from WS with garter st over garter st, P over P, K over K. Continue rib until piece measures 8 cm / 3⅛", remember BUTTONHOLES on left band – see explanation above and KNITTING TIP. Work next row as follows from RS: 10 band sts as before, A.1B (= 28 sts dec to 25 sts), * K 3, P 2, P 2 tog *, repeat from *-* 11-13-15-17-19-21 times in total, K 3, P 2 tog, P 3, P 2 tog, * K 3, P 2, P 2 tog *, repeat from *-* 11-13-15-17-19-21 times in total, K 3, A.2B (= 28 sts dec to 25 sts) and 10 band sts as before = 213-237-261-285-309-333 sts. Work back from WS with garter st over garter st, P over P, K over K, (work A.1B and A.2B as shown in diagram). Switch to circular needle size 4 mm / US 6 and work next row from RS as follows: 10 band sts as before, A.4 (= 25 sts), work A.3A over the next 72-84-96-108-120-132 sts (= 12-14-16-18-20-22 repetitions of 6 sts), work A.3B (= 5 sts), work A.3C over the next 66-78-90-102-114-126 sts (= 11-13-15-17-19-21 repetitions of 6 sts), work A.5 (= 25 sts) and finish with 10 band sts as before. Insert 1 marker in the 59th-65th-71st-77th-83rd-89th st in from each side (markers are in a st in garter st in the sides on body). Continue the pattern like this and move the markers upwards when working. REMEMBER THE KNITTING GAUGE When piece measures 46-47-48-49-50-51 cm / 18"-18½"-19"-19¼"-19¾"-20", bind off 7 sts in each side for armholes (i.e. Bind off st with marker + 3 sts on each side of this). Then finish front and back piece separately. BACK PIECE: = 89-101-113-125-137-149 sts. Continue A.3 on back piece as before and bind off for armholes at beg of every row in each side as follows: bind off 2 sts 0-0-2-5-5-7 times and 1 st 2-2-4-4-4-6 times = 85-97-97-97-109-109 sts. Continue to work until piece measures 66-68-70-72-74-76 cm / 26"-26¾"-27½"-28⅜"-29⅛"-30". Now bind off the middle 23-27-27-27-29-29 sts for neck and finish each shoulder separately. Bind off 2 st on next row from neck = 29-33-33-33-38-38 sts remain on the shoulder. Continue to work until piece measures 68-70-72-74-76-78 cm / 26¾"-27½"-28⅜"-29⅛"-30"-30¾" and loosely bind off. Repeat on the other shoulder. LEFT FRONT PIECE: = 55-61-67-73-79-85 sts. Continue the pattern as before and bind off for armhole at beg of every row from the side as on back piece. AT THE SAME TIME when 2 rows have been worked after last buttonhole on band work 1 ridge (i.e. 2 rows K) over only the outermost 10 band sts towards mid front (do not work the other sts on row). Then work over all sts on row as before. AT THE SAME TIME inc 1 st for shawl collar towards mid front – READ INCREASE TIP-1. Inc like this every other row 18-18-18-20-20-20 times in total. AT THE SAME TIME when piece measures 52-53-54-55-56-57 cm / 20½"-21"-21¼"-21⅝"-22"-22½" (2 cm / ¾" should now be worked after last buttonhole), dec 1 st for neckline towards mid front - READ DECREASE TIP. Dec like this every other row (i.e. every row from RS) a total of 10-12-12-12-13-13 times and then every 4th row (i.e. every other row from RS) 4 times in total in all sizes. After all inc and dec, there are 57-61-61-63-68-68 sts on needle. When piece measures 68-70-72-74-76-78 cm / 26¾"-27½"-28⅜"-29⅛"-30"-30¾", bind off the outermost 29-33-33-33-38-38 sts on shoulder = 28-28-28-30-30-30 sts remain for collar. Continue back and forth in garter st over these sts as follows: * 1 ridge over all sts, 1 ridge over only the outermost 18-18-18-20-20-20 sts *, repeat from *-* until collar measures approx. 9-9-9-10-10-10 cm / 3½"-3½"-3½"-4"-4"-4" inside on the most narrow (collar measures approx. 18-18-18-20-20-20 cm / 7"-7"-7"-8"-8"-8" at the edge on the widest). Bind off. RIGHT FRONT PIECE: Work as left but reversed. NOTE: Do not dec for buttonholes on right band. When working 1 ridge over only the outermost 10 sts towards mid front, adjust according to left front piece. SLEEVE: Cast on 56-56-63-63-63-70 sts on double pointed needles size 3 mm / US 2.5 with Karisma. K 1 round. Work next round as follows: * K 3, P 4 *, repeat from *-* the entire round. When piece measures 6 cm / 2⅜", work next round as follows: * K 3, P 2, P 2 tog *, repeat from *-* the entire round = 48-48-54-54-54-60 sts. Switch to double pointed needles size 4 mm / US 6 and work pattern in the round according to diagram A.3A. Insert 1 marker in last st on round (i.e. in st in garter st = mid under sleeve) and move the marker upwards. When piece measures 8 cm / 3⅛", inc 2 sts mid under sleeve - READ INCREASE TIP-2. Inc a total of 18-20-20-22-25-25 times in Size S: On every 7th round, in size M + L: On every 6th round, in size XL: On every 5th round, in size XXL: Alternately on every 4th and 5th round and size XXXL: On every 4th round = 84-88-94-98-104-110 sts. When piece measures 53-53-51-49-49-46 cm / 21"-21"-20"-19¼"-19¼"-18" (NOTE: Shorter measurements in the larger sizes because of longer sleeve cap and wider shoulders) bind off the middle 7 sts under sleeve (bind off st with marker + 3 sts on each side of this). Now work sleeve cap back and forth on circular needle. Continue with the pattern while AT THE SAME TIME binding off at beg of every row in each side as follows: bind off 3 sts 1 time, 2 sts 1-1-2-3-3-4 time and 1 st 2-2-3-3-3-6 times. Continue to cast off 2 sts in each side of piece until piece measures 59 cm / 23¼" in all sizes, bind off 3 sts 1 time in each side and bind off the remaining sts. Sleeve measures approx. 60 cm / 23½" in all sizes. Make another sleeve the same way. ASSEMBLY: Sew the shoulder seams. Sew collar tog mid back (make sure that seam is not visible when collar is folded down). Sew collar to neckline in the back of neck. Sew in sleeves. Sew the buttons on to the right band. |
|||||||||||||||||||
Diagram explanations |
|||||||||||||||||||
|
|||||||||||||||||||
 |
|||||||||||||||||||
 |
|||||||||||||||||||
 |
|||||||||||||||||||
Have you finished this pattern?Tag your pictures with #dropspattern #jacksoncardigan or submit them to the #dropsfan gallery. Do you need help with this pattern?You'll find 18 tutorial videos, a Comments/Questions area and more by visiting the pattern on garnstudio.com. © 1982-2026 DROPS Design A/S. We reserve all rights. This document, including all its sub-sections, has copyrights. Read more about what you can do with our patterns at the bottom of each pattern on our site. |
|||||||||||||||||||






With over 40 years in knitting and crochet design, DROPS Design offers one of the most extensive collections of free patterns on the internet - translated to 17 languages. As of today we count 333 catalogs and 12525 patterns - 12515 of which are translated into English (US/in).
We work hard to bring you the best knitting and crochet have to offer, inspiration and advice as well as great quality yarns at incredible prices! Would you like to use our patterns for other than personal use? You can read what you are allowed to do in the Copyright text at the bottom of all our patterns. Happy crafting!
Post a comment to pattern DROPS 174-1
We would love to hear what you have to say about this pattern!
If you want to leave a question, please make sure you select the correct category in the form below, to speed up the answering process. Required fields are marked *.