
Popular categories
Looking for a yarn?


Comments / Questions (107)
![]() Elke wrote:
Elke wrote:
Hallo, als ik de pas maak, komen aan de achterzijde (waar de toeren zich sluiten) in het begin de toeren mooi uit tegenover elkaar. Naarmate ik verder vorder, is er echter een klein hoogteverschil tussen links en rechts. Dit komt slordig over, zeker omdat het effect nog eens versterkt wordt door de verschillende kleuren per toer. Ik wissel nochtans van kleuren zoals aangegeven in het patroon. Kan u me helpen?
31.12.2018 - 11:08DROPS Design answered:
Dag Elke,
Er zou geen hoogte verschil moeten (/kunnen) ontstaan als je elke toer sluit zoals aangegeven bij 'informatie voor het haken'. Je moet dus elke toer sluiten en dan pas met de nieuwe toer beginnen.
01.01.2019 - 17:54
![]() Anne Kirchner wrote:
Anne Kirchner wrote:
Is there a diagram instead of written instructions for this pattern? The written instructions are very difficult to decipher. Wondering if a.1 and a.2 are really the v-stitch? Thank you
30.10.2018 - 22:55DROPS Design answered:
Dear Mrs Kirchner, you have to work diagram and at the same time follow the written pattern to make the increases in A.1 in your size. It's not V-stitches, in row 1 in A.1 you work 1 sc, 1 ch and skip next dc. In row 2 you will work 2 dc around each ch-space. Repeat these 2 rows. In A.2 you will work th same way, but yo uwill work sometimes 3 dc round the ch-spaces for the increases. Happy crocheting!
31.10.2018 - 08:34Mariana wrote:
Gracias por tu anterior respuesta, te cuento que inicie el tejido con 98 cadenas y pude continuar bien el tejido con la cantidad de puntos altos. Por otro lado te quería consultar porque ya llegué a la altura de las mangas y con respecto a las 8 cadenas que había que dejar , me dice que tengo que hacer 1punto alto en cada una, mi pregunta sería si la vuelta de medio punto y cadena ya no la hago más a partir de acá ?
01.08.2018 - 00:50DROPS Design answered:
Hola Mariana. A partir de la sisa el cuerpo se trabaja según el diagrama A.1: 1 vuelta de puntos altos, 1 vuelta de puntos bajos/ puntos de cadeneta.
07.08.2018 - 20:08Mariana wrote:
Hola , estoy empezando el tejido en talla s , si sigo las indicaciones del principio montando 96 cadenas cuando termino la vuelta de puntos altos llego a un total de 83 puntos altos y no 84, puede ser?
26.07.2018 - 19:35DROPS Design answered:
Hola Mariana. El patrón es correcto. No olvides que los primeros 3 puntos de cadeneta = 1 p.a.
31.07.2018 - 12:36Jimena L wrote:
Has anyone managed to finish this jumper? Would you like to share with me the instructions in a more user friendly way? I really like the jumper and I have started it 3 times but sadly I don't understand instructions (I'm used to reading patterns/instructions and I have never seen any project written this way). If you like to share it with me this is my email address: jimena.lovos (at) gmail.com Thanks!!!
13.04.2018 - 20:00DROPS Design answered:
Dear Jimena, according to Ravelry, several crocheters managed to finish this sweater. Can you please ask specific questions so we might help you with the particular point you have problems with? Also, do not forget that you can always ask for help in person in the store you bought your DROPS yarn from. Happy Crafting!
15.04.2018 - 14:43
![]() Shereece wrote:
Shereece wrote:
The pattern refers to A.1 and A.2. However, whatbis confusing is that there are several rows in those diagrams. The 1st sc/ch row in both is the same but I'm supposed to do so many repeats of A.1 and so many repeats of A.2? Is there a video tutorial for this yoke? I'm by no means a beginner crocheter. I'm very comfortable with reading written patterns and diagrams. But I'm really struggling with how you've written this one and I'd like to do this sweater!
09.01.2018 - 14:55DROPS Design answered:
Dear Shereece, when working diagrams A.1 and A.2 work same row of each diagram, ie work first row in A.1 and A.2 as explained, then on next row work row 2 in both diagrams and so on. You can insert markers between diagrams so that you know which of A.1/A.2 you should now work. Happy crocheting!
09.01.2018 - 17:05
![]() Rosa wrote:
Rosa wrote:
Hvor mange gram garn ville man skulle bruge i en medium trøje? hvis man nu lavede den ens farvet
03.01.2018 - 19:07DROPS Design answered:
Hei Rosa. Det har vi dessverre ingen oversikt over ettersom denne genseren er heklet med 3 farger. Men om du erstatter de 2 bifargene med hovedfargen, er du iallefall garantert å ha nok garn. mvh Drops design
04.01.2018 - 06:59
![]() Helga wrote:
Helga wrote:
Thank you for your kind answer and help!
13.12.2017 - 19:03
![]() Stephanie wrote:
Stephanie wrote:
Ik vond het een zo'n lekker patroon dat ik nadat ik de lengte van trui had bereikt, maar ben verder gegaan tot ik hem aan kon als jurk. Een roos gehaakt als accent en die erop genaaid.
12.12.2017 - 15:56
![]() Helga wrote:
Helga wrote:
I'm making size S and now I'm at row 5 but can't make this row well, there are always more stiches left at the end of the row. Would you pls so kind and explain me rows 3-4-5 more clearly (incl. how many stiches should have totally in each of the rows )?
08.12.2017 - 14:23DROPS Design answered:
Dear Helga, in first size you will work round 3 in pattern increasing only in A.2 as in diagram = 100 tr at the end of round 3. Work round 4 as in diagram = only increase in A.2 as shown in diagram. Then work round 5 increasing in A.2 as in diagram (no increase evenly in A.1). = 116 tr at the end of round 5. Happy crocheting!
11.12.2017 - 10:58
|
||||||||||||||||||||||
Misty Mountain#mistymountainsweater |
||||||||||||||||||||||
|
|
||||||||||||||||||||||
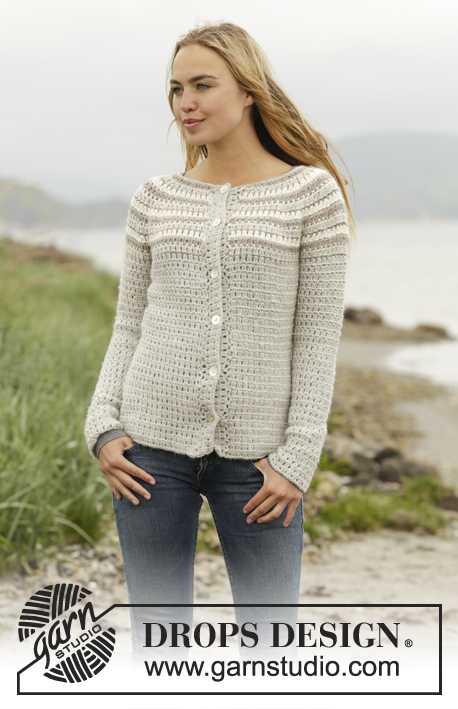
Crochet DROPS jumper and hat with stripes, worked top down in “Puna”. Size: S - XXXL.
DROPS 173-37 |
||||||||||||||||||||||
|
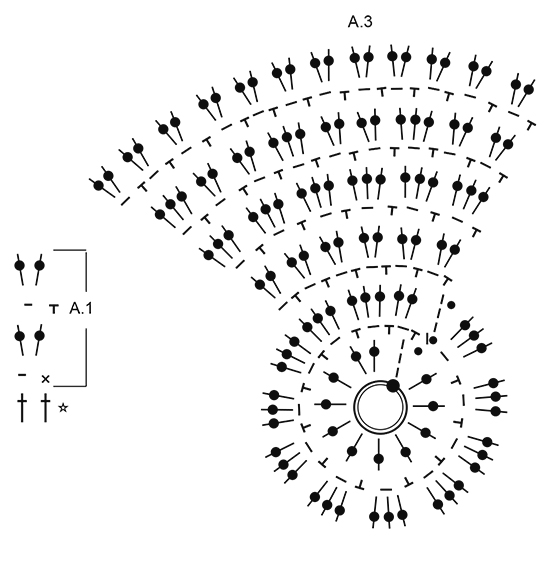
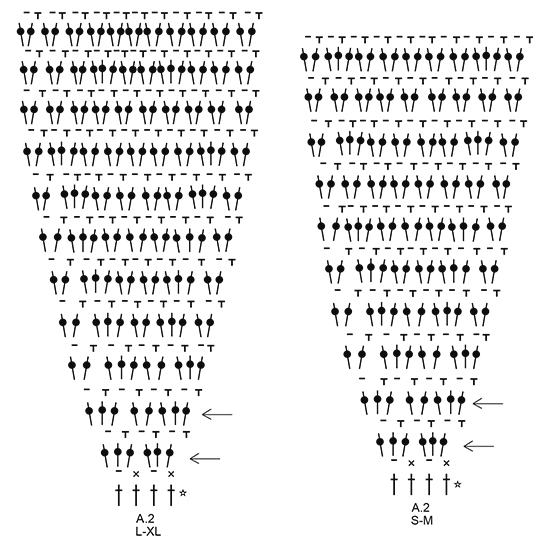
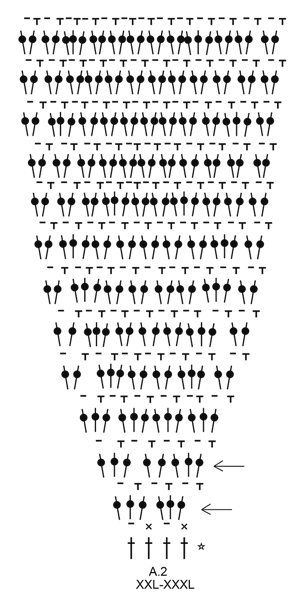
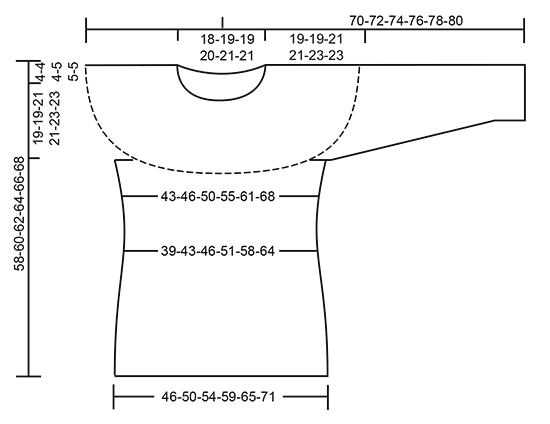
PATTERN: See diagrams A.1 to A.3. See diagram for correct size. CROCHET INFO: Beg every sc round with 1 ch (this replaces first sc) and finish with 1 sl st in first ch from beg of round. Beg every round with dc with 3 ch (= first dc) and finish with 1 sl st in 3rd ch at beg of round. At the end of every round with dc/sc work as follows: Before last pull through of last dc/sc switch color as follows: Get next color, i.e. 2 round down (1 dc round and 1 sc round), with the new color work 1 sl st around round it was worked on (i.e. around last dc/sc), ch 4, pull then through last loop on hook. This is done to avoid a tight strand in the piece. STRIPES: STRIPE 1: 1 round off white. STRIPE 2: 1 round light gray. STRIPE 3: 1 round taupe. DECREASE TIP (applies to body): Adjust so that next round is 1 round with dc. Work as before until 1 ch remains before marker, * work 1 dc around next ch, but wait with last pull through, work 1 dc more around same ch, but on last pull through, pull yarn through all sts on hook (= 1 dc dec) *, repeat from *-* around next ch (i.e. on the other side of marker) = 2 dc dec at each marker (= 4 dc in total). Every time you dec, repeat A.1 2 times less in total in width. INCREASE TIP: Adjust so that next round is 1 round with dc. Work as before until 1 ch remains before marker, * work 3 dc around next ch *, repeat from *-* 2 times in total = 2 dc inc at marker, repeat at both markers (= 4 dc inc in total). Every time you inc, repeat A.1 2 more times in total in width. DECREASE TIP-1 (applies to sleeve): Adjust so that next round is 1 round with dc. * Work 1 dc around first/next ch on round but wait with last pull through, work 1 dc more around the same ch but on last pull through, pull yarn through all sts on hook (= 1 dc dec) *, repeat from *-* around next ch = 2 dc dec. Every time you dec, repeat A.1 1 time less in total in width. Dec alternately at beg and end of round (i.e. when dec at the end work as before until 2 ch remain on round). ---------------------------------------------------------- JUMPER: The piece is worked top down. Rounds start mid back. YOKE: Work 96-101-101-110-115-120 ch on hook size 4.5 mm/US 7 with taupe and form a ring with 1 sl st in first ch. Work 3 ch (= 1 dc) - READ CROCHET INFO, 1 dc in each of the next 5-3-3-5-3-1 ch, * skip ch 1, 1 dc in each of the next 6 ch *, repeat from *-* the entire row = 84-88-88-96-100-104 dc. Work 2nd round (= round with sc/ch) in pattern as follows in STRIPES – see explanation above. Work A.1 over the first 10-12-12-12-14-14 dc (= 5-6-6-6-7-7 times in width), A.2 over the next 8 dc (= 2 times in width), A.1 over the next 6-6-6-8-8-8 dc (= 3-3-3-4-4-4 times in width), A.2 over the next 8 dc (= 2 times in width), A.1 over the next 20-22-22-24-26-28 dc (= 10-11-11-12-13-14 times in width), A.2 over the next 8 dc (= 2 times in width), A.1 over the next 6-6-6-8-8-8 dc (= 3-3-3-4-4-4 times in width), A.2 over the next 8 dc (= 2 times in width), A.1 over the last 10-10-10-12-12-14 dc (= 5-5-5-6-6-7 times in width). Repeat A.1 vertically and inc as shown in A.2 AT THE SAME TIME inc evenly as follows: Work 3rd round in pattern AT THE SAME TIME inc evenly as follows: Work A.1 over the first 10-12-12-12-14-14 sts and inc 0-2-2-4-4-4 dc evenly, A.2 as before (= 2 times in width), A.1 over the next 6-6-6-8-8-8 sts and inc 0-4-4-4-4-4 dc evenly, A.2 as before, A.1 over the next 20-22-22-24-26-28 sts and inc 0-4-4-6-6-8 dc evenly, A.2 as before, A.1 over the next 6-6-6-8-8-8 sts and inc 0-4-4-4-4-4 dc evenly, A.2 as before, A.1 over the last 10-10-10-12-12-14 sts and inc 0-2-2-2-4-4 dc evenly = 100-120-120-132-138-144 dc (includes inc in A.2). REMEMBER THE CROCHET GAUGE! Work 4th round in pattern as follows: Work A.1 over the first 10-14-14-16-18-18 dc, A.2 as before, A.1 over the next 6-10-10-12-12-12 dc, A.2 as before, A.1 over the next 20-26-26-30-32-36 dc, A.2 as before, A.1 over the next 6-10-10-12-12-12 dc, A.2 as before, A.1 over the last 10-12-12-14-16-18 dc. Work 5th round in pattern AT THE SAME TIME inc evenly as follows: Work A.1 over the first 10-14-14-16-18-18 sts and inc 0-0-0-2-0-4 dc evenly, A.2 as before (= 2 times in width), A.1 over the next 6-10-10-12-12-12 sts and inc 0-2-4-4-0-0 dc evenly, A.2 as before, A.1 over the next 20-26-26-30-32-36 sts and inc 0-0-2-4-4-8 dc evenly, A.2 as before, A.1 over the next 6-10-10-12-12-12 sts and inc 0-2-4-4-0-0 dc evenly, A.2 as before, A.1 over the last 10-12-12-14-16-18 sts and inc 0-0-2-2-2-4 dc evenly = 116-140-148-164-160-176 dc (includes inc in A.2). Continue pattern and inc in A.2. When last round remains in A.2, piece measures approx. 18-18-19-19-21-21 cm / 7"-7"-7½"-7½"-8¼"-8¼" from neck edge (= 212-236-260-276-304-320 dc). Work last round of A.2 as follows: Work A.1 over the first 10-14-14-18-18-22 dc, A.2 over the next 20-20-22-22-26-26 dc (= 1 time in width), 8-8-8-10-10-12 ch, skip the next 46-52-58-60-64-64 dc (i.e. 20-20-22-22-26-26 dc A.2, 6-12-14-16-12-12 dc A.1 and 20-20-22-22-26-26 dc A.2 for sleeve), A.2 over the next 20-20-22-22-26-26 dc (= 1 time in width), A.1 over the next 20-26-28-34-36-44 dc, A.2 over the next 20-20-22-22-26-26 dc (= 1 time in width), 8-8-8-10-10-12 ch, skip the next 46-52-58-60-64-64 dc (i.e. 20-20-22-22-26-26 dc A.2, 6-12-14-16-12-12 dc A.1 and 20-20-22-22-26-26 dc A.2 for sleeve), A.2 over the next 20-20-22-22-26-26 dc (= 1 time in width), A.1 over the last 10-12-14-16-18-22 dc = 136-148-160-176-196-216 sts. Continue piece with light gray. Work next round as follows: Work A.1 over the first 30-34-36-40-44-48 sts, 1 dc in each of the 8-8-8-10-10-12 ch under sleeve, insert 1 marker between these sts, A.1 over the next 60-66-72-78-88-96 sts, 1 dc in each of the 8-8-8-10-10-12 ch under sleeve, insert 1 marker between these, A.1 over the last 30-32-36-38-44-48 sts. Insert 1 marker in piece, NOW MEASURE PIECE FROM HERE. Then repeat A.1 over all sts. When piece measures 4 cm / 1½" from marker, dec 2 dc at each marker - READ DECREASE TIP. Dec like this every 4-4½-4½-5½-5½-6 cm / 1½"-1¾"-1¾"-2¼"-2¼"-2½" 3 times in total = 124-136-148-164-184-204 sts. When piece measures 14-16-16-17-17-19 cm / 5½"-6¼"-6¼"-6¾"-6¾"-7½" from marker, inc 2 dc at each marker – see INCREASE TIP. Inc like this every 2½ cm / ⅞" a total of 6 times = 148-160-172-188-208-228 dc. Continue pattern until piece measures 35-37-37-38-38-40 cm / 13¾"-14½"-14½"-15"-15"-15¾" from marker (= 54-56-58-59-61-63 cm / 21¼"-22"-22¾"-23¼"-24"-24¾" from neck edge), adjust to finish with 1 round dc. Fasten off. SLEEVE: = 46-52-58-60-64-64 dc. Work first round on sleeve with same color as last stripe in sc on body. Sleeve is worked in the round, top down. Beg by working mid under sleeve as follows: Work 1 sc in the 5th-5th-5th-5th-5th-6th ch of the 8-8-8-10-10-12 ch worked in armhole on body, work 1 ch (= 1 sc), work 1 sc in each of the next 3-3-3-5-5-6 ch, A.1 (i.e. 1 round with sc and ch) over the 46-52-58-60-64-64 dc over sleeve, finish with 1 sc in each of the remaining 4-4-4-4-4-5 ch under sleeve = 54-60-66-70-74-76 sts. Continue piece with light gray. Insert 1 marker in piece, NOW MEASURE PIECE FROM HERE. Work A.1 in the round. When piece measures 3 cm / 1" from marker, dec 2 dc under sleeve - READ DECREASE TIP-1. Dec like this every 3-2½-2-2-2-2 cm / 1⅛"-⅞"-¾"-¾"-¾"-¾" 11-13-15-17-18-18 times in total = 32-34-36-36-38-40 sts. When piece measures 42-44-43-45-45-47 cm / 16½"-17¼"-17"-17¾"-17¾"-18½" from marker, adjust to finish with 1 round dc. Fasten off. Work the other sleeve the same way. NECK EDGE: Work with light gray from RS as follows: Work 1 sc in every ch where dc was worked in first round (= 84-88-88-96-100-104 sc). Fasten off. ---------------------------------------------------------- HAT: Work piece top down, in STRIPES - see explanation above. Work 4 ch on hook size 3.5 mm/E/4 with taupe and form a ring with 1 sl st in first ch. Work A.3 – see CROCHET INFO! After the 3 first rounds of A.3 (= 36 dc) repeat A.3 4 times in total on the round. REMEMBER THE CROCHET GAUGE! When working last round of A.3, inc 0-2-4 dc evenly = 96-98-100 dc. Piece measures approx. 17 cm / 6¾" in diameter. Then work A.1 over all sts (= 48-49-50 times on round). When piece measures 23-24-25 cm / 9"-9½"-9¾" in total from the top, adjust so that last round is a round with dc, work 1 sc in every dc (continue with stripes). Work 3 rounds in total with 1 sc in every st. Piece measures 24-25-26 cm / 9½"-9¾"-10¼" in total from the top. Fasten off. |
||||||||||||||||||||||
Diagram explanations |
||||||||||||||||||||||
|
||||||||||||||||||||||
 |
||||||||||||||||||||||
 |
||||||||||||||||||||||
 |
||||||||||||||||||||||
 |
||||||||||||||||||||||
Have you finished this pattern?Tag your pictures with #dropspattern #mistymountainsweater or submit them to the #dropsfan gallery. Do you need help with this pattern?You'll find 14 tutorial videos, a Comments/Questions area and more by visiting the pattern on garnstudio.com. © 1982-2026 DROPS Design A/S. We reserve all rights. This document, including all its sub-sections, has copyrights. Read more about what you can do with our patterns at the bottom of each pattern on our site. |
||||||||||||||||||||||


With over 40 years in knitting and crochet design, DROPS Design offers one of the most extensive collections of free patterns on the internet - translated to 17 languages. As of today we count 324 catalogs and 12285 patterns - 12275 of which are translated into English (US/in).
We work hard to bring you the best knitting and crochet have to offer, inspiration and advice as well as great quality yarns at incredible prices! Would you like to use our patterns for other than personal use? You can read what you are allowed to do in the Copyright text at the bottom of all our patterns. Happy crafting!
Post a comment to pattern DROPS 173-37
We would love to hear what you have to say about this pattern!
If you want to leave a question, please make sure you select the correct category in the form below, to speed up the answering process. Required fields are marked *.