
Popular categories
Looking for a yarn?


Comments / Questions (8)
![]() Carol Maitland wrote:
Carol Maitland wrote:
Hi I have intentions of knitting this pattern in the near future. I am new at knitting from a chart so I have questions.The instructions say to start at the bottom right corner,once that is complete where do I go.I am knitting in the round so do I go back to the right side and start over again.on the 2nd row or do I redo the 1st row tillthe round is complete and then go to the second row. Thks so much,any info would help.Carol. when working with dpns how do I read the chart.
10.01.2023 - 17:04DROPS Design answered:
Hi Carol, You continue with the first row in the diagram (from right to left repeated) until the round is complete then start on row 2 in the diagram for round 2. Happy knitting!
11.01.2023 - 07:04
![]() Marianna wrote:
Marianna wrote:
Quando iniziò lo schema A1 per il cappello finisco il ferro con 2 rovesci invece che 6 perché???
03.11.2020 - 21:26DROPS Design answered:
Buonasera Marianna, ci può indicare esattamente il punto dello schema a cui fa riferimento? Buon lavoro!
04.11.2020 - 19:23
![]() Liette Courchesne wrote:
Liette Courchesne wrote:
Bonjour, je ne réussi pas à imprimer les explications. J'ai vérifier tous les paramètres de mon imprimante et je l'ai essayé aussi et tout est ok. Alors si vous pouviez voir de votre côté.Merci
13.03.2018 - 19:12
![]() Elena wrote:
Elena wrote:
Per il collo non capisco dove sbaglio sono arrivata alla fine del 1°giro, A2 mi termina con la sequenza di 7 dir/rov anzichè coi 3 dir...eppure ho 255 m.... grazie
17.11.2017 - 18:13DROPS Design answered:
Buonasera Elena, quando inizia a lavorare A.2 deve avere 300 maglie, e nel corso del 1° giro di A.2 diminuirà 45 maglie, in modo da avere 255 maglie alla fine del primo giro. Se non abbiamo interpretato nel modo corretto la sua domanda, ci riscriva pure! Buon lavoro!
17.11.2017 - 20:02
![]() Maria wrote:
Maria wrote:
Ciao, Con i ferri diritti i diagrammi si leggono così? Dal basso verso l'alto, da destra verso sinistra. Ogni riga corrisponde ad 1 ferro e ogni quadrato ad 1 maglia. A1 S/M io lo leggerei così 1° riga 1: 3 maglie a dritto,1 rovescio,1 dritto,1 rovescio etc fino alla 14° maglia. riga 2 (da destra a sinistra): 2 maglie a dritto,1maglia a rovescio,1 dritto fino alla 14° maglia.Al 36° riga iniziano le diminuzioni. in ogni ferro si lavora il disegno in larghezza per 6 volte. Giusto? grazie
19.01.2017 - 15:24DROPS Design answered:
Buongiorno Maria. Quando lavora avanti indietro con i ferri dritti, le righe dispari del diagramma vengono lette da destra verso sinistra, quelle pari da sinistra verso destra. E’ corretto come legge la prima riga, la seconda è: rov, dir, rov, dir fino alle ultime due maglie che vengono lavorate a rov (nei ferri pari: quadrato bianco a rov, quadrato con pallino nero a dir). Il disegno viene lavorato 6 volte in larghezza e le maglie diminuiscono a partire dal 36° ferro. Buon lavoro!
19.01.2017 - 16:14
![]() Sofia wrote:
Sofia wrote:
Hej! Skulle halsvärmaren gå att sticka fram och tillbaka på rundsticka istället, eller blir mönstret galet då? Älskar det geometriska mönstret, men skulle vilja ha en halsduk istället för rundkrage.
04.01.2016 - 19:50DROPS Design answered:
Hej. Det borde inte vara några problem att sticka det fram och tillbaka på rundsticka istället. Lycka till!
05.01.2016 - 08:10
![]() Franca wrote:
Franca wrote:
Il cappello sì, lo scaldacollo lo preferirei meno largo
02.06.2015 - 17:26
![]() Hilde Dønheim wrote:
Hilde Dønheim wrote:
Lekkert sett.
29.05.2015 - 00:00
|
||||||||||
Winter Triangle#wintertriangleset |
||||||||||
 |
 |
|||||||||
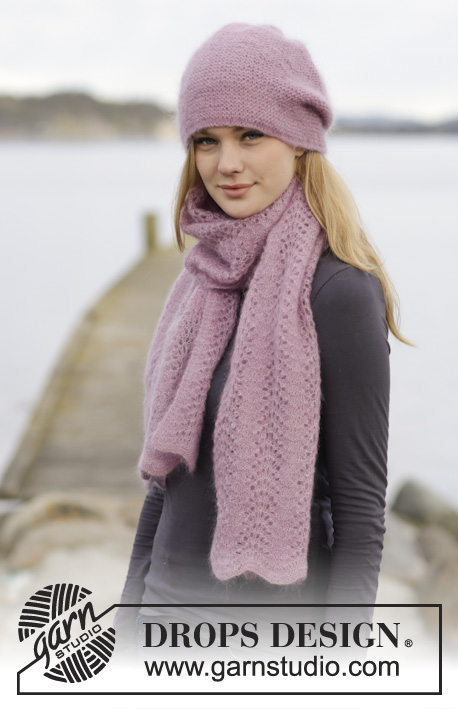
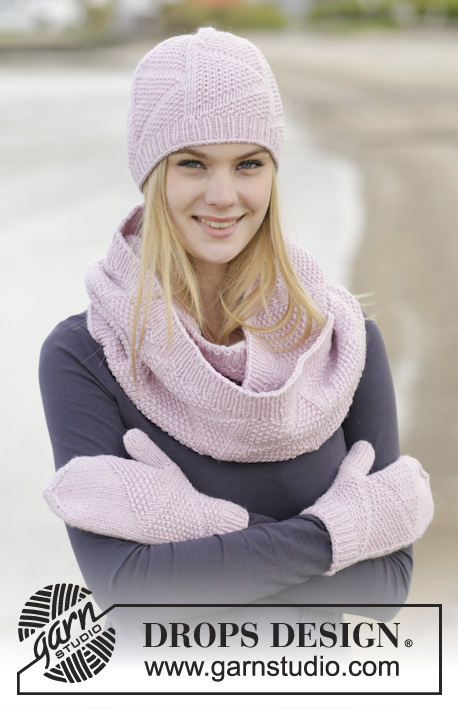
Set consists of: Knitted DROPS hat, double neck warmer and mittens with textured pattern in “Nepal”.
DROPS 165-38 |
||||||||||
|
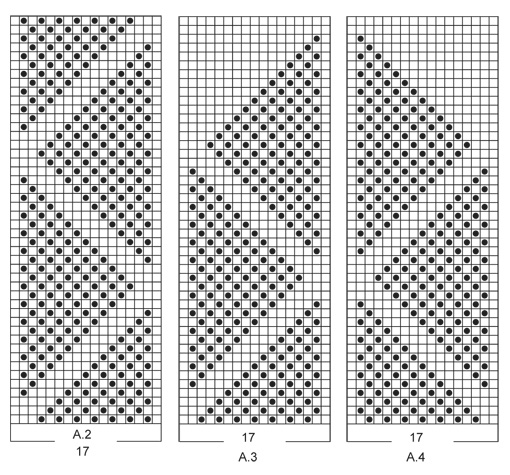
HAT: PATTERN: See diagram A.1. ---------------------------------------------------------- HAT: Worked in the round on circular needle, switch to double pointed needles when needed. Cast on 90-96-102 sts on circular needle size 3.5 mm / US 4 with Nepal. K 1 round. Work rib K 1/P 1 until piece measures 3 cm / 1''. Switch to circular needle size 4.5 mm / US 7. Work A.1 – see diagram for correct size - 6 times in total in width AT THE SAME TIME on first round dec 6 sts evenly = 84-90-96 sts. REMEMBER THE KNITTING GAUGE When A.1 has been worked 1 time vertically, there are 24 sts on needle. On next round K tog all sts 2 by 2 = 12 sts. Piece measures approx. 25-25-27 cm / 9 3/4"-9 3/4"-10½". Cut the yarn and pull it through the last sts, tighten tog and fasten. ---------------------------------------------------------- NECK WARMER: PATTERN: See diagram A.2. ---------------------------------------------------------- NECK WARMER: Worked in the round on circular needle. Cast on 300 sts on circular needle size 4.5 mm / US 7 with Nepal. K 1 round. Work rib = K 1/P 1. When piece measures approx. 3 cm / 1'', switch to circular needle size 5.5 mm / US 9. Work A.2 (= 17 sts) 15 times in total in width AT THE SAME TIME on first round dec 45 sts evenly = 255 sts. REMEMBER THE KNITTING GAUGE When A.2 has been worked 1 time vertically, piece measures approx. 26 cm / 10 1/4''. Switch to circular needle size 4.5 mm / US 7. Work rib (= K 1/P 1) AT THE SAME TIME on first round inc 45 sts evenly = 300 sts. Loosely bind off when rib measures 3 cm / 1'' (entire neck warmer measures approx. 29 cm / 11½''). ---------------------------------------------------------- MITTENS: PATTERN: See diagrams A.3-A.4. INCREASE TIP: Inc 1 st by making 1 YO, on next row K YO twisted to avoid holes. DECREASE TIP: Dec as follows (beg 3 sts before marker): K 2 tog, K 2 (marker is between these 2 sts), slip 1 st as if to K, K 1, psso. ---------------------------------------------------------- LEFT MITTEN: Worked in the round on double pointed needles. Cast on 40-44 sts on double pointed needles size 3.5 mm / US 4 with Nepal and K 1 round. Then work rib (= K 1/P 1). When rib measures 4 cm / 1½'', switch to double pointed needles size 4 mm / US 6. Continue as follows: K 1-2, A.3 (= 17 sts), K the remaining sts AT THE SAME TIME on first round dec 4 sts evenly = 36-40 sts. REMEMBER THE KNITTING GAUGE When piece measures 8 cm / 3 1/8'', inc 1 st on each side of first st on round for thumb (= 2 sts inc) - READ INCREASE TIP. Repeat inc on each side of the inc sts on every other round a total of 5 times = 46-50 sts. Now slip the 11 thumb sts on 1 stitch holder. Work in stockinette st and A.3 in the round AT THE SAME TIME cast on 1 new st behind thumb on next round = 36-40 sts. When A.3 has been worked 1 time vertically, continue in stockinette st. After A.3 the mitten measures approx. 22 cm / 8 3/4'' (try on the mitten, approx. 4 cm / 1½'' remains until finished measurements). Work in stockinette st until mitten measures 22 cm / 8 3/4"'' or desired length. Insert 1 marker at beg of round and 1 marker after 18-20 sts. Now dec 1 st on each side of both markers (= 4 sts dec) - READ DECREASE TIP. Repeat dec every other round 2 more times and then every round 4 times = 8-12 sts remain on needle. On next round K tog all sts 2 by 2 = 4-6 sts. Cut the yarn and pull it through the remaining sts, tighten tog and fasten. THUMB: Slip the 11 thumb sts back on double pointed needles size 4 mm / US 6. In addition pick up 4-5 sts behind thumb = 15-16 sts. Work in stockinette st until the thumb itself measures approx. 4½ cm / 1 3/4'' (try on the mitten, approx. ½ cm / 1/4'' remains until finished measurements). K 2 rounds AT THE SAME TIME K all sts tog 2 by 2 on both rounds. Cut the yarn and pull it through the remaining sts, tighten tog and fasten. RIGHT MITTEN: Cast on and work as left mitten but work as follows: A.4 (= 17 sts), K 0-1, K 1 (= thumb sts, inc on each side of this st), stockinette st over the remaining sts. |
||||||||||
Diagram explanations |
||||||||||
|
||||||||||
 |
||||||||||
 |
||||||||||
Have you finished this pattern?Tag your pictures with #dropspattern #wintertriangleset or submit them to the #dropsfan gallery. Do you need help with this pattern?You'll find 20 tutorial videos, a Comments/Questions area and more by visiting the pattern on garnstudio.com. © 1982-2026 DROPS Design A/S. We reserve all rights. This document, including all its sub-sections, has copyrights. Read more about what you can do with our patterns at the bottom of each pattern on our site. |
||||||||||


With over 40 years in knitting and crochet design, DROPS Design offers one of the most extensive collections of free patterns on the internet - translated to 17 languages. As of today we count 325 catalogs and 12298 patterns - 12288 of which are translated into English (US/in).
We work hard to bring you the best knitting and crochet have to offer, inspiration and advice as well as great quality yarns at incredible prices! Would you like to use our patterns for other than personal use? You can read what you are allowed to do in the Copyright text at the bottom of all our patterns. Happy crafting!
Post a comment to pattern DROPS 165-38
We would love to hear what you have to say about this pattern!
If you want to leave a question, please make sure you select the correct category in the form below, to speed up the answering process. Required fields are marked *.