
Popular categories
Looking for a yarn?


Comments / Questions (26)
![]() Stefanie wrote:
Stefanie wrote:
Bonjour Je viens de tricoter déjà une manche et je viens de me rendre compte que je viens de faire une erreur. Les 8 m qu'il faut rabattre milieu sous la manche, est ce que c'est tout au début qu'il faut rabattre ? Car moi je l'ai fait à partir de la 34eme maille. Je ne comprends pas très bien.
11.12.2020 - 11:27DROPS Design answered:
Bonjour Stéphanie, les 8 mailles à rabattre sous la manche doivent être au milieu sous la manche, ce sont les mailles qui seront contre les 8 rabattues pour l'emmanchure dos/devant, autrement dit, pour la manche, on va rabattre les 4 dernières mailles du tour + les 4 premières mailles du début du tour. Bon tricot!
11.12.2020 - 13:06
![]() Stefanie wrote:
Stefanie wrote:
Bonjour. Je suis actuellement en train de faire ce pull et j'en suis aux manches. J'ai un énorme soucis avec les aiguilles doubles pointes je n'y arrive pas du tout avec 5 aiguilles. Est ce que c'est possible de répartir les mailles sur 3 aiguilles ? Merci d'avance pour votre réponse
23.11.2020 - 16:36DROPS Design answered:
Bonjour Stéfanie, vous pouvez tout à fait répartir les mailles sur uniquement 3 aiguilles et tricoter avec la 4ème, avez-vous pensé à la technique du magic loop? C'est une alternative aux doubles pointes qui a ses adeptes. Bon tricot!
24.11.2020 - 09:07
![]() Louise wrote:
Louise wrote:
Bonjour , les diminutions 2 doivent elles être réparties symétriquement par rapport au marqueur indiquant la séparation entre les 2 parties? Dans votre explication il est indiqué de faire à 5 mailles du marqueur une diminution, nous nous retrouvons donc à 4 mailles du marqueur. On nous dit ensuite de tricoter 6 mailles cela nous amène à 2 mailles du marqueur et de diminuer . Au final il y a une diminution à 4 mailles du marqueur et une à 2. Est ce correct?
30.10.2020 - 08:48DROPS Design answered:
Bonjour Louise, les diminutions-2 sont symétriques par rapport au marqueur, commencez 5 mailles avant le marqueur, tricotez 2 mailles ensemble à l'endroit, 3 mailles endroit, glissez le marqueur, tricotez 3 mailles endroit, puis glissez 1 maille à l'endroit, tricotez 1 maille endroit et passez la maille glissée par-dessus la maille tricoté = vous avez 6 mailles entre les 2 diminutions, 3 de chaque côté du marqueur. Bon tricot!
30.10.2020 - 10:38
![]() Blue wrote:
Blue wrote:
Bonjour, Je n'arrive pas a comprendre comment faire une augmentation avec un jeté malgré la vidéo explicative... Puis-je utiliser une autre technique comme des augmentations intercalaires par exemple ? Merci
02.04.2020 - 02:22DROPS Design answered:
Bonjour Mme Blue, tout à fait :) Dans ce modèle, on ne devrait pas voir de différence. Bon tricot!
02.04.2020 - 08:37
![]() Lucille wrote:
Lucille wrote:
Bonjour, Je reviens sur mon commentaire sur les aiguilles, du coup j\'aimerais savoir pourquoi il faut 2 aiguilles circulaires, une de 40 cm et une de 80 cm ? A quel moment doit-on utiliser celle de 40 cm ? Et celle de 80 cm ? En vous remerciant
05.11.2019 - 18:04DROPS Design answered:
Bonjour Lucille, dans ce modèle tricoté de bas en haut, on va commencer le dos & le devant avec celle de 80 cm, les manches vont se tricoter avec les doubles pointes, puis la circulaire de 40 cm quand on aura suffisamment de mailles. L'empiècement va se tricoter avec la 80 cm, puis, quand on va diminuer pour l'empiècement, la 80 cm sera trop longue, on changera alors pour la 40 cm pour terminer. Bon tricot!
06.11.2019 - 08:32
![]() Lucille wrote:
Lucille wrote:
Bonjour, J'aimerais faire ce model et je suis en train de rechercher le matériel mais je voulais savoir quand vous dites : "AIGUILLES DOUBLES POINTES ET CIRCULAIRES (40 et 80 cm) DROPS n° 3 " Faut-il des aiguilles doubles pointes en 40 cm et des circulaires en 80 cm où est ce que je n'ai pas bien compris ? Car je ne trouve que des doubles pointes de 20 cm... En vous remerciant. Lucille
03.11.2019 - 21:26DROPS Design answered:
Bonjour Lucille, effectivement, la longueur indiquée ici correspond à la longueur des aiguilles circulaires, les doubles-pointes sont des aiguilles de 20 cm. Bon tricot!
05.11.2019 - 08:05
![]() Bianca Rothman wrote:
Bianca Rothman wrote:
När man skall maska av för ärmhålen på fram och bakstycke så blir det lite galet i beskrivningen. Det börjar ju med 53 maskor, sen 10 anmärkningar. 106 maskor, 10 avmaskningar och sen 53 maskor för att avsluta bak. Står ej så i beskrivningen.
16.10.2017 - 07:02
![]() Camille wrote:
Camille wrote:
Bonjour, au niveau de l'empiecement après avoir mis les manches sur les mêmes aiguilles que le corps au niveau des emmanchures, où doit on commencer le tour endroit en naturel ?
05.09.2017 - 22:24DROPS Design answered:
Bonjour Camille, commencez à la transition d'une des manches et du dos, soit avant le dos, soit après le dos. Bon tricot!
06.09.2017 - 08:58
![]() Shelly wrote:
Shelly wrote:
I don't see pattern a.1 in the instruction . There is only a.2.
09.03.2016 - 21:36DROPS Design answered:
Dear Shelly, you will find A.1 below both A.2 and above measurement chart, tog with A.3. Happy knitting!
10.03.2016 - 08:30
![]() Griet wrote:
Griet wrote:
Mooi model! Ik had graag de basiskleur grijs vervangen door petroleum(blauw). Met welke kleur kan ik dan combineren om het zwart bovenaan te vervangen?
03.10.2015 - 17:47DROPS Design answered:
Hoi Griet. Neem contact op met uw verkooppunt. Zij kunnen u goed adviseren in het kiezen van de juiste kleurencombinatie. Veel plezier mee.
05.10.2015 - 13:43
|
|||||||||||||||||||
Ferry Cross#ferrycrosssweater |
|||||||||||||||||||
|
|
|||||||||||||||||||
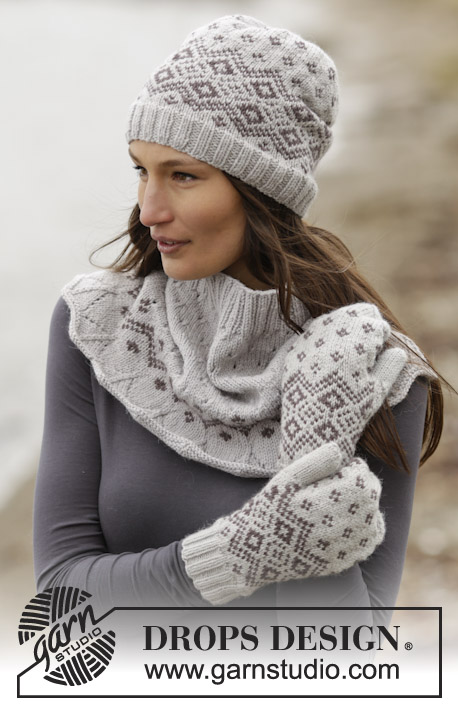
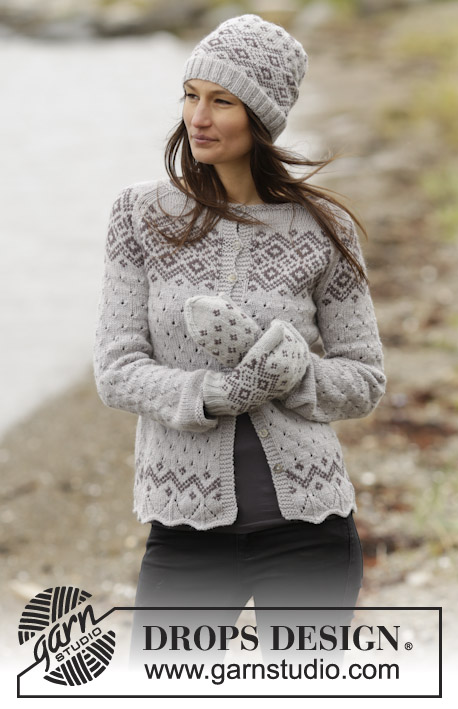
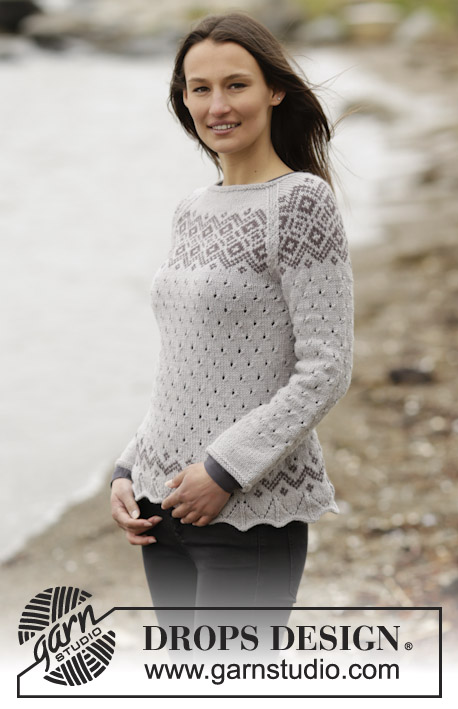
Knitted DROPS jumper with round yoke and Nordic pattern in "Alpaca". Size: S - XXXL.
DROPS 165-14 |
|||||||||||||||||||
|
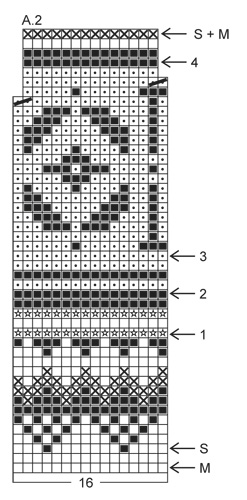
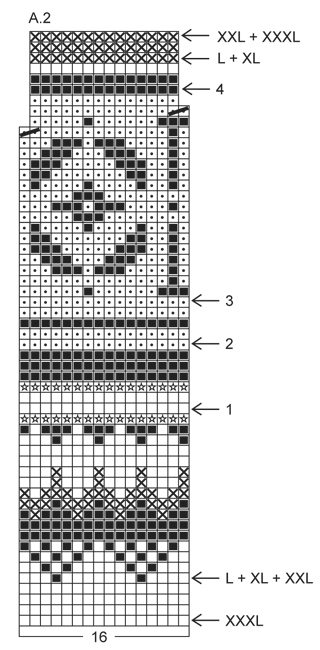
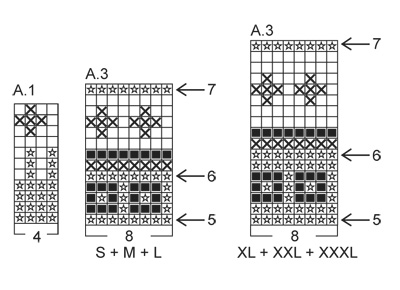
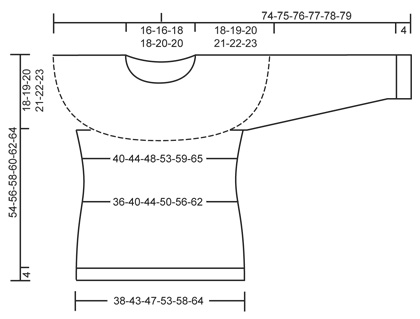
DECREASE TIP-1: To calculate how often dec should be done, use the total no of sts on round (e.g. 248 sts) and divide by no of dec to be done (e.g. 64) = 3.88. I.e. in this example K approx. every 3rd and 4th st tog. DECREASE TIP-2 (applies to sides of body): Dec 1 st on each side of marker as follows: Beg 5 sts before marker and K 2 tog, K 6 (marker is in the middle of these sts), slip 1 st as if to K, K 1, psso. INCREASE TIP (applies to sides of body): Inc 1 st on each side of markers as follows: Beg 3 st before marker, 1 YO, K 6, 1 YO. On next round K YOs twisted to avoid holes. PATTERN: See diagrams A.1 to A.3 – choose diagram for correct size. Work entire pattern in stockinette st. KNITTING TIP: To avoid the knitting gauge to tighten when working pattern, it is important not to tighten the strands on back side of piece. Switch to a higher needle no when working pattern if the pattern is somewhat tight. ---------------------------------------------------------- BODY: Worked in the round on circular needle. Cast on 248-272-296-336-376-408 sts on circular needle size 2.5 mm / US 1.5 with light gray. K 1 round. Then work rib = K 2/P 2 for 4 cm / 1½". K 1 round while AT THE SAME TIME dec 64-68-72-84-96-100 sts evenly - READ DECREASE TIP-1 = 184-204-224-252-280-308 sts. Insert 1 marker in each side = 92-102-112-126-140-154 sts between markers on front and back piece. Switch to circular needle size 3 mm / US 2.5 and work in stockinette st. REMEMBER THE KNITTING GAUGE When piece measures 8 cm / 3⅛", dec 1 st on each side of both markers - READ DECREASE TIP-2 (= 4 sts dec). Repeat dec every 3 cm / 1" a total of 3 times in all sizes = 172-192-212-240-268-296 sts. When piece measures 20 cm / 8", inc 1 st on each side of both markers - READ INCREASE TIP (= 4 sts inc). Repeat inc every 2½-2½-2½-4½-4½-4½ cm / ⅞"-⅞"-⅞"-1¾"-1¾"-1¾" 5-5-5-4-4-4 times in total = 192-212-232-256-284-312 sts. When piece measures 32-33-34-35-36-37 cm / 12½"-13½"-13⅜"-13¾"-14¼"-14½" (inc should now be done), work pattern in the round according to diagram A.1 - READ KNITTING TIP. After A.1 K 1 round with off white as follows: bind off 4-4-5-5-6-6 sts for armhole, work 88-98-106-118-130-144 sts (= front piece), bind off 8-8-10-10-12-12 sts for armhole, work 88-98-106-118-130-144 sts (= back piece) and bind off the last 4-4-5-5-6-6 sts for armhole (piece measures approx. 36-37-38-39-40-41 cm / 14¼"-14½"-15"-14¼"-15¾"-16⅛". Put piece aside and knit the sleeves. SLEEVE: Worked in the round on double pointed needles. Cast on 64-64-68-68-72-72 sts on double pointed needles size 2.5 mm / US 1.5 with light gray. K 1 round. Then work rib = K 2/P 2 for 4 cm / 1½". K 1 round while AT THE SAME TIME dec 8-8-8-8-10-10 sts evenly = 56-56-60-60-62-62 sts. Switch to double pointed needles size 3 mm / US 2.5 and work in stockinette st. When piece measures 8-11-10-10-7-10 cm / 3"-4½"-4"-4"-2¾"-4", inc 2 sts mid under sleeve. Repeat inc every 4-3-3-2½-2½-2 cm / 1½"-1"-1"-⅞"-⅞"-¾" 10-12-12-14-15-17 times in total = 76-80-84-88-92-96 sts. When piece measures 44-44-43-43-42-42 cm / 17¼"-17¼"-17"-17"-16½"-16½" (NOTE: Shorter measurements in the larger sizes because of wider shoulders - and inc should now be done), work pattern according to diagram A.1. After A.1 K 1 round with off white while binding off the middle 8-8-10-10-12-12 sts under sleeve = 68-72-74-78-80-84 sts remain on needle (piece now measures approx. 48-48-47-47-46-46 cm / 19"-19"-18½"-18½"-18"-18"). Put piece aside and make another sleeve. YOKE: Slip sleeves on to same circular needle as body where armholes were bound off (without working them first) = 312-340-360-392-420-456 sts. K 1 round with off white while dec 8-4-8-8-4-8 sts evenly = 304-336-352-384-416-448 sts. Then work pattern in the round according to diagram A.2 (choose diagram for correct size and beg on round marked with arrow in diagram for correct size). AT THE SAME TIME on round marked with arrow 1 in diagram dec 38-42-44-48-52-56 sts evenly (i.e. K every 7th and 8th st tog) = 266-294-308-336-364-392 sts. On round marked with arrow 2 in diagram dec 38-42-44-48-52-56 sts evenly again (i.e. K every 6th and 7th st tog) = 228-252-264-288-312-336 sts. On round marked with arrow 3 in diagram dec 4-12-8-0-8-0 sts evenly. SIZE S: K every 56th and 57th st tog, SIZE M: K every 20th and 21st st tog, SIZE L: K every 32nd and 33rd st tog, SIZE XXL: K every 38th and 39th st tog, (do not dec in size XL + XXXL) = 224-240-256-288-304-336 sts. Continue pattern and dec as shown in diagram = 196-210-224-252-266-294 sts on needle before arrow 4. On round marked with arrow 4 in diagram dec 28-30-32-36-38-42 sts evenly (i.e. K every 6th and 7th st tog) = 168-180-192-216-228-252 sts. Finish A.2 (finish after round marked with arrow for correct size). Then work pattern in the round according to diagram A.3 (choose diagram for correct size). AT THE SAME TIME on round marked with arrow 5 in diagram dec 16-12-8-16-20-28 sts evenly as follows: SIZE S: K alternately every 9th and 10th st and every 10th and 11th st tog, SIZE M: K every 14th and 15th st tog, SIZE L: K every 23rd and 24th st tog, SIZE XL: K alternately every 12th and 13th st and every 13th and 14th st tog, SIZE XXL: K alternately every 10th and 11th st and every 11th and 12th st tog, SIZE XXXL: K every 8th and 9th st tog = 152-168-184-200-208-224 sts. Continue pattern. On round marked with arrow 6 in diagram dec 24-32-32-40-40-48 sts evenly. SIZE S: K every 5th and 6th st tog, SIZE M + XL + XXL: K approx. every 4th and 5th st tog, SIZE L: K alternately every 4th and 5th st and every 5th and 6th st tog, SIZE XXXL: K alternately every 3th and 4th st and every 4th and 5th st tog = 128-136-152-160-168-176 sts. On round marked with arrow 7 in diagram dec 28-36-44-52-52-60 sts evenly. SIZE S: K alternately every 3rd and 4th st and every 4th and 5th st tog, SIZE M + L: K approx. alternately every 2nd and 3rd st and every 3rd and 4th st tog, Size XL + XXL + XXXL: K approx. every 2nd and 3rd st tog = 100-100-108-108-116-116 sts remain on needle. ELEVATION IN BACK OF NECK: Insert 1 marker mid back. Beg mid back and work with light gray as follows: K 8 sts past marker, turn, tighten yarn and P 16 sts back. Turn, tighten yarn and K 24 sts, turn, tighten yarn and P 32 sts back. Continue to work 8 sts more in stockinette st on every turn until a total of 64-64-64-80-80-80 sts have been worked, turn and K until mid back again. NECK EDGE: Switch to a short circular needle size 2.5 mm / US 1.5 and K 1 round, P 1 round and K 1 round with light gray. Then work rib = K 2/P 2 for 3 cm / 1". Loosely bind off sts with K over K and P over P. Jumper measures approx. 54-56-58-60-62-64 cm / 21¼"-22"-22¾"-23⅝"-24⅜"-25¼" up to shoulder. ASSEMBLY: Sew the openings under the sleeves. |
|||||||||||||||||||
Diagram explanations |
|||||||||||||||||||
|
|||||||||||||||||||
 |
|||||||||||||||||||
 |
|||||||||||||||||||
 |
|||||||||||||||||||
 |
|||||||||||||||||||
Have you finished this pattern?Tag your pictures with #dropspattern #ferrycrosssweater or submit them to the #dropsfan gallery. Do you need help with this pattern?You'll find 31 tutorial videos, a Comments/Questions area and more by visiting the pattern on garnstudio.com. © 1982-2026 DROPS Design A/S. We reserve all rights. This document, including all its sub-sections, has copyrights. Read more about what you can do with our patterns at the bottom of each pattern on our site. |
|||||||||||||||||||


With over 40 years in knitting and crochet design, DROPS Design offers one of the most extensive collections of free patterns on the internet - translated to 17 languages. As of today we count 325 catalogs and 12298 patterns - 12288 of which are translated into English (US/in).
We work hard to bring you the best knitting and crochet have to offer, inspiration and advice as well as great quality yarns at incredible prices! Would you like to use our patterns for other than personal use? You can read what you are allowed to do in the Copyright text at the bottom of all our patterns. Happy crafting!
Post a comment to pattern DROPS 165-14
We would love to hear what you have to say about this pattern!
If you want to leave a question, please make sure you select the correct category in the form below, to speed up the answering process. Required fields are marked *.