
Popular categories
Looking for a yarn?


Comments / Questions (92)
![]() Dana wrote:
Dana wrote:
In der Anleitung zur Passe steht: "...Wenn A.1 in der Höhe zu Ende gestr wurde, kraus re weiterstr ..." Heißt dass, es erscheint ein glatt rechts gestricktes Muster oder stricke ich eine Runde rechts eine Runde links und erhalte Krausrippen?
22.04.2015 - 08:18DROPS Design answered:
Liebe Dana, Letzteres ist richtig: Kraus rechts bedeutet in Runden, dass Sie 1 Rd re und 1 Rd li stricken, also Krausrippen in Runden. Wenn Sie genau hinschauen, können Sie auf dem Foto sehen, dass die Passe kraus und nicht glatt erscheint. Weiterhin viel Spaß beim Stricken und gutes Gelingen!
23.04.2015 - 14:19
![]() Simea wrote:
Simea wrote:
In der Beschreibung der Passe heisst es in der 1. Zunahme Rd re, in der nächsten li zunehmen (=10 Zunahmen pro Rd). Was genau bedeutet: in jeder 4.Rd die Zunahmen 9 x arb? Verstehe nicht ganz wie ich von 203 M auf 363 M kommen soll.
01.04.2015 - 13:49DROPS Design answered:
Sie haben ja pro Zunahme-Rd 10 zugenommene M. Die Zunahmen arbeiten Sie in insgesamt 9 Runden, das macht also 90 M. Zwischen den Zunahme-Rd stricken Sie immer 3 Runden ohne Zunahmen, nehmen also nur in jeder 4. Rd diese 10 M zu. Danach stricken Sie die Zunahmen nochmal in 7 Zunahme-Rd, das sind weitere 70 zugenommene M, diesmal jedoch in jeder 6. Rd (also mit 5 Runden ohne Zunahmen dazwischen). Dann haben Sie insgesamt 90 + 70 M zugenommen = 160 M, 203 M + 160 M = 363 M.
02.04.2015 - 09:58
![]() Irene Salomonsen wrote:
Irene Salomonsen wrote:
Trenger hjelp tilførste mønsterrapport på bolen A2, A3 A4. Skal maseant her være 204 eller 199 for str small? A2 skal strikkes en gang, så skal A3 repeteres til det gjenstår 6 m, så A4? Får det ikke til å stemme helt
30.03.2015 - 12:21DROPS Design answered:
Hej Irene, du har 199 m. Stickar A.2 =7m, A.3 = 6m x 31, A.4 = 6m = totalt 199. Lycka till!
15.05.2015 - 12:07
![]() Monika wrote:
Monika wrote:
Danke. Das ist fundamental,gell :)
29.03.2015 - 12:07DROPS Design answered:
Sozusagen, ja. :-) Man sollte es im Hinterkopf haben, ansonsten kann man die Anleitungen tatsächlich leicht missverstehen, denn dieses Prinzip ist an sich immer gleich. :-) Viel Spaß beim Weiterstricken!
29.03.2015 - 13:04
![]() Monika wrote:
Monika wrote:
In der Beschreibung des Rumpfteiles heißt es: wie folgt stricken: A.2, A.3 bis noch 6M übrig sind, A.4 das verstehe ich nicht. Ich stricke abwechselnd A.2 und A.3 und die letzten 6 M der Runde dann A.4? Da gäbs in R 5 eine ungünstige Trennung... Danke für die Antwort
28.03.2015 - 16:07DROPS Design answered:
Nein, Sie stricken 1 x A.2, dann so lange A.3 bis noch 6 M übrig sind und zuletzt A.4. Also nicht A.2 und A.3 im Wechsel. A.2 und A.4 rahmen A.3 sozusagen ein. Bei den Musterbeschreibungen trennt das Komma immer die einzelnen Schritte, ebenso wie bei Häkelanleitungen.
29.03.2015 - 11:10
![]() Helen Fällman wrote:
Helen Fällman wrote:
Mönster 160 - 7 När man kommer till mönsterrapport A2-A3- A4 och har stickat det första mönstervarvet och gjort ett rätvarv så misstämmer mönstret på nästa varv. Det funkar ej med 2 omslag brevid varandra för då stämmer inte nästa varv. Men om jag gör ett omslag så minsas maskantalet i varje varv så det funker ej heller. Hur jag än försöker lista ut så kommer jag inte vidar i hur det ska stickas. Hur ska det stickas? Mvh Helen Fällman
24.03.2015 - 16:19
![]() Gail wrote:
Gail wrote:
Thank you so much, I have it!
11.03.2015 - 23:16
![]() Gail wrote:
Gail wrote:
I do not understand the pattern. After knitting the yoke, you have 217 sts. Pattern then says work A2, A3 until 6 sts remain, A4. Do I work A2, A3 and A4 as I cannot just work A2 and A3, there is a K2tog. in between A3 and A4. Please help. Whichever way I work it there are always 2sts left. Thank you Gail Hark
11.03.2015 - 14:42DROPS Design answered:
Dear Gail, work over the 217 sts as follows: A.2 over the first 7 sts, then repeat A.3 (= 6 sts) over the next 204 sts (= a total of 34 times), and finish round with A.4. On row 5, work the last 2 sts in A.2 with the first st in A.3, then work the last 2 sts in A.3 with the first st in next A.3 or the first st in A.4. Happy knitting!
11.03.2015 - 14:57Margret wrote:
After having put the 10 markers inc alternatively left and right of them every other round is confusing. However, worse is that every 4th round 10 times and then every 6th round 5 times ends with a piece that is bound to be much more than the 20 cm mentioned. Please get back to me on this. I think there may be a mistake here.
28.02.2015 - 15:31DROPS Design answered:
Dear Margret, on 1st inc row you will inc on the left of every marker, on next inc row you will inc on the right of every marker (1 st inc at each marker on every inc row). In first size, you will inc for a total of 70 rounds, ie approx 15 cm - remember to check your gauge and keep the correct tension (48 rows in garter st = 10 cm). Happy knitting!
02.03.2015 - 08:25
![]() Herma wrote:
Herma wrote:
Dankjewel voor de uitleg.
26.02.2015 - 21:47
|
|||||||||||||||||||
Timeless Beauty#timelessbeautysweater |
|||||||||||||||||||
 |
 |
||||||||||||||||||
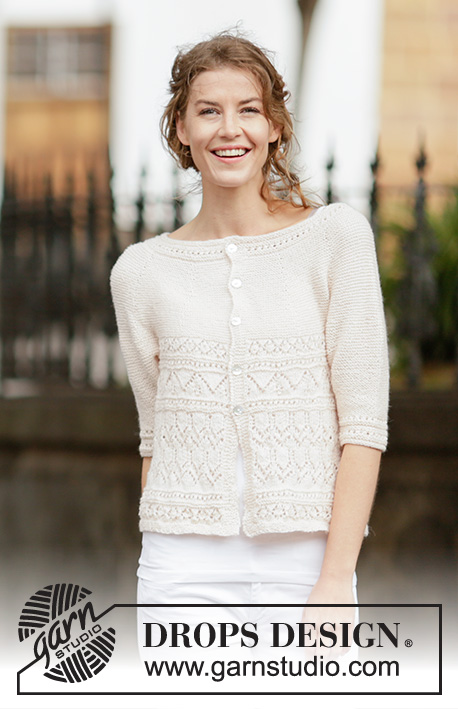
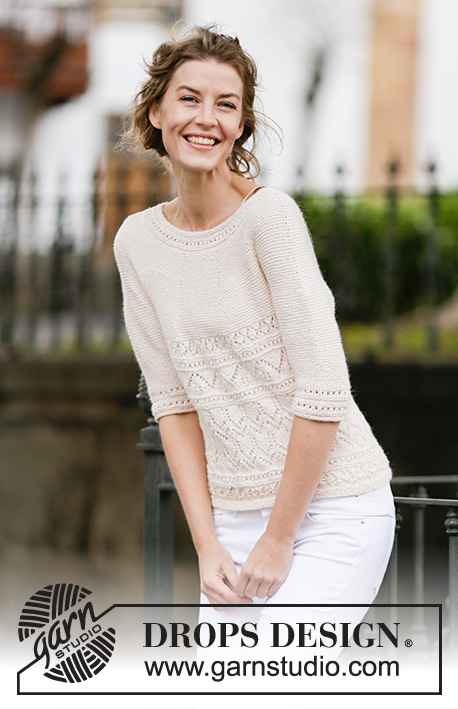
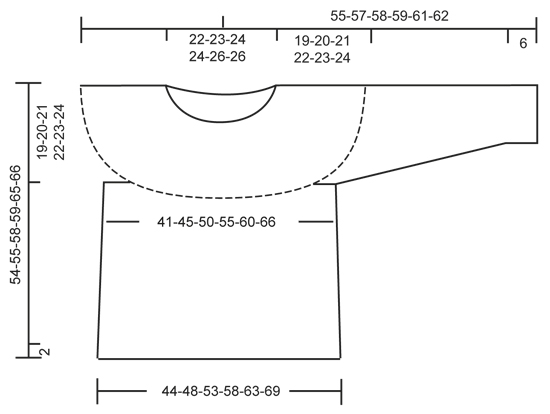
Knitted DROPS jumper in garter st with lace pattern and round yoke, worked top down in ”DROPS BabyAlpaca Silk” or DROPS BABYMERINO. Size: S - XXXL.
DROPS 160-7 |
|||||||||||||||||||
|
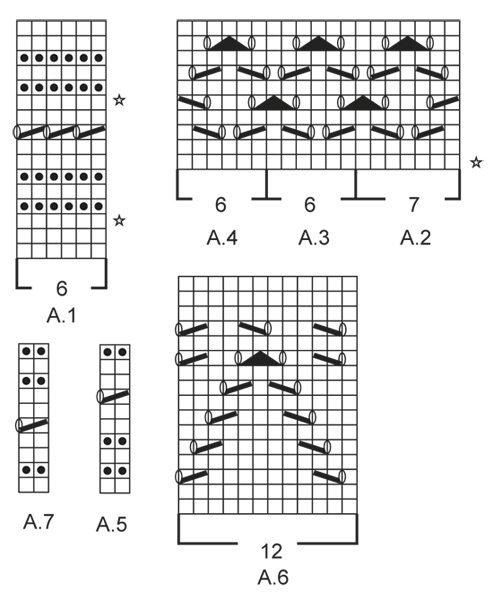
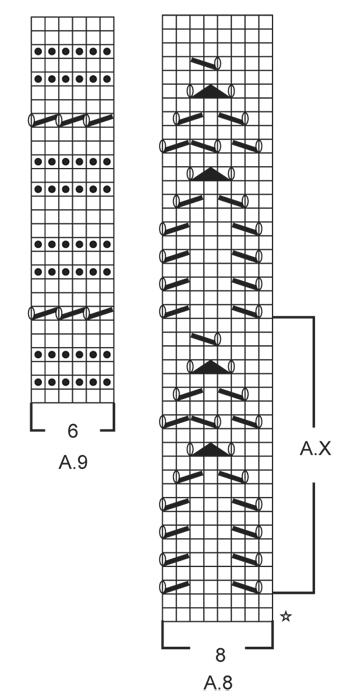
GARTER ST (worked in the round): * K 1 round and P 1 round *, repeat from *-*. 1 ridge = 2 rounds. GARTER ST (back and forth): K all rows. 1 ridge = K2 rows. PATTERN: See diagrams A.1 to A.9. INCREASE TIP: Inc 1 st by making 1 YO, on next round work YO twisted (i.e. work in back loop of st instead front) to avoid holes. ---------------------------------------------------------- JUMPER: Worked top down in the round on circular needle. Rounds start mid back. The sleeve is worked back and forth on circular needle. YOKE: Cast on 120-128-144-148-148-164 sts on circular needle size 2.5 mm / US 1.5 with BabyAlpaca Silk or BabyMerino. Work 2 ridges in GARTER ST in the round - see explanation above. Now work PATTERN A.1, AT THE SAME TIME on 3rd round inc 18-20-30-32-32-34 sts evenly - READ INCREASE TIP, and on 11th round inc 15-19-29-29-29-33 sts evenly = 153-167-203-209-209-231 sts. REMEMBER THE KNITTING GAUGE When A.1 has been worked vertically, continue in garter st and insert 10 markers in the piece as follows: Work the first 9-12-12-15-15-12 sts, insert a marker, then insert a marker 15-16-20-20-20-23 sts apart, after last marker there are 9-11-11-14-14-12 sts. On next round beg inc. Inc alternately on right and left side of markers (= 10 inc). Inc every other round 0-2-0-3-7-7 times, every 4th round 10-10-9-9-8-8 times and every 6th round 5-5-7-7-7-8 times = 303-337-363-399-429-461 sts. On next round, inc 8-4-10-2-4-10 sts evenly = 311-341-373-401-433-471 sts. Piece measures approx. 19-20-21-22-23-24 cm / 7½"-8"-8¼"-8¾"-9"-9½". Now work as follows: K the first 45-50-55-60-66-74 sts (= half back piece), slip the next 66-72-76-80-84-88 sts on a stitch holder (= sleeve), cast on 10-10-10-12-12-12 sts under sleeve, work the next 89-97-111-121-133-147 sts (= front piece), slip the next 66-72-76-80-84-88 sts on a stitch holder (= sleeve), cast on 10-10-10-12-12-12 sts under sleeve, work the remaining 45-50-55-60-66-74 sts (= half back piece). BODY: There are now 199-217-241-265-289-319 sts for body. Now switch to circular needle size 3 mm / US 2.5. Then work as follows: A.2, A.3 until 6 sts remain, A.4. When A.2-A.4 have been worked vertically, continue with A.5 (on 7th round K the last st). Continue with A.6, AT THE SAME TIME on 1st round adjust no of sts to 204-216-240-264-288-324. When A.6 has been worked vertically, continue with A.7 1 time vertically. Then work A.8, inc 4-8-8-8-8-4 sts evenly on 1st round = 208-224-248-272-296-328 sts. When A.X has been worked 1 time vertically, repeat A.X 0-0-0-0-1-1 more time before continuing with the rest of A.8. Now continue with A.7. Then work as follows: A.2, A.3 until 6 sts remain on round, AT THE SAME TIME inc 3-5-5-5-5-3 sts evenly on 1st round (over A.3), A.4 = 211-229-253-277-301-331 sts. Now work A.7 0-0-1-1-0-0 times vertically (on 5th round K last st on round). When entire diagram has been worked vertically, work 2 rounds in stockinette st while AT THE SAME TIME on last round inc 17-21-23-25-25-27 sts evenly = 228-250-276-302-326-358 sts. Switch to circular needle size 2.5 mm / US 1.5 and work in garter st for 2 cm / ¾". Bind off alternately with K 1 and P 1. Piece measures approx. 54-55-58-59-65-66 cm / 21¼"-21½"-22¾"-23¼"-25½"-26". SLEEVE: Work sleeve in GARTER ST back and forth - see explanation above, on circular needle. There are 66-72-76-80-84-88 sts for each sleeve. NOW MEASURE THE PIECE FROM HERE. Slip sts from stitch holder back on circular needle size 2.5 mm / US 1.5 and cast on 6-6-6-7-7-7 new sts at the end of the next 2 rows = 78-84-88-94-98-102 sts. When sleeve measures 4 cm / 1½", dec 1 st inside 1 edge st in each side of piece by K 2 tog. Repeat dec every 1½-2-2½-3-3½-3½ cm / ½"-¾"-⅞"-3⅛"-3¼"-3¼" 7-6-5-4-3-3 more times = 62-70-76-84-90-94 sts. When piece measures 19 cm / 7½" in all sizes, work as follows: 1 edge st in garter st, A.9 until 1 st remains, 1 edge st in garter st. When entire A.9 have been worked vertically, work 1 ridge. Loosely bind off. Make another sleeve the same way. ASSEMBLY: Sew underarm seams in outer loops of edge sts. Sew the openings under the sleeves. |
|||||||||||||||||||
Diagram explanations |
|||||||||||||||||||
|
|||||||||||||||||||
 |
|||||||||||||||||||
 |
|||||||||||||||||||
 |
|||||||||||||||||||
Have you finished this pattern?Tag your pictures with #dropspattern #timelessbeautysweater or submit them to the #dropsfan gallery. Do you need help with this pattern?You'll find 26 tutorial videos, a Comments/Questions area and more by visiting the pattern on garnstudio.com. © 1982-2026 DROPS Design A/S. We reserve all rights. This document, including all its sub-sections, has copyrights. Read more about what you can do with our patterns at the bottom of each pattern on our site. |
|||||||||||||||||||


With over 40 years in knitting and crochet design, DROPS Design offers one of the most extensive collections of free patterns on the internet - translated to 17 languages. As of today we count 324 catalogs and 12291 patterns - 12281 of which are translated into English (US/in).
We work hard to bring you the best knitting and crochet have to offer, inspiration and advice as well as great quality yarns at incredible prices! Would you like to use our patterns for other than personal use? You can read what you are allowed to do in the Copyright text at the bottom of all our patterns. Happy crafting!
Post a comment to pattern DROPS 160-7
We would love to hear what you have to say about this pattern!
If you want to leave a question, please make sure you select the correct category in the form below, to speed up the answering process. Required fields are marked *.