
Popular categories
Looking for a yarn?


Comments / Questions (92)
![]() Els wrote:
Els wrote:
Eigenlijk is mijn vraag: zijn de ajourpatroontjes in tricotsteek en de rest in ribbelsteek gebreid? Het zou fijn zijn wanneer er een duidelijke detailfoto van de trui is. Met dank voor de aandacht.
28.05.2016 - 11:37
![]() Els wrote:
Els wrote:
De telpatronen A1, 5 en 7 geven averechtse toeren aan, de andere niet. Onduidelijk daardoor voor mij of alles in ribbel wordt gebreid. Uitvergroten van de foto van de trui is niet scherp genoeg om dit te kunnen bekijken.
27.05.2016 - 23:33DROPS Design answered:
Hoi Els. Alle telpatronen geven zowel de goede als de verkeerde kant aan. Kijk ook hier hoe je onze telpatronen moet lezen
30.05.2016 - 13:28
![]() Sabine Joelle wrote:
Sabine Joelle wrote:
Je souhaiterais tricoter les manches en rond avec une aiguille circulaire. Pourriez-vous m'indiquer comment faire. Merci. Joêlle
13.05.2016 - 13:13DROPS Design answered:
Bonjour Joêlle, relevez 5-6 m (cf taille) dans les 10-12 m montées sous la manche et reprenez toutes les mailles en attente (vous aurez 2 m en moins par rapport aux explications), continuez comme indiqué en diminuant de chaque côté du marqueur du début des tours. Bon tricot!
13.05.2016 - 13:24
![]() Kjellaug Herringbotn wrote:
Kjellaug Herringbotn wrote:
Heihar strikket ferdig A.1 og merket av med 10 merker. Skal begynne med økning på hver 2 .p 0-2-0-3-7-7 ganger osv på 4.p. Forstår. Ikke hvordan dette er, kan jeg få det forklart på en enkel måte.?
10.05.2016 - 10:42DROPS Design answered:
Hei Kjellaug. Dvs, du öker ikke i hver 2. p for str S og L, men fortsaetter direkte til ökning i hver 4. p
10.05.2016 - 15:40
![]() Bernabé Lilou wrote:
Bernabé Lilou wrote:
Dans vos explications à aucun moment il n'est dit quand passer aux aiguilles n° 3 ... cad après les côtes mousses. A préciser pour celles qui suivent scrupuleusement le déroulement des explications. Beau modèle simple à réaliser
29.04.2016 - 08:17DROPS Design answered:
Bonjour Mme Bernabé Lilou, toute la partie de l'empiècement (au point mousse) se tricote avec des aiguilles 2.5, on change pour l'aiguille 3 quand on tricote le dos et le devant (après l'empiècement). Pensez toujours à bien vérifier votre tension et ajustez la taille des aiguilles si nécessaire. Bon tricot!
29.04.2016 - 09:26
![]() Sonja Heimer wrote:
Sonja Heimer wrote:
Hallo, ich habe ein Problem. Bei der Maschenprobe mit der Nadel wie angegeben fehlen mir ganze 2 cm. Und das, obwohl ich normal Stricke. Gleichmäßig aber nicht fest. Mein Maschenbild ist auch gleichmäßig. Brauch den Pullover in Größe M. Ich weiß jetzt nicht was ich tun soll. Größe L stricken? Oder 2 Nadelstärken größer nehmen; dann wird das Maschenbild aber zu locker. Können Sie mir weiterhelfen? Mit freundlichen Grüßen Sonja Heimer
14.03.2016 - 08:02DROPS Design answered:
Liebe Sonja, Sie sollten unbedingt die Maschenprobe einhalten (also die Nadelstärke ändern, bis die angegebenen Masse erreicht werden). Gerade bei einem Raglan- oder Rundpassenmodell sollte man nicht einfach eine Grösse grösser stricken mit anderer Maschenprobe, da die Dimensionen in der Höhe dann auch nicht mehr stimmen.
14.03.2016 - 09:08Leila wrote:
Hi please to explain this pattern in simple sentences for me for size 40 send for email me
08.02.2016 - 16:12
![]() Sandybelle wrote:
Sandybelle wrote:
Es posible reemplazar el punto musgo de la parte superior del pulover por punto jersey? Personalmente me gusta mas como queda el punto jersey en un pulover.
06.02.2016 - 21:57DROPS Design answered:
Hola Sandybelle: Si, pero ten en cuenta que si trabajas con los mismos pts te va a quedar más estrecho puesto que con la misma tensión del tejido y trabajando en punto musgo la labor queda más voluminosa.
07.02.2016 - 21:02Leila wrote:
Hi please to explain this pattern in simple sentences for me for size 40
05.02.2016 - 08:53DROPS Design answered:
Dear Leila, you are welcome to contact your DROPS store for any further individual assistance, they will answer you per mail or telephone. Happy knitting!
05.02.2016 - 10:01
![]() Ilona wrote:
Ilona wrote:
Kann man den Pullover auch von unten anfangen, damit man die Ärmel auch in Runden und nicht in Reihen stricken kann, sodass ich die Ärmel und den Rumpfteil auf eine lange Rundnadel legen und in einem Stück stricken kann, da ich diese Methode bevorzuge. Vielen Dank.
14.11.2015 - 07:14DROPS Design answered:
Ja, das ist möglich, allerdings müssen Sie einiges beachten: Sie lesen die ganze Anleitung quasi rückwärts. Zunahmen werden zu Abnahmen und umgekehrt, die Muster müssen Sie in umgekehrter Reihenfolge arbeiten und von oben nach unten lesen. Bei den Armausschnitten müssen Sie, statt M anzuschlagen, die entsprechende M-Zahl an der unteren Ärmelmitte abketten, ebenso bei den Ärmeln, wenn Sie diese in Runden von unten nach oben stricken.
19.11.2015 - 10:58
|
|||||||||||||||||||
Timeless Beauty#timelessbeautysweater |
|||||||||||||||||||
 |
 |
||||||||||||||||||
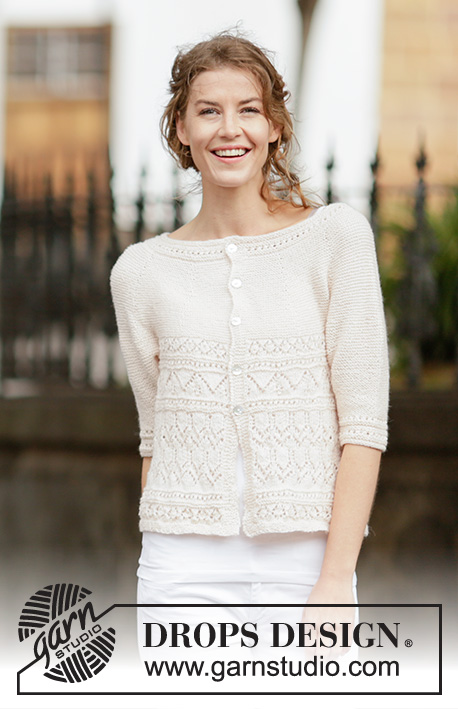
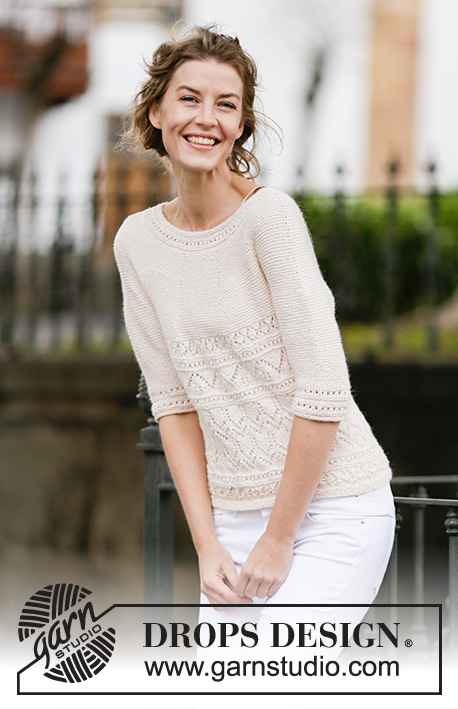
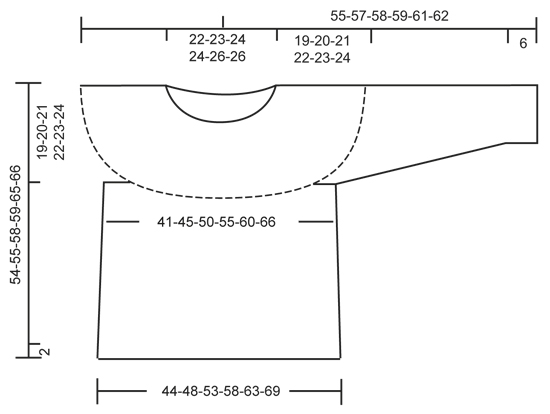
Knitted DROPS jumper in garter st with lace pattern and round yoke, worked top down in ”DROPS BabyAlpaca Silk” or DROPS BABYMERINO. Size: S - XXXL.
DROPS 160-7 |
|||||||||||||||||||
|
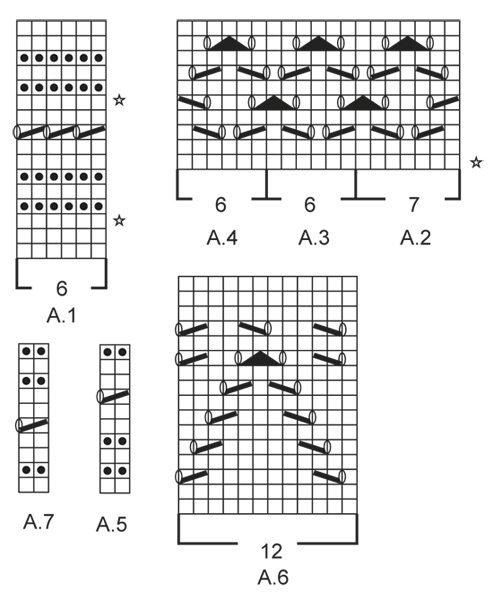
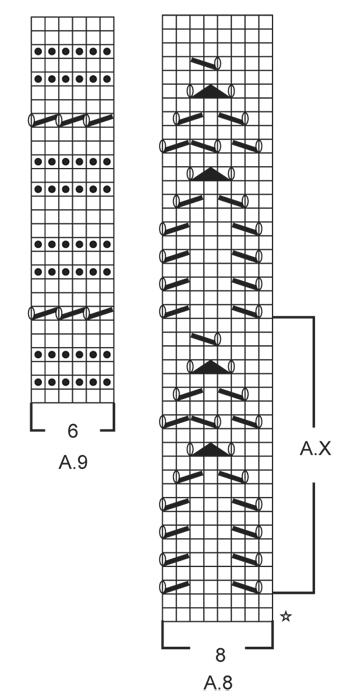
GARTER ST (worked in the round): * K 1 round and P 1 round *, repeat from *-*. 1 ridge = 2 rounds. GARTER ST (back and forth): K all rows. 1 ridge = K2 rows. PATTERN: See diagrams A.1 to A.9. INCREASE TIP: Inc 1 st by making 1 YO, on next round work YO twisted (i.e. work in back loop of st instead front) to avoid holes. ---------------------------------------------------------- JUMPER: Worked top down in the round on circular needle. Rounds start mid back. The sleeve is worked back and forth on circular needle. YOKE: Cast on 120-128-144-148-148-164 sts on circular needle size 2.5 mm / US 1.5 with BabyAlpaca Silk or BabyMerino. Work 2 ridges in GARTER ST in the round - see explanation above. Now work PATTERN A.1, AT THE SAME TIME on 3rd round inc 18-20-30-32-32-34 sts evenly - READ INCREASE TIP, and on 11th round inc 15-19-29-29-29-33 sts evenly = 153-167-203-209-209-231 sts. REMEMBER THE KNITTING GAUGE When A.1 has been worked vertically, continue in garter st and insert 10 markers in the piece as follows: Work the first 9-12-12-15-15-12 sts, insert a marker, then insert a marker 15-16-20-20-20-23 sts apart, after last marker there are 9-11-11-14-14-12 sts. On next round beg inc. Inc alternately on right and left side of markers (= 10 inc). Inc every other round 0-2-0-3-7-7 times, every 4th round 10-10-9-9-8-8 times and every 6th round 5-5-7-7-7-8 times = 303-337-363-399-429-461 sts. On next round, inc 8-4-10-2-4-10 sts evenly = 311-341-373-401-433-471 sts. Piece measures approx. 19-20-21-22-23-24 cm / 7½"-8"-8¼"-8¾"-9"-9½". Now work as follows: K the first 45-50-55-60-66-74 sts (= half back piece), slip the next 66-72-76-80-84-88 sts on a stitch holder (= sleeve), cast on 10-10-10-12-12-12 sts under sleeve, work the next 89-97-111-121-133-147 sts (= front piece), slip the next 66-72-76-80-84-88 sts on a stitch holder (= sleeve), cast on 10-10-10-12-12-12 sts under sleeve, work the remaining 45-50-55-60-66-74 sts (= half back piece). BODY: There are now 199-217-241-265-289-319 sts for body. Now switch to circular needle size 3 mm / US 2.5. Then work as follows: A.2, A.3 until 6 sts remain, A.4. When A.2-A.4 have been worked vertically, continue with A.5 (on 7th round K the last st). Continue with A.6, AT THE SAME TIME on 1st round adjust no of sts to 204-216-240-264-288-324. When A.6 has been worked vertically, continue with A.7 1 time vertically. Then work A.8, inc 4-8-8-8-8-4 sts evenly on 1st round = 208-224-248-272-296-328 sts. When A.X has been worked 1 time vertically, repeat A.X 0-0-0-0-1-1 more time before continuing with the rest of A.8. Now continue with A.7. Then work as follows: A.2, A.3 until 6 sts remain on round, AT THE SAME TIME inc 3-5-5-5-5-3 sts evenly on 1st round (over A.3), A.4 = 211-229-253-277-301-331 sts. Now work A.7 0-0-1-1-0-0 times vertically (on 5th round K last st on round). When entire diagram has been worked vertically, work 2 rounds in stockinette st while AT THE SAME TIME on last round inc 17-21-23-25-25-27 sts evenly = 228-250-276-302-326-358 sts. Switch to circular needle size 2.5 mm / US 1.5 and work in garter st for 2 cm / ¾". Bind off alternately with K 1 and P 1. Piece measures approx. 54-55-58-59-65-66 cm / 21¼"-21½"-22¾"-23¼"-25½"-26". SLEEVE: Work sleeve in GARTER ST back and forth - see explanation above, on circular needle. There are 66-72-76-80-84-88 sts for each sleeve. NOW MEASURE THE PIECE FROM HERE. Slip sts from stitch holder back on circular needle size 2.5 mm / US 1.5 and cast on 6-6-6-7-7-7 new sts at the end of the next 2 rows = 78-84-88-94-98-102 sts. When sleeve measures 4 cm / 1½", dec 1 st inside 1 edge st in each side of piece by K 2 tog. Repeat dec every 1½-2-2½-3-3½-3½ cm / ½"-¾"-⅞"-3⅛"-3¼"-3¼" 7-6-5-4-3-3 more times = 62-70-76-84-90-94 sts. When piece measures 19 cm / 7½" in all sizes, work as follows: 1 edge st in garter st, A.9 until 1 st remains, 1 edge st in garter st. When entire A.9 have been worked vertically, work 1 ridge. Loosely bind off. Make another sleeve the same way. ASSEMBLY: Sew underarm seams in outer loops of edge sts. Sew the openings under the sleeves. |
|||||||||||||||||||
Diagram explanations |
|||||||||||||||||||
|
|||||||||||||||||||
 |
|||||||||||||||||||
 |
|||||||||||||||||||
 |
|||||||||||||||||||
Have you finished this pattern?Tag your pictures with #dropspattern #timelessbeautysweater or submit them to the #dropsfan gallery. Do you need help with this pattern?You'll find 26 tutorial videos, a Comments/Questions area and more by visiting the pattern on garnstudio.com. © 1982-2026 DROPS Design A/S. We reserve all rights. This document, including all its sub-sections, has copyrights. Read more about what you can do with our patterns at the bottom of each pattern on our site. |
|||||||||||||||||||


With over 40 years in knitting and crochet design, DROPS Design offers one of the most extensive collections of free patterns on the internet - translated to 17 languages. As of today we count 324 catalogs and 12291 patterns - 12281 of which are translated into English (US/in).
We work hard to bring you the best knitting and crochet have to offer, inspiration and advice as well as great quality yarns at incredible prices! Would you like to use our patterns for other than personal use? You can read what you are allowed to do in the Copyright text at the bottom of all our patterns. Happy crafting!
Post a comment to pattern DROPS 160-7
We would love to hear what you have to say about this pattern!
If you want to leave a question, please make sure you select the correct category in the form below, to speed up the answering process. Required fields are marked *.