
Popular categories
Looking for a yarn?


Comments / Questions (92)
![]() Barbara Benning wrote:
Barbara Benning wrote:
Gerne würde ich das Modell DROPS 160-7 nacharbeiten, möchte aber ein Garn aus der Garngruppe B , evt. Muskat uni, dafür nehmen. Geht das und was muss ich dafür beachten?
20.04.2020 - 13:21DROPS Design answered:
Liebe Frau Benning, Sie würden nicht die richtige Maschenprobe mit einem Garn der Garngruppe B haben -und leider können wir nicht jede Anleitung nach jedem individuellen Wunsch umrechnen. Gerne wenden Sie sich bitte an Ihrem DROPS Laden, oder suchen Sie sich ein Modell aus der Garngruppe B. Danke für Ihr Verständnis. Viel Spaß beim stricken!
20.04.2020 - 13:58
![]() Carmen wrote:
Carmen wrote:
Per gli aumenti prima faccio aumenti ogni 4 per 10 e poi Faccio quelli ogni 6 oppure gli aumenti vanno fatti in contemporanea cioè aumento nel 4 e nel 6 ferro, poi nell'8 e nel 12 ecc?
18.02.2020 - 19:53DROPS Design answered:
Buonasera Carmen, prima deve lavorare tutti gli aumenti ogni 4 giri, poi tutti quelli ogni 6 giri...e così via. Buon lavoro!
18.02.2020 - 21:54
![]() Myrna Laupland wrote:
Myrna Laupland wrote:
After completing the body portion and returning to to the sleeve will I use the 2.5mm needles for the garter stitch sleeve or keep using the 3mm needles I am using for the body? Just want to confirm before I get to the sleeve. Thank you. P.S. Love the baby Alpaca Silk yarn and Heather colour
18.02.2020 - 04:51DROPS Design answered:
Hi Myrna, You continue the sleeves with needle size 3 mm. Happy knitting!
18.02.2020 - 07:13
![]() Ulrike wrote:
Ulrike wrote:
Wow, toller Service - vielen Dank. Die Wolle ”BabyAlpaca Silk” ist ein Gedicht und läßt sich wunderbar stricken.
03.02.2020 - 14:23
![]() Ulrike wrote:
Ulrike wrote:
Sorry, ich habe es verstanden. Ein Teil der Rundung wird ja Ärmel. Viele Grüße Ulrike
02.02.2020 - 15:25
![]() Ulrike wrote:
Ulrike wrote:
Ich habe den oben genannten Pullover angefangen. Beim Zunehmen komme ich bei meiner Größe XXL auf 433 Maschen. Bei einer Maschenprobe von 24 M = 10 cm kommt man damit auf 1,80 m Umfang. Das kann doch nicht stimmen. Was mache ich falsch? Vielen Dank im Voraus Ulrike
02.02.2020 - 14:59DROPS Design answered:
Liebe Ulrike, der Pullover wird von oben nach unten gestricht, dh die 433 Maschen sind für den gesamten Umfang: Rückenteil, Ärmel, Vorderteil, Ärmel (siehe gepunktete Linie in der Maßskizze). Nach der Verteilung haben Sie nur noch 289 Maschen für Rumfpteil = ca 120 cm (= 2x 60 cm wie in der Maßskizze). Viel Spaß beim stricken!
03.02.2020 - 10:15
![]() Ursula Blohm wrote:
Ursula Blohm wrote:
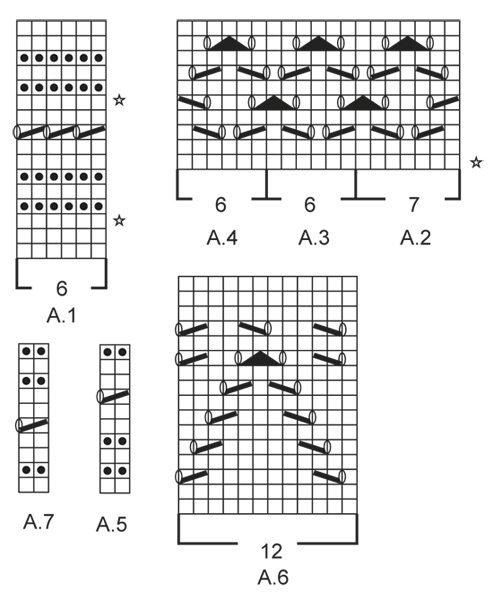
Ich verstehe leider die Interpretation von A.2 bis A.4 nicht. Strickt man zuerst A.2 hoch, dann A.3 und danach A.4 oder strickt man die 19 Maschen insgesamt von rechts nach links oder von links nach rechts ? Und was bedeutet A.2, A.3 stricken bis noch 6 Maschen übrig sind ? Was geschieht mit denen ? Vielen Dank für Eure Hilfe im voraus
07.01.2020 - 23:38DROPS Design answered:
Liebe Frau Blohm, wenn Sie A.2 bis A4 stricken sollen Sie die Diagramme so arbeiten: A.2 über die ersten 7 Maschen der Runde, dann wiederholen Sie die 6 Maschen von A.3 bis 6 Maschen am Ende der Runde bleiben, und jetzt stricken Sie A.4 über diese 6 letzten Maschen. Viel Spaß beim stricken!
08.01.2020 - 09:10
![]() Liz wrote:
Liz wrote:
Hello, I really love this pattern but would like a smaller neckline for size medium. Currently it is about 23cm based on your diagram and I would like to reduce it to about 16 or 17cm. How many stitches should I cast on and how can I adjust the increases to accommodate the change? Thank you!
31.12.2019 - 20:11DROPS Design answered:
Dear Liz, we are unfortunately not able to adjust every pattern to every single request. For any individual assistance please contact your DROPS store, even per mail or telephone. Happy knitting!
02.01.2020 - 14:14
![]() Lorinda wrote:
Lorinda wrote:
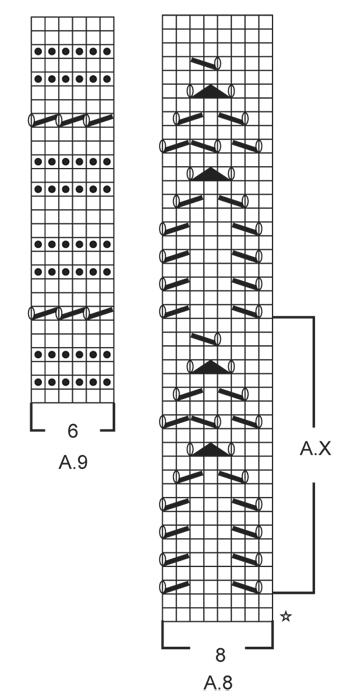
I am at diagram A.9 for the sleeves. Because the sleeves are knitted flat, are the rows in the diagram only for when I knit on the right side of the work or is this diagram for every row no matter right side or wrong?
28.12.2019 - 14:29DROPS Design answered:
Dear Lorinda, start working A.9 from the right side, so that the eyelet rows will be worked from RS. Read diagram from the right towards the left from RS and from the left towards the right from WS. Read more about diagrams here. Happy knitting!
02.01.2020 - 12:32
![]() Lorinda wrote:
Lorinda wrote:
Hello, I am just finishing the yoke of this pattern and saw your answer to a question regarding how to work diagram A.2-A.4. The first row of that group of diagrams has a star indicating it is an increase row. But I dont see any instruction on what to increase. Is that only for the second time I knit A.2, A.3 and increase to 229 sts. For the size M I am knitting? There is no increase the first time I kn it these diagrams?
11.12.2019 - 13:03DROPS Design answered:
Dear Lorinda, that's right, the only increase you will work in A.2-A.4 is when you will increase 5 sts to adjust to 229 sts in size M. Happy knitting!
11.12.2019 - 13:09
|
|||||||||||||||||||
Timeless Beauty#timelessbeautysweater |
|||||||||||||||||||
 |
 |
||||||||||||||||||
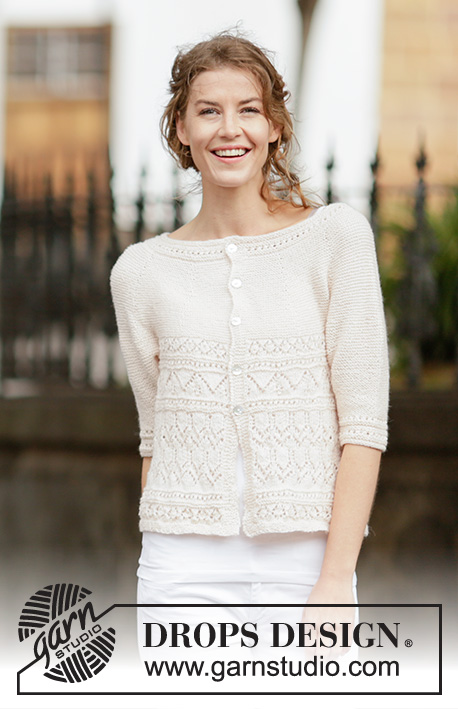
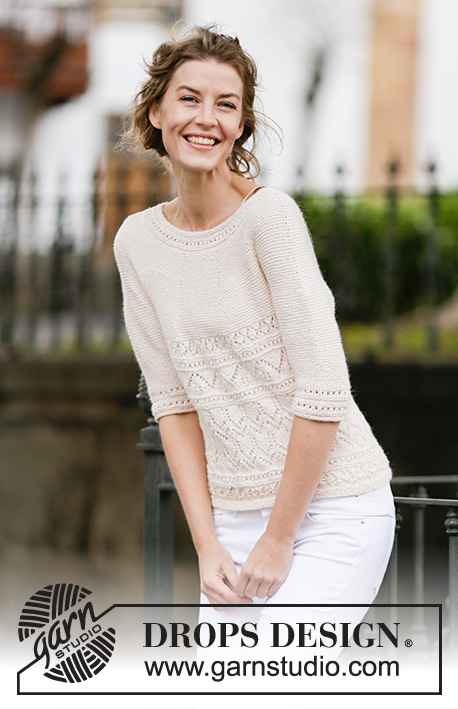
Knitted DROPS jumper in garter st with lace pattern and round yoke, worked top down in ”DROPS BabyAlpaca Silk” or DROPS BABYMERINO. Size: S - XXXL.
DROPS 160-7 |
|||||||||||||||||||
|
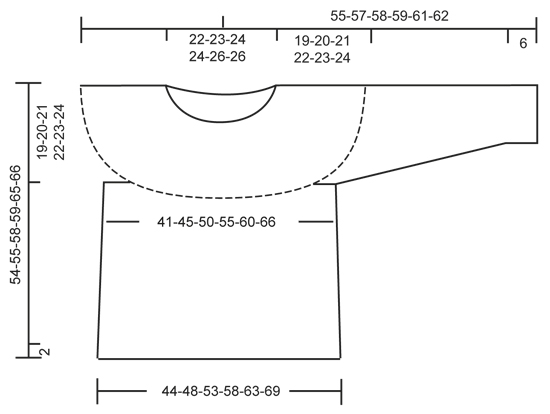
GARTER ST (worked in the round): * K 1 round and P 1 round *, repeat from *-*. 1 ridge = 2 rounds. GARTER ST (back and forth): K all rows. 1 ridge = K2 rows. PATTERN: See diagrams A.1 to A.9. INCREASE TIP: Inc 1 st by making 1 YO, on next round work YO twisted (i.e. work in back loop of st instead front) to avoid holes. ---------------------------------------------------------- JUMPER: Worked top down in the round on circular needle. Rounds start mid back. The sleeve is worked back and forth on circular needle. YOKE: Cast on 120-128-144-148-148-164 sts on circular needle size 2.5 mm / US 1.5 with BabyAlpaca Silk or BabyMerino. Work 2 ridges in GARTER ST in the round - see explanation above. Now work PATTERN A.1, AT THE SAME TIME on 3rd round inc 18-20-30-32-32-34 sts evenly - READ INCREASE TIP, and on 11th round inc 15-19-29-29-29-33 sts evenly = 153-167-203-209-209-231 sts. REMEMBER THE KNITTING GAUGE When A.1 has been worked vertically, continue in garter st and insert 10 markers in the piece as follows: Work the first 9-12-12-15-15-12 sts, insert a marker, then insert a marker 15-16-20-20-20-23 sts apart, after last marker there are 9-11-11-14-14-12 sts. On next round beg inc. Inc alternately on right and left side of markers (= 10 inc). Inc every other round 0-2-0-3-7-7 times, every 4th round 10-10-9-9-8-8 times and every 6th round 5-5-7-7-7-8 times = 303-337-363-399-429-461 sts. On next round, inc 8-4-10-2-4-10 sts evenly = 311-341-373-401-433-471 sts. Piece measures approx. 19-20-21-22-23-24 cm / 7½"-8"-8¼"-8¾"-9"-9½". Now work as follows: K the first 45-50-55-60-66-74 sts (= half back piece), slip the next 66-72-76-80-84-88 sts on a stitch holder (= sleeve), cast on 10-10-10-12-12-12 sts under sleeve, work the next 89-97-111-121-133-147 sts (= front piece), slip the next 66-72-76-80-84-88 sts on a stitch holder (= sleeve), cast on 10-10-10-12-12-12 sts under sleeve, work the remaining 45-50-55-60-66-74 sts (= half back piece). BODY: There are now 199-217-241-265-289-319 sts for body. Now switch to circular needle size 3 mm / US 2.5. Then work as follows: A.2, A.3 until 6 sts remain, A.4. When A.2-A.4 have been worked vertically, continue with A.5 (on 7th round K the last st). Continue with A.6, AT THE SAME TIME on 1st round adjust no of sts to 204-216-240-264-288-324. When A.6 has been worked vertically, continue with A.7 1 time vertically. Then work A.8, inc 4-8-8-8-8-4 sts evenly on 1st round = 208-224-248-272-296-328 sts. When A.X has been worked 1 time vertically, repeat A.X 0-0-0-0-1-1 more time before continuing with the rest of A.8. Now continue with A.7. Then work as follows: A.2, A.3 until 6 sts remain on round, AT THE SAME TIME inc 3-5-5-5-5-3 sts evenly on 1st round (over A.3), A.4 = 211-229-253-277-301-331 sts. Now work A.7 0-0-1-1-0-0 times vertically (on 5th round K last st on round). When entire diagram has been worked vertically, work 2 rounds in stockinette st while AT THE SAME TIME on last round inc 17-21-23-25-25-27 sts evenly = 228-250-276-302-326-358 sts. Switch to circular needle size 2.5 mm / US 1.5 and work in garter st for 2 cm / ¾". Bind off alternately with K 1 and P 1. Piece measures approx. 54-55-58-59-65-66 cm / 21¼"-21½"-22¾"-23¼"-25½"-26". SLEEVE: Work sleeve in GARTER ST back and forth - see explanation above, on circular needle. There are 66-72-76-80-84-88 sts for each sleeve. NOW MEASURE THE PIECE FROM HERE. Slip sts from stitch holder back on circular needle size 2.5 mm / US 1.5 and cast on 6-6-6-7-7-7 new sts at the end of the next 2 rows = 78-84-88-94-98-102 sts. When sleeve measures 4 cm / 1½", dec 1 st inside 1 edge st in each side of piece by K 2 tog. Repeat dec every 1½-2-2½-3-3½-3½ cm / ½"-¾"-⅞"-3⅛"-3¼"-3¼" 7-6-5-4-3-3 more times = 62-70-76-84-90-94 sts. When piece measures 19 cm / 7½" in all sizes, work as follows: 1 edge st in garter st, A.9 until 1 st remains, 1 edge st in garter st. When entire A.9 have been worked vertically, work 1 ridge. Loosely bind off. Make another sleeve the same way. ASSEMBLY: Sew underarm seams in outer loops of edge sts. Sew the openings under the sleeves. |
|||||||||||||||||||
Diagram explanations |
|||||||||||||||||||
|
|||||||||||||||||||
 |
|||||||||||||||||||
 |
|||||||||||||||||||
 |
|||||||||||||||||||
Have you finished this pattern?Tag your pictures with #dropspattern #timelessbeautysweater or submit them to the #dropsfan gallery. Do you need help with this pattern?You'll find 26 tutorial videos, a Comments/Questions area and more by visiting the pattern on garnstudio.com. © 1982-2026 DROPS Design A/S. We reserve all rights. This document, including all its sub-sections, has copyrights. Read more about what you can do with our patterns at the bottom of each pattern on our site. |
|||||||||||||||||||


With over 40 years in knitting and crochet design, DROPS Design offers one of the most extensive collections of free patterns on the internet - translated to 17 languages. As of today we count 324 catalogs and 12291 patterns - 12281 of which are translated into English (US/in).
We work hard to bring you the best knitting and crochet have to offer, inspiration and advice as well as great quality yarns at incredible prices! Would you like to use our patterns for other than personal use? You can read what you are allowed to do in the Copyright text at the bottom of all our patterns. Happy crafting!
Post a comment to pattern DROPS 160-7
We would love to hear what you have to say about this pattern!
If you want to leave a question, please make sure you select the correct category in the form below, to speed up the answering process. Required fields are marked *.