
Popular categories
Looking for a yarn?


Comments / Questions (91)
![]() Val wrote:
Val wrote:
I'm in trouble. Since I did yesterday a wrong decrease (is not clear this explanation),now I have to remake again the round of yesterday, and it's all a mess. The stitch markers skip since I had to unravel? the k 2 tog, so I don't know if the stitch marker have to stay 2 stiches ahead or after... it's all a mess right now, I ve also lost the starting point of the beginning of the round... now what I will do? I lost the right places of the stitches , nothing match anymore how they should be
14.12.2021 - 16:57DROPS Design answered:
Dear Val, it's a bit tricky to have an idea of your work, maybe you can bring your work to your store or show them a picture so that they can help you easely? The markers on the sides should have been inserted when divding piece, you can try to follow the middle of the 10 sts cast on on your work inserting your marker, then decrease simply as explained under DECREASE TIP on each side of these markers. Hope it will help. Happy knitting!
15.12.2021 - 07:44
![]() Val wrote:
Val wrote:
Sorry, i'm confused because the dec tip says "slip 1 st as if k, k1 ,psso" and not 'K1, splip 1 as if to k, k1, psso.... " not says "K2 tog, K1, slip marker, K1, slip 1 as if to K, K1, psso, and work until 3 sts remain". Also, the "repeat dec every 2 cm until piece measure 14 cm from MARKER under sleeves" . What marker under sleeve? My marker under sleeve is follow my current row, so I'm confused, Thank you 4 help!
14.12.2021 - 16:44DROPS Design answered:
Dear Val, the marker mid under sleeve is the marker placed in the middle of the 10 stitches cast on when dividing yoke. you will decrease on each side of the middle 2 sts under sleeve: decrease, K1, marker, K1, decrease. measuring these 14 cm from the marker = from the new stitches cast on mid under sleeve when dividing. Can this help?
15.12.2021 - 07:41
![]() Val wrote:
Val wrote:
Sorry I don't understand the decrease explanation ( I ve watched videos, is not that I don't understand how to do the 2k tog or psso) but I don' t understand what stitches I have to pick up. The instructions says "On next round dec 1 st on each side of each marker in the sides" I don't understand in which sense ' I knitted the first 11 stitches before marker, I did k 2 tog, before marker, now I have again to do k 2 tog or sl 1, k1 and psso? I don't get it.. thank you!
13.12.2021 - 22:48DROPS Design answered:
Dear Val, you mean on body, correct? Work until 3 sts remain before the marker on the side of the jumper (body), K2 tog, K1, slip marker, K1, slip 1 as if to K, K1, psso, and work until 3 sts remain before next marker on the other side of the jumper and repeat the decrease. This video shows how to work this kind of decrease (on a sleeve in the video). Hope it can help you. Happy knitting!
14.12.2021 - 07:48
![]() Confused wrote:
Confused wrote:
Sorry, I'm at this point " cast on 10 new sts under sleeve, insert a marker in the middle of these 10 sts" ... I've never knitted a sweater so I don't understand how to hold this sweater and how to add the cast on stitches under sleeve... in which sense? There's a video? Thank you...
05.12.2021 - 17:50DROPS Design answered:
Dear Confused, you can check the following lesson with pictures on how to knit a sweater in the round. https://www.garnstudio.com/lesson.php?id=71&cid=19 You can also check this video: https://www.garnstudio.com/video.php?id=1634&lang=en Happy knitting!
05.12.2021 - 20:53
![]() Melinda Berlanger wrote:
Melinda Berlanger wrote:
Bonjour, pour la manche, où mesurer les 38 cm? ou on a monter les 10 mailles? ou bien de l'épaule? de même pour coudre sous les manches, comment devons nous joindre les coutures? merci beaucoup
25.11.2021 - 14:41DROPS Design answered:
Bonjour Mme Berlanger, mesurez la longueur de la manche au milieu du dessus de la manche, à partir des mailles reprises pour cette partie; cette vidéo montre comment fermer l'ouverture sous les manches (les 10 mailles montée sous la manche). Bon tricot!
25.11.2021 - 16:42
![]() Conny Andersen wrote:
Conny Andersen wrote:
Hej Nu har jeg strikket blusen i str xxxl. Der var fejl i opskriften, så jeg måtte regne ud hvor mange masker jeg skulle slå op for at maskeantallet passede med mønstret med rensdyr. Den ser ikke ud som på billedet fordi man skal strikke 11 omgange efter mønster a1. Det gør at m2 kommer til at svæve langt under a1. Det ser ikke særlig smart ud. Så jeg er lidt skuffet
10.11.2021 - 07:40
![]() Caroline wrote:
Caroline wrote:
I'm working this in size M, lovely pattern and going very well. On the body where it says 'When piece measures 56-58-60-62-64-66 cm'. Is this measured from the 10 new stitches please under the arm as was the 13 cm? thank you.
07.11.2021 - 11:43DROPS Design answered:
Dear Caroline, the measurements are in total, not just under the arm. Happy knitting!
07.11.2021 - 13:50
![]() Christina wrote:
Christina wrote:
Hallo Liebes Team, Den Rumpfteil des Pullis habe ich bereits fertig gestellt. Beim stricken des Musters am Ärmel habe ich allerdings 74 Masche, die ich auf das Muster aufteilen soll (für je 12 Maschen). Was soll mit dem restlichen Maschen unter dem Arm gemacht werden, die nicht im Muster gestrickt werden?
25.10.2021 - 23:15DROPS Design answered:
Liebe Christina, Sie stricken stets so viele Maschen wie möglich im Muster, das Muster geht an der unteren Ärmelmitte nicht auf. Es kommen dann ja noch die Abnahmen an der unteren Ärmelmitte hinzu, dadurch geht das Muster dann auch weiterhin nicht auf. Achten Sie darauf, dass Sie das Muster ab der oberen Ärmelmitte abzählen (wie in der Anleitung beschrieben), damit es mittig zu liegen kommt. Viel Spaß beim Weiterstricken!
26.10.2021 - 12:13
![]() Donata wrote:
Donata wrote:
Hallo liebes Drops Design Team, Ist es vorgesehen, dass der Pullover gespannt wird zur Fertigstellung?
25.10.2021 - 15:02DROPS Design answered:
Liebe Donata, vorgesehen ist es nicht unbedingt, aber Sie können den Pullover anfeuchten und auf das passende Maß spannen, bei Einstrickmustern kann das sinnvoll sein, um das Muster etwas zu glätten, falls es etwas unregelmäßig geworden ist. Viel Spaß mit diesem schönen Pullover!
25.10.2021 - 19:37
![]() Valentina wrote:
Valentina wrote:
Hello, is it possible to have a more HQ photo of the lady that wear the sweater? I would like to see better the details especially in the collar YOKE 's zone. Also, I have a request about colors. Do you know if there's a knitting tool online that permit to change colors of a fair isle pattern, to see how it would look like changing colors? I would like to use more colors, but I can't image how it will result. Thanks for the infos!
20.10.2021 - 01:13DROPS Design answered:
Dear Valentina, we only have thse pictures available that you can see on the pattern. If you are curious, why don't you check Ravelry as a number of different people knitted this and have their projects and pictures there. Happy Stitching!
20.10.2021 - 02:29
|
||||||||||
Silver Stag#silverstagsweater |
||||||||||
 |
 |
|||||||||
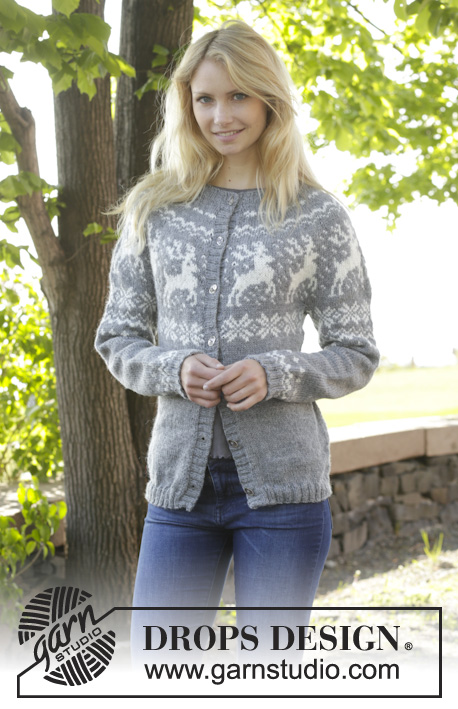
Knitted DROPS jumper with round yoke, reindeer pattern, worked top down in ”Karisma”. Size: S - XXXL.
DROPS 157-23 |
||||||||||
|
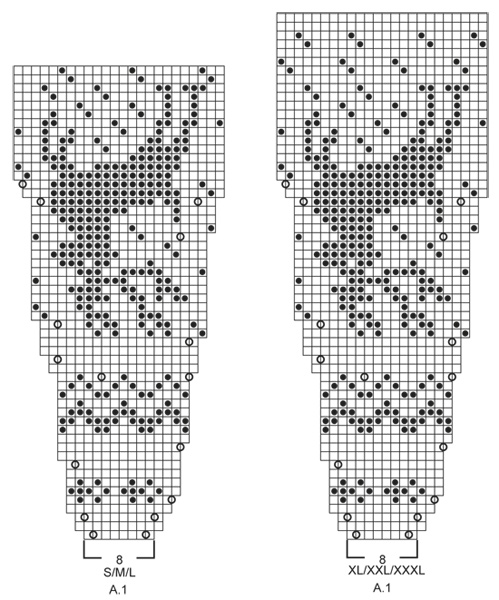
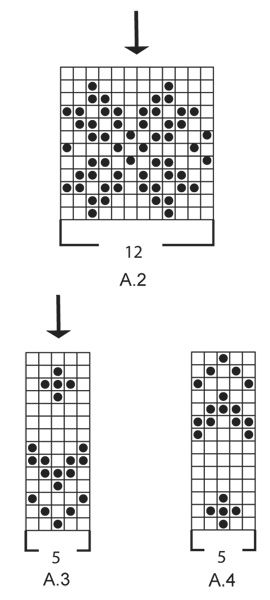
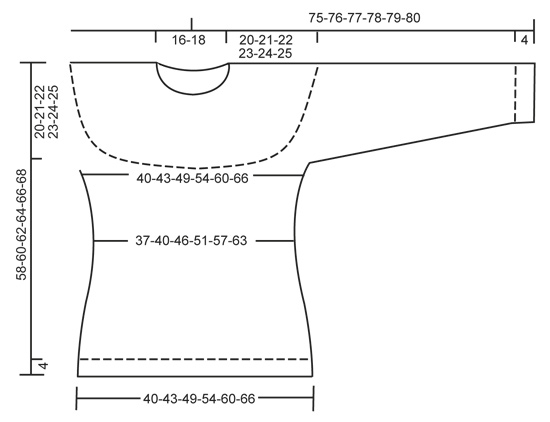
PATTERN: See diagrams A.1 to A.4. The diagrams show all rows in pattern seen from RS. Work entire pattern in stockinette st. DECREASE TIP (applies to sides and sleeves): Dec before marker and 1 st K as follows: K 2 tog. Dec after marker and 1 st K as follows: Slip 1 st as if to K, K 1, psso. INCREASE TIP (applies to sides): Inc 4 sts in total on row. Work until 1 st remains before marker, 1 YO, 2 sts in stockinette st, 1 YO = 2 sts inc. On next round K YO twisted (i.e. work in the back loop of YO instead of front) to avoid holes. ---------------------------------------------------------- JUMPER: Worked in the round on circular needle, top down. Work sleeves in the round on double pointed needles. YOKE: Cast on 88-92-96-100-104-108 sts on circular needle size 3 mm / US 2.5 with medium gray. Work rib P 2/K 2 until piece measures 3 cm / 1". Now switch to circular needle size 4 mm / US 6 and work 1 round in stockinette st, AT THE SAME TIME inc 0-4-8-20-24-28 sts evenly = 88-96-104-120-128-136 sts. Now work as follows: A.1 (= 8 sts) 11-12-13-15-16-17 times in width. REMEMBER THE GAUGE! When A.1 has been worked 1 time vertically, there are 264-288-312-360-384-408 sts on round. Continue with 3-5-9-5-7-11 rounds with medium gray. NOTE: In size S, L, XL, XXXL stop 24 sts (= 1 repetition) before last round is worked. This is now beg of the next rounds. Pattern is now correctly placed after sts are divided for sleeves and body. Work next round as follows: Work the first 37-40-46-52-58-64 sts (= half back piece), slip the next 58-64-64-76-76-76 sts on a stitch holder (= sleeve), cast on 10 new sts under sleeve, insert a marker in the middle of these 10 sts, work the next 74-80-92-104-116-128 sts (= front piece), slip the next 58-64-64-76-76-76 sts on a stitch holder (= sleeve), cast on 10 new sts under sleeve, insert a marker in the middle of these 10 sts, work the remaining 37-40-46-52-58-64 sts (= half back piece). BODY: There are now 168-180-204-228-252-276 sts for body. Now work A.2 (= 12 sts) over all sts on round. Continue like this until A.2 has been worked 1 time vertically. Now work piece in stockinette st with medium gray. On next round dec 1 st on each side of each marker in the sides - SEE DECREASE TIP. Repeat dec every 2 cm / ¾" 2 more times = 156-168-192-216-240-264 sts. When piece measures 12-13-14-15-16-17 cm / 4¾"-5⅛"-5½"-6"-6¼"-6¾" from marker under sleeves, inc 1 st on each side of marker in each side of piece – see INCREASE TIP. Repeat inc every 2 cm / ¾" 2 more times = 168-180-204-228-252-276 sts. When piece measures 56-58-60-62-64-66 cm / 22"-22¾"-23⅝"-24⅜"-25¼"-26", switch to circular needle size 3 mm / US 2.5 and inc 22-26-26-30-30-34 sts evenly = 190-206-230-258-282-310 sts. Continue to work rib as follows: * K 2, P 2 *, repeat from *-*. When rib has been worked for 4 cm / 1½", bind off with K over K and P over P. SLEEVES: First work pattern, then continue sleeve in medium gray. Slip sts from stitch holder back on double pointed needles size 4 mm / US 6. There are now 58-64-64-76-76-76 sts for sleeve. Work 1 row in stockinette st. Then cast on 10 sts under sleeve = 68-74-74-86-86-86 sts. Insert a marker in the middle of these new sts. Then work the sleeve in the round. Now work A.2. NOTE: Adjust so that the 2 middle sts in diagram (see arrow) are the 2 middle sts on sleeve. When A.2 has been worked, continue with A.3. NOTE: Adjust pattern so that the middle st in diagram (see arrow) is one of the 2 middle sts on sleeve, AT THE SAME TIME beg dec under sleeve - remember DECREASE TIP. Repeat dec every 3-2½-2½-2½-2½-2½ cm / 1⅛"-⅞"-⅞"-⅞"-⅞"-⅞" 9-12-12-12-12-12 more times = 48-48-48-60-60-60 sts. When sleeve measures 38 cm / 15", work A.4. NOTE: Adjust so that the middle st in diagram (see arrow) is one of the 2 middle sts on sleeve. When A.4 has been worked vertically, switch to double pointed needles size 3 mm / US 2.5 and inc 4-8-8-0-4-4 sts evenly = 52-56-56-60-64-64 sts. Then work rib (= K 2/P 2) for 3 cm / 1". Bind off with K over K and P over P. ASSEMBLY: Sew the holes under the sleeves. |
||||||||||
Diagram explanations |
||||||||||
|
||||||||||
 |
||||||||||
 |
||||||||||
 |
||||||||||
Have you finished this pattern?Tag your pictures with #dropspattern #silverstagsweater or submit them to the #dropsfan gallery. Do you need help with this pattern?You'll find 24 tutorial videos, a Comments/Questions area and more by visiting the pattern on garnstudio.com. © 1982-2026 DROPS Design A/S. We reserve all rights. This document, including all its sub-sections, has copyrights. Read more about what you can do with our patterns at the bottom of each pattern on our site. |
||||||||||


With over 40 years in knitting and crochet design, DROPS Design offers one of the most extensive collections of free patterns on the internet - translated to 17 languages. As of today we count 324 catalogs and 12290 patterns - 12280 of which are translated into English (US/in).
We work hard to bring you the best knitting and crochet have to offer, inspiration and advice as well as great quality yarns at incredible prices! Would you like to use our patterns for other than personal use? You can read what you are allowed to do in the Copyright text at the bottom of all our patterns. Happy crafting!
Post a comment to pattern DROPS 157-23
We would love to hear what you have to say about this pattern!
If you want to leave a question, please make sure you select the correct category in the form below, to speed up the answering process. Required fields are marked *.