
Popular categories
Looking for a yarn?


Comments / Questions (80)
![]() Karine wrote:
Karine wrote:
Hei, jeg er bittelitt usikker på hvordan jeg skal gjøre denne biten, kan dere forklare det til en som ikke er kjempe erfaren? \"skulder). Videre felles det på hver p fra halsen slik: 2 m 2 ggr, 1 m 3 ggr. Når arb måler 66-68-70-72-74-76 cm felles det av 8-9-10-11-12-14 m til skrå skulder på beg av neste p fra ermhull 2 ggr. På neste p felles de resterende m av (= 14-15-16-18-19-20 m). Arb måler 66-68-70-72-74-76 cm ytterst på skulderen og ned.\"
21.03.2024 - 21:24DROPS Design answered:
Hej Karine, når du vender første gang ved halsen, starter du med at felle 2 masker, det gør du også næste gang du strikker fra halsen. 3.gang du strikker fra halsen lukker du kun 1m og det gør du ialt 3 gange :)
03.04.2024 - 14:16
![]() Karin wrote:
Karin wrote:
In het patroon kan ik nergens vinden hoe veel steken ik in het voor- en achterpand moet afkanten voor de mouw. Alvast bedankt voor uw antwoord.
24.02.2024 - 13:20DROPS Design answered:
Dag Karin,
In dit patroon kant je geen steken af voor de armgaten, maar je zet steken op aan het einde van de naald om een zgn verlaagd armsgat te maken.
25.02.2024 - 10:29
![]() Elisabeth Westerlund wrote:
Elisabeth Westerlund wrote:
Garnpriset till denna modell, Blue Horizon, ska vara 204 kr för minsta storleken. Jag får det till 385 kr. Räknar jag fel, eller….? Mvh Elisabeth Westerlund
07.11.2023 - 22:19DROPS Design answered:
Hej Elisabeth, det er en fejl - det er rettet - tak for info!
09.11.2023 - 15:42
![]() Aitameur wrote:
Aitameur wrote:
Bonjour Je dois faire des diminutions d3s MANCHES apres les Cotes de 62 a 50 mailles...sauf que ca dis pas combien de diminution pour calculer et repartir les diminutions ...merci de me le preciser ...merci encore pour tout vos beaux modèles.
18.09.2023 - 23:35DROPS Design answered:
Bonjour Mme Aitameur, vous devez donc diminuer 12 mailles à intervalles réguliers au tour suivant; dans cette leçon, nous expliquons comment répartir des diminutions (ou des augmentations), vous saurez ainsi comment les placer. Bon tricot!
19.09.2023 - 09:26
![]() Anna wrote:
Anna wrote:
Hello! I’d like to knit this with yarn from yarn group C, but I’m a bit confused about how to do the gradient section without holding two strands together (as I would with yarn group A). What would you recommend ?
13.09.2023 - 16:31DROPS Design answered:
Dear Anna, with 1 strand yarn group C you won't get the same effect with colours as you will work with only one colour, but you can choose 3 different colours that can create such a nice effect. Feel free to ask your DROPS store for any further assistance choose the best matching colours, they will be able to help even per mail or telephone. Happy knitting!
14.09.2023 - 09:36
![]() Jack wrote:
Jack wrote:
For the increases in the sleeve in the XL size, is the first increase at 9cm and then an additional 12 increases after this (13 in total)? If it is just 12 increases with the final increase at 47.5cm, this brings the stitch count to 76 not 78. If the final increase is at 51cm, this is when the deceases for the sleeve cap begin?
07.09.2023 - 13:24DROPS Design answered:
Dear Jack, ah oops you are right, you should increase 13 times and not 12 as explained in the previous answer, you might then have to increase more often to get the correct length, it should work with 3 cm between each increase - I'll report this to our design team, thanks for noticing. Happy knitting!
07.09.2023 - 17:06
![]() Jack wrote:
Jack wrote:
Does the sleeve measure 54cm including the 6cm cuff? Also, the last increase for the sleeve is at 51cm but this is when the decreases for the cap start. How does this work?
06.09.2023 - 22:58DROPS Design answered:
Dear Jack, in 4th size you increase the first time after 9 cm, then 12,5 cm, 16 cm, 19,5 cm ... 12th increase will be worked after 47,5 cm, so 3,5 cm before the 51 cm. Measure piece from cast on edge (including the 54 cm). Happy knitting!
07.09.2023 - 09:14
![]() Lola wrote:
Lola wrote:
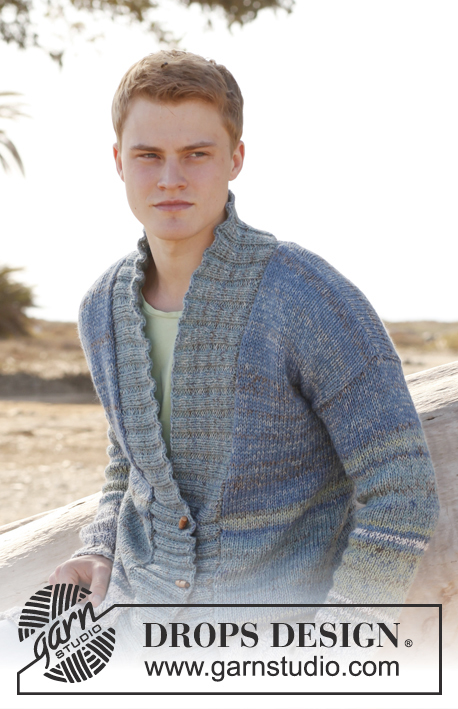
Hola de nuevo! Igual me estoy precipitando pq aún no he empezado las mangas pero no me cuadra que las mangas acaben con el color azul-blanco y no con azul-azul dado por la unión con las terminaciones del hombro. ¿Confío en el proceso? Gracias! ❤️
15.08.2023 - 13:30DROPS Design answered:
Hola Lola, la manga es bastante baja en este modelo. La unión entre el hombro y la manga se da justo en el borde entre la región azul-azul (en el hombro) y la región azul-blanco (de la manga). El patrón está correcto.
20.08.2023 - 19:13
![]() Lola wrote:
Lola wrote:
Hola, estoy teniendo problemas con los hombros. He tejido así (talla L): 63cm Los hombros a partir del remate del cuello (43pt en cada lado): 1v: (r) 2pj×2 al final de la hilera = 41 2v: (d) 2pj×2 al principio de la hilera = 39 3v: (r) 2pj al final =38 4v: (d) 2pj al principio = 37 5v: (r) 2pj al final= 36 Ahora pone que tengo que seguir tejiendo hst q mida 70cm y luego en las últ 3 hileras rem 10pts, 10 y 16 😥. ¿Cómo lo hago? No lo entiendo. Gracias!
15.08.2023 - 13:27DROPS Design answered:
Hola Lola, en la 1ª fila que comienza desde el escote cierras 2 pts al inicio de la fila. En la siguiente fila trabajas normal de vuelta. En la 3ª fila (desde el escote) cierras 2 pts al inicio de la fila. Trabaja de vuelta la siguiente fila. En la 5ª (y en la 7ª y 9ª) fila cierras solo 1 pt al inicio de la fila. Las otras filas se trabajan de vuelta. Deberías tener 36 pts. Trabaja en pt jersey hasta que la labor mida 70cm. En la siguiente fila que comienza desde la sisa cierra 10 pts al inicio de la fila. Trabaja la siguiente fila de vuelta. En la siguiente fila desde la sisa cierra 10 pts más al inicio de la fila. En la última fila cierra los 16 pts restantes.
20.08.2023 - 19:09
![]() Aitameur wrote:
Aitameur wrote:
Bonjour J ai un souci avec les diminutions...j e suis sur le devant juste apres les cotes..j ai 106 mailles (large)...je dois repartir 16 diminutions..106÷16=6.62...donc je dois alterner les dim...sauf que je sais plus quoi faire je comprend pas a combien de mailles je dois diminuer....merci de me le dire ou expliquer
19.03.2022 - 22:53DROPS Design answered:
Bonjour Mme Aitameur, cette leçon explique comment diminuer à intervalles réguliers; dans votre exemple, suivez l'exemple 2 des diminutions: vous allez tricoter alternativement chaque5ème et 6ème maille ensemble et chaque 6ème et 7ème maille ensemble, veillez à bien diminuer le bon nombre de mailles sur le rang, et tricotez les dernières mailles à l'endroit. Bon tricot!
21.03.2022 - 08:25
|
|
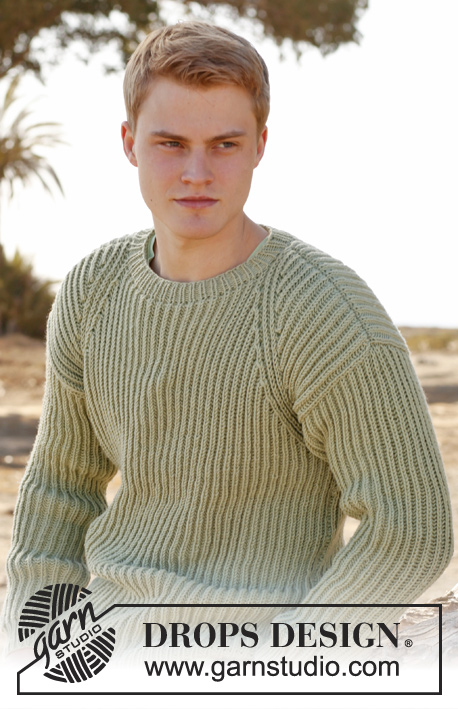
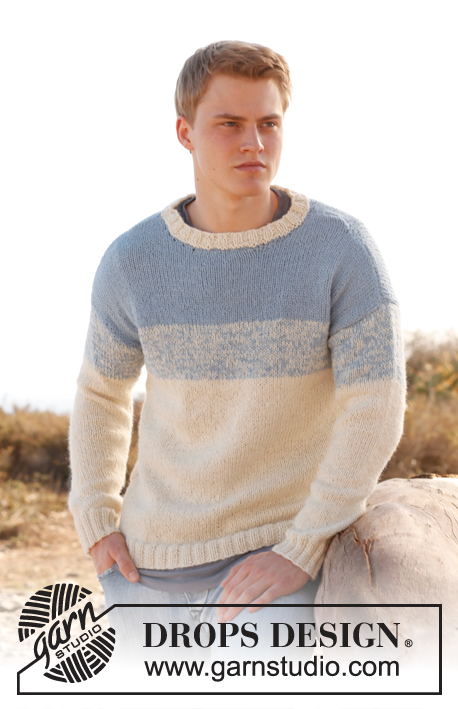
Blue Horizon#bluehorizonsweater |
|
 |
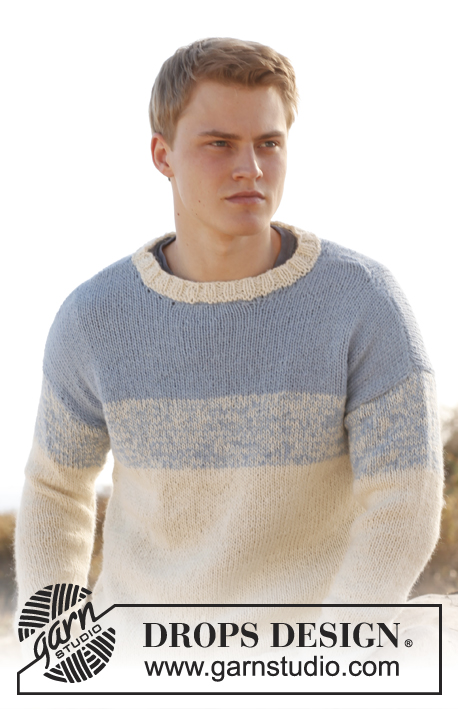 |
Men's knitted sweater in 2 strands DROPS Alpaca. Size: S - XXXL.
DROPS Extra 0-899 |
|
|
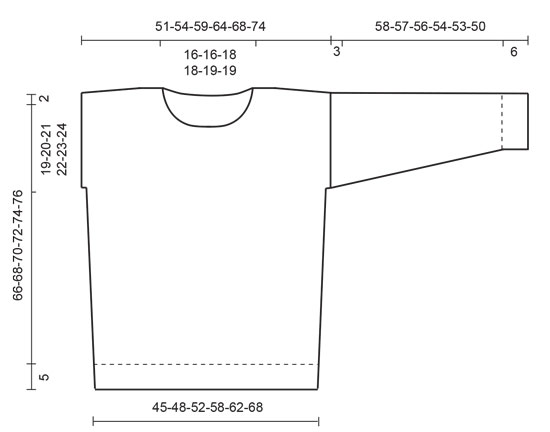
RIB: * K 2, P 2 *. DECREASE TIP: Dec inside 1 edge st in garter st. All dec are done from RS! Dec before 1 edge st as follows: K 2 tog. Dec after 1 edge st as follows: Slip 1 st as if to K, K 1, psso. ---------------------------------------------------------- FRONT PIECE: Worked back and forth on circular needle with 2 strands Alpaca. Cast on 94-98-106-118-130-142 sts (includes 1 edge st in each side) with 2 strands off white on circular needle size 4 mm / US 6. Work RIB - see explanation above - for 5 cm / 2". Switch to circular needle size 5 mm / US 8 and K 1 row from RS while AT THE SAME TIME dec 16-14-16-18-22-24 sts evenly = 78-84-90-100-108-118 sts (incl 1 edge st in each side). Continue in stockinette st. REMEMBER THE GAUGE! Inc 1 st in each side when piece measures 15-16-10-16-17-18 cm / 6"-6¼"-4"-6¼"-6¾"-7", repeat inc every 10-10-9-11-11-11 cm / 4"-4"-3½"-4⅜"-4⅜"-4⅜" 2-2-3-2-2-2 more times (3-3-4-3-3-3 times in total) = 84-90-98-106-114-124 sts. AT THE SAME TIME when piece measures 38-38-38-39-39-40 cm / 15"-15"-15"-15¼"-15¼"-15¾", switch to 1 strand light blue and 1 strand off white. When piece measures 45-46-47-48-49-50 cm / 17¾"-18"-18½"-19"-19¼"-19¾", cast on 2 new sts at the end of the next 2 rows = 88-94-102-110-118-128 sts. Work until piece measures 48-48-49-50-50-52 cm / 19"-19"-19¼"-19¾"-19¾"-20½" and continue with 2 strands light blue. When piece measures 60-62-63-65-66-68 cm / 23½"-24½"-24¾"-25½"-26"-26¾", bind off the middle 14-14-16-16-18-18 sts for neck and finish each shoulder separately (= 37-40-43-47-50-55 sts on each shoulder). Then bind off on every row from neck as follows: 2 sts 2 times, 1 st 3 times. When piece measures 66-68-70-72-74-76 cm / 26"-26¾"-27½"-28⅜"-29⅛"-30", bind off 8-9-10-11-12-14 sts for diagonal shoulder at beg of next row from armhole 2 times. On next row bind off the remaining sts (= 14-15-16-18-19-20 sts). Piece measures approx. 66-68-70-72-74-76 cm / 26"-26¾"-27½"-28⅜"-29⅛"-30" at the edge of shoulder and down. BACK PIECE: Cast on and work as front piece. When piece measures 64-66-68-70-72-74 cm / 25¼"-26"-26¾"-27½"-28⅜"-29⅛", bind off the middle 26-26-28-28-30-30 sts for neck and finish each shoulder separately. Then bind off 1 st on next row from neck. When piece measures 66-68-70-72-74-76 cm / 26"-26¾"-27½"-28⅜"-29⅛"-30", bind off 8-9-10-11-12-14 sts for diagonal shoulder in each side at beg of next row from sleeve 2 times. On next row bind off the remaining sts (= 14-15-16-18-19-20 sts). Piece measures approx. 66-68-70-72-74-76 cm / 26"-26¾"-27½"-28⅜"-29⅛"-30" at the edge of shoulder and down. SLEEVE: Worked back and forth on needle. Cast on 54-58-62-62-66-66 sts (incl 1 edge st in each side) with 2 strands off white on circular needle size 4 mm / US 6. Work RIB - see explanation above - for 6 cm / 2⅜". Switch to circular needle size 5 mm / US 8 and work in stockinette st while AT THE SAME TIME dec no of sts to 44-48-50-52-54-56. When piece measures 9-8-10-9-9-10 cm / 3½"-3"-4"-3½"-3½"-4", inc 1 st in each side. Repeat inc every 4-4-3.5-3.5-3-2.5 cm / 1½"-1½"-1¼"-1¼"-1⅛"-⅞" 11-11-12-12-13-14 more times = 68-72-76-78-82-86 sts. AT THE SAME TIME when piece measures 47-47-46-45-44-42 cm / 18½"-18½"-18"-17¾"-17¼"-16½", switch to 1 strand light blue and 1 strand off white. When piece measures 55-54-53-51-50-47 cm / 21½"-21¼"-21"-20"-19¾"-18½" - NOTE! Shorter measurements in the larger sizes because of wider shoulders - bind off for sleeve cap at beg of every row as follows: 5 sts 3 times in each side. Bind off the remaining sts when piece measures 58-57-56-54-53-50 cm / 22¾"-22½"-22"-21¼"-21"-19¾". Knit another sleeve. ASSEMBLY: Sew shoulder seams inside 1 edge st. Sew in sleeves and sew sleeve and side seams in one inside 1 edge st. NECK EDGE: Worked in the round on circular needle. Pick up 90 to 110 sts around the neck with 2 strands light blue on circular needle size 4 mm / US 6. Then switch to 2 strands off white and K 1 round while AT THE SAME TIME adjusting no of sts to 96-96-100-100-104-104. P 1 round and K 1 round. Then work rib - see explanation above - until piece measures 2.5 cm / 1". Loosely bind off with K over K and P over P. |
|
 |
|
Have you finished this pattern?Tag your pictures with #dropspattern #bluehorizonsweater or submit them to the #dropsfan gallery. Do you need help with this pattern?You'll find 16 tutorial videos, a Comments/Questions area and more by visiting the pattern on garnstudio.com. © 1982-2026 DROPS Design A/S. We reserve all rights. This document, including all its sub-sections, has copyrights. Read more about what you can do with our patterns at the bottom of each pattern on our site. |
|


With over 40 years in knitting and crochet design, DROPS Design offers one of the most extensive collections of free patterns on the internet - translated to 17 languages. As of today we count 324 catalogs and 12291 patterns - 12281 of which are translated into English (US/in).
We work hard to bring you the best knitting and crochet have to offer, inspiration and advice as well as great quality yarns at incredible prices! Would you like to use our patterns for other than personal use? You can read what you are allowed to do in the Copyright text at the bottom of all our patterns. Happy crafting!
Post a comment to pattern DROPS Extra 0-899
We would love to hear what you have to say about this pattern!
If you want to leave a question, please make sure you select the correct category in the form below, to speed up the answering process. Required fields are marked *.