
Popular categories
Looking for a yarn?


Comments / Questions (35)
![]() Leena Hanhinen wrote:
Leena Hanhinen wrote:
Hei. Malli nro u-677 ohjeessa lukee neulo kaikki kerrokset oikein. Malli siis kudotaan sileänä neuleena. Miten onnistuu? Minä en saa, vaan pitää kutoa nurjapuoli nurin ja oikea oikein. Katsoin kyllä teidän videon?
16.10.2025 - 05:47DROPS Design answered:
Hei, kun neulot sileää neuletta, neulo oikeaa oikealta puolelta ja nurjaa nurjalta puolelta. Työssä neulotaan myös ainaoikeaa, jolloin kyseiset silmukat neulotaan jokaisella kerroksella oikein.
16.10.2025 - 17:26
![]() Marjo wrote:
Marjo wrote:
I don't know how to slip the 3mm knit stitches to the 4mm of the garment. Where do I start . At the begining of the 5 slipped stitches which would be the outer edge. Possibly a diagram would help,
22.09.2025 - 02:44DROPS Design answered:
Hi Marjo, When changing needles, the easiest method is to work the stitches from the 3 mm needles using the 4 mm needles. In this pattern the next row is stocking stitch so recommend you begin from the right side and knit the first row using the 4 mm needles and decrease the number of stitches evenly on this row as stated for your size. Regards, Drops Team.
22.09.2025 - 06:08
![]() Birgit wrote:
Birgit wrote:
Hallo, wie ist das gemeint, ab 36cm für die Armausschnitte 10M abketten? 36 cm ab dem Bündchen, oder 8cm Bündchen plus 36cm stricken?
04.11.2024 - 16:10DROPS Design answered:
Liebe Birgit, die 36 cm in XXXL messen Sie ab Anschlagskante. Viel Spaß beim Stricken!
05.11.2024 - 09:08
![]() Kirstin wrote:
Kirstin wrote:
I know others have asked this but I don't understand the answer!! Please explain work next to last st on row as first st in A1 but do not dec in this st. Does this mean no matter where I am up to in the pattern when I get to the 2nd last st, always knit what would be first stitch in A1? Won't this look weird if it's out of kilter with the pattern? And do I just skip the dec if it falls due in this st? Thank you!!
20.03.2022 - 07:17DROPS Design answered:
Dear Kirstin, this stitch is worked as the first stitch in A.1 so that the pattern is symmetrical. In some rows, there should be a decrease in that stitch; in this case you just work the stitch in the corresponding color (according to A.1) without working 2tog. Happy knitting!
20.03.2022 - 17:50
![]() Susan Browder wrote:
Susan Browder wrote:
I don’t understand how to slip the sleeve edges onto the same circular needle as the body. Do I slip one sleeve edge on each side of the body?
13.03.2022 - 05:57DROPS Design answered:
Dear Susan, first, you slip the stitches from one of the fronts, then you introduce the stitches from one sleeve edge over the stitches cast off for the armhole in the body, then you add the stitches for the back, then the other sleeve edge, and finally the stitches of the other front. All of the stitches in the garment should be on the same side (Right side). Happy knitting!
13.03.2022 - 22:34
![]() Sissi wrote:
Sissi wrote:
Liebes Team, für die Zunahme der Seitenschrägung im Rumpfteil heißt es bei einer Gesamtlänge 10 cm. Wird das Bündchen (8cm) mitgemessen? Oder nach Bündchen 10 cm messen und dann die jeweiligen Zunahme stricken? Vielen 💜 Dank💜 🙏im Vorraus🙇
09.01.2020 - 18:34DROPS Design answered:
Liebe Sissi, diese 10 cm werden von der Anschlagskante gesmessen. Viel Spaß beim stricken!
10.01.2020 - 08:36
![]() Vera wrote:
Vera wrote:
Hallo liebes Drops Team Sind im Diagramm nur die Hinreihen eingezeichnet oder wird das Muster schon in der Rückreihe erweitert ? Das habe ich nicht verstanden. LG Vera Bartkowiak
03.03.2019 - 12:36DROPS Design answered:
Liebe Vera, alle Reihen sind im Diagram gezeigt, dh die Hin- sowie die Rückreihen. Hier lesen Sie wie man Strick-Diagramme liest. Viel Spaß beim stricken!
04.03.2019 - 10:09
![]() Stephanie wrote:
Stephanie wrote:
I have just finished the sleeves and am ready to work on the yoke. The directions say to slip the sleeves onto the same needle as the body and then purl 1 row. Do I add both sleeves to the end (not where I stopped knitting before)? But, the sleeves would be knitted together???? Please clarify. Thank you!
03.06.2018 - 08:49DROPS Design answered:
Dear Stephanie, this video shows how to slip both sleeves above sts bound off for armholes on the sides. You will then work a total of 1-3-5 rows (see size) and now start A.1 including decrease for circular yoke. Happy knitting!
04.06.2018 - 09:16
![]() Mette Pedersen wrote:
Mette Pedersen wrote:
Hej:) Jeg kan ikke se hvor langt oppe på vesten, at jeg skal starte med mønstret. På forhånd tak for hjælpen.
14.02.2018 - 10:27DROPS Design answered:
Hei Mette. Hei. Når du er ferdig med bærestykket og har strikket begge ermkantene og satt disse sammen med bærestykket, strikkes det 1 pinne vrang fra vrangen samtidig som det felles 1-5-13-9-9-5 m jevnt fordelt = 275-291-307-339-371-403 m. Deretter strikkes 0-2-4-0-2-4 pinner til med vinrød og glstrikk. Så starter du med diagram A.1 (se diagram for din størrelse). God Fornøyelse!
14.02.2018 - 13:18
![]() Hildegard Brake wrote:
Hildegard Brake wrote:
Hallo, kann ich die Weste auch als Pullover stricken? Wie geht das? Kann ich die jeweils angegebenen Maschenzahlen nehmen und alles auf einer Rundstricknadel im Kreis stricken? MfG Hildegard Brake
27.11.2017 - 15:09DROPS Design answered:
Liebe Frau Brake, so können Sie wahrscheinlich stricken, passen Sie mal auf, daß die Farbenmuster mit den gesamten Maschenanzahl passt. Viel Spaß beim stricken!
27.11.2017 - 15:21
|
||||||||||||||||
Sweet Scarborough#sweetscarboroughcardigan |
||||||||||||||||
 |
 |
|||||||||||||||
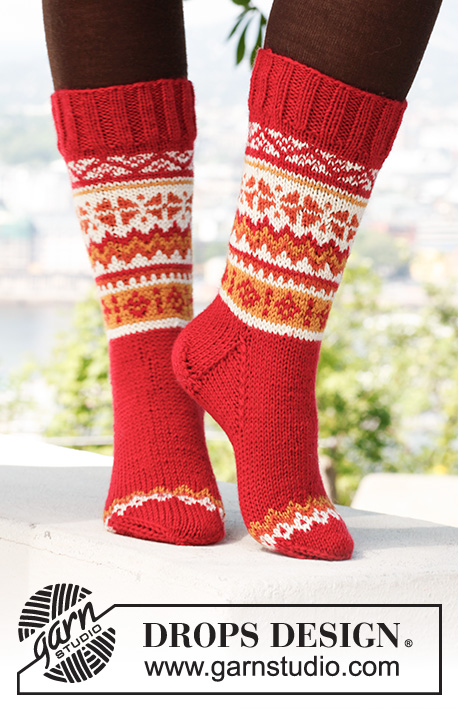
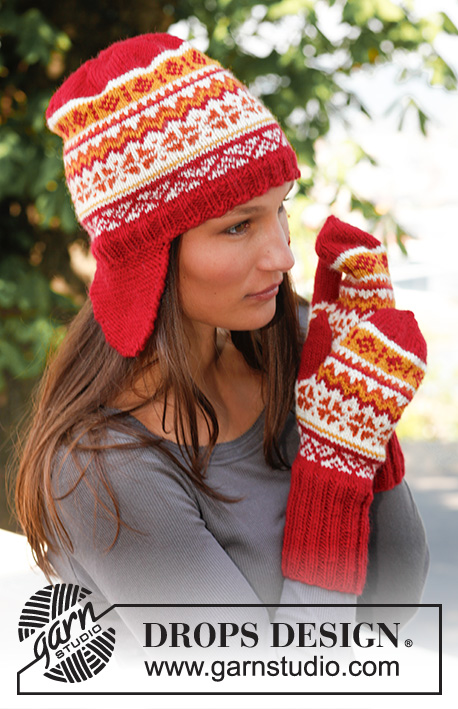
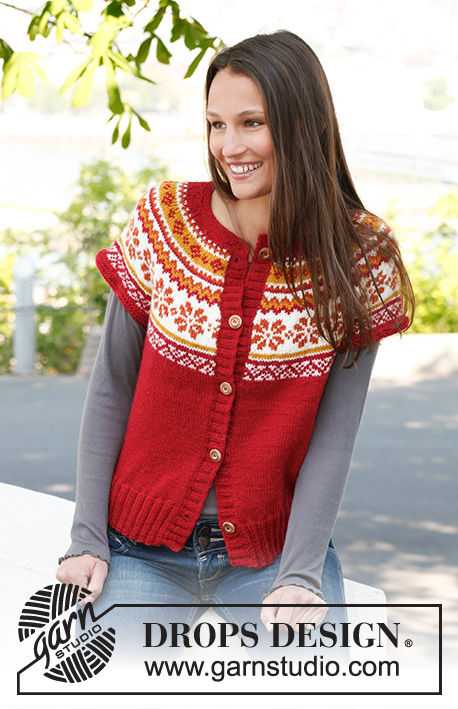
Knitted DROPS vest with round yoke and Norwegian pattern in ”Karisma”.
DROPS 140-10 |
||||||||||||||||
|
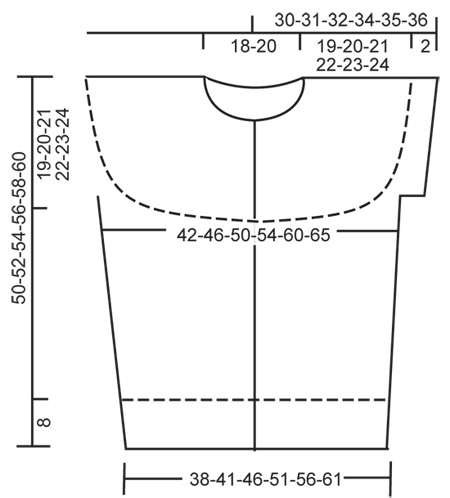
GARTER ST (back and forth on circular needle): K sts on all rows. PATTERN: See diagram A-1. Diagram is worked in stockinette st - 1st row = RS. ---------------------------------------------------------- BODY: Worked back and forth on circular needle from mid front. Cast on 184-200-220-240-268-292 sts on circular needle size 3 mm / US 2.5 with wine red. Work rib as follows (1st row = RS): 1 edge st in GARTER ST - see explanation above - * K 2/P 2 *, repeat from *-* until 3 sts remain, K 2 and 1 edge st in garter st. When piece measures 8 cm / 3⅛", switch to circular needle size 4 mm / US 6, work 1 row in stockinette st while at the same time dec 24-24-28-28-32-36 sts evenly = 160-176-192-212-236-256 sts. Insert 2 markers in the piece; 40-44-48-53-59-64 sts in from each side (= 80-88-96-106-118-128 sts between markers on back piece). Continue in stockinette st with 1 edge st in garter st in each side. REMEMBER THE GAUGE! When piece measures 10 cm / 4" in total, inc 1 st on each side of markers in the sides. Repeat inc every 5 cm / 2" 3 more times = 176-192-208-228-252-272 sts. When piece measures 31-32-33-34-35-36 cm / 12¼"-12½"-13"-13⅜"-13¾"-14¼", work next row as follows from RS: 39-43-47-52-58-63 sts (= right front piece), bind off 10 sts for armhole, work 78-86-94-104-116-126 sts (= back piece), bind off 10 sts for armhole, work the rest of row (= 39-43-47-52-58-63 sts on left front piece), do not cut the thread. Put piece aside and knit the sleeve edges. SLEEVE EDGE: Worked back and forth on circular needle size 3 mm / US 2.5. Cast on 70-72-76-80-84-88 sts with wine red. K 5 rows (1st row = WS), work next row as follows: bind off the first 5 sts, work 60-62-66-70-74-78 sts and bind off the last 5 sts, cut the thread. Put piece aside and knit another sleeve edge. YOKE: Slip sleeve edges on to same circular needle size 4 mm / US 6 as body = 276-296-320-348-380-408 sts (do not work them when slipping them on to needle). P 1 row from WS while at the same time dec 1-5-13-9-9-5 sts evenly = 275-291-307-339-371-403 sts. Work 0-2-4-0-2-4 more rows with wine red in stockinette st. Continue with diagram A-1 (see diagram for your size) with 1 edge st in each side in garter st, work next to last st on row as first st in A-1 but do not dec in this st. After all dec there are 88-93-98-108-118-128 sts on needle and piece measures approx. 50-52-54-56-58-60 cm / 19¾"-20½"-21¼"-22"-22¾"-23⅝" up to shoulder. Then work an elevation in the back of neck with wine red as follows (1st row = RS): K 51-54-56-61-66-71 sts, turn, P 14-15-14-14-14-14 sts, turn, K 21-22-21-21-21-21 sts, turn, P 28-29-28-28-28-28 sts, continue like this by working 7 sts more on every turn until a total of 70-71-70-84-84-84 sts have been worked, turn and work the rest of row, cut the thread. Put sts on a holder, neck edge is worked after the front bands are finished. LEFT BAND: Pick up approx. 105-125 sts inside 1 edge st along left front on circular needle size 3 mm / US 2.5 with wine red. K 1 row from WS, then K 1 row from RS while inc no of sts evenly to 128-132-136-140-144-148 sts. Work rib as follows (1st row = WS): 1 edge st in garter st, * P 2/K 2 *, repeat from *-* and finish with P 2 and 1 edge st in garter st. Continue with K over K and P over P until rib measures 3 cm / 1⅛", loosely bind off. RIGHT BAND: Work as left band but after 1 cm / ⅜", bind off for 5-5-6-6-6-6 buttonholes evenly (buttonholes are bind off in P-sections seen from RS). 1 BUTTONHOLE = P 2 tog and make 1 YO – top buttonhole should be in the first P-section from the top and bottom hole approx. 5-6 cm / 2"-2⅜" from bottom edge. NECK EDGE: The neck edge is worked with wine red on circular needle size 3 mm / US 2.5 as follows: Pick up 6 sts over right band (inside 1 edge st), work the 88-93-98-108-118-128 sts from stitch holder around the neck on to needle and pick up 6 sts over left band = 100-105-110-120-130-140 sts. K 1 row from WS while at the same time dec evenly to 90-94-98-102-106-110 sts. Continue with K 4 rows back and forth, then bind off. ASSEMBLY: Sew sleeve edges tog edge to edge in front loop of outermost sts. Sew tog the openings under the sleeves and sew on buttons. |
||||||||||||||||
Diagram explanations |
||||||||||||||||
|
||||||||||||||||
 |
||||||||||||||||
 |
||||||||||||||||
Have you finished this pattern?Tag your pictures with #dropspattern #sweetscarboroughcardigan or submit them to the #dropsfan gallery. Do you need help with this pattern?You'll find 13 tutorial videos, a Comments/Questions area and more by visiting the pattern on garnstudio.com. © 1982-2026 DROPS Design A/S. We reserve all rights. This document, including all its sub-sections, has copyrights. Read more about what you can do with our patterns at the bottom of each pattern on our site. |
||||||||||||||||


With over 40 years in knitting and crochet design, DROPS Design offers one of the most extensive collections of free patterns on the internet - translated to 17 languages. As of today we count 325 catalogs and 12298 patterns - 12288 of which are translated into English (US/in).
We work hard to bring you the best knitting and crochet have to offer, inspiration and advice as well as great quality yarns at incredible prices! Would you like to use our patterns for other than personal use? You can read what you are allowed to do in the Copyright text at the bottom of all our patterns. Happy crafting!
Post a comment to pattern DROPS 140-10
We would love to hear what you have to say about this pattern!
If you want to leave a question, please make sure you select the correct category in the form below, to speed up the answering process. Required fields are marked *.