
Popular categories
Looking for a yarn?


Comments / Questions (474)
![]() Barbara wrote:
Barbara wrote:
KOŁNIERZ: rozumiem ze mam podzielic oczka do markera, aby miec srodek przodu? Dekolt:\\\" w tym samym czasie, 2 cm po rozpoczeciu dodawania o. na kolnierz\\\" te 2 cm znajduja sie w tym samym rzedzie, gdy zaczynam dodawac oczka na kolnierz (tzn przerabiam 2cm tego co wypada we wzorze i potem zamykam 1 oczko z kazdej strony dekoltu ) czy 2 cm powyzej miejsca w ktorym zaczelam dodawac oczka na kolnierz?
16.06.2018 - 08:30DROPS Design answered:
Witaj Barbaro! Nie musisz nic dzielić. Robótka jest przerabiana w tę i z powrotem, w całości od dołu do góry, a oczka na kołnierz są dodawane na brzegach (tam gdzie obszycia przodów, w odl. 1 o. od brzegu). Na tych brzegach (z 2 stron obszycia, czyli oczek ściegiem francuskim) będziesz jednocześnie dodawać oczka na kołnierz i zamykać oczka na skos dekoltu (to zaczynasz dopiero 2 cm od początku dodawania oczek na kołnierz, najlepiej umieścić tam marker). Powodzenia!
18.06.2018 - 17:58
![]() Barbara wrote:
Barbara wrote:
Dzien dobry,umiesciłam markery po 92 oczkach dla rozmiaru L/XL. Wypadaja w schemacie A-1, ale w czasie przekladania oczek poprzesuwaly mi sie. Czy po zamknieciu 11 oczek w grupie lewych o. i dodaniu nastepnych 3 ( w sumie mam 297 o.), moje markery powinny znajdowac sie po 75 oczku od brzegu?
16.06.2018 - 08:30DROPS Design answered:
Witaj Barbaro! Nie widzę tam dodawania 3 o. Na moment, który opisujesz (oczka zostały zamknięte 8 razy) marker powinien znajdować się za 76 o. od brzegu. Inaczej mówiąc marker cały czas będzie się znajdował na środku 3-ciego schematu A-1 od brzegu (będzie 12 o. schematu A-1 z każdej strony markera). Pozdrawiam i powodzenia!
18.06.2018 - 21:31
![]() Lee Pearce wrote:
Lee Pearce wrote:
I am not understanding this part of the pattern: At the same time when piece measures approx. 51-52-53 cm / 20"-20½"-21" (make sure that next row is worked from RS), bind off for armholes as follows: Size S/M and L/XL: bind off 6 sts in the side (i.e. 3 sts on each side of markers in the sides). I only have markers to show the start of the collar and where the 6 stitches are in between the two part patterns
08.05.2018 - 14:44DROPS Design answered:
Dear Mrs Pearce, you should have inserted a marker for the sides when starting to work pattern: " Insert a marker after 75-92-108 sts in from each side (= 152-185-216 sts between markers on back piece)". You will bind off for the armholes 6 sts on each side (= before + after) of each both markers. Happy knitting!
08.05.2018 - 17:31
![]() Barbara wrote:
Barbara wrote:
Dziekuje za pomoc, teraz juz wiem ja zrobic 2 oczka z jednego. Chcialam jeszcze spytać czy rzad z powiekszeniami jest drugim rzedem z pierwszych pieciu? A takze pomiedzy warkoczami oczka je rozdzielajace to oczka lewe? Pozdrawiam
22.03.2018 - 10:49DROPS Design answered:
Witaj ponownie Basiu! 5 pierwszych rzędów jest przerabianych na prawo i stanowią brzeg na dole swetra (ściągacz francuski). Później jest rząd z dodawaniem oczek. Warkocze są rozdzielane przez oczka lewe. Pozdrawiamy!
22.03.2018 - 18:12
![]() Barbara wrote:
Barbara wrote:
Dziekuje za odpowiedz. Jak mam zrobić te 2o.p. w każde z 2 nast. o. (= 4 o.p.)? Czy to znaczy ze kazde z 2 oczek prawych mam przerobic podwojnie? Czy mozecie mi wskazać jakis film instruktarzowy, zebym mogla zobaczyć jak to się robi? Dziekuje za Wasza pomoc. Pozdrawiam
21.03.2018 - 20:20DROPS Design answered:
Witaj Basiu! Już służę pomocą. Jak przerobić 2 oczka w 1 oczko znajdziesz TUTAJ . Pozdrawiamy i miłej pracy!
22.03.2018 - 09:40
![]() Barbara wrote:
Barbara wrote:
Dzien dobry, dziękuję za udzielona odpowiedz. Pytalam o poczatkowe o., poniewaz dalej w instrukcji czytam, ze po przerobieniu 6 rz. powinnam otrzymać 369 o. dla rozmiaru L/XL. Niestety nie ma nic o dadawaniu oczek, ani narzutach. Prosze mi powiedziec jak mam otzymac 60 brakujacych oczek? Robiac wedlug opisu mam powtorzyc schmat A-1 +13o.l 8 razy, moge to zrobic tylko 7, a natepnie brakuje mi oczek na ostatni schemat A-1. przed 6 oczkami obszycia.Pozdrawiam Barbara
20.03.2018 - 12:20DROPS Design answered:
Witaj Basiu! Oczka są dodawane w następującym miejscu: "6 o. obszycia przodu ŚCIEGIEM FRANCUSKIM – patrz powyżej, [* 2 o.l., 2 o.p. w każde z 2 nast. o. (= 4 o.p.), 2 o.l.*, powt. od *-* jeszcze 2 razy, 14-13-12 o.l.], powt. od [-] jeszcze 6-8-10 razy, następnie od *-* jeszcze 3 razy i 6 o. obszycia przodu ściegiem francuskim = 302-369-432 o.", a dokładniej chodzi o wykonanie 2 o.p. w każde z 2 nast. o. (= 4 o.p.). Pozdrawiamy!
21.03.2018 - 18:12
![]() Barbara wrote:
Barbara wrote:
Kiedy piszecie ze trzeba nabrac 309 oczek , a następnie w nawiasie"w tym 6 o. Na obszycie przodu z kazdej strony"to znaczy, ze ma nabrać 321 oczek? Dziekuje za odpowiedz.
18.03.2018 - 21:20DROPS Design answered:
Witaj Basiu! Nabrać 309 oczek to znaczy: 297 na tył i przody, a 6+6=12 na obszycia przodów. Pozdrawiamy!
19.03.2018 - 18:00
![]() Zonnetje wrote:
Zonnetje wrote:
Bijna klaar met achterpand, maar toch nog een vraag... bij LINKERSCHOUDER (2e zin) staat: Brei 1 nld RECHT aan de verkeerde kant. Ik neem aan dat ik gewoon de steken moet breien zoals ze zich voordoen, en dus NIET ALLES RECHT? Want anders zou dat toch ook bij de rechterschouder moeten staan, en dat is niet het geval. Dank voor uw antwoord alvast.
03.02.2018 - 17:28DROPS Design answered:
Hoi Zonnetje, De steken moet je inderdaad breien zoals ze zich voordoen. Ik zal de tekst even aanpassen. Dankjewel ;)
06.02.2018 - 15:53
![]() Zonnetje wrote:
Zonnetje wrote:
U kunt mijn vorige vraag negeren, want het kwartje is inmiddels gevallen: in maat S zijn er geen hele patroonherhalingen meer, alleen nog 2 halve op elk apart te breien deel. Soms is iets zo eenvoudig dat je er gewoon overheen leest... ik ga weer vrolijk verder met dit geweldige patroon :)
01.02.2018 - 15:50
![]() Zonnetje wrote:
Zonnetje wrote:
Minder bij een hoogte van ong. 70-73-76 cm - pas zo aan enz enz... - 3 st gelijkmatig over de halve patroonherhalingen en 6 st gelijkmatig over de hele (dus minder 6-9-9 st in totaal) = 49-57-61 st. Ik brei de kleinste maat. Als ik in de halve patroonherhaling 3 st minder en in de hele 6 st, dan minder ik er toch totaal 9 i.p.v. 6? Ik zit vast verkeerd te denken, dus graag uw hulp om eruit te komen... alvast dank weer :)
31.01.2018 - 19:57DROPS Design answered:
Hoi Zonnetje, Na alle minderingen voor de hals en het armsgat, zijn er in de kleinste maat 2 halve herhalingen van A.1 over (en niet meer een hele herhaling), dus je mindert 2 maal 3 st. = 6 steken
06.02.2018 - 15:44
|
|||||||||||||||||||||||||
Celtica#celticacardigan |
|||||||||||||||||||||||||
 |
 |
||||||||||||||||||||||||
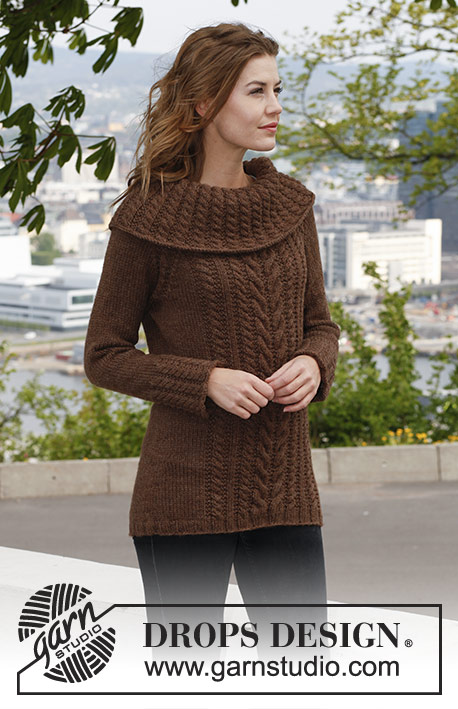
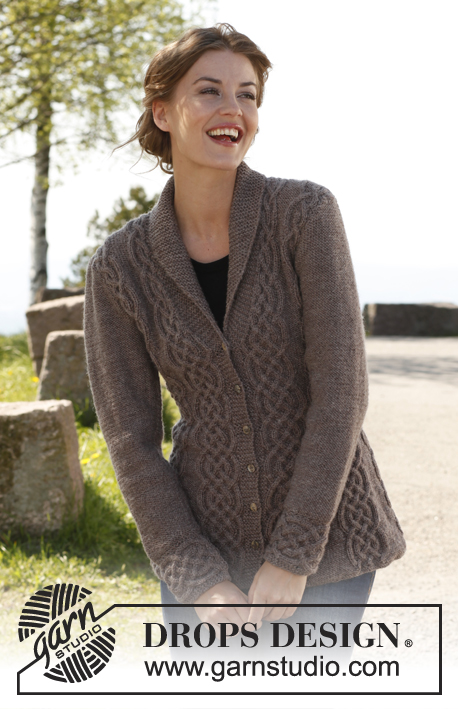
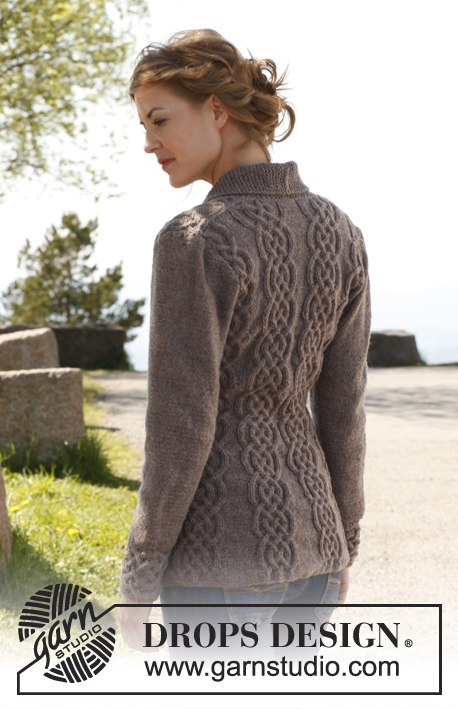
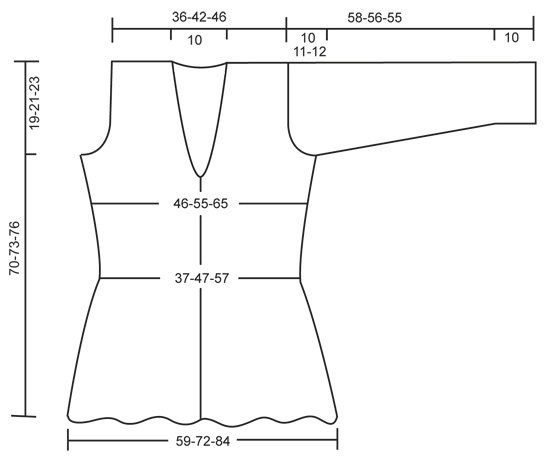
Knitted DROPS fitted jacket with cables and shawl collar in ”Lima”. Size: S - XXXL.
DROPS 143-1 |
|||||||||||||||||||||||||
|
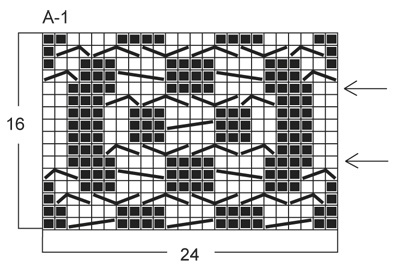
GARTER ST (back and forth on needle): K sts on all rows. 1 ridge = 2 K rows. PATTERN: See diagram A-1, diagram shows pattern from RS. First row = RS. BUTTONHOLES: bind off for buttonholes on right band. 1 buttonhole = K 3rd and 4th st from mid front tog and make 1 YO. Bind off for buttonholes when piece measures: SIZE S/M: 7, 14, 21, 28, 35 and 42 cm / 2¾", 5½", 8¼", 11", 13¾" and 16½". SIZE L/XL: 8, 15, 22, 29, 36 and 43 cm / 3⅛", 6", 8¾", 11⅜", 14¼" and 17". SIZE XXL/XXXL: 9, 16, 23, 30, 37 and 44 cm / 3½", 6¼", 9", 11¾", 14½" and 17¼". INCREASE TIP (applies to collar): Inc by making 1 YO inside outermost st - on next row K YO twisted to avoid holes. DECREASE TIP (applies to neck): Dec for neck inside all sts in garter st (i.e. band + the sts inc for collar). All dec are done from RS! Dec as follows AFTER sts in garter st: Slip 1 st as if to K, K 1, psso. Dec as follows BEFORE sts in garter st: K 2 tog. On all WS rows P sts after/before sts in garter st while dec. -------------------------------------------------------- BODY: Worked back and forth on circular needle from mid front. Cast on 254-309-360 sts (includes 6 band sts in each side towards mid front) on circular needle size 4 mm / US 6 with Lima. K 5 rows (1st row = WS). Then work as follows (seen from RS): 6 band sts in GARTER ST – see explanation above, [* P 2, K 2 in each of the next 2 sts (= K 4), P 2 *, repeat from *-* 2 more times, P 14-13-12], repeat from [-] 6-8-10 more times, then from *-* 3 more times and 6 band sts in garter st = 302-369-432 sts. Work K over K and P over P and band sts in garter st. Continue as follows (seen from from RS): 6 sts in garter st, [diagram A-1 (= 24 sts), P 14-13-12], repeat from [-] 6-8-10 more times, A-1 and 6 sts in garter st. Insert a marker after 75-92-108 sts in from each side (= 152-185-216 sts between markers on back piece). REMEMBER THE GAUGE! When piece measures approx. 5-7-9 cm / 2"-2¾"-3½" (adjust so that next row is worked from RS), dec 1 st in every P-section by P the first 2 sts tog (i.e. dec 7-9-11 sts on row). Repeat dec every 6th row 11-10-9 more times – NOTE: Dec alternately at the end and beg of every P-section. AT THE SAME TIME when piece measures 7-8-9 cm / 2¾"-3⅛"-3½", bind off for BUTTONHOLES - see explanation above. After all dec in P-sections, 218-270-322 sts remain on needle and only 2 P sts between every A-1 (piece now measures approx. 29 cm / 11½"). Continue until piece measures approx. 33-35-36 cm / 13"-13¾"-14¼" (adjust so that next row is worked from RS), now inc 1 st in every P-section by making 1 YO after last P st in every P-section, on next row (from WS) K YOs twisted to avoid holes. Repeat inc every 6th row 3-2-2 more times – NOTE: Inc alternately before and after all P sts by making 1 YO. When all inc are done, there are 6-5-5 P sts in every P-section and 246-297-355 sts in total on needle. READ UNTIL LEFT FRONT PIECE BEFORE CONTINUING! COLLAR: When piece measures 41-42-43 cm / 16⅛"-16½"-17", inc 1 st in each side towards mid front for collar - SEE INCREASE TIP. Repeat inc every other row 11 more times and then every 4th row 6 times = 18 sts inc for collar and 24 sts in garter st in total. NECKLINE: At the same time, 2 cm / ¾" after beg inc for collar, dec 1 st in each side for neck - SEE DECREASE TIP. Repeat dec every other row 5 more times and then every 4th row 6 times (i.e. half of A-1 in each side has been dec, continue with K 2 in the middle of diagram where there used to be a cable over 4 sts). ARMHOLES: At the same time when piece measures approx. 51-52-53 cm / 20"-20½"-21" (make sure that next row is worked from RS), bind off for armholes as follows: Size S/M and L/XL: bind off 6 sts in the side (i.e. 3 sts on each side of markers in the sides). SIZE XXL/XXXL: bind off 7 sts in the side, i.e. the 5 P sts where marker is + 1 st on each side of these. Finish each part separately. LEFT FRONT PIECE: Then bind off for armhole at beg of every row from the side: 3 sts 0-1-3 times, 2 sts 3-3-4 times and 1 st 5-4-6 times. After all bind offs for armhole, dec for neck and inc for collar, 55-66-70 sts remain on shoulder. There is now ½ repetition of A-1 towards the neck before collar in all sizes, there is also ½ repetition towards the armhole in the smallest size. Continue the pattern as before with 1 edge st in garter st towards armhole. When piece measures approx. 70-73-76 cm / 27½"-28¾"-30", stop after one whole or half repetition of A-1 vertically, dec 3 sts evenly over the half repetitions and 6 sts evenly over the whole ones (i.e. dec 6-9-9 sts in total) = 49-57-61 sts. On next row from RS, bind off the first 25-33-37 sts for shoulder, K the last 24 sts in garter st. Then work back and forth in garter st over these sts for collar as follows: * 2 rows over all sts, 2 rows over only the outermost 18 sts (towards mid front) *, repeat from *-* until collar measures approx. 5½ cm / 2¼" at the inside on the most narrow part, bind off. RIGHT FRONT PIECE: Work as left front piece but reversed. After sts for shoulder have been bound off (from RS so that same no of rows have been worked on both front pieces), cut the yarn at the end of row. Continue working the collar starting from WS. BACK PIECE: = 114-139-167 sts. Continue to bind off for armholes at beg of every row in each side as on front piece = 92-113-121 sts. Continue the pattern with 1 edge st in garter st in each side. When piece measures approx. 68-71-74 cm / 26¾"-28"-29" (make sure that last row worked is 1 of the rows marked with 1 arrow in diagram), then on next row (= RS), bind off the middle 24-23-23 sts for neck, work the rest of row, finish each shoulder separately in pattern. LEFT SHOULDER: Work 1 row from WS, bind off 2 sts at beg of next row (= towards neck) = 32-43-47 sts. K 1 row from WS. On next row (= RS), dec 3 sts evenly over the half repetitions of A-1 and 6 sts evenly over the whole repetitions of A-1 (i.e. dec 6-9-9 sts in total) = 26-34-38 sts. Bind off on next row (= WS). There is 1 st more on shoulder on back piece than on front piece, this is because the collar is to be sewn inside 1 st on back piece. RIGHT SHOULDER: Beg mid back, i.e. from WS, bind off 2 sts at beg of row (= 32-43-47 sts remain on shoulder). Work 1 row from RS and 1 row from WS. On next row (= RS), dec 3 sts evenly over the half repetitions of A-1 and 6 sts evenly over the whole repetitions of A-1 (i.e. dec 6-9-9 sts in total) = 26-34-38 sts. Bind off on next row (= WS). SLEEVE: First work the cuff sideways, back and forth on circular needle. CUFF: Cast on 22 sts on needle size 4 mm / US 6 with Lima. K 1 row from WS. Work next row as follows: 1 st in GARTER ST – see explanation above, * P 2, K 2 in each of the next 2 sts (= K 4), P 2 *, repeat from *-* 2 more times, finish with 3 sts in garter st = 28 sts. Work 1 row from WS with K over K and P over P with 1 st in garter st in one side and 3 sts in garter st in the other side. Continue with A-1 until 4-4-5 repetitions have been worked vertically, then work the first 2 rows in A-1 one more time (piece measures approx. 24-24-30 cm / 9½"-9½"-11¾"). Work next row as follows (= RS): 1 st in garter st, * P 2, K 2 tog, K 2 tog, P 2 *, repeat from *-* 2 more times, finish with 3 sts in garter st = 22 sts. K 1 row from WS over all sts, then bind off. Edge is approx. 10 cm / 4" wide, continue with sleeve. SLEEVE: Worked back and forth on circular needle size 4 mm / US 6. Pick up along the edge where there is only 1 garter st - pick up 1 st in every ridge (= 2 K rows). K 1 row from WS while at the same time adjusting no of sts to 52-54-62. Then K 1 row from RS, the continue in reverse stockinette st. When piece measures 15 cm / 6" in total, inc 1 st in each side. Repeat inc every 3-2-2 cm / 1⅛"-¾"-¾", 10-13-13 more times = 74-82-90 sts. When piece measures 48-45-43 cm / 19"-17¾"-17" (shorter measurements in the larger sizes because of longer sleeve cap and wider shoulders), bind off for sleeve cap at beg of every row in each side: 4 sts 1 time, 2 sts 3 times and 1 st 6-7-9 times, then bind off 2 sts in each side until piece measures 57-55-54 cm / 22½"-21½"-21¼", now bind off 3 sts 1 time in each side. Bind off the remaining sts, piece measures approx. 58-56-55 cm / 22¾"-22"-21½". ASSEMBLY: Sew the shoulder seams. Sew collar tog mid back and sew it on to neck line inside 1 edge st. Sew sleeve seams – sew cuff edge to edge (cast on edge against bind off edge) to avoid a chunky seam, sew the rest of sleeve inside 1 edge st. Sew sleeves in body and sew on buttons. |
|||||||||||||||||||||||||
Diagram explanations |
|||||||||||||||||||||||||
|
|||||||||||||||||||||||||
 |
|||||||||||||||||||||||||
 |
|||||||||||||||||||||||||
Have you finished this pattern?Tag your pictures with #dropspattern #celticacardigan or submit them to the #dropsfan gallery. Do you need help with this pattern?You'll find 16 tutorial videos, a Comments/Questions area and more by visiting the pattern on garnstudio.com. © 1982-2026 DROPS Design A/S. We reserve all rights. This document, including all its sub-sections, has copyrights. Read more about what you can do with our patterns at the bottom of each pattern on our site. |
|||||||||||||||||||||||||


With over 40 years in knitting and crochet design, DROPS Design offers one of the most extensive collections of free patterns on the internet - translated to 17 languages. As of today we count 324 catalogs and 12290 patterns - 12280 of which are translated into English (US/in).
We work hard to bring you the best knitting and crochet have to offer, inspiration and advice as well as great quality yarns at incredible prices! Would you like to use our patterns for other than personal use? You can read what you are allowed to do in the Copyright text at the bottom of all our patterns. Happy crafting!
Post a comment to pattern DROPS 143-1
We would love to hear what you have to say about this pattern!
If you want to leave a question, please make sure you select the correct category in the form below, to speed up the answering process. Required fields are marked *.