
Popular categories
Looking for a yarn?


Comments / Questions (474)
![]() Deni wrote:
Deni wrote:
In collar section for neckline, how many stitches do you have before starting neckline for XXXL size? It would help if there could be number of stitches in each new part of pattern. Thank you.
20.12.2019 - 18:29DROPS Design answered:
Dear Deni, you start inc for collar when piece measures 43 cm and repeat these increases first every 2nd row then every 4th row and after 2 cm you start decreasing for neck, the number of sts for band/collar will depenb ond how many rows you need to knit 2 cm - this is the reason why there is no number of stitches given at this step. Just continue increase for collar as explained and start decreasing for neck 2 cm after 1st inc for collar. Happy knitting!
02.01.2020 - 09:11
![]() Marie wrote:
Marie wrote:
Ne faudrait-il pas faire des rangs raccourcis sur les bordures au point mousse devant afin que celles-ci ne "tirent" pas ?
09.09.2019 - 09:32DROPS Design answered:
Bonjour Marie, elles ne sont pas prévues dans ce modèle, mais si vous voyez que vos bordures devant contractent trop l'ouvrage en hauteur, vous pouvez en faire. Bon tricot!
09.09.2019 - 11:47
![]() Blanca Sanchez Canchari wrote:
Blanca Sanchez Canchari wrote:
Hola, es un hermoso trabajo, me gustaría saber si tiene un explicación por vídeo, o una imagen más clara donde se ve el aumento, la disminución, etc. Gracias, un fuerte abrazo desde el Perú
06.09.2019 - 00:09DROPS Design answered:
Hola Blanca. Tienes varios vídeos explicativos bajo el patrón. Para obtener más ayuda contacta con la tienda DROPS más cercana.
27.10.2019 - 20:50
![]() Bente Danielsen wrote:
Bente Danielsen wrote:
Hei! Jeg forstår ikke hva jeg skal gjøre når jeg har felt de ytterste 37 maskene (xxl) på skulderen. Da har jeg igjen mange masker før de 24 rillemaskene. Hvordan skal dette gjøres?
13.08.2019 - 18:56DROPS Design answered:
Hei Bente. Du har 61 masker på pinnen når du skal felle 37 masker, du har da 24 masker igjen på pinnen. Disse maskene strikkes i riller, les krage under Venste forstykke. God Fornøyelse!
23.09.2019 - 10:03
![]() Coraline wrote:
Coraline wrote:
Un grand merci !!!!
23.07.2019 - 18:16
![]() Coraline wrote:
Coraline wrote:
Bonjour , est ce qu’il faut tricoter en allers et retours sur aiguille circulaire en utilisant 2 aiguilles circulaires ou une seule ?
23.07.2019 - 15:49DROPS Design answered:
Bonjour Coraline! Une seule aiguille circulaire est suffisante. Comment tricoter en allers et retours sur aiguille circulaire vous trouverez ICI. Bon tricot!
23.07.2019 - 18:11
![]() Nathalie wrote:
Nathalie wrote:
Hi, I'm working on the LEFT FRONT - When you say STOP after one whole or half repetition does this mean the decreases are done on RS row 9 or 1? Then you work the WS row and then you BO 33 sts on RS row? When piece measures approx. 28 3/4", stop after one whole or half repetition of A-1 vertically, dec 3 sts evenly over the half repetitions and 6 sts evenly over the whole ones (i.e. dec 6-9-9 sts in total) = 49-57-61 sts. On next row from RS, bind off the first 25-33 sts.
19.07.2019 - 13:03DROPS Design answered:
Dear Nathalie, you should stop A.1 with either last row in diagram or after half the rows, ie either on last row in diagram or on row 10 (= from WS) so that next row is worked from RS. Happy knitting!
05.08.2019 - 16:16
![]() Coraline wrote:
Coraline wrote:
Bonjour , je ne comprends pas ce passage : Relever les mailles le long du côté où il n'y a qu'une seule m au point mousse (= 2 rangs end) - relever 1 m dans chaque côte mousse (= tous les 2 rangs end). Merci
18.07.2019 - 19:46DROPS Design answered:
Bonjour Coraline, vous relevez les mailles le long du côté du poignet avec 1 m lisière au point mousse (les 3 m point mousse = bordure du bas de la manche), en relevant 1 m dans chaque côte mousse, sachant qu'1 côte mousse correspond à 2 rangs endroit du poignet (= 1 rang sur l'endroit + 1 rang sur l'envers). Bon tricot!
19.07.2019 - 08:00
![]() Corry wrote:
Corry wrote:
Brei recht boven recht en averecht boven averecht. Houdt dit in dat je een soort ribbel krijgt? Dus niet breien zoals de steken zich voordoen?
25.06.2019 - 15:36DROPS Design answered:
Dag Corry,
Hiermee wordt inderdaad bedoeld dat je de steken breit zoals ze zich voordoen, dus je breit recht waar de steek op de vorige naald ook recht was gebreid en averecht waar de steek op de vorige naald ook averecht was gebreid.
27.06.2019 - 13:01
![]() Eileen Hunkins wrote:
Eileen Hunkins wrote:
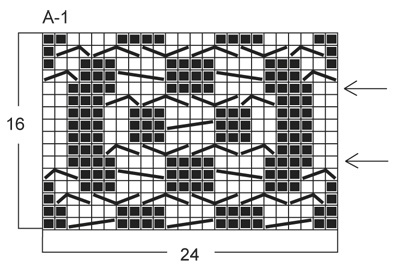
I tried to figure out your pattern and I come to the conclusion, I am not use to your pattern techniques. I am educated in the rows being numbered and the pattern for each numbered row. A-1Diagram has 16 rows and 24 accross. How does this pattern diagram fit into any of your instructions, the total 16x24=384 stitches. Too many stitches for the sizes. Does RS and WS mean Right side and Wrong side.
28.04.2019 - 23:51DROPS Design answered:
Dear Mrs Hunkins, you will find here how to read diagrams - A.1 is worked over 24 sts - see written pattern to see when you will work diagram for your size. Happy knitting!
29.04.2019 - 11:25
|
|||||||||||||||||||||||||
Celtica#celticacardigan |
|||||||||||||||||||||||||
 |
 |
||||||||||||||||||||||||
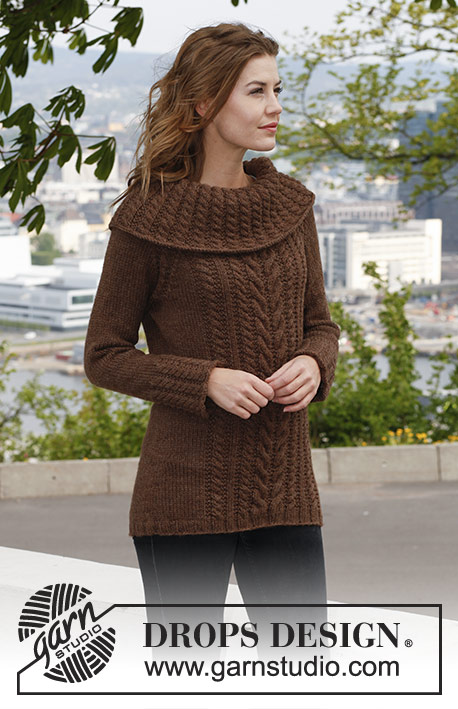
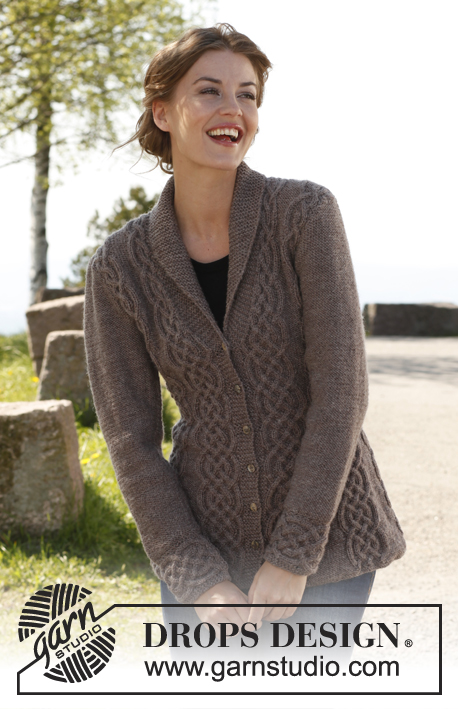
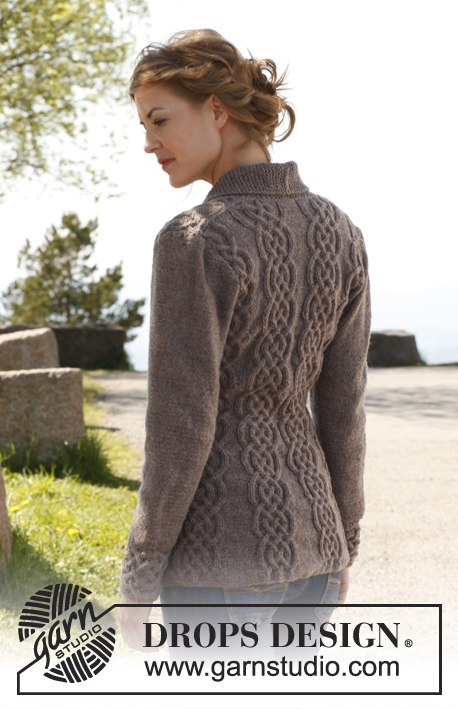
Knitted DROPS fitted jacket with cables and shawl collar in ”Lima”. Size: S - XXXL.
DROPS 143-1 |
|||||||||||||||||||||||||
|
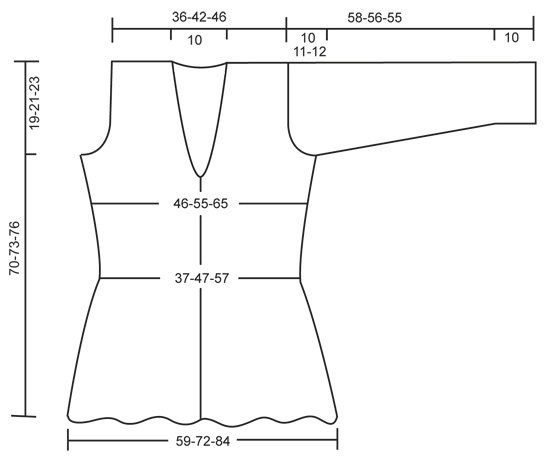
GARTER ST (back and forth on needle): K sts on all rows. 1 ridge = 2 K rows. PATTERN: See diagram A-1, diagram shows pattern from RS. First row = RS. BUTTONHOLES: bind off for buttonholes on right band. 1 buttonhole = K 3rd and 4th st from mid front tog and make 1 YO. Bind off for buttonholes when piece measures: SIZE S/M: 7, 14, 21, 28, 35 and 42 cm / 2¾", 5½", 8¼", 11", 13¾" and 16½". SIZE L/XL: 8, 15, 22, 29, 36 and 43 cm / 3⅛", 6", 8¾", 11⅜", 14¼" and 17". SIZE XXL/XXXL: 9, 16, 23, 30, 37 and 44 cm / 3½", 6¼", 9", 11¾", 14½" and 17¼". INCREASE TIP (applies to collar): Inc by making 1 YO inside outermost st - on next row K YO twisted to avoid holes. DECREASE TIP (applies to neck): Dec for neck inside all sts in garter st (i.e. band + the sts inc for collar). All dec are done from RS! Dec as follows AFTER sts in garter st: Slip 1 st as if to K, K 1, psso. Dec as follows BEFORE sts in garter st: K 2 tog. On all WS rows P sts after/before sts in garter st while dec. -------------------------------------------------------- BODY: Worked back and forth on circular needle from mid front. Cast on 254-309-360 sts (includes 6 band sts in each side towards mid front) on circular needle size 4 mm / US 6 with Lima. K 5 rows (1st row = WS). Then work as follows (seen from RS): 6 band sts in GARTER ST – see explanation above, [* P 2, K 2 in each of the next 2 sts (= K 4), P 2 *, repeat from *-* 2 more times, P 14-13-12], repeat from [-] 6-8-10 more times, then from *-* 3 more times and 6 band sts in garter st = 302-369-432 sts. Work K over K and P over P and band sts in garter st. Continue as follows (seen from from RS): 6 sts in garter st, [diagram A-1 (= 24 sts), P 14-13-12], repeat from [-] 6-8-10 more times, A-1 and 6 sts in garter st. Insert a marker after 75-92-108 sts in from each side (= 152-185-216 sts between markers on back piece). REMEMBER THE GAUGE! When piece measures approx. 5-7-9 cm / 2"-2¾"-3½" (adjust so that next row is worked from RS), dec 1 st in every P-section by P the first 2 sts tog (i.e. dec 7-9-11 sts on row). Repeat dec every 6th row 11-10-9 more times – NOTE: Dec alternately at the end and beg of every P-section. AT THE SAME TIME when piece measures 7-8-9 cm / 2¾"-3⅛"-3½", bind off for BUTTONHOLES - see explanation above. After all dec in P-sections, 218-270-322 sts remain on needle and only 2 P sts between every A-1 (piece now measures approx. 29 cm / 11½"). Continue until piece measures approx. 33-35-36 cm / 13"-13¾"-14¼" (adjust so that next row is worked from RS), now inc 1 st in every P-section by making 1 YO after last P st in every P-section, on next row (from WS) K YOs twisted to avoid holes. Repeat inc every 6th row 3-2-2 more times – NOTE: Inc alternately before and after all P sts by making 1 YO. When all inc are done, there are 6-5-5 P sts in every P-section and 246-297-355 sts in total on needle. READ UNTIL LEFT FRONT PIECE BEFORE CONTINUING! COLLAR: When piece measures 41-42-43 cm / 16⅛"-16½"-17", inc 1 st in each side towards mid front for collar - SEE INCREASE TIP. Repeat inc every other row 11 more times and then every 4th row 6 times = 18 sts inc for collar and 24 sts in garter st in total. NECKLINE: At the same time, 2 cm / ¾" after beg inc for collar, dec 1 st in each side for neck - SEE DECREASE TIP. Repeat dec every other row 5 more times and then every 4th row 6 times (i.e. half of A-1 in each side has been dec, continue with K 2 in the middle of diagram where there used to be a cable over 4 sts). ARMHOLES: At the same time when piece measures approx. 51-52-53 cm / 20"-20½"-21" (make sure that next row is worked from RS), bind off for armholes as follows: Size S/M and L/XL: bind off 6 sts in the side (i.e. 3 sts on each side of markers in the sides). SIZE XXL/XXXL: bind off 7 sts in the side, i.e. the 5 P sts where marker is + 1 st on each side of these. Finish each part separately. LEFT FRONT PIECE: Then bind off for armhole at beg of every row from the side: 3 sts 0-1-3 times, 2 sts 3-3-4 times and 1 st 5-4-6 times. After all bind offs for armhole, dec for neck and inc for collar, 55-66-70 sts remain on shoulder. There is now ½ repetition of A-1 towards the neck before collar in all sizes, there is also ½ repetition towards the armhole in the smallest size. Continue the pattern as before with 1 edge st in garter st towards armhole. When piece measures approx. 70-73-76 cm / 27½"-28¾"-30", stop after one whole or half repetition of A-1 vertically, dec 3 sts evenly over the half repetitions and 6 sts evenly over the whole ones (i.e. dec 6-9-9 sts in total) = 49-57-61 sts. On next row from RS, bind off the first 25-33-37 sts for shoulder, K the last 24 sts in garter st. Then work back and forth in garter st over these sts for collar as follows: * 2 rows over all sts, 2 rows over only the outermost 18 sts (towards mid front) *, repeat from *-* until collar measures approx. 5½ cm / 2¼" at the inside on the most narrow part, bind off. RIGHT FRONT PIECE: Work as left front piece but reversed. After sts for shoulder have been bound off (from RS so that same no of rows have been worked on both front pieces), cut the yarn at the end of row. Continue working the collar starting from WS. BACK PIECE: = 114-139-167 sts. Continue to bind off for armholes at beg of every row in each side as on front piece = 92-113-121 sts. Continue the pattern with 1 edge st in garter st in each side. When piece measures approx. 68-71-74 cm / 26¾"-28"-29" (make sure that last row worked is 1 of the rows marked with 1 arrow in diagram), then on next row (= RS), bind off the middle 24-23-23 sts for neck, work the rest of row, finish each shoulder separately in pattern. LEFT SHOULDER: Work 1 row from WS, bind off 2 sts at beg of next row (= towards neck) = 32-43-47 sts. K 1 row from WS. On next row (= RS), dec 3 sts evenly over the half repetitions of A-1 and 6 sts evenly over the whole repetitions of A-1 (i.e. dec 6-9-9 sts in total) = 26-34-38 sts. Bind off on next row (= WS). There is 1 st more on shoulder on back piece than on front piece, this is because the collar is to be sewn inside 1 st on back piece. RIGHT SHOULDER: Beg mid back, i.e. from WS, bind off 2 sts at beg of row (= 32-43-47 sts remain on shoulder). Work 1 row from RS and 1 row from WS. On next row (= RS), dec 3 sts evenly over the half repetitions of A-1 and 6 sts evenly over the whole repetitions of A-1 (i.e. dec 6-9-9 sts in total) = 26-34-38 sts. Bind off on next row (= WS). SLEEVE: First work the cuff sideways, back and forth on circular needle. CUFF: Cast on 22 sts on needle size 4 mm / US 6 with Lima. K 1 row from WS. Work next row as follows: 1 st in GARTER ST – see explanation above, * P 2, K 2 in each of the next 2 sts (= K 4), P 2 *, repeat from *-* 2 more times, finish with 3 sts in garter st = 28 sts. Work 1 row from WS with K over K and P over P with 1 st in garter st in one side and 3 sts in garter st in the other side. Continue with A-1 until 4-4-5 repetitions have been worked vertically, then work the first 2 rows in A-1 one more time (piece measures approx. 24-24-30 cm / 9½"-9½"-11¾"). Work next row as follows (= RS): 1 st in garter st, * P 2, K 2 tog, K 2 tog, P 2 *, repeat from *-* 2 more times, finish with 3 sts in garter st = 22 sts. K 1 row from WS over all sts, then bind off. Edge is approx. 10 cm / 4" wide, continue with sleeve. SLEEVE: Worked back and forth on circular needle size 4 mm / US 6. Pick up along the edge where there is only 1 garter st - pick up 1 st in every ridge (= 2 K rows). K 1 row from WS while at the same time adjusting no of sts to 52-54-62. Then K 1 row from RS, the continue in reverse stockinette st. When piece measures 15 cm / 6" in total, inc 1 st in each side. Repeat inc every 3-2-2 cm / 1⅛"-¾"-¾", 10-13-13 more times = 74-82-90 sts. When piece measures 48-45-43 cm / 19"-17¾"-17" (shorter measurements in the larger sizes because of longer sleeve cap and wider shoulders), bind off for sleeve cap at beg of every row in each side: 4 sts 1 time, 2 sts 3 times and 1 st 6-7-9 times, then bind off 2 sts in each side until piece measures 57-55-54 cm / 22½"-21½"-21¼", now bind off 3 sts 1 time in each side. Bind off the remaining sts, piece measures approx. 58-56-55 cm / 22¾"-22"-21½". ASSEMBLY: Sew the shoulder seams. Sew collar tog mid back and sew it on to neck line inside 1 edge st. Sew sleeve seams – sew cuff edge to edge (cast on edge against bind off edge) to avoid a chunky seam, sew the rest of sleeve inside 1 edge st. Sew sleeves in body and sew on buttons. |
|||||||||||||||||||||||||
Diagram explanations |
|||||||||||||||||||||||||
|
|||||||||||||||||||||||||
 |
|||||||||||||||||||||||||
 |
|||||||||||||||||||||||||
Have you finished this pattern?Tag your pictures with #dropspattern #celticacardigan or submit them to the #dropsfan gallery. Do you need help with this pattern?You'll find 16 tutorial videos, a Comments/Questions area and more by visiting the pattern on garnstudio.com. © 1982-2026 DROPS Design A/S. We reserve all rights. This document, including all its sub-sections, has copyrights. Read more about what you can do with our patterns at the bottom of each pattern on our site. |
|||||||||||||||||||||||||


With over 40 years in knitting and crochet design, DROPS Design offers one of the most extensive collections of free patterns on the internet - translated to 17 languages. As of today we count 324 catalogs and 12290 patterns - 12280 of which are translated into English (US/in).
We work hard to bring you the best knitting and crochet have to offer, inspiration and advice as well as great quality yarns at incredible prices! Would you like to use our patterns for other than personal use? You can read what you are allowed to do in the Copyright text at the bottom of all our patterns. Happy crafting!
Post a comment to pattern DROPS 143-1
We would love to hear what you have to say about this pattern!
If you want to leave a question, please make sure you select the correct category in the form below, to speed up the answering process. Required fields are marked *.