
Popular categories
Looking for a yarn?


Comments / Questions (474)
![]() Anne wrote:
Anne wrote:
Jeg kan ikke få maskerne til at blive fra 254 til 302,kan det forklares bedre og ellers en skøn trøje
24.10.2013 - 09:42DROPS Design answered:
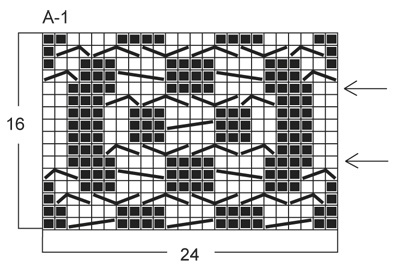
Hej Anne. Du strikker [* 2 vr, strik 2 r i hver af de 2 næste m (= 4 r), 2 vr *, gentag fra *-* 2 GANGE TIL, 14 vr], gentag fra [-] 6 gange til, derefter fra *-* 3 gange til og 6 kantm i retstrik. Det er vigtigt du husker at gentage de to gange til som jeg har skrevet i fed.
24.10.2013 - 11:53
![]() Anne Løgsted wrote:
Anne Løgsted wrote:
Jeg kan ikke få maskerne til at blive til 302 fra starten, kan det forklares bedre.
24.10.2013 - 09:33Oceane wrote:
Hi, thanks for the answer about the diagram but i still no understand witch way i have to read the little symbole inside the diagram. Do i have to read them by group of 3 or 4 sts like the legend or do i have to revers them like if i read them sts by sts
23.10.2013 - 05:56DROPS Design answered:
Dear Oceane, follow the diagram text as stated above chart, and work the sts as stated under that text, ie for 3rd symbol, work over these sts : slip 1 st on cable needle behind piece, K 2, P 1 from cable needle. When you see 4th symbol in diag, just work on the 3 sts as stated under text and so on. 1 white square = St st, 1 black square= reverse stockinette. Happy knitting!
23.10.2013 - 09:07
![]() DROPS NL wrote:
DROPS NL wrote:
Hallo Annette, het maakt niet uit of je aan de goede of aan de verkeerde kant mindert. Als het uitmaakt, dan geven we het specifiek aan. Hetzelfde geldt voor de steken, recht of averecht. Het gaat erom dat je st mindert zodat de afkantrand niet te los wordt (door de kabel heb je extra steken).
21.10.2013 - 15:55Oceane wrote:
Hi' i don t understand how read the diagram Left to right? Up to down? Thanks
21.10.2013 - 00:56DROPS Design answered:
Dear Oceane, in the diag. 1 square=1st x 1 row. Start reading diag at the bottom corner on the right side towards links for RS rows, and from the left towards right for WS rows. (1st row=RS). Happy knitting!
21.10.2013 - 14:12
![]() Annette wrote:
Annette wrote:
Hallo, ik heb een vraag over het gelijkmatig minderen over de patroonherhalingen bij 70 cm ( kleinste maat). Moeten deze minderingen op de goede kant gemaakt worden? Vervolgens is mijn vraag of deze minderingen alleen over de rechte steken gemaakt moeten worden of ook over de averechte steken? Moet ik de volgende naald op de verkeerde kant breien zoals de steken zich voordoen? En moet ik de steken bij het afkanten ook breien zoals ze zich voordoen of allemaal recht? M.vr.gr. Annette
18.10.2013 - 10:44
![]() Annette wrote:
Annette wrote:
Hallo, ik ben dit vest met veel plezier aan het breien, maar ik heb een vraag/opmerking over de meerderingen voor de sjaalkraag. Moeten deze aan de goede of verkeerde kant van het werk gemaakt worden? Ik ben net begonnen ze aan de goede kant van het werk te maken, maar de kraag wordt omgeslagen en dan komt de verkeerde kant van het werk aan de buitenkant. Ik vind de meerderingen er dan niet zo mooi uitzien. Hoe kan ik dit oplossen? M.vr.gr. Annebet Meijer
14.10.2013 - 10:05DROPS Design answered:
Hoi Annebet. Je maakt de meerderingen (de omslagen) op de goede kant. In de volgende nld (de verkeerde kant) brei je de omslagen verdraait rechts. Maar je kan natuurlijk altijd meerderen op een andere manier als je dat prettiger en mooier vindt. En vaak gaan de steken ook veel mooier liggen als je het model hebt gewassen.
15.10.2013 - 13:46
![]() Andrea Blümel wrote:
Andrea Blümel wrote:
Hallo liebes Drops Team! Erstmal danke für die letzte schnelle Antwort! Habe leider wieder ein Problem: Die Abnahme für Ausschnitt ist soweit klar, aber wie muss ich das Muster danach weiter stricken?
11.10.2013 - 11:58DROPS Design answered:
Liebe Andrea, haben Sie folgende Stelle gelesen:"die Hälfte von A-1 wird abgenommen; dort, wo zuvor ein Zopf über 4 M war - in der Mitte des Musters - nun mit 2 M re weiterstricken"? Es wird also insgesamt die Hälfte von A1 abgenommen, die verbleibenden Maschen werden weiter im Muster gestrickt wie beschrieben.
12.10.2013 - 08:52
![]() Stella wrote:
Stella wrote:
What do the S/M - L/XL sizes mean in actual measurements please - either inches or centimetres will do :-)
25.09.2013 - 18:37DROPS Design answered:
Dear Stella, have a look on the measurement chart at the bottom of the page, measures are given in cm from side to side and will help you to find the correct size. Compare to any similar garment you like. Happy knitting!
26.09.2013 - 09:07
![]() Kathrin wrote:
Kathrin wrote:
Hallo, habe das 1.Muster wieder auftrennen müssen, da sich das Keltenmuster nicht ergab. Von welcher Seite aus wird das Muster gelesen?
23.09.2013 - 12:44DROPS Design answered:
Liebe Kathrin, es sind alle Reihen abgebildet und Sie beginnen in der rechten unteren Ecke das Muster zu lesen.
24.09.2013 - 09:21
|
|||||||||||||||||||||||||
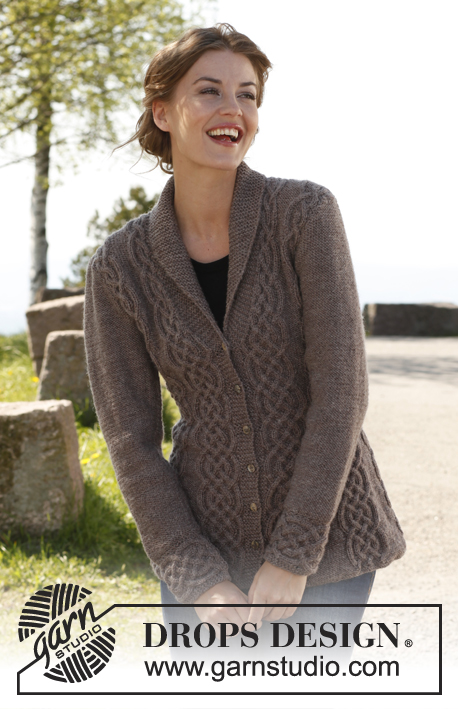
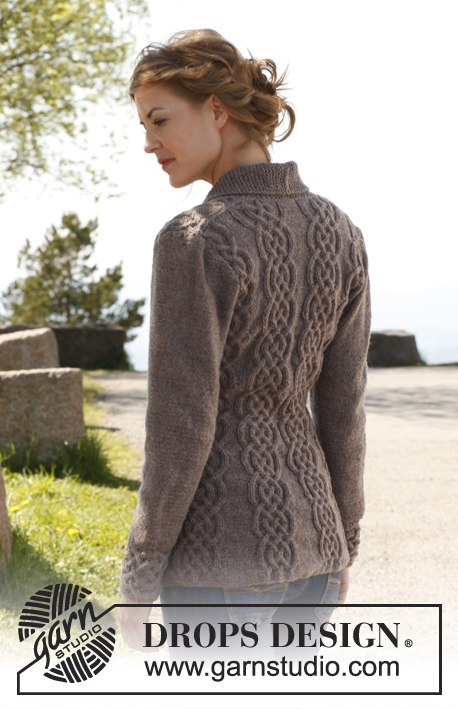
Celtica#celticacardigan |
|||||||||||||||||||||||||
 |
 |
||||||||||||||||||||||||
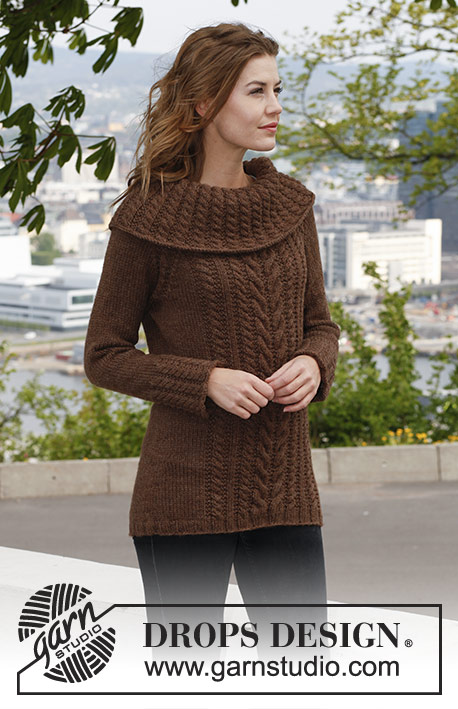
Knitted DROPS fitted jacket with cables and shawl collar in ”Lima”. Size: S - XXXL.
DROPS 143-1 |
|||||||||||||||||||||||||
|
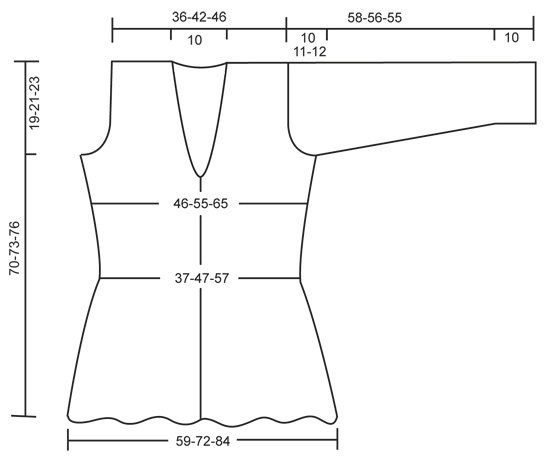
GARTER ST (back and forth on needle): K sts on all rows. 1 ridge = 2 K rows. PATTERN: See diagram A-1, diagram shows pattern from RS. First row = RS. BUTTONHOLES: bind off for buttonholes on right band. 1 buttonhole = K 3rd and 4th st from mid front tog and make 1 YO. Bind off for buttonholes when piece measures: SIZE S/M: 7, 14, 21, 28, 35 and 42 cm / 2¾", 5½", 8¼", 11", 13¾" and 16½". SIZE L/XL: 8, 15, 22, 29, 36 and 43 cm / 3⅛", 6", 8¾", 11⅜", 14¼" and 17". SIZE XXL/XXXL: 9, 16, 23, 30, 37 and 44 cm / 3½", 6¼", 9", 11¾", 14½" and 17¼". INCREASE TIP (applies to collar): Inc by making 1 YO inside outermost st - on next row K YO twisted to avoid holes. DECREASE TIP (applies to neck): Dec for neck inside all sts in garter st (i.e. band + the sts inc for collar). All dec are done from RS! Dec as follows AFTER sts in garter st: Slip 1 st as if to K, K 1, psso. Dec as follows BEFORE sts in garter st: K 2 tog. On all WS rows P sts after/before sts in garter st while dec. -------------------------------------------------------- BODY: Worked back and forth on circular needle from mid front. Cast on 254-309-360 sts (includes 6 band sts in each side towards mid front) on circular needle size 4 mm / US 6 with Lima. K 5 rows (1st row = WS). Then work as follows (seen from RS): 6 band sts in GARTER ST – see explanation above, [* P 2, K 2 in each of the next 2 sts (= K 4), P 2 *, repeat from *-* 2 more times, P 14-13-12], repeat from [-] 6-8-10 more times, then from *-* 3 more times and 6 band sts in garter st = 302-369-432 sts. Work K over K and P over P and band sts in garter st. Continue as follows (seen from from RS): 6 sts in garter st, [diagram A-1 (= 24 sts), P 14-13-12], repeat from [-] 6-8-10 more times, A-1 and 6 sts in garter st. Insert a marker after 75-92-108 sts in from each side (= 152-185-216 sts between markers on back piece). REMEMBER THE GAUGE! When piece measures approx. 5-7-9 cm / 2"-2¾"-3½" (adjust so that next row is worked from RS), dec 1 st in every P-section by P the first 2 sts tog (i.e. dec 7-9-11 sts on row). Repeat dec every 6th row 11-10-9 more times – NOTE: Dec alternately at the end and beg of every P-section. AT THE SAME TIME when piece measures 7-8-9 cm / 2¾"-3⅛"-3½", bind off for BUTTONHOLES - see explanation above. After all dec in P-sections, 218-270-322 sts remain on needle and only 2 P sts between every A-1 (piece now measures approx. 29 cm / 11½"). Continue until piece measures approx. 33-35-36 cm / 13"-13¾"-14¼" (adjust so that next row is worked from RS), now inc 1 st in every P-section by making 1 YO after last P st in every P-section, on next row (from WS) K YOs twisted to avoid holes. Repeat inc every 6th row 3-2-2 more times – NOTE: Inc alternately before and after all P sts by making 1 YO. When all inc are done, there are 6-5-5 P sts in every P-section and 246-297-355 sts in total on needle. READ UNTIL LEFT FRONT PIECE BEFORE CONTINUING! COLLAR: When piece measures 41-42-43 cm / 16⅛"-16½"-17", inc 1 st in each side towards mid front for collar - SEE INCREASE TIP. Repeat inc every other row 11 more times and then every 4th row 6 times = 18 sts inc for collar and 24 sts in garter st in total. NECKLINE: At the same time, 2 cm / ¾" after beg inc for collar, dec 1 st in each side for neck - SEE DECREASE TIP. Repeat dec every other row 5 more times and then every 4th row 6 times (i.e. half of A-1 in each side has been dec, continue with K 2 in the middle of diagram where there used to be a cable over 4 sts). ARMHOLES: At the same time when piece measures approx. 51-52-53 cm / 20"-20½"-21" (make sure that next row is worked from RS), bind off for armholes as follows: Size S/M and L/XL: bind off 6 sts in the side (i.e. 3 sts on each side of markers in the sides). SIZE XXL/XXXL: bind off 7 sts in the side, i.e. the 5 P sts where marker is + 1 st on each side of these. Finish each part separately. LEFT FRONT PIECE: Then bind off for armhole at beg of every row from the side: 3 sts 0-1-3 times, 2 sts 3-3-4 times and 1 st 5-4-6 times. After all bind offs for armhole, dec for neck and inc for collar, 55-66-70 sts remain on shoulder. There is now ½ repetition of A-1 towards the neck before collar in all sizes, there is also ½ repetition towards the armhole in the smallest size. Continue the pattern as before with 1 edge st in garter st towards armhole. When piece measures approx. 70-73-76 cm / 27½"-28¾"-30", stop after one whole or half repetition of A-1 vertically, dec 3 sts evenly over the half repetitions and 6 sts evenly over the whole ones (i.e. dec 6-9-9 sts in total) = 49-57-61 sts. On next row from RS, bind off the first 25-33-37 sts for shoulder, K the last 24 sts in garter st. Then work back and forth in garter st over these sts for collar as follows: * 2 rows over all sts, 2 rows over only the outermost 18 sts (towards mid front) *, repeat from *-* until collar measures approx. 5½ cm / 2¼" at the inside on the most narrow part, bind off. RIGHT FRONT PIECE: Work as left front piece but reversed. After sts for shoulder have been bound off (from RS so that same no of rows have been worked on both front pieces), cut the yarn at the end of row. Continue working the collar starting from WS. BACK PIECE: = 114-139-167 sts. Continue to bind off for armholes at beg of every row in each side as on front piece = 92-113-121 sts. Continue the pattern with 1 edge st in garter st in each side. When piece measures approx. 68-71-74 cm / 26¾"-28"-29" (make sure that last row worked is 1 of the rows marked with 1 arrow in diagram), then on next row (= RS), bind off the middle 24-23-23 sts for neck, work the rest of row, finish each shoulder separately in pattern. LEFT SHOULDER: Work 1 row from WS, bind off 2 sts at beg of next row (= towards neck) = 32-43-47 sts. K 1 row from WS. On next row (= RS), dec 3 sts evenly over the half repetitions of A-1 and 6 sts evenly over the whole repetitions of A-1 (i.e. dec 6-9-9 sts in total) = 26-34-38 sts. Bind off on next row (= WS). There is 1 st more on shoulder on back piece than on front piece, this is because the collar is to be sewn inside 1 st on back piece. RIGHT SHOULDER: Beg mid back, i.e. from WS, bind off 2 sts at beg of row (= 32-43-47 sts remain on shoulder). Work 1 row from RS and 1 row from WS. On next row (= RS), dec 3 sts evenly over the half repetitions of A-1 and 6 sts evenly over the whole repetitions of A-1 (i.e. dec 6-9-9 sts in total) = 26-34-38 sts. Bind off on next row (= WS). SLEEVE: First work the cuff sideways, back and forth on circular needle. CUFF: Cast on 22 sts on needle size 4 mm / US 6 with Lima. K 1 row from WS. Work next row as follows: 1 st in GARTER ST – see explanation above, * P 2, K 2 in each of the next 2 sts (= K 4), P 2 *, repeat from *-* 2 more times, finish with 3 sts in garter st = 28 sts. Work 1 row from WS with K over K and P over P with 1 st in garter st in one side and 3 sts in garter st in the other side. Continue with A-1 until 4-4-5 repetitions have been worked vertically, then work the first 2 rows in A-1 one more time (piece measures approx. 24-24-30 cm / 9½"-9½"-11¾"). Work next row as follows (= RS): 1 st in garter st, * P 2, K 2 tog, K 2 tog, P 2 *, repeat from *-* 2 more times, finish with 3 sts in garter st = 22 sts. K 1 row from WS over all sts, then bind off. Edge is approx. 10 cm / 4" wide, continue with sleeve. SLEEVE: Worked back and forth on circular needle size 4 mm / US 6. Pick up along the edge where there is only 1 garter st - pick up 1 st in every ridge (= 2 K rows). K 1 row from WS while at the same time adjusting no of sts to 52-54-62. Then K 1 row from RS, the continue in reverse stockinette st. When piece measures 15 cm / 6" in total, inc 1 st in each side. Repeat inc every 3-2-2 cm / 1⅛"-¾"-¾", 10-13-13 more times = 74-82-90 sts. When piece measures 48-45-43 cm / 19"-17¾"-17" (shorter measurements in the larger sizes because of longer sleeve cap and wider shoulders), bind off for sleeve cap at beg of every row in each side: 4 sts 1 time, 2 sts 3 times and 1 st 6-7-9 times, then bind off 2 sts in each side until piece measures 57-55-54 cm / 22½"-21½"-21¼", now bind off 3 sts 1 time in each side. Bind off the remaining sts, piece measures approx. 58-56-55 cm / 22¾"-22"-21½". ASSEMBLY: Sew the shoulder seams. Sew collar tog mid back and sew it on to neck line inside 1 edge st. Sew sleeve seams – sew cuff edge to edge (cast on edge against bind off edge) to avoid a chunky seam, sew the rest of sleeve inside 1 edge st. Sew sleeves in body and sew on buttons. |
|||||||||||||||||||||||||
Diagram explanations |
|||||||||||||||||||||||||
|
|||||||||||||||||||||||||
 |
|||||||||||||||||||||||||
 |
|||||||||||||||||||||||||
Have you finished this pattern?Tag your pictures with #dropspattern #celticacardigan or submit them to the #dropsfan gallery. Do you need help with this pattern?You'll find 16 tutorial videos, a Comments/Questions area and more by visiting the pattern on garnstudio.com. © 1982-2026 DROPS Design A/S. We reserve all rights. This document, including all its sub-sections, has copyrights. Read more about what you can do with our patterns at the bottom of each pattern on our site. |
|||||||||||||||||||||||||


With over 40 years in knitting and crochet design, DROPS Design offers one of the most extensive collections of free patterns on the internet - translated to 17 languages. As of today we count 324 catalogs and 12290 patterns - 12280 of which are translated into English (US/in).
We work hard to bring you the best knitting and crochet have to offer, inspiration and advice as well as great quality yarns at incredible prices! Would you like to use our patterns for other than personal use? You can read what you are allowed to do in the Copyright text at the bottom of all our patterns. Happy crafting!
Post a comment to pattern DROPS 143-1
We would love to hear what you have to say about this pattern!
If you want to leave a question, please make sure you select the correct category in the form below, to speed up the answering process. Required fields are marked *.