
Popular categories
Looking for a yarn?


Comments / Questions (474)
![]() S.johnsen wrote:
S.johnsen wrote:
Kan jeg strikke denne model med drops - you #4? Jeg er klar over at garnet ikke er helt det samme..
16.04.2014 - 23:49DROPS Design answered:
Hej S. Johnsen. DLY#4 er tykkere en Lima - faktisk mere identisk med Nepal. Jeg tror den bliver for tyk, men pröv at strikke en pröve og se om du kan lide resultatet. Ellers vaelg en model fra garnkategori C
17.04.2014 - 11:55Milena wrote:
I made beautiful blue cardigan on that model and instructions. I am delightful! Thank you very much
11.04.2014 - 23:33
![]() Babina wrote:
Babina wrote:
Ich trage die normale Konfektionsgröße 38, bin aber sehr groß. Wenn ich die mittlere Größe nehme scheint mir die Hüftweite des Schnitts (144 cm) riesig, die Taillenweite (94) dagegen gerade richtig, weil die in der kleinsten Größe angegebenen 74 cm für mich zu schmal wäre. Auf dem Bild sieht die Jacke nicht besonders weit aus oder täuscht das? Meine Maschenprobe hat gestimmt.
02.04.2014 - 08:51DROPS Design answered:
Liebe Babina, diese Jacke ist durch das Muster stark tailliert und die Hüftpartie ist recht weit. Dies ist das besondere Design dieses Modells - wir haben aber viele Anleitungen für Jacken, die eine geradere Form haben. Vielleicht gefallen und passen Ihnen diese besser?
08.04.2014 - 08:51Marianne wrote:
I'm up to the left front in the pattern. The diagram shows that the armhole decrease begins at 70 cm, but after the neck and armhole decreases and the collar increases, with 55 stitches on my needle (small size), the pattern reads, "when the piece measures 70 cm......" My garment already measures more than 70 cm, and I'm uncertain when I should begin the next decreases. Where have I goes wrong? With thanks for your help.
29.03.2014 - 11:17Marianne answered:
Please disregard my previous question. I see I've misread the diagram. The total length is 70 cm, and I see I have started the armhole decrease at 51 cm. Love this pattern but it is certainly proving challenging for my level of knitting skill. So far it looks great and I'm keen to complete it. Thanks for offering this pattern on the net. It's much more interesting than the patterns usually available in Australia.
29.03.2014 - 11:27
![]() Eva wrote:
Eva wrote:
Jeg er i gang med at strikke denne model i str. L/XL, men de angivne 850 g LIMA er for lidt. Der mangler garn til det andet ærme. Jeg brugte ca. 115 g til det første, og da jeg ikke længere kan købe garnet i samme indfarvning, har jeg måttet købe 3 ngl ekstra for at undgå et evt. synligt skift mellem de to indfarvninger. Det havde muligvis været nok med 2 ngl ekstra (i alt 950 g), hvis det hele var samme indfarvning.
20.03.2014 - 23:36Marianne wrote:
Is the purl side of the fabric the right side/ outside of the sleeve in this pattern? With thanks.
06.03.2014 - 12:31DROPS Design answered:
Dear Marianne, you pick up sts from Cuff and work then reverse stockinette, ie P side is from RS. Happy knitting!
06.03.2014 - 14:05
![]() Karina wrote:
Karina wrote:
Når jeg skal begynne å strikke rad 1 på mønster A1 skal det da være fra rett eller vrang? Når det står at man skal strikke rett på maskene som er på hjelpepinnen, skal det da også strikkes rett mellom mønstrene A1?
23.02.2014 - 19:14DROPS Design answered:
Hej Karina, 1.p i diagram A-1 strikkes fra retten. A-1 strikkes över 24 m, og mellan hver A-1 er det masker som strikkes vrang fra retten og de strikkes rett fra vrangen, så desse masker er i glatt med vrangen ut.
03.03.2014 - 23:56
![]() Cordula wrote:
Cordula wrote:
Tipp: Nach einigen erfolglosen Machenproben habe ich das Ärmelbündchen als Maschenprobe gestrickt und dabei die passende Nadelstärke gefunden. Jetzt strickt sich die Jacke quasi von allein! :)
16.02.2014 - 19:51
![]() Swantje wrote:
Swantje wrote:
Gr. S/M: Rücken = 114 M, abzüglich 24 M Abnahmen Ärmelrand = 90 M. Anleitung sagt 92 M. Was mache ich falsch? (0x3M, 1x3M, 3x3M Abnahme beidseitig = 24M?!)
08.02.2014 - 11:52DROPS Design answered:
Liebe Swantje, Sie haben die Armelabnahmen falsch gelesen. Für die kleinste Grösse wird wie folgt abgekettet (immer die erste Angabe): 0 x 3 M, 3 x 2 M, 5 x 1 M = 11 M. Also 114 M - 22 M (beideseitig 11 M)= 92 M.
10.02.2014 - 09:26
![]() Regina Ohlwerter wrote:
Regina Ohlwerter wrote:
Hallo liebes Drops-Team Ich habe mir diese wunderschöne Jacke gestrickt, kam aber mit den angegebenen Maschenzahlen nicht zurecht, obwohl ich bei der Maschenprobe richtig gelegen habe. Wenn ich Größe S stricken würde (normal trage ich M) könnte ich mich 2 x mit der Jacke kleiden - alles viel zu weit! Was stimmt da nicht? Habe ich einen Fehler gemacht oder stimmen die Angaben nicht? Freundliche Grüße Regina Ohlwerter
08.02.2014 - 07:42DROPS Design answered:
Liebe Regina, haben Sie die Maschenprobe glatt re erstellt? Das Muster zieht stark zusammmen und das ist bei der Anleitung berücksichtigt.
08.02.2014 - 14:16
|
|||||||||||||||||||||||||
Celtica#celticacardigan |
|||||||||||||||||||||||||
 |
 |
||||||||||||||||||||||||
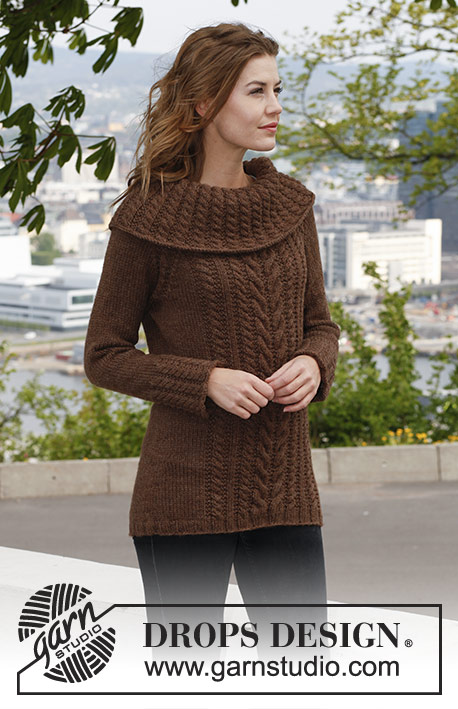
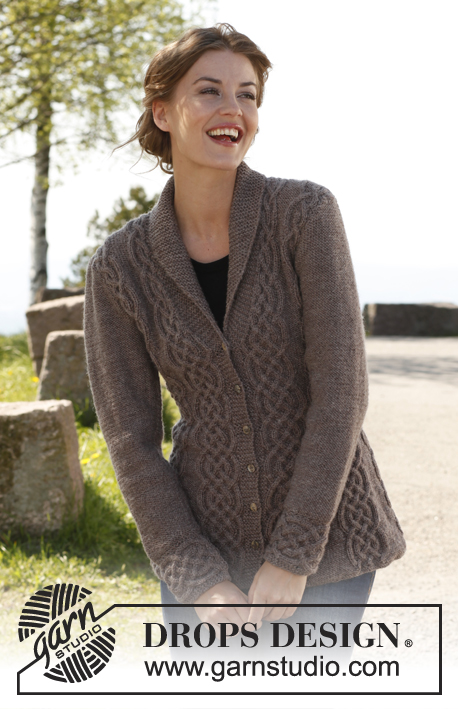
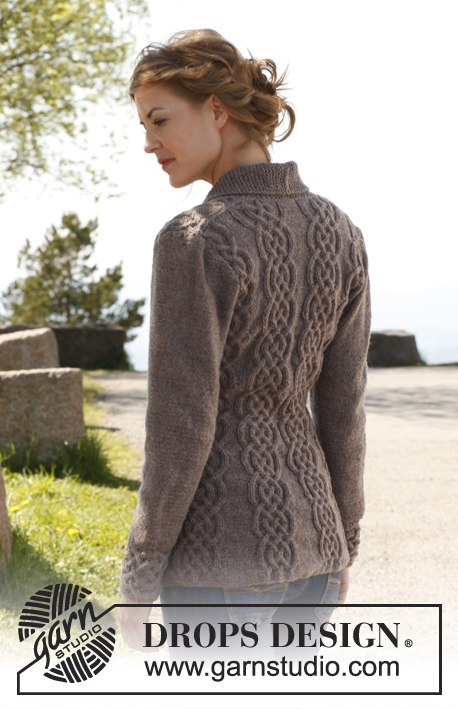
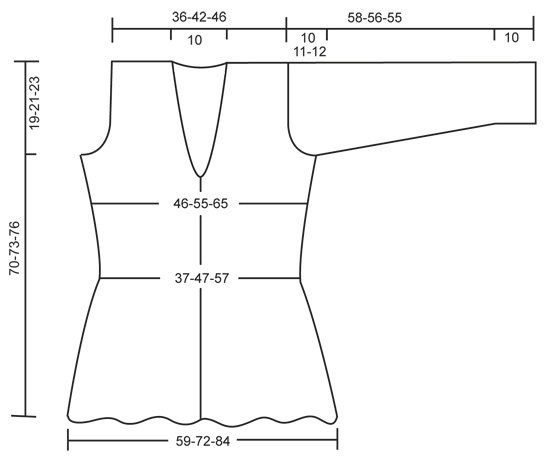
Knitted DROPS fitted jacket with cables and shawl collar in ”Lima”. Size: S - XXXL.
DROPS 143-1 |
|||||||||||||||||||||||||
|
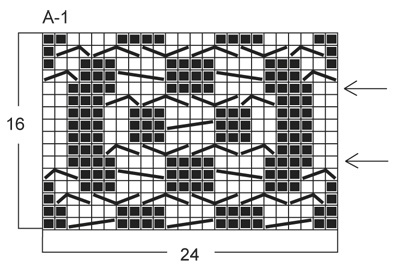
GARTER ST (back and forth on needle): K sts on all rows. 1 ridge = 2 K rows. PATTERN: See diagram A-1, diagram shows pattern from RS. First row = RS. BUTTONHOLES: bind off for buttonholes on right band. 1 buttonhole = K 3rd and 4th st from mid front tog and make 1 YO. Bind off for buttonholes when piece measures: SIZE S/M: 7, 14, 21, 28, 35 and 42 cm / 2¾", 5½", 8¼", 11", 13¾" and 16½". SIZE L/XL: 8, 15, 22, 29, 36 and 43 cm / 3⅛", 6", 8¾", 11⅜", 14¼" and 17". SIZE XXL/XXXL: 9, 16, 23, 30, 37 and 44 cm / 3½", 6¼", 9", 11¾", 14½" and 17¼". INCREASE TIP (applies to collar): Inc by making 1 YO inside outermost st - on next row K YO twisted to avoid holes. DECREASE TIP (applies to neck): Dec for neck inside all sts in garter st (i.e. band + the sts inc for collar). All dec are done from RS! Dec as follows AFTER sts in garter st: Slip 1 st as if to K, K 1, psso. Dec as follows BEFORE sts in garter st: K 2 tog. On all WS rows P sts after/before sts in garter st while dec. -------------------------------------------------------- BODY: Worked back and forth on circular needle from mid front. Cast on 254-309-360 sts (includes 6 band sts in each side towards mid front) on circular needle size 4 mm / US 6 with Lima. K 5 rows (1st row = WS). Then work as follows (seen from RS): 6 band sts in GARTER ST – see explanation above, [* P 2, K 2 in each of the next 2 sts (= K 4), P 2 *, repeat from *-* 2 more times, P 14-13-12], repeat from [-] 6-8-10 more times, then from *-* 3 more times and 6 band sts in garter st = 302-369-432 sts. Work K over K and P over P and band sts in garter st. Continue as follows (seen from from RS): 6 sts in garter st, [diagram A-1 (= 24 sts), P 14-13-12], repeat from [-] 6-8-10 more times, A-1 and 6 sts in garter st. Insert a marker after 75-92-108 sts in from each side (= 152-185-216 sts between markers on back piece). REMEMBER THE GAUGE! When piece measures approx. 5-7-9 cm / 2"-2¾"-3½" (adjust so that next row is worked from RS), dec 1 st in every P-section by P the first 2 sts tog (i.e. dec 7-9-11 sts on row). Repeat dec every 6th row 11-10-9 more times – NOTE: Dec alternately at the end and beg of every P-section. AT THE SAME TIME when piece measures 7-8-9 cm / 2¾"-3⅛"-3½", bind off for BUTTONHOLES - see explanation above. After all dec in P-sections, 218-270-322 sts remain on needle and only 2 P sts between every A-1 (piece now measures approx. 29 cm / 11½"). Continue until piece measures approx. 33-35-36 cm / 13"-13¾"-14¼" (adjust so that next row is worked from RS), now inc 1 st in every P-section by making 1 YO after last P st in every P-section, on next row (from WS) K YOs twisted to avoid holes. Repeat inc every 6th row 3-2-2 more times – NOTE: Inc alternately before and after all P sts by making 1 YO. When all inc are done, there are 6-5-5 P sts in every P-section and 246-297-355 sts in total on needle. READ UNTIL LEFT FRONT PIECE BEFORE CONTINUING! COLLAR: When piece measures 41-42-43 cm / 16⅛"-16½"-17", inc 1 st in each side towards mid front for collar - SEE INCREASE TIP. Repeat inc every other row 11 more times and then every 4th row 6 times = 18 sts inc for collar and 24 sts in garter st in total. NECKLINE: At the same time, 2 cm / ¾" after beg inc for collar, dec 1 st in each side for neck - SEE DECREASE TIP. Repeat dec every other row 5 more times and then every 4th row 6 times (i.e. half of A-1 in each side has been dec, continue with K 2 in the middle of diagram where there used to be a cable over 4 sts). ARMHOLES: At the same time when piece measures approx. 51-52-53 cm / 20"-20½"-21" (make sure that next row is worked from RS), bind off for armholes as follows: Size S/M and L/XL: bind off 6 sts in the side (i.e. 3 sts on each side of markers in the sides). SIZE XXL/XXXL: bind off 7 sts in the side, i.e. the 5 P sts where marker is + 1 st on each side of these. Finish each part separately. LEFT FRONT PIECE: Then bind off for armhole at beg of every row from the side: 3 sts 0-1-3 times, 2 sts 3-3-4 times and 1 st 5-4-6 times. After all bind offs for armhole, dec for neck and inc for collar, 55-66-70 sts remain on shoulder. There is now ½ repetition of A-1 towards the neck before collar in all sizes, there is also ½ repetition towards the armhole in the smallest size. Continue the pattern as before with 1 edge st in garter st towards armhole. When piece measures approx. 70-73-76 cm / 27½"-28¾"-30", stop after one whole or half repetition of A-1 vertically, dec 3 sts evenly over the half repetitions and 6 sts evenly over the whole ones (i.e. dec 6-9-9 sts in total) = 49-57-61 sts. On next row from RS, bind off the first 25-33-37 sts for shoulder, K the last 24 sts in garter st. Then work back and forth in garter st over these sts for collar as follows: * 2 rows over all sts, 2 rows over only the outermost 18 sts (towards mid front) *, repeat from *-* until collar measures approx. 5½ cm / 2¼" at the inside on the most narrow part, bind off. RIGHT FRONT PIECE: Work as left front piece but reversed. After sts for shoulder have been bound off (from RS so that same no of rows have been worked on both front pieces), cut the yarn at the end of row. Continue working the collar starting from WS. BACK PIECE: = 114-139-167 sts. Continue to bind off for armholes at beg of every row in each side as on front piece = 92-113-121 sts. Continue the pattern with 1 edge st in garter st in each side. When piece measures approx. 68-71-74 cm / 26¾"-28"-29" (make sure that last row worked is 1 of the rows marked with 1 arrow in diagram), then on next row (= RS), bind off the middle 24-23-23 sts for neck, work the rest of row, finish each shoulder separately in pattern. LEFT SHOULDER: Work 1 row from WS, bind off 2 sts at beg of next row (= towards neck) = 32-43-47 sts. K 1 row from WS. On next row (= RS), dec 3 sts evenly over the half repetitions of A-1 and 6 sts evenly over the whole repetitions of A-1 (i.e. dec 6-9-9 sts in total) = 26-34-38 sts. Bind off on next row (= WS). There is 1 st more on shoulder on back piece than on front piece, this is because the collar is to be sewn inside 1 st on back piece. RIGHT SHOULDER: Beg mid back, i.e. from WS, bind off 2 sts at beg of row (= 32-43-47 sts remain on shoulder). Work 1 row from RS and 1 row from WS. On next row (= RS), dec 3 sts evenly over the half repetitions of A-1 and 6 sts evenly over the whole repetitions of A-1 (i.e. dec 6-9-9 sts in total) = 26-34-38 sts. Bind off on next row (= WS). SLEEVE: First work the cuff sideways, back and forth on circular needle. CUFF: Cast on 22 sts on needle size 4 mm / US 6 with Lima. K 1 row from WS. Work next row as follows: 1 st in GARTER ST – see explanation above, * P 2, K 2 in each of the next 2 sts (= K 4), P 2 *, repeat from *-* 2 more times, finish with 3 sts in garter st = 28 sts. Work 1 row from WS with K over K and P over P with 1 st in garter st in one side and 3 sts in garter st in the other side. Continue with A-1 until 4-4-5 repetitions have been worked vertically, then work the first 2 rows in A-1 one more time (piece measures approx. 24-24-30 cm / 9½"-9½"-11¾"). Work next row as follows (= RS): 1 st in garter st, * P 2, K 2 tog, K 2 tog, P 2 *, repeat from *-* 2 more times, finish with 3 sts in garter st = 22 sts. K 1 row from WS over all sts, then bind off. Edge is approx. 10 cm / 4" wide, continue with sleeve. SLEEVE: Worked back and forth on circular needle size 4 mm / US 6. Pick up along the edge where there is only 1 garter st - pick up 1 st in every ridge (= 2 K rows). K 1 row from WS while at the same time adjusting no of sts to 52-54-62. Then K 1 row from RS, the continue in reverse stockinette st. When piece measures 15 cm / 6" in total, inc 1 st in each side. Repeat inc every 3-2-2 cm / 1⅛"-¾"-¾", 10-13-13 more times = 74-82-90 sts. When piece measures 48-45-43 cm / 19"-17¾"-17" (shorter measurements in the larger sizes because of longer sleeve cap and wider shoulders), bind off for sleeve cap at beg of every row in each side: 4 sts 1 time, 2 sts 3 times and 1 st 6-7-9 times, then bind off 2 sts in each side until piece measures 57-55-54 cm / 22½"-21½"-21¼", now bind off 3 sts 1 time in each side. Bind off the remaining sts, piece measures approx. 58-56-55 cm / 22¾"-22"-21½". ASSEMBLY: Sew the shoulder seams. Sew collar tog mid back and sew it on to neck line inside 1 edge st. Sew sleeve seams – sew cuff edge to edge (cast on edge against bind off edge) to avoid a chunky seam, sew the rest of sleeve inside 1 edge st. Sew sleeves in body and sew on buttons. |
|||||||||||||||||||||||||
Diagram explanations |
|||||||||||||||||||||||||
|
|||||||||||||||||||||||||
 |
|||||||||||||||||||||||||
 |
|||||||||||||||||||||||||
Have you finished this pattern?Tag your pictures with #dropspattern #celticacardigan or submit them to the #dropsfan gallery. Do you need help with this pattern?You'll find 16 tutorial videos, a Comments/Questions area and more by visiting the pattern on garnstudio.com. © 1982-2026 DROPS Design A/S. We reserve all rights. This document, including all its sub-sections, has copyrights. Read more about what you can do with our patterns at the bottom of each pattern on our site. |
|||||||||||||||||||||||||


With over 40 years in knitting and crochet design, DROPS Design offers one of the most extensive collections of free patterns on the internet - translated to 17 languages. As of today we count 324 catalogs and 12290 patterns - 12280 of which are translated into English (US/in).
We work hard to bring you the best knitting and crochet have to offer, inspiration and advice as well as great quality yarns at incredible prices! Would you like to use our patterns for other than personal use? You can read what you are allowed to do in the Copyright text at the bottom of all our patterns. Happy crafting!
Post a comment to pattern DROPS 143-1
We would love to hear what you have to say about this pattern!
If you want to leave a question, please make sure you select the correct category in the form below, to speed up the answering process. Required fields are marked *.