
Popular categories
Looking for a yarn?


Comments / Questions (474)
![]() Bettina29 wrote:
Bettina29 wrote:
SUPERBE je vais la tricoter car c'est une veste dont on a tout de suite envie tant elle est élégante.
10.02.2015 - 15:38
![]() Lisa wrote:
Lisa wrote:
I still don't understand the st. incr. for the Collar. I am still knitting across correct? Should incr. be on both sides? Then wouldn't total incr be 36st. and 48 sts in garter total? I appreciate your patience.
14.01.2015 - 18:30DROPS Design answered:
Dear Lisa, you inc for collar towards mid front, ie at beg and end of row when you are still working body on the same needle, then you continue inc for collar towards mid front (beg of row for right front piece, end of row for left front piece) - number of sts in garter st will be 24 for collar (including front band sts) each side when all inc are done. Happy knitting!
15.01.2015 - 09:57
![]() Rita wrote:
Rita wrote:
Dec 1 st in each side for neck (i.e. half of A-1 in each side has been dec, continue with K 2 in the middle of diagram where there used to be a cable over 4 sts). Do I inc after 6th garter st for collar then dec on first two sts of cable pattern and last 3 sts of cale pattern before garter band & p 2 sts on WS to prepare for the SKP & K2Tog? Thank you Rita
04.01.2015 - 14:21DROPS Design answered:
Dear Rita, dec for neck edge is done after all sts in garter sts (the 6 front band sts + the inc sts for collar) at the beg of row (right front piece) and before all sts in garter sts (6 front band sts + inc sts for collar) at the end of row (left front piece) - see "decreasing tip" at the beg of the pattern - you will dec number of sts worked in cable, ie when all dec are done, the half sts in A.1 has been dec on each side (first half in right front piece, 2nd half in left front piece). Happy knitting!
05.01.2015 - 09:18
![]() Lisa wrote:
Lisa wrote:
I am also, confused about the decreases for the neckline- It says to dec for neck inside all sts in garter st. ( band + the sts in. for collar) So do the decreases only occur before the garter st. for the band and and outer stitch of the collar?
01.01.2015 - 22:42DROPS Design answered:
Dear Lisa, dec for neckline are done from RS after all sts in garter st for front band + collar (on right front piece) and before all sts in garter st for front band + collar (on left front piece). Happy knitting!
02.01.2015 - 16:43
![]() Lisa wrote:
Lisa wrote:
I am working on the body and have reached 41cm 246ST, and now will start inc. for collar. I need to inc 1st each side towards mid front for collar, which I believe means I inc on the outside stitch of the band on each side? =2 should be 1? As that would give me 18 st inc. Then on every other row 11 times the every 4th row 6times=18 st. inc for collar and 24 sts. in garter total. Were are the 6 sts. coming from that bring total to 24St.?
01.01.2015 - 22:30DROPS Design answered:
Dear Lisa, the sts for collar are worked inside outermost st (front band st), you will inc a total of 18 sts as you said + the 6 front band sts = a total of 24 sts for collar. Happy knitting!
02.01.2015 - 16:41
![]() Moira Laughlin wrote:
Moira Laughlin wrote:
I'm just reading the pattern over before starting. Regarding the cabling diagram: The first pattern explanation says to slip 1 stitch on the cable needle, while all the others (including the reverse of the first) say to slip 2 stitches on the cable needle. Is this a misprint, or intentional? Thanks for your help!
31.12.2014 - 20:52DROPS Design answered:
Dear Mrs Laughlin, text to diagram is correct, this jacket has been worked several times successfully. Happy knitting!
02.01.2015 - 16:24Lisa wrote:
Body is done, Confused with the reading to Left Front Piece. After ARMHOLES- is says to finish each part separately. Does this start after the Body or after the collar and neckline?
30.12.2014 - 01:19DROPS Design answered:
Dear Lisa, body is worked in once piece to the armhole, ie, when piece measures approx 51-52-53 (you have started to inc for collar and first dec for neckline), bind off sts for armholes and finish each front piece and back piece separately. Happy knitting!
30.12.2014 - 14:25
![]() Lidy Been wrote:
Lidy Been wrote:
Dank je wel voor je advies. Omdat ik al zover ben zou dat betekenen dat ik een heel eind weer moet uithalen. Heeft u nog een andere tip, waardoor ik mijn werk niet hoef uit te halen?
02.12.2014 - 09:08DROPS Design answered:
Hoi Lidy. Je kan vanaf nu een paar keer de verkorte breien, dan trekt het weer recht. Je hoeft volgens mij niet uit te halen. In totaal moet je het misschien 2-3 keer doen.
02.12.2014 - 16:12
![]() Lidy Been wrote:
Lidy Been wrote:
Ik ben bezig met dit patroon en heb nu ongeveer 35 cm gebreid. De sluitbies wordt in ribbelsteek gebreid en vraagt meer toeren per 10 cm dan het kabelpatroon, waardoor de sluitbies het breiwerk scheeftrekt. Wat is er fout gegaan en zijn hier meer meldingen van ?
28.11.2014 - 08:00DROPS Design answered:
Hoi Lidy. Als je ribbelsteken veel meer nld hebt dan de tricotsteken, dan kan de voorbies inderdaad wat scheef trekken. Je kan dit oplossen door een paar keer verkorte toeren te breien alleen over de voorbiessteken. Dwz, 1 nld heen en 1 nld terug over de 6 voorbiesst aan beide kanten. Op deze manier krijg je meer nld over de ribbelsteken en een gelijke hoogte.
01.12.2014 - 14:58Julia wrote:
Hi I'm having some trouble at the area where I have to increase and decrease at the same time for the collar and neckline. From the previous part, it says that there should be 92 sts in each of the front sides, and 185 sts in the back piece. After the Increase/decreases, you somehow wind up with 66 sts in the sides, and 139 sts in the back piece. Do the number of sts always include the band sts for the sides? And how did the back piece get decreased to 139 sts?
19.11.2014 - 22:01DROPS Design answered:
Dear Julia, in 2nd size, you have 5 P sections on back piece, so that you will dec 5 times 1 st each dec row a total of 11 times (55 sts dec) and inc 5 times 1 st each inc row a total of 3 times (15 sts inc): 185 - 55 + 15 = 145, then cast off 3 sts each side of back piece = 139 sts. On front pieces, sts includes front band/collar sts. Happy knitting!
20.11.2014 - 09:52
|
|||||||||||||||||||||||||
Celtica#celticacardigan |
|||||||||||||||||||||||||
 |
 |
||||||||||||||||||||||||
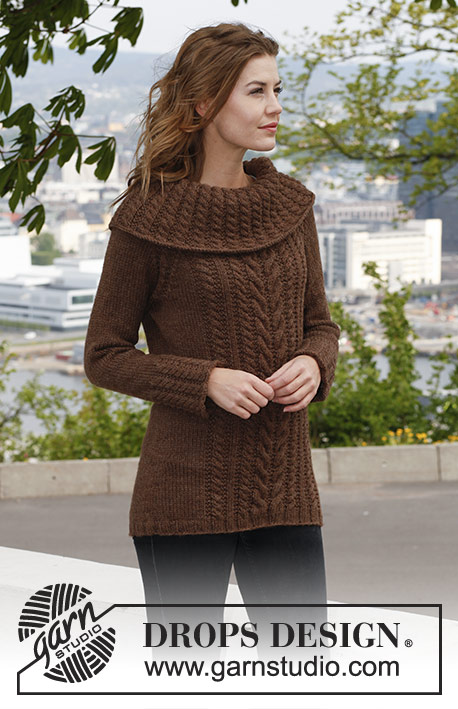
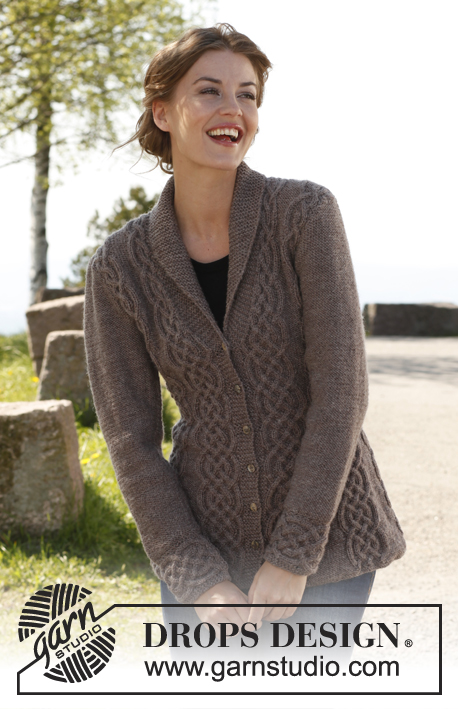
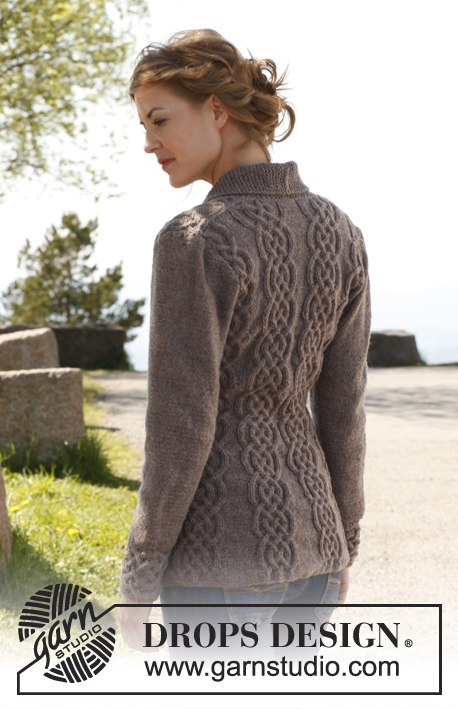
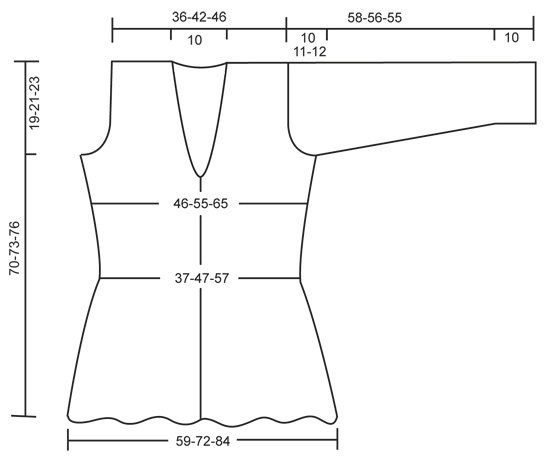
Knitted DROPS fitted jacket with cables and shawl collar in ”Lima”. Size: S - XXXL.
DROPS 143-1 |
|||||||||||||||||||||||||
|
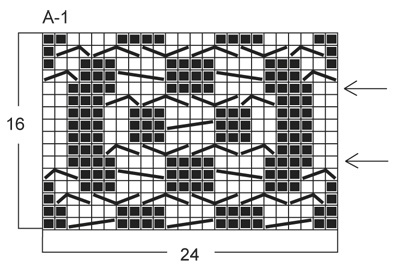
GARTER ST (back and forth on needle): K sts on all rows. 1 ridge = 2 K rows. PATTERN: See diagram A-1, diagram shows pattern from RS. First row = RS. BUTTONHOLES: bind off for buttonholes on right band. 1 buttonhole = K 3rd and 4th st from mid front tog and make 1 YO. Bind off for buttonholes when piece measures: SIZE S/M: 7, 14, 21, 28, 35 and 42 cm / 2¾", 5½", 8¼", 11", 13¾" and 16½". SIZE L/XL: 8, 15, 22, 29, 36 and 43 cm / 3⅛", 6", 8¾", 11⅜", 14¼" and 17". SIZE XXL/XXXL: 9, 16, 23, 30, 37 and 44 cm / 3½", 6¼", 9", 11¾", 14½" and 17¼". INCREASE TIP (applies to collar): Inc by making 1 YO inside outermost st - on next row K YO twisted to avoid holes. DECREASE TIP (applies to neck): Dec for neck inside all sts in garter st (i.e. band + the sts inc for collar). All dec are done from RS! Dec as follows AFTER sts in garter st: Slip 1 st as if to K, K 1, psso. Dec as follows BEFORE sts in garter st: K 2 tog. On all WS rows P sts after/before sts in garter st while dec. -------------------------------------------------------- BODY: Worked back and forth on circular needle from mid front. Cast on 254-309-360 sts (includes 6 band sts in each side towards mid front) on circular needle size 4 mm / US 6 with Lima. K 5 rows (1st row = WS). Then work as follows (seen from RS): 6 band sts in GARTER ST – see explanation above, [* P 2, K 2 in each of the next 2 sts (= K 4), P 2 *, repeat from *-* 2 more times, P 14-13-12], repeat from [-] 6-8-10 more times, then from *-* 3 more times and 6 band sts in garter st = 302-369-432 sts. Work K over K and P over P and band sts in garter st. Continue as follows (seen from from RS): 6 sts in garter st, [diagram A-1 (= 24 sts), P 14-13-12], repeat from [-] 6-8-10 more times, A-1 and 6 sts in garter st. Insert a marker after 75-92-108 sts in from each side (= 152-185-216 sts between markers on back piece). REMEMBER THE GAUGE! When piece measures approx. 5-7-9 cm / 2"-2¾"-3½" (adjust so that next row is worked from RS), dec 1 st in every P-section by P the first 2 sts tog (i.e. dec 7-9-11 sts on row). Repeat dec every 6th row 11-10-9 more times – NOTE: Dec alternately at the end and beg of every P-section. AT THE SAME TIME when piece measures 7-8-9 cm / 2¾"-3⅛"-3½", bind off for BUTTONHOLES - see explanation above. After all dec in P-sections, 218-270-322 sts remain on needle and only 2 P sts between every A-1 (piece now measures approx. 29 cm / 11½"). Continue until piece measures approx. 33-35-36 cm / 13"-13¾"-14¼" (adjust so that next row is worked from RS), now inc 1 st in every P-section by making 1 YO after last P st in every P-section, on next row (from WS) K YOs twisted to avoid holes. Repeat inc every 6th row 3-2-2 more times – NOTE: Inc alternately before and after all P sts by making 1 YO. When all inc are done, there are 6-5-5 P sts in every P-section and 246-297-355 sts in total on needle. READ UNTIL LEFT FRONT PIECE BEFORE CONTINUING! COLLAR: When piece measures 41-42-43 cm / 16⅛"-16½"-17", inc 1 st in each side towards mid front for collar - SEE INCREASE TIP. Repeat inc every other row 11 more times and then every 4th row 6 times = 18 sts inc for collar and 24 sts in garter st in total. NECKLINE: At the same time, 2 cm / ¾" after beg inc for collar, dec 1 st in each side for neck - SEE DECREASE TIP. Repeat dec every other row 5 more times and then every 4th row 6 times (i.e. half of A-1 in each side has been dec, continue with K 2 in the middle of diagram where there used to be a cable over 4 sts). ARMHOLES: At the same time when piece measures approx. 51-52-53 cm / 20"-20½"-21" (make sure that next row is worked from RS), bind off for armholes as follows: Size S/M and L/XL: bind off 6 sts in the side (i.e. 3 sts on each side of markers in the sides). SIZE XXL/XXXL: bind off 7 sts in the side, i.e. the 5 P sts where marker is + 1 st on each side of these. Finish each part separately. LEFT FRONT PIECE: Then bind off for armhole at beg of every row from the side: 3 sts 0-1-3 times, 2 sts 3-3-4 times and 1 st 5-4-6 times. After all bind offs for armhole, dec for neck and inc for collar, 55-66-70 sts remain on shoulder. There is now ½ repetition of A-1 towards the neck before collar in all sizes, there is also ½ repetition towards the armhole in the smallest size. Continue the pattern as before with 1 edge st in garter st towards armhole. When piece measures approx. 70-73-76 cm / 27½"-28¾"-30", stop after one whole or half repetition of A-1 vertically, dec 3 sts evenly over the half repetitions and 6 sts evenly over the whole ones (i.e. dec 6-9-9 sts in total) = 49-57-61 sts. On next row from RS, bind off the first 25-33-37 sts for shoulder, K the last 24 sts in garter st. Then work back and forth in garter st over these sts for collar as follows: * 2 rows over all sts, 2 rows over only the outermost 18 sts (towards mid front) *, repeat from *-* until collar measures approx. 5½ cm / 2¼" at the inside on the most narrow part, bind off. RIGHT FRONT PIECE: Work as left front piece but reversed. After sts for shoulder have been bound off (from RS so that same no of rows have been worked on both front pieces), cut the yarn at the end of row. Continue working the collar starting from WS. BACK PIECE: = 114-139-167 sts. Continue to bind off for armholes at beg of every row in each side as on front piece = 92-113-121 sts. Continue the pattern with 1 edge st in garter st in each side. When piece measures approx. 68-71-74 cm / 26¾"-28"-29" (make sure that last row worked is 1 of the rows marked with 1 arrow in diagram), then on next row (= RS), bind off the middle 24-23-23 sts for neck, work the rest of row, finish each shoulder separately in pattern. LEFT SHOULDER: Work 1 row from WS, bind off 2 sts at beg of next row (= towards neck) = 32-43-47 sts. K 1 row from WS. On next row (= RS), dec 3 sts evenly over the half repetitions of A-1 and 6 sts evenly over the whole repetitions of A-1 (i.e. dec 6-9-9 sts in total) = 26-34-38 sts. Bind off on next row (= WS). There is 1 st more on shoulder on back piece than on front piece, this is because the collar is to be sewn inside 1 st on back piece. RIGHT SHOULDER: Beg mid back, i.e. from WS, bind off 2 sts at beg of row (= 32-43-47 sts remain on shoulder). Work 1 row from RS and 1 row from WS. On next row (= RS), dec 3 sts evenly over the half repetitions of A-1 and 6 sts evenly over the whole repetitions of A-1 (i.e. dec 6-9-9 sts in total) = 26-34-38 sts. Bind off on next row (= WS). SLEEVE: First work the cuff sideways, back and forth on circular needle. CUFF: Cast on 22 sts on needle size 4 mm / US 6 with Lima. K 1 row from WS. Work next row as follows: 1 st in GARTER ST – see explanation above, * P 2, K 2 in each of the next 2 sts (= K 4), P 2 *, repeat from *-* 2 more times, finish with 3 sts in garter st = 28 sts. Work 1 row from WS with K over K and P over P with 1 st in garter st in one side and 3 sts in garter st in the other side. Continue with A-1 until 4-4-5 repetitions have been worked vertically, then work the first 2 rows in A-1 one more time (piece measures approx. 24-24-30 cm / 9½"-9½"-11¾"). Work next row as follows (= RS): 1 st in garter st, * P 2, K 2 tog, K 2 tog, P 2 *, repeat from *-* 2 more times, finish with 3 sts in garter st = 22 sts. K 1 row from WS over all sts, then bind off. Edge is approx. 10 cm / 4" wide, continue with sleeve. SLEEVE: Worked back and forth on circular needle size 4 mm / US 6. Pick up along the edge where there is only 1 garter st - pick up 1 st in every ridge (= 2 K rows). K 1 row from WS while at the same time adjusting no of sts to 52-54-62. Then K 1 row from RS, the continue in reverse stockinette st. When piece measures 15 cm / 6" in total, inc 1 st in each side. Repeat inc every 3-2-2 cm / 1⅛"-¾"-¾", 10-13-13 more times = 74-82-90 sts. When piece measures 48-45-43 cm / 19"-17¾"-17" (shorter measurements in the larger sizes because of longer sleeve cap and wider shoulders), bind off for sleeve cap at beg of every row in each side: 4 sts 1 time, 2 sts 3 times and 1 st 6-7-9 times, then bind off 2 sts in each side until piece measures 57-55-54 cm / 22½"-21½"-21¼", now bind off 3 sts 1 time in each side. Bind off the remaining sts, piece measures approx. 58-56-55 cm / 22¾"-22"-21½". ASSEMBLY: Sew the shoulder seams. Sew collar tog mid back and sew it on to neck line inside 1 edge st. Sew sleeve seams – sew cuff edge to edge (cast on edge against bind off edge) to avoid a chunky seam, sew the rest of sleeve inside 1 edge st. Sew sleeves in body and sew on buttons. |
|||||||||||||||||||||||||
Diagram explanations |
|||||||||||||||||||||||||
|
|||||||||||||||||||||||||
 |
|||||||||||||||||||||||||
 |
|||||||||||||||||||||||||
Have you finished this pattern?Tag your pictures with #dropspattern #celticacardigan or submit them to the #dropsfan gallery. Do you need help with this pattern?You'll find 16 tutorial videos, a Comments/Questions area and more by visiting the pattern on garnstudio.com. © 1982-2026 DROPS Design A/S. We reserve all rights. This document, including all its sub-sections, has copyrights. Read more about what you can do with our patterns at the bottom of each pattern on our site. |
|||||||||||||||||||||||||


With over 40 years in knitting and crochet design, DROPS Design offers one of the most extensive collections of free patterns on the internet - translated to 17 languages. As of today we count 324 catalogs and 12290 patterns - 12280 of which are translated into English (US/in).
We work hard to bring you the best knitting and crochet have to offer, inspiration and advice as well as great quality yarns at incredible prices! Would you like to use our patterns for other than personal use? You can read what you are allowed to do in the Copyright text at the bottom of all our patterns. Happy crafting!
Post a comment to pattern DROPS 143-1
We would love to hear what you have to say about this pattern!
If you want to leave a question, please make sure you select the correct category in the form below, to speed up the answering process. Required fields are marked *.